- Installing and configuring Kerio Control VPN Client for users
- System requirements
- Prerequisites
- Kerio Control VPN Client for Windows
- Removing connections
- Changing a language
- Enabling/disabling balloon messages
- Kerio Control VPN Client for OS X
- Removing connections
- Troubleshooting SSL certificates
- Kerio Control VPN Client for Linux
- Troubleshooting
- Настройка клиента VPN от Kerio на Linux Ubuntu
- Установка Kerio VPN Client
- Настройка Kerio VPN Client
- Ошибка при соединении
- Установка на CentOS
- Настройка клиента VPN от Kerio на Linux Ubuntu
- Настройка Kerio VPN Client
- Ошибка при соединении
- После подключения нету доступа к сети
- Установка на CentOS
Installing and configuring Kerio Control VPN Client for users
Kerio Control VPN Virtual private network — A network that enables users connect securely to a private network over the Internet. Client enables an encrypted connection from individual systems (clients) to a remote private network via the Internet. The connection enables these clients to access the private network as if they were physically connected.
Three versions of Kerio Control VPN Client are available:
If you have administration rights to your computer, you can establish a persistent connection. Persistent connections are reestablished whenever you restart your machine.
Kerio Control 9.2.8 does not work with previous versions of Kerio Control VPN Client.
System requirements
Prerequisites
To connect to the Kerio Control network, you need to know:
- Your Kerio Control username and password
- The name of the Kerio Control server or its IP address An identifier assigned to devices connected to a TCP/IP network.
Kerio Control VPN Client for Windows
- Download and install Kerio Control VPN Client. Kerio Control VPN Client starts automatically after installation and you can see the Kerio Control VPN Client window.
- In the Connection field, type a name for the new connection.
- In the Server field, type the Kerio Control server name or IP address. If your administrator gives you more than one server name or IP address, separate them with semicolons.

- In the Username and Password fields, type your Kerio Control username and password.
- (Optional) Select Save password to save your password in Kerio Control VPN Client.
- (Optional) You can select Persistent connection if you have administration rights to your computer. Persistent connections are reestablished whenever you restart your machine.
- Click Connect.
Kerio Control requires a valid SSL certificate SSL certificates are used to authenticate an identity on a server. to verify your connection when establishing the connection. If an SSL Secure Sockets Layer — A protocol that ensures integral and secure communication between networks. certificate warning appears, consult the warning with your administrator.
![]()
If Kerio Control VPN Client is running, Windows taskbar displays the icon.
Removing connections
To remove old or broken connections:

- Open Kerio Control VPN Client.
- In the Connection menu, select the connection.
- Click the icon. Kerio Control VPN Client asks you if you want to remove the selected connection.
- Click Yes.
Kerio Control VPN Client removes the connection.
Changing a language
To change the language of the Kerio Control VPN Client interface:
![]()
- Right-click the icon in the notification area of the Windows taskbar.

- In the context menu, click Settings.
- In the Kerio Control VPN Client Settings dialog box, select your preferred language.
- Click OK.
Kerio Control VPN Client switches to the new language immediately.
Enabling/disabling balloon messages
A balloon message in Kerio Control VPN Client is a pop-up message that appears in the Windows taskbar at the Kerio Control VPN Client icon. To enable or disable balloon messages:
![]()
- Right-click the icon in the notification area of the Windows taskbar.
- In the context menu, click Settings.
- In the Kerio Control VPN Client Settings dialog box, select Enable balloon messages.
- Click OK.
Kerio Control VPN Client for OS X
- Download and install Kerio Control VPN Client. Kerio Control VPN Client starts automatically when you install it and you can see the Kerio Control VPN Client window.
- In the Connection field, type a name for the new connection.
- In the Server field, type the Kerio Control server name or IP address. If your administrator gives you more than one server name or IP address, separate them with semicolons. Kerio Control VPN Client tries to connect to the first server. If the connection cannot be established, Kerio Control VPN Client can then try the next server.
- In the Username and Password fields, type your Kerio Control username and password.

- (Optional) Select Save password to save your password in Kerio Control VPN Client.
- (Optional) You can select Persistent connection if you have administration rights to your computer (click the lock on the Kerio Control VPN Client window). Persistent connections are reestablished whenever you restart your computer.
- (Optional) Select Show VPN status in menu bar to display a status icon on the right side of the main menu bar when Kerio Control VPN Client is running.
Removing connections
To remove old or broken connections:
- Open Kerio Control VPN Client.
- In the Connection menu, select the connection.
- Click the Remove button. Kerio Control VPN Client asks you if you want to remove the selected connection.
- Click Yes.
Kerio Control VPN Client removes your connection.
Troubleshooting SSL certificates
Kerio Control requires a valid SSL certificate to verify Kerio Control VPN Client when establishing the connection to Kerio Control . If an SSL certificate warning appears, the certificate is probably self-signed and you must insert the Kerio Control certificate in the system keychain manually.
A self-signed certificate is a certificate that your administrator generated for you in Kerio Control . The certificate is not signed by any certification authority.
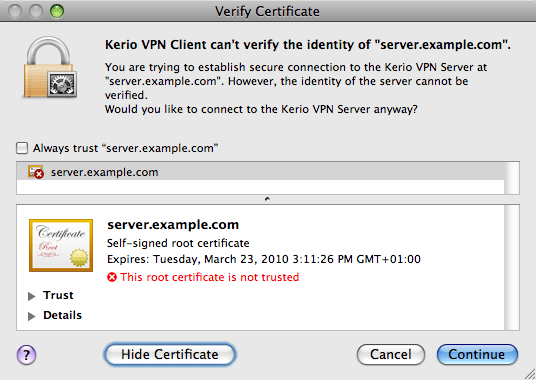
- In the Verify Certificate window warning, click the certificate image and drag it to the desktop. This creates a file with the certificate on the desktop (for example server.example.com.cer ).
The Keychain Access application must not be running at this point. If it is running, close it.
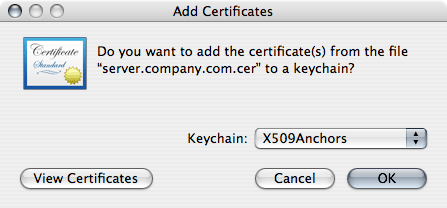
- Select the X509Anchors keychain. To add a certificate, you need to be logged in as an administrator.
- In the Keychain Access application, select the X509Anchors keychain, look up the new certificate (for example, server.example.com ) and click to open it.
- In the certificate window, scroll to the bottom.
- Open the Trust Settings section.
- Set the Always Trust option for the When using this certificate entry.
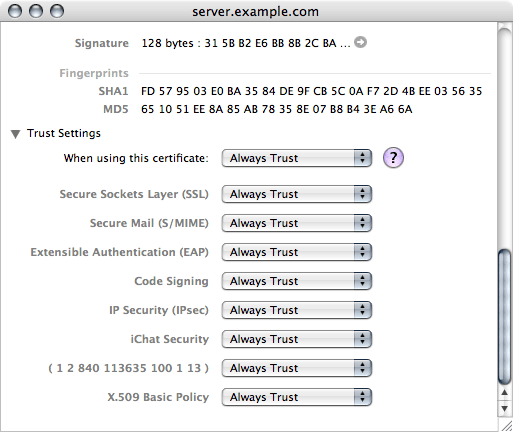
- Close all running applications and log out of the system.
- Reboot the system and establish a VPN connection to Kerio Control .
From now on, Verify Certificate warning should not display.
Kerio Control VPN Client for Linux
Detailed information about Kerio Control VPN Client for Linux is included in the read-me file.
Troubleshooting
Kerio Control VPN Client generates logs of its own activity and detected errors. For more information refer to Kerio Control VPN Client for administrators.
Настройка клиента VPN от Kerio на Linux Ubuntu

Опубликовано: 05.03.2020
Установка Kerio VPN Client
Переходим на страницу загрузки Kerio Control и копируем ссылку на соответствующую версию клиента:

* со стороны Kerio есть клиенты для Linux только для Debian/Ubuntu 32-bit или 64-bit.
Используя скопированную ссылку, загружаем клиент на Linux:
* в данном примере нами была скопирована 64-х битная версия клиента.
Устанавливаем необходимые для работы VPN-клиента компоненты:
apt-get install debconf openssl
И устанавливаем сам клиент:
dpkg -i kerio-control-vpnclient-linux-amd64.deb
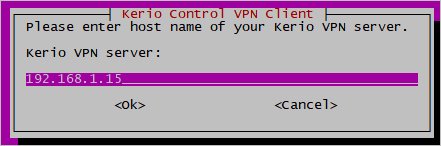
Система в процессе установки сразу предложит диалоговые окна для настройки. В первом окне вводим адрес нашего сервера (Kerio VPN Server):

* для примера мы введи адрес внутренней сети, но чаще, будет необходимость в использовании внешнего адреса для сервера.
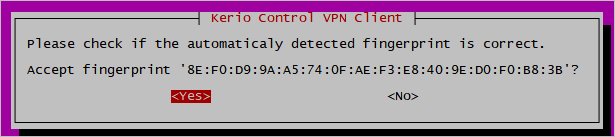
Разрешаем автоматически определить отпечаток для сертификата сервера:

После определения отпечатка, он будет выведен на экран, а нам нужно будет его принять:

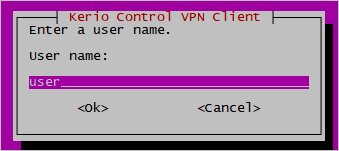
Вводим имя пользователя для авторизации в сети VPN:

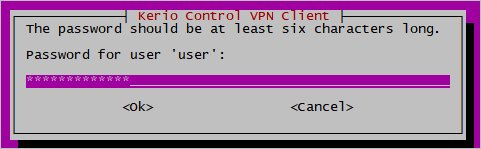
Вводим пароль для пользователя:

Система завершит установку.
Разрешим автозапуск сервиса и стартанем его:
systemctl enable kerio-kvc
Настройка Kerio VPN Client
Настройку клиента мы выполнили в момент установки. Но если нам необходимо изменить конфигурацию или мы ошиблись, то изменения можно внести командой:
Пример содержимого конфига:
* где 192.168.1.15 — адрес нашего сервера; user — пользователь; XOR:390c0f266713026d782c — пароль в виде хэша; 8E:F0:D9:9A:A5:74:0F:AE:F3:E8:40:9E:D0:F0:B8:3B — отпечаток сертификата.
После изменений вводим команду:
systemctl restart kerio-kvc
Ошибка при соединении
Ошибки, которые возникают при установке соединения можно увидеть в лог-файле error.log:
tail -f /var/log/kerio-kvc/error.log
Детализацию лога можно увидеть командой:
tail -f /var/log/kerio-kvc/debug.log
В некоторых случаях помогает установка более ранней версии клиента. Список файлов для установки можно найти на сайте ryadel (на странице мы найдем клиенты разных версий для систем Linux и Windows). Переустановка выполняется командой:
dpkg -i kerio-control-vpnclient-8.6.0-3673-linux-amd64.deb
* данной командой мы установим kerio vpn client версии 8.6.
Установка на CentOS
На сайте разработчика можно найти только deb-пакеты, которые работают в системах на базе Debian. Чтобы выполнить конвертирование данного пакета под систему RPM, устанавливаем alien:
Теперь можно конвертировать пакет deb в rpm:
alien —to-rpm kerio-control-vpnclient-linux-amd64.deb
rpm -Uvh kerio-control-vpnclient-*.rpm
Настройка клиента VPN от Kerio на Linux Ubuntu
Переходим на страницу загрузки Kerio Control и копируем ссылку на соответствующую версию клиента:

* со стороны Kerio есть клиенты для Linux только для Debian/Ubuntu 32-bit или 64-bit.
Используя скопированную ссылку, загружаем клиент на Linux:
wget http://download.kerio.com/dwn/kerio-control-vpnclient-linux-amd64.deb* в данном примере нами была скопирована 64-х битная версия клиента.
Устанавливаем необходимые для работы VPN-клиента компоненты:
apt-get install debconf opensslИ устанавливаем сам клиент:
dpkg -i kerio-control-vpnclient-linux-amd64.debСистема в процессе установки сразу предложит диалоговые окна для настройки. В первом окне вводим адрес нашего сервера (Kerio VPN Server):
* для примера мы введи адрес внутренней сети, но чаще, будет необходимость в использовании внешнего адреса для сервера.
Разрешаем автоматически определить отпечаток для сертификата сервера:

После определения отпечатка, он будет выведен на экран, а нам нужно будет его принять:
Вводим имя пользователя для авторизации в сети VPN:
Вводим пароль для пользователя:
Система завершит установку.
Разрешим автозапуск сервиса и стартанем его:
systemctl enable kerio-kvcНастройка Kerio VPN Client
Настройку клиента мы выполнили в момент установки. Но если нам необходимо изменить конфигурацию или мы ошиблись, то изменения можно внести командой:
dpkg-reconfigure kerio-control-vpnclientПример содержимого конфига:
192.168.1.15
4090
user
XOR:390c0f266713026d782c
8E:F0:D9:9A:A5:74:0F:AE:F3:E8:40:9E:D0:F0:B8:3B
1
* где 192.168.1.15 — адрес нашего сервера; user — пользователь; XOR:390c0f266713026d782c — пароль в виде хэша; 8E:F0:D9:9A:A5:74:0F:AE:F3:E8:40:9E:D0:F0:B8:3B — отпечаток сертификата.
После изменений вводим команду:
systemctl restart kerio-kvcОшибка при соединении
Ошибки, которые возникают при установке соединения можно увидеть в лог-файле error.log:
tail -f /var/log/kerio-kvc/error.logДетализацию лога можно увидеть командой:
tail -f /var/log/kerio-kvc/debug.logВ некоторых случаях помогает установка более ранней версии клиента. Список файлов для установки можно найти на сайте ryadel (на странице мы найдем клиенты разных версий для систем Linux и Windows). Переустановка выполняется командой:
dpkg -i kerio-control-vpnclient-8.6.0-3673-linux-amd64.deb* данной командой мы установим kerio vpn client версии 8.6.
После подключения нету доступа к сети
Если удалось нормально авторизоваться но доступа к сети не появилось то попробуйте обновить настройки сервиса.
sudo nano /lib/systemd/system/kerio-kvc.serviceи заменил все содержимое на
# This service is actually a systemd target, # but we are using a service since targets cannot be reloaded. [Unit] Description=Kerio Control VPN Client After=network.target [Service] Type=forking Restart=always RestartSec=5 ExecStartPre=/bin/sh -c "rm /var/log/kerio-kvc/debug.log" ExecStart=/usr/sbin/kvpncsvc /var/lib/kerio-control-vpn 2>&1 | logger -p daemon.err -t kerio-control-vpnclient 2>/dev/null ExecReload=/usr/bin/pkill -SIGHUP kvpncsvc ExecStartPost=/bin/sh -c "cat /var/log/kerio-kvc/debug.log | grep MAC | tail -1 | tr - : |rev|cut -d' ' -f 1|rev| xargs -I <> ip link set kvnet addr <>" [Install] Alias=kerio-vpn Alias=kerio-control-vpn Alias=kerio-control-vpnclient WantedBy=multi-user.targetДобавил StartPre в котором удаляем лог debug и добавляем шаг StartPost в котором меняем MAC адрес из-за которого нас не выпускает в сеть.
Сохраняем, перезапускаем демон
sudo systemctl daemon-reloadУстановка на CentOS
На сайте разработчика можно найти только deb-пакеты, которые работают в системах на базе Debian. Чтобы выполнить конвертирование данного пакета под систему RPM, устанавливаем alien:
Теперь можно конвертировать пакет deb в rpm:
alien --to-rpm kerio-control-vpnclient-linux-amd64.debrpm -Uvh kerio-control-vpnclient-*.rpm