- Kerio Control VPN Client for Debian/Ubuntu Linux
- PREPARATION
- INSTALLATION / UPGRADE
- CONFIGURATION
- HOW TO VERIFY THE SERVER’S CERTIFICATE FINGERPRINT?
- STARTING / STOPPING
- UNINSTALLATION
- TROUBLESHOOTING
- OPEN SOURCE SOFTWARE NOTICE
- Kerio client vpn linux
- Настройка Kerio VPN Client
- Kerio VPN Client для Debian/Ubuntu Linux
- Configuring Kerio Control VPN Client for Linux
- Prerequisites
- Solution
- Installation
- Configuration
- How to Verify the Server’s Certificate Fingerprint?
- Starting / Stopping
- Uninstallation
- Information on Log Files
- Установка
- Настройка
- Kerio VPN Client не подключается
- SSL3 в Ubuntu 16.04
- Kerio VPN Client не подключается
- SSL3 в Ubuntu 16.04
- Скрипт для сборки OpenSSL с поддержкой SSL v3
Kerio Control VPN Client for Debian/Ubuntu Linux
Kerio Control VPN Client is a tool for secure connection into a private network running Kerio Control on its Internet gateway.
PREPARATION
For supported Debian/Ubuntu Linux distributions and hardware requirements, please see: http://www.kerio.com/control/technical-specifications
Before you start with Kerio Control VPN Client installation, make sure that the ‘debconf’ and ‘openssl’ packages are installed on your system.
# apt-get install debconf openssl INSTALLATION / UPGRADE
To install Kerio Control VPN Client on 32-bit Debian / Ubuntu, issue the following command:
# dpkg -i kerio-control-vpnclient-###-linux.deb (Replace ### above with the actual version string.)
To install Kerio Control VPN Client on 64-bit Debian / Ubuntu, issue the following command:
# dpkg -i kerio-control-vpnclient-###-linux-amd64.deb CONFIGURATION
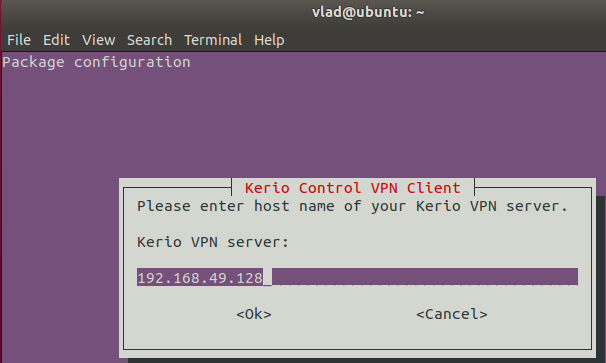
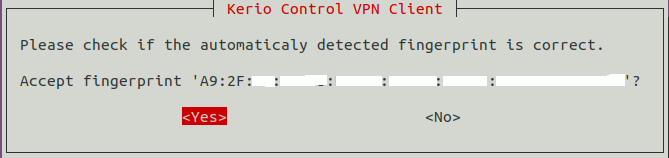
Kerio Control VPN Client for Linux supports only one VPN connection at a time. During the package installation, a configuration wizard is automatically started. The wizard will ask for the server name/address, username, password and it offers an automatic detection of the server’s certificate fingerprint (for server identity verification).
Alternatively, the server’s certificate fingerprint may be entered manually.
If you want to change the configuration later, run the wizard again by invoking the following command:
# dpkg-reconfigure kerio-control-vpnclient Alternatively, it is possible to manually edit the configuration file:
After any changes to this file, it is necessary to reload the configuration:
HOW TO VERIFY THE SERVER’S CERTIFICATE FINGERPRINT?
To make sure that the detected server’s certificate fingerprint matches the desired server, take the following steps:
- Open the Administration Console for particular Kerio Control server.
- Go to the Configuration / Interfaces section.
- Open the VPN Server properties.
- Compare the content of the Fingerprint field with the automatically detected certificate fingerprint.
STARTING / STOPPING
Kerio Control VPN Client will be automatically started after installation and restarted after reconfiguration.
You can start/stop it manually by invoking the command:
UNINSTALLATION
To uninstall Kerio Control VPN Client, remove the installed package:
# apt-get remove kerio-control-vpnclient To uninstall Kerio Control VPN Client completely with configuration removal, use:
# apt-get remove --purge kerio-control-vpnclient TROUBLESHOOTING
Kerio Control VPN Client creates the following log files in the
/var/log/kerio-kvc directory :
init.log — information on starting and stopping the daemon error.log — information on critical errors debug.log — more detailed status and error messages
OPEN SOURCE SOFTWARE NOTICE
The ‘libkvnet’ library is a free software distributed under the terms of GNU Lesser General Public License (LGPL).
Kerio client vpn linux

* со стороны Kerio есть клиенты для Linux только для Debian/Ubuntu 32-bit или 64-bit. Используя скопированную ссылку, загружаем клиент на Linux: * в данном примере нами была скопирована 64-х битная версия клиента.

Устанавливаем необходимые для работы VPN-клиента компоненты: apt-get install debconf openssl И устанавливаем сам клиент: dpkg -i kerio-control-vpnclient-linux-amd64.deb Система в процессе установки сразу предложит диалоговые окна для настройки. В первом окне вводим адрес нашего сервера (Kerio VPN Server): * для примера мы введи адрес внутренней сети, но чаще, будет необходимость в использовании внешнего адреса для сервера.
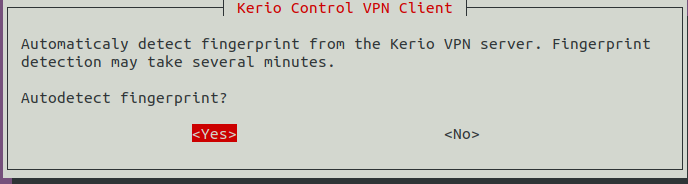
Разрешаем автоматически определить отпечаток для сертификата сервера:  После определения отпечатка, он будет выведен на экран, а нам нужно будет его принять:
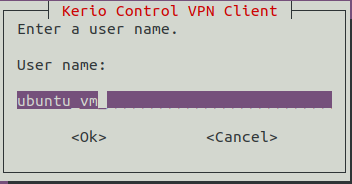
  Вводим имя пользователя для авторизации в сети VPN:
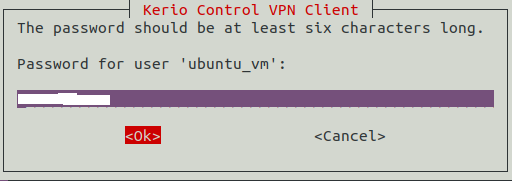
  Вводим пароль для пользователя:

Система завершит установку. Разрешим автозапуск сервиса и стартанем его: systemctl enable kerio-kvc systemctl start kerio-kvc
Настройка Kerio VPN Client
Настройку клиента мы выполнили в момент установки. Но если нам необходимо изменить конфигурацию или мы ошиблись, то изменения можно внести командой: Источник
Kerio VPN Client для Debian/Ubuntu Linux

Kerio VPN Client представляет собой инструмент для соединение с vpn сетью
работающей на шлюзе Kerio WinRoute Firewall. Не так давно появился клиент и под Linux.
Предлагаю небольшую инструкцию по установке и использованию Kerio VPN Client для Debian/Ubuntu Linux Подготовка к установке Поддерживаются 32-битные Debian / Ubuntu дистрибутивы:
Debian 5.0, Ubuntu 8.04, Ubuntu 8.10 и выше. Перед тем как начать установку с Kerio VPN Client, убедитесь, что
‘Debconf «и» пакеты OpenSSL’ установлены на вашей системе. # apt-get install debconf openssl Для установки Kerio VPN Client, выполните следующие команды:
# dpkg -i kerio-kvc_###_i386.deb Так же можно загрузить deb пакет с официального сайта www.kerio.ru/ru/firewall/download Kerio VPN Client для Linux поддерживает одновременно только одно VPN соединение.
Во время установки пакета мастер конфигурации запускается автоматически.
Мастер запросит имя сервера / адрес, имя пользователя, пароль и предлагает автоматическое обнаружение сервера,
получение сертификата (для сервера проверки идентификации).
Кроме того, он может быть введён вручную. Если вы хотите изменить конфигурацию позже, запустите мастер снова следующей командой: Альтернативный вариант, править файл конфигурации: После любых изменений потребуется перезапуск службы: Kerio VPN Client будут автоматически запускаться после установки
и перезапуска после реконфигурации.
Вы можете запускать / останавливать его вручную, путем вызова команды:
Kerio VPN Client создает log файлы в директории init.log — информация о старте или остановке демона error.log — информация о критических ошибках debug.log — детальная информация и статус соединения Ну вот VPN сеть настроена, мной лично опробовано, работает стабильно. Источник
Configuring Kerio Control VPN Client for Linux
Kerio Control VPN Client is a tool for secure connection into a private network running Kerio Control on its Internet gateway.
Prerequisites
Before you start with the Kerio Control VPN Client installation, make sure that the ‘debconf’ and ‘openssl’ packages are installed on your system. If the ‘debconf’ and ‘openssl’ packages are NOT installed on your system, execute the following command to install them:
Solution
Installation
To install Kerio Control VPN Client on 32-bit Debian / Ubuntu, execute the following command: To install Kerio Control VPN Client on 64-bit Debian / Ubuntu, execute the following command:
Configuration
Kerio Control VPN Client for Linux supports only one VPN connection at a time. During the package installation, a configuration wizard is automatically started. The wizard will ask for
the server name/address,
 username,
 automatic detection of the server’s certificate fingerprint (for server identity verification).
 Alternatively, the server’s certificate fingerprint may be entered manually. If you want to change the configuration later, rerun the wizard by executing the following command: Alternatively, it is possible to edit the configuration file /etc/kerio-kvc.conf manually.
After any changes to this file, it is necessary to reload the configuration by executing the following command:
How to Verify the Server’s Certificate Fingerprint?
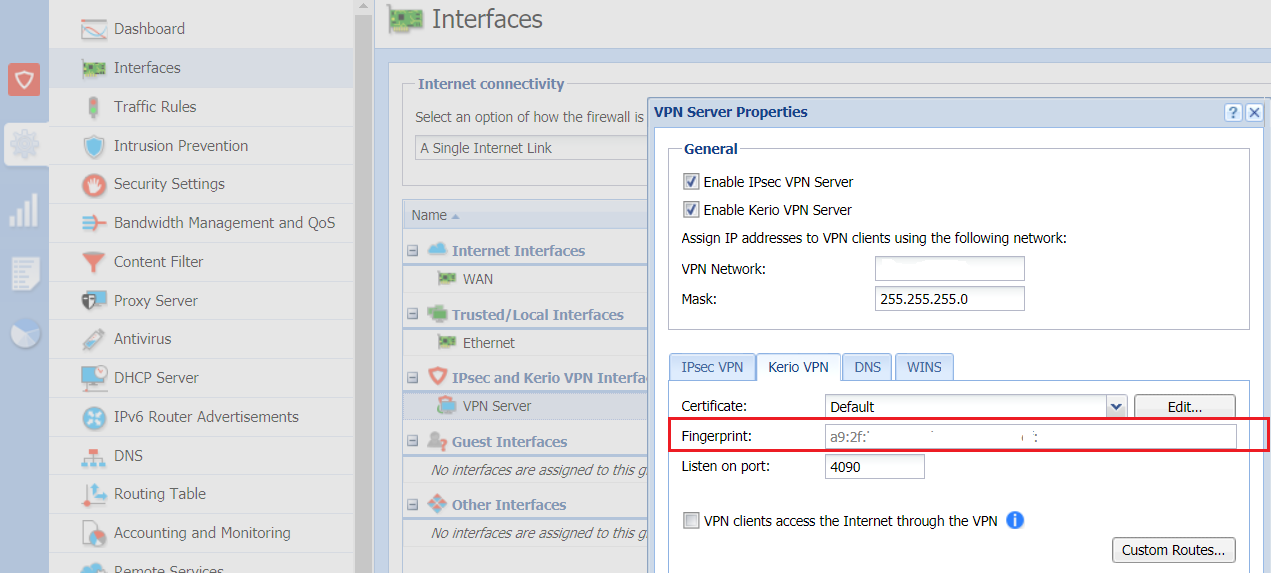
To make sure that the detected server’s certificate fingerprint matches the desired server, take the following steps: Open the Administration Console for a particular Kerio Control server. Go to the Configuration / Interfaces section. Open the VPN Server properties. Compare the content of the Fingerprint field with the automatically detected certificate fingerprint from the VPN client side.
Starting / Stopping
Kerio Control VPN Client will be automatically started after installation and restarted after reconfiguration. You can start/stop it manually by executing the following command: 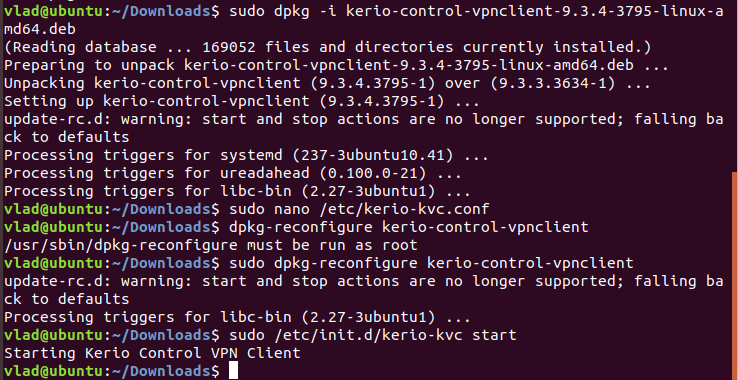 Once the Kerio Control VPN client is started, the Status -> VPN clients section will show Connected status.
  For more information, please refer to Monitoring VPN clients.
Uninstallation
To uninstall Kerio Control VPN Client, remove the installed package by executing the following command: To uninstall Kerio Control VPN Client completely with configuration removal, execute the following command:
Information on Log Files
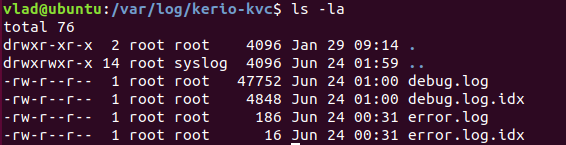
Kerio Control VPN Client creates the following log files in the /var/log/kerio-kvc directory: init.log — provides information on starting and stopping the daemon. error.log — includes information on critical errors. debug.log — contains more detailed status and error messages.
Open Source Software Notice The ‘libkvnet’ library is free software distributed under the terms of the GNU Lesser General Public License (LGPL). Источник
Установка
Сначал ставим 32-битные библиотеки и необходимые debconf и openssl Скачиваем kerio vpn client Устанавливаем его так:
Настройка
Настройки kerio vpn-client находятся тут: /etc/kerio-kvc.conf
Для повторной настройки используем:
Kerio VPN Client не подключается
Столкнулся с загадочной ситуацией.
Новый Kerio VPN Client версии 8.6 не подключается к KerioControl версии 7.2. Хотя, старый версии 8.5 исправно работает. Клиент под Windows сообщает SSL Error. Выкладываю рабочие версии: kerio-control-vpnclient-8.5.0-3127-linux.deb
Под windows: kerio-control-vpnclient_7.2.0_i386_and_x64_for_Windows
SSL3 в Ubuntu 16.04
При попытке настроить соединение в Ubuntu 16.04 в файле ошибок /tmp/kerio-control-vpn.stderr бывает вот такое: Это из-за того, что из нового openssl выпилили SSLv3. Остается только собрать из исходников с поддержкой SSLv3 Источник
Kerio VPN Client не подключается
Столкнулся с загадочной ситуацией.
Новый Kerio VPN Client версии 8.6 не подключается к KerioControl версии 7.2. Хотя, старый версии 8.5 исправно работает. Клиент под Windows сообщает SSL Error. Выкладываю рабочие версии: kerio-control-vpnclient-8.5.0-3127-linux.deb
Под windows: kerio-control-vpnclient_7.2.0_i386_and_x64_for_Windows
SSL3 в Ubuntu 16.04
При попытке настроить соединение в Ubuntu 16.04 в файле ошибок /tmp/kerio-control-vpn.stderr бывает вот такое:
error:140A90C4:SSL routines:SSL_CTX_new:null ssl method passed:ssl_lib.c:1878:
Это из-за того, что из нового openssl выпилили SSLv3. Остается только собрать из исходников с поддержкой SSLv3
wget https://www.openssl.org/source/openssl-1.1.0c.tar.gz tar -xvf ./openssl-1.1.0c.tar.gz cd openssl-1.1.0c ./config --prefix=/usr --openssldir=/usr
Затем нужно отключить опции OPENSSL_NO_SSL3 и OPENSSL_NO_SSL3_METHOD.
Для этого редактируем файлик ./configdata.pm и в строке openssl_other_defines удаляем опции, а также в строке options удаляем no-ssl3 no-ssl3-method
nano ./configdata.pm make all sudo make install
Скрипт для сборки OpenSSL с поддержкой SSL v3
#!/bin/sh -e # Get latest OpenSSL 1.0.2 version from https://openssl.org/source/ # v1.1.0 seems to have removed SSLv2/3 support openssl_version=1.0.2e # Build OpenSSL wget https://openssl.org/source/openssl-$openssl_version.tar.gz tar -xvf openssl-$openssl_version.tar.gz cd openssl-$openssl_version # --prefix will make sure that make install copies the files locally instead of system-wide # --openssldir will make sure that the binary will look in the regular system location for openssl.cnf # no-shared builds a mostly static binary ./config --prefix=`pwd`/local --openssldir=/usr/lib/ssl enable-ssl2 enable-ssl3 no-shared make depend make # -i continues on errors, since make install may try to put some files in /usr/lib/ssl, which we don't want make -i install # Install just the binary so we can use s_client -ssl2 sudo cp local/bin/openssl /usr/local/bin/ # Cleanup cd .. rm -rf openssl-$openssl_version rm openssl-$openssl_version.tar.gz # To test: # $ openssl s_client -connect google.com:443 -ssl2 # CONNECTED(00000003) # 139675635414688:error:1407F0E5:SSL routines:ssl2_write:ssl handshake failure:s2_pkt.c:412: # $ openssl s_client -connect google.com:443 -ssl3 # CONNECTED(00000003) # 140647504119456:error:1408F10B:SSL routines:SSL3_GET_RECORD:wrong version number:s3_pkt.c:365: