- Kernel update kali linux
- Install Build Dependencies
- Download the Kali Linux Kernel Source Code
- Configure Your Kernel
- Build the Kernel
- Install the Modified Kernel
- How to update Kali Linux
- Update Kali Linux using GUI
- Updates to the application information cache
- Updating all packages n Kali Linux
- Updating the cache and applications in one command
- How to see which packages will be updated in Kali Linux
- How to update one package in Kali Linux
- How to update the Kali Linux kernel
- How to update the Kali Linux to the latest version
- Removing unused programs and kernels in Kali Linux
- Clearing the package cache in Kali Linux
- Related articles:
Kernel update kali linux
The customizability of Kali Linux extends all the way down into the Linux kernel.
Depending on your requirements, you might want to add drivers, patches, or kernel features that are not included in the stock Kali Linux kernel. The following guide will describe how the Kali Linux kernel can be quickly modified and recompiled for your needs. Note that global wireless injection patches are already present by default in the Kali Linux kernel.
Install Build Dependencies
Start by installing all the build dependencies for recompiling the kernel:
[email protected]:~$ sudo apt install -y build-essential libncurses5-dev fakeroot xz-utils Download the Kali Linux Kernel Source Code
The remainder of this section focuses on the 4.9 version of the Linux kernel, but the examples can, of course, be adapted to the particular version of the kernel that you want. We assume that the linux-source-4.9 binary package has been installed. Note that we install a binary package containing the upstream sources, we do not retrieve the Kali source package named linux:
[email protected]:~$ sudo apt install -y linux-source-4.9 Reading package lists. Done Building dependency tree Reading state information. Done The following additional packages will be installed: bc libreadline7 Suggested packages: libncurses-dev | ncurses-dev libqt4-dev The following NEW packages will be installed: bc libreadline7 linux-source-4.9 0 upgraded, 3 newly installed, 0 to remove and 0 not upgraded. Need to get 95.4 MB of archives. After this operation, 95.8 MB of additional disk space will be used. [. ] [email protected]:~$ ls /usr/src linux-config-4.9 linux-patch-4.9-rt.patch.xz linux-source-4.9.tar.xz Notice that the package contains /usr/src/linux-source-4.9.tar.xz, a compressed archive of the kernel sources. You must extract these files in a new directory (not directly under /usr/src/, since there is no need for special permissions to compile a Linux kernel). Instead, ~/kernel/ is more appropriate:
[email protected]:~$ mkdir -p ~/kernel/ [email protected]:~$ cd ~/kernel/ [email protected]:~/kernel$ tar -xaf /usr/src/linux-source-4.9.tar.xz Configure Your Kernel
When recompiling a more recent version of the kernel (possibly with an additional patch), the configuration will most likely be kept as close as possible to that proposed by Kali Linux. In this case, and rather than reconfiguring everything from scratch, it is sufficient to copy the /boot/config-version file (the version is that of the kernel currently used, which can be found with the uname -r command) into a .config file in the directory containing the kernel sources:
[email protected]:~/kernel$ cp /boot/config-4.9.0-kali1-amd64 ~/kernel/linux-source-4.9/.config If you need to make changes or if you decide to reconfigure everything from scratch, you must take the time to configure your kernel. This can be done by calling the make menuconfig command:
The details of using menuconfig to set up a kernel build are beyond the scope of this guide. There is a detailed tutorial on configuring a kernel build on Linux.org.
Build the Kernel
Once the kernel configuration is ready, a simple make deb-pkg will generate up to 5 Debian packages: linux-image-version that contains the kernel image and the associated modules, linux-headers-version, which contains the header files required to build external modules, linux-firmware-image-version, which contains the firmware files needed by some drivers (this package might be missing when you build from the kernel sources provided by Debian or Kali), linux-image-version-dbg, which contains the debugging symbols for the kernel image and its modules, and linux-libc-dev, which contains headers relevant to some user-space libraries like GNU glibc. The Linux kernel image is a big build, expect it to take a while to complete:
[email protected]:~/kernel$ make clean [email protected]:~/kernel$ make deb-pkg LOCALVERSION=-custom KDEB_PKGVERSION=$(make kernelversion)-1 [. ] [email protected]:~/kernel$ ls ../*.deb ../linux-headers-4.9.0-kali1-custom_4.9.2-1_amd64.deb ../linux-image-4.9.0-kali1-custom_4.9.2-1_amd64.deb ../linux-image-4.9.0-kali1-custom-dbg_4.9.2-1_amd64.deb ../linux-libc-dev_4.9.2-1_amd64.deb Install the Modified Kernel
When the build has successfully completed, you can go ahead and install the new custom kernel and reboot your system. Please note that the specific kernel version numbers will vary — in our example, done on a Kali 2016.2 system, it was 4.9.2. Depending on the current kernel version you’re building, you will need to adjust your commands accordingly:
[email protected]:~/kernel$ sudo dpkg -i ../linux-image-4.9.0-kali1-custom_4.9.2-1_amd64.deb [email protected]:~/kernel$ reboot Once your system has rebooted, your new kernel should be running. If things go wrong and your kernel fails to boot successfully, you can still use the Grub menu to boot from the original stock Kali kernel and fix your issues.
Updated on: 2023-Mar-06
Author: g0tmi1k
How to update Kali Linux
Updating programs (in Linux usually used the word ‘packages’) on Linux systems is different from updating in Windows. Updating process is one of the key advantages of Linux family OSs.
If in Windows each program is updated individually: some programs do this automatically, some output the appropriate notification, for some you need to go to the official web site and check information about the new version. In Linux, all programs (packages) are assembled into one or more repositories. Usually, each distribution has its own repository. One system can use several repositories at once, for example, Linux Mint ‘out of the box’ uses packages from the Ubuntu repository and from its own repository.
The result of this approach is that you can check for updates at once for all packages and update them with just a few mouse clicks (if you use a graphical interface) or with two commands (if you prefer the command line).
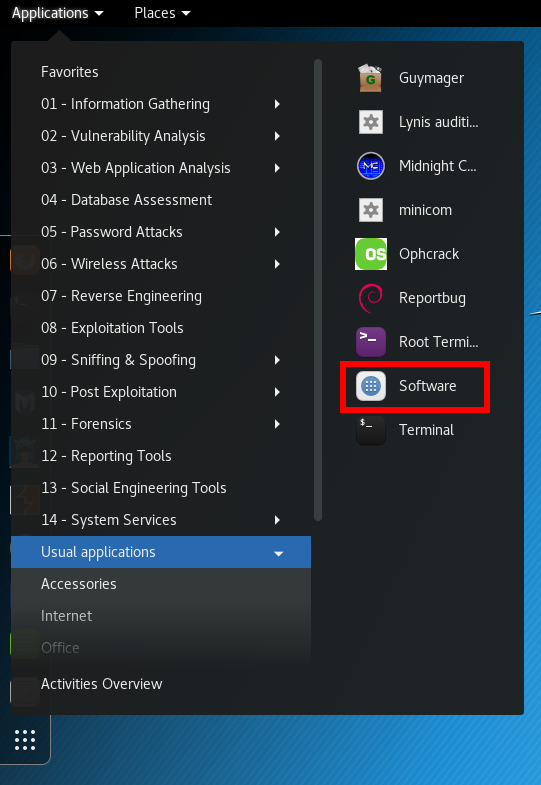
Update Kali Linux using GUI
I recommend you using the command line (console) to update the system, because it is faster and more reliable. But if you prefer a graphical interface, then in the menu, find the «Software» item and run.
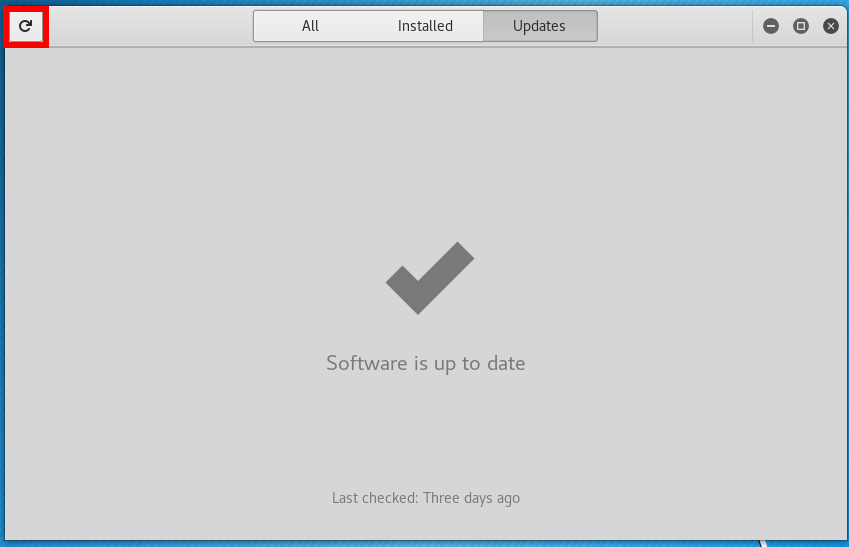
Go to the «Updates» tab, if there are no updates, click on the circular arrow in the upper left corner:
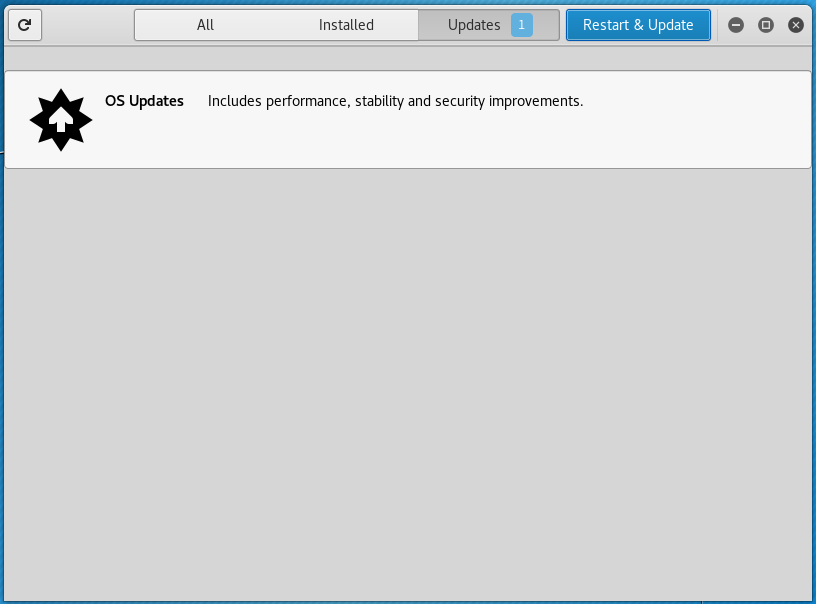
You will see a message about operating system updates:
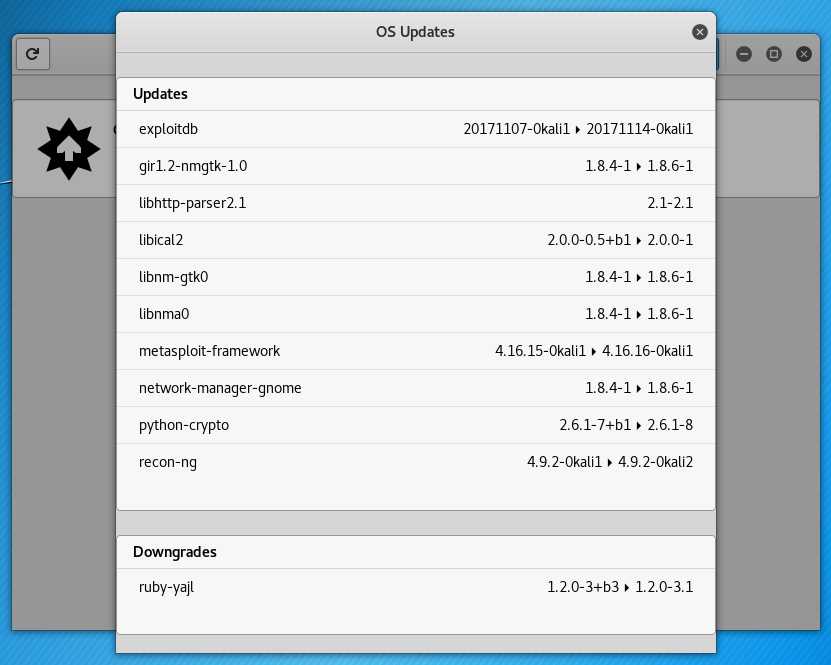
If you are interested in what packages will be updated, click on the message:
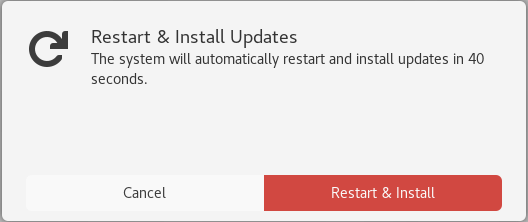
To start the update process, click the ‘Restart and Update’ button and confirm your choice:
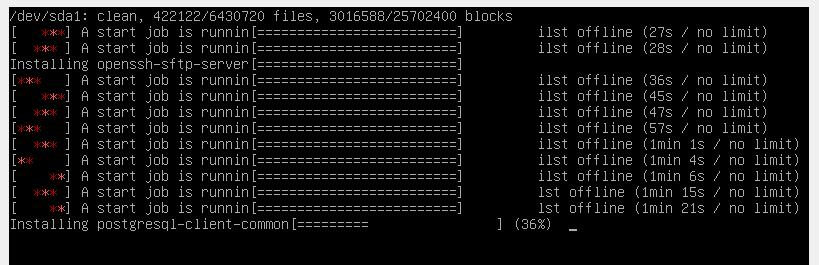
Kali Linux will restart and while the next booting the update process will be performed:
Updates to the application information cache
When changes are made to the repository, for example, when updating a package, you need to synchronize this information with the local cache of your Linux operating system. This is done by the command:
Note: this result (cache updating) can be achieved in various ways, including several more commands. For example, the following command will also update the cache (there is no difference what command you use):
Even if you are not going to perform a full system upgrade, you must perform a cache update before installing any packages. Otherwise, you may encounter an error that the required package was not found. This error occurs because your system has information about the previous version of the package and a link for downloading it. However, in the repository, the obsolete version could already be deleted. Attempt to download according to expired link causes the error. The result is that the package is present in the repository, but your system does not recognize its new address until it updates its cache.
Updating all packages n Kali Linux
To update all packages for which new versions are available, and to install the necessary dependencies and remove the interfering packages, use the command:
Among the removed packages can be conflicting (interfering with the installation of the required dependencies).
A similar result can be obtained by the commands:
sudo apt-get dist-upgrade # or sudo aptitudehe full-upgrade
Updating the cache and applications in one command
For convenience, you can combine the cache update command and the command to run a complete system update to one, the -y option is used for confirmation, to start the process of installing new packages immediately:
sudo apt update && sudo apt full-upgrade -y
How to see which packages will be updated in Kali Linux
Before starting the upgrade process, you can display a list of packages for which there are new versions and which will be updated by the above commands. To see information about new packages, type:

How to update one package in Kali Linux
If you do not want to update the entire system, but want to update one specific program, use the command like that (replace the package_name with an actual name):
sudo apt install package_name
For example, to update the apktool package:
How to update the Kali Linux kernel
The Linux kernel comes packed in a package, like the rest of programs. As new versions of the kernel are released, in Kali Linux it will be updated along with the rest of the packages when the command is executed:
How to update the Kali Linux to the latest version
Regular new versions of Kali Linux, for example, 2017.1, 2017.2, etc., are released. If you have already installed any version released since 2016 (the so-called Rolling releases), then to fully update the system you just need to update the package cache, and then run a full upgrade of the packages, i.e. execute the command
sudo apt update && sudo apt full-upgrade -y
Although the news indicates different innovations associated with a particular release, in fact, these innovations (kernel updates, new versions of programs and new tools) could be added long before the official release, and if you regularly update your system, they have already been installed or will be installed by the above command.
News about a release mainly refers to the Live image, which is updated several times a year, all the other innovations fall to each Kali Linux user right after the implementation.
Removing unused programs and kernels in Kali Linux
From time to time, it is recommended to execute commands to remove packages that were automatically installed (to satisfy dependencies for other package), and are now no longer needed as dependencies changed or the package(s) needing them were removed in the meantime.
To do this, use the command:
You should check that the list does not include applications you have grown to like even though they were once installed just as a dependency of another package. You can mark such a package as manually installed by using apt-mark(8). Packages which you have installed explicitly via install are also never proposed for automatic removal.
Its use is safe and should not lead to problems.
As already mentioned, since the kernels are supplied as packages, the above command will also remove the unused (because a new version is already installed) Linux kernel.
Clearing the package cache in Kali Linux
In addition to the cache in which information about the packages is stored, there is also a cache containing the files of the packages themselves. And if the first is very small in size, the second occupies quite a lot of space, which is constantly increasing.
With each update, the package files are downloaded to the cache. After the update, the downloaded files (you can call them installation files) are not deleted, and gradually the cache grows to large sizes. This is done with the idea that if after the next update you find that the new package has problems and the old version is already inaccessible in the online repository, then you can roll up to the old version by installing it from a file stored in the cache.
For rolling distributions, the cache grows very quickly, and if you are not qualified enough to roll back to the old version, the installation package of which is stored in the cache, then for you these hundreds of megabytes or even a few gigabytes is wasted space on the hard drive. Therefore, from time to time, you can execute commands
clean clears out the local repository of retrieved package files. It removes everything but the lock file from /var/cache/apt/archives/ and /var/cache/apt/archives/partial/.
autoclean (and the auto-clean alias since 1.1)
Like clean, autoclean clears out the local repository of retrieved package files. The difference is that it only removes package files that can no longer be downloaded, and are largely useless.
This allows a cache to be maintained over a long period without it growing out of control. The configuration option APT::Clean-Installed will prevent installed packages from being erased if it is set to off.