- Clonezilla – клонирование на диск меньшего размера
- Поделиться ссылкой на эту запись:
- Похожее
- Всего комментариев: 9 Комментировать
- Как в Linux клонировать диск в диск другого размера
- 2 ответа 2
- Clonezilla Clone Larger Disk to Smaller Disk vs Easier Way
- Why use Clonezilla to clone larger disk to smaller disk?
- How to make Clonezilla clone to smaller drive possible
- An easier way to clone larger hard drive to smaller drive
- Boot from the cloned drive
- Create portable AOMEI Backupper
- More questions about Clonezilla clone HDD to smaller SSD
- Conclusion
- Best Free Backup Software
- Do you need any more help?
Clonezilla – клонирование на диск меньшего размера
При переносе данных со старого HDD на новый SSD в очередной раз столкнулся с проблемой когда текущая stable версия Clonezilla (1.2.11-23) отказалась выполнять восстановление разделов диска сделанного с помощью режима savedisk при условии что новый диск-получатель имеет меньший размер чем диск с которого снимался образ. Причём не помогло даже предварительно сжатие разделов до размера, который вписывался бы в размер нового диска с помощью Gparted . Где-то на одном из линуксоидных интернет форумов (ссылку к сожалению не сохранил) наткнулся на обсуждение этой проблемы и неожиданное для меня заявление одного комарада о том, что якобы в альтернативных сборках Clonezilla такой вариант восстановления поддерживался и в качестве примера была предложена сборка Clonezilla-Live-20110922-Natty . Как оказалось, данная версия действительно помогла мне решить проблему восстановления на диск меньшего размера.
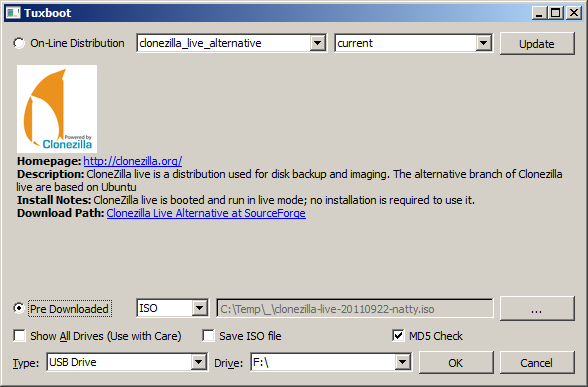
И ещё. Пока возился с Clonezilla/Gparted открыл для себя ещё одну весьма удобную утилитку – Tuxboot . Она позволяет легко и быстро создать загрузочный Live USB накопитель с соответствующими инструментами. Утилита может использоваться для загрузки образа как напрямую с сайта проектов, так и работает с пред загруженным iso (это может оказаться полезным для тех кто например работает через прокси)
Поделиться ссылкой на эту запись:
Похожее
Всего комментариев: 9 Комментировать

Clonezilla – меняем жёсткий диск без переустановки ОС
Отличием от указанной последовательности действий будет лишь использование сборки Clonezilla-Live-20110922-Natty
Как в Linux клонировать диск в диск другого размера
Имеем Linux — Fedora 22,
HDD — на котором установлена система, требуется переехать на SDD который в два раза меньшего размера, но данных на HDD мало, поэтому влезут.
Оба диска подключены к компьютеру.
Вопрос: как клонировать диск? Желательно средствами GNU Linux. Уточнения:
1. CD/DVD — нет.
2. gparted — не работает с активным системным разделом.
3. Куда tar архив размещать? в /dev/null ? два диска всего.
4. Диски разного размера!
Загружаешься с livecd, монтируешь существующий hdd, весь hdd пакуешь в tar, монтируешь ssd, распаковываешь tar на ssd. Дальше самое интересное, нужно указать grub откуда грузиться. Примерно так mount -t proc none /mnt/ssd/proc mount -o bind /sys /mnt/ssd/sys mount -o bind /dev /mnt/ssd/dev chroot /mnt/ssd /bin/bash grub root (hd0,0) setup (hd0) /mnt/ssd — примонтированый ssd
2 ответа 2
Все можно сделать, главное аккуратно. Нужны следующие вещи:
- livecd диск или лучше флешка. Можно другого совместимого дистрибутива, к примеру ubuntu.
- оба диска должны быть подключены к компу.
- загрузится с live
- открыть gparted или любую другую любимую утилиту для разбивки диска.
- разбить ssd как нужно (home, root, swap и дальше по предпочтениям), отформатировать
- монтируем новые диски и старые. Рекомендую сделать в /mount папку old (для старого диска) и new (для нового).
- копируем данные. Так как это линукс, то можно с помощью cp, главное сохранить права. К примеру home cp -a /mount/old/home/ /mount/new/home .
- аналогично копируется корень. Но тут есть особеность — не все нужно копировать. к примеру, папку tmp не нужно (хотя ничего плохого не будет). Если в папка /mount/old/proc и /mount/old/sys что то будет внутри — это копировать не нужно (содержимое этих папок система создает сама).
- не забываем о boot разделе.
- если имена устройств поменялись (к примеру, home это был /dev/sda*1*, а стал /dev/sdb*4* — тут важна цифра, а не буква), то открываем файл /mount/new/etc/fstab и правим по феншую.
- осталось последнее — перенести загрузочную запись. Вначале копируем старый dd if=/dev/sdX of=/path/to/mbr_file.img bs=512 count=1 , а потом переносим на новый. Так как мы не хотим потереть таблицу разделов, то нужно не все скопировать. dd if=/path/to/mbr_file.img of=/dev/sdX bs=446 count=1 .
Все, можно выключать, поставить диски по местам, поправить в биосе загрузочное устройство и пробовать.
Что делать, если ничего не завелось?
Старый диск скорее всего не поврежден. Так что им можно будет загрузиться. Плюс есть флешка. Можно восстановить.
Но если честно, то я переносил немного по другому. Все как выше, разбил диск, скопировал home раздел, потом вытянул старый диск, и загрузился с флешки. И начал установку как обычно. В процессе установки главное не отформатировать home раздел (хотя потом все равно можно скопировать). Так как home раздел есть, то сохранятся все настройки программ. Потом только возможно нужно будет доустановить недостающие программы.
Clonezilla Clone Larger Disk to Smaller Disk vs Easier Way
It’s possible to use Clonezilla clone larger disk to smaller disk but the steps are a little tricky. So you can try an easier way to complete the task — disk cloning software AOMEI Backupper Standard.

By Ivy / Last update May 19, 2023
Content of this article:
Why use Clonezilla to clone larger disk to smaller disk?
As an open source free software, Clonezilla can be used to clone or backup hard drive. Since it works with most of the operating systems largely used in company or home, many people love to use Clonezilla, especially when they want to upgrade hard drive with a new one. In this case, you can use Clonezilla disk to disk clone feature to clone a hard drive to another without reinstalling Windows and programs.
However, the target drive is generally not the same size as the source drive in practical — it could be larger or smaller. And because of the excellent performance and increasingly affordable price of SSDs, many users would choose to clone larger HDD to smaller SSD using Clonezilla. If you happen to be in this situation, you can make some extra efforts to get this done, or try an easier alternative directly.

How to make Clonezilla clone to smaller drive possible
Officially, Clonezilla requires the destination partition to be equal to or larger than the source one. So the only way to get Clonezilla copy to smaller disk is to shrink the source partition to fit the destination partition first.
Then, let’s learn how to clone larger drive to smaller one with clonezilla:
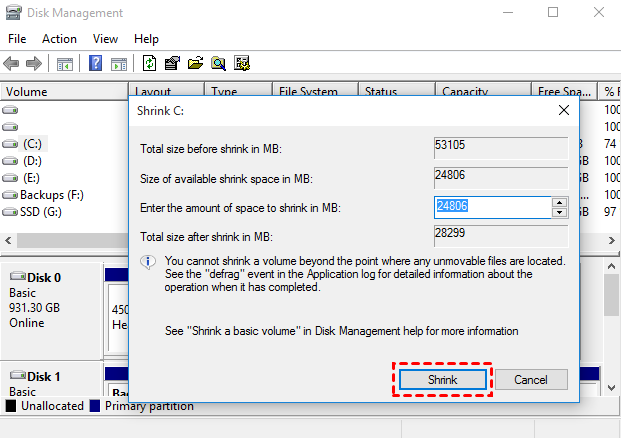
Step 1. Open Disk Management in Windows 10/8/7. If you are running Linux system, you can boot your computer from GParted media.
Step 2. Right click the source partition and click “Shrink Volume” and follow the wizard to shrink the partition.
Step 3. When you get that done, reboot to Clonezilla.
Step 4. Select the source disk and destination disk.
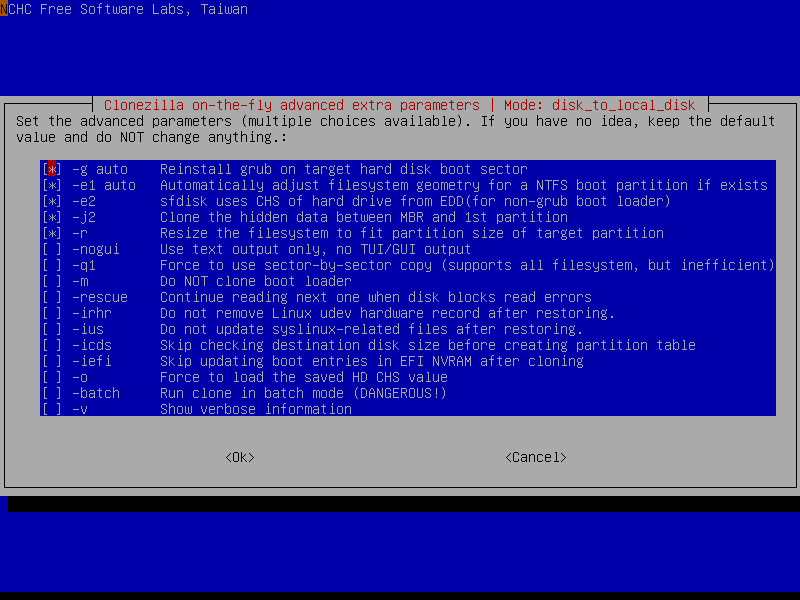
Step 5. Choose EXPERT mode and enable the “-icds” option. You need to also choose the option»Resize partitional table proportionally» in one of the following menus.
Tip: –icds is an advanced mode allowing Clonezilla to ignore disk size before creating partition table. So you need to enable it when use Clonezilla restore image to smaller disk or clone to smaller disk.
Step 6. Configure other Clonezilla options if needed and then type in “y” to confirm and start the clone.
This should allow you to clone larger drive to smaller drive without receiving error like Clonezilla destination disk is too small, or Clonezilla failed to create a partition table on this disk.
As you can see, the whole process is quite cumbersome, and you may encounter Clonezilla failed to clone issue due to the bad sector on your disk.
To clone larger drive to smaller drive more effeciently, you can try best disk clone software — AOMEI Backupper Professional to clone larger drive to smaller drive directly without extra preparation. It just needs only a few clicks to finish the job. Please keep reading to learn more.
An easier way to clone larger hard drive to smaller drive
AOMEI Backupper Professional, a reliable backup, restore and clone software for Windows 11/10/8/7, allows you to clone hard drive to another one within a few clicks.
- It allows you to clone drives of different sizes. You can easily clone larger HDD to smaller SSD or clone SSD to larger SSD.
- It provides 3 cloning solutions: entire disk clone, system clone only, and individual partition clone.
- It allows you to boost the performance of an SSD and prolong its lifespan.
- It has a user-friendly GUI compared to Clonezilla’s text-based interface.
- It supports all kinds of SSD disks, such as SATA, NVMe, PCIe, AHCI, etc. If you want faster reading and writing speed, cloning Windows 10 to NVMe will be a great option.
Check the following steps to see how to clone larger HDD to smaller SSD:
Step 1. Download and run it on your computer.
Note: The Clone feature can only be demonstrated in the trial version. If you want to clone larger disk to smaller disk and directly boot from it, please upgrade to the full version of AOMEI Backupper Professional.
Step 2. At the main interface, click Clone and then select Disk Clone.

Step 3. Select the source disk, and click Next to continue.

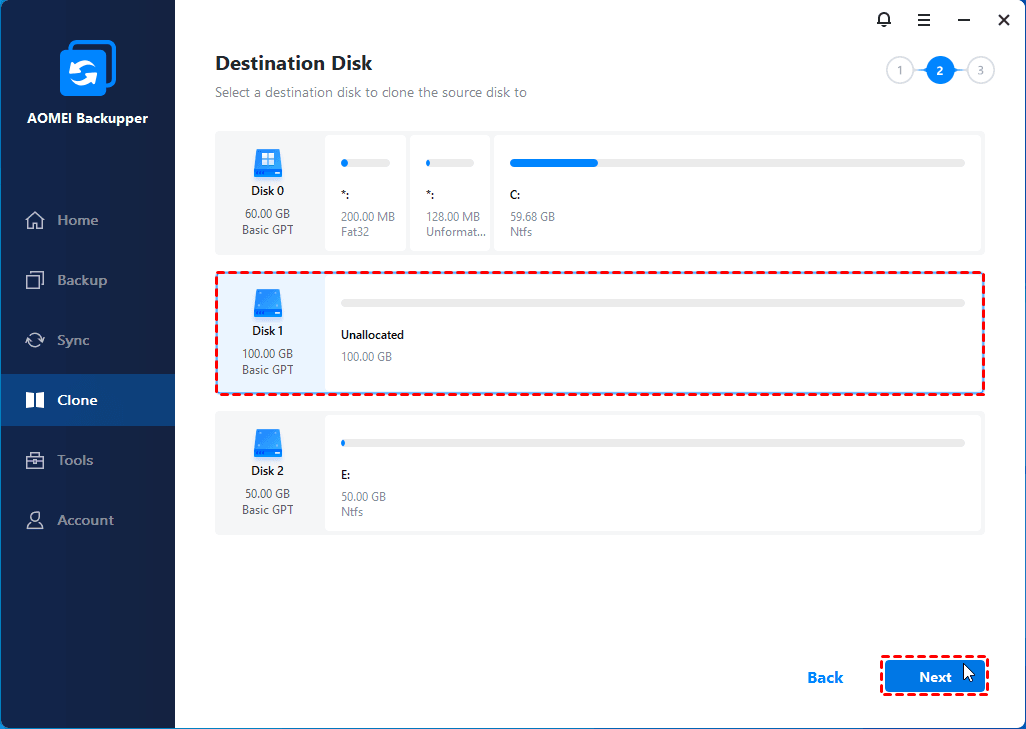
Step 4. Select your new hard drive as the destination to clone the source drive to. Then click Next to continue.
Step 5. Check the operation summary and click Start Clone.

Notes:
1. Edit Partitions allows you to resize partitions. Under this option, you can choose Copy without resizing partitions, Add unused space to all partitions or Manually adjust partition size.
2. Select Sector By Sector Clone if you want to clone every sector no matter it is used or not, even if it’s a blank sector or a logically bad sector.
3. It’s suggested to check SSD Alignment while cloning hard drive to SSD, because it can improve the speed of reading and writing as well as prolong the service life of SSD.
In a short while, AOMEI Backupper will complete the cloning process. Therefore, you do not have to do such tricks to make Clonezilla clone disk to smaller disk if you try AOMEI Backupper.
Boot from the cloned drive
To boot your computer from the cloned disk, you can unplug the old hard drive, install the new drive there and then start your computer.
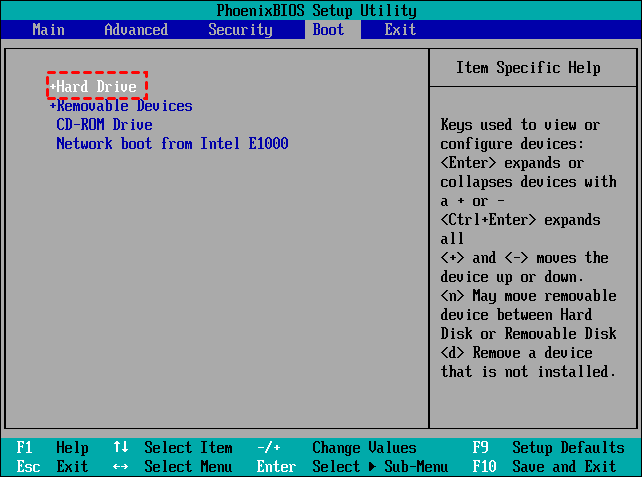
You can also keep the old disk installed, restart your computer and continuously press a specific key (usually F2, F8, F12, Del) to enter BIOS Setup. Then go to the Boot tab to set the cloned disk as first boot device.
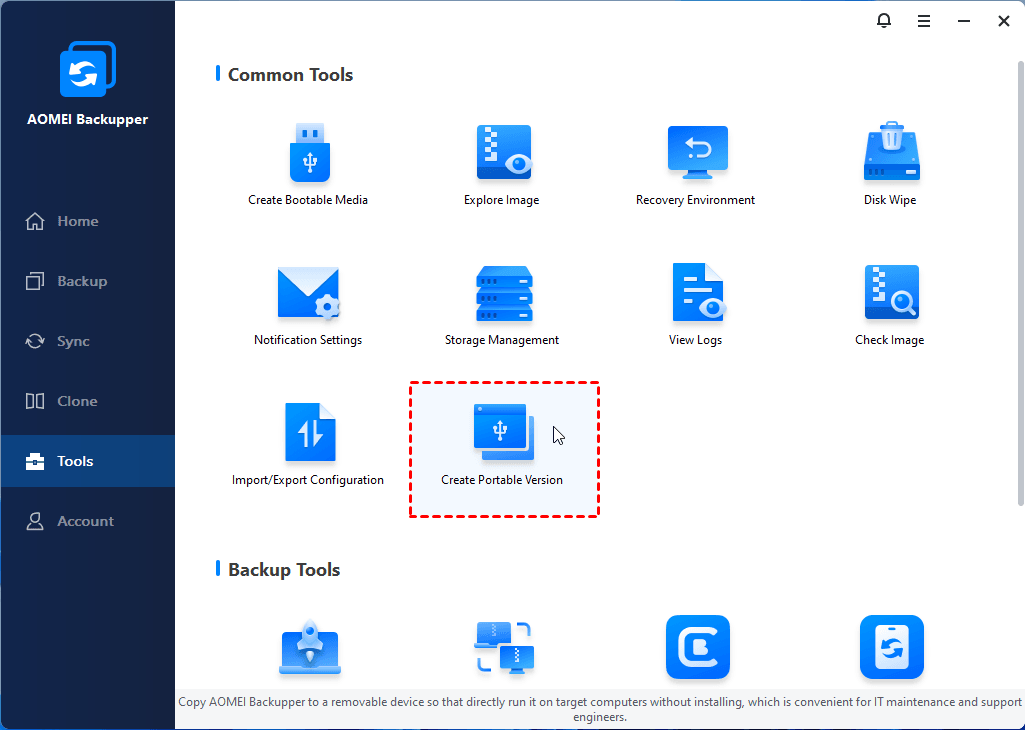
Create portable AOMEI Backupper
If you want to perform disk clone on multiple computers, you can use a built-in tool to create portable version of AOMEI Backupper (supported by Tech and Tech Plus edition). Then connect it to any target computer for direct use.
More questions about Clonezilla clone HDD to smaller SSD
Q 1: Can Clonezilla clone to a smaller drive?
Although you can find corresponding info on its website, but the premise is to shrink the source disk first and be sure it can fit on the destination disk.
Q 2: Can you clone hard drives of different sizes?
For Clonezilla, cloning a large drive to a smaller drive is a little tricky. Therefore, you’d better use disk cloning software to clone hard drive of different size, either to larger or smaller one.
Q 3: How long does cloning HDD to SSD take?
The cloning process depends on how much data your source disk has and the speed of both the source disk and destination disk. Thus, it might be slightly different.
Conclusion
To let Clonezilla clone to smaller disk, you need to shrink the source partition to fit the destination partition. Or you can just try AOMEI Backupper to achieve the goal without any complicated operation. It supports all kinds of disk clone, for example, clone large HDD to smaller SSD, clone system from Intel SSD to another, clone NVMe SSD, etc.
Besides disk to disk cloning, AOMEI Backupper also offers various backup options to keep your data safe, including system/disk/partition/file backup. You can also create bootable disk to help you boot your computer when a disaster happens.
If you want to protect unlimited computers within your company, you can pick AOMEI Backupper Technician. With the inbuilt AOMEI Image Deploy tool, you are also allowed to deploy/restore system image file on server-side computer to multiple client-side computers over network. Go for AOMEI Backupper right now!
Best Free Backup Software
- System and Files Backup
- Automatic Backup
- Incremental Backup
- File Synchronization
- Hard Drive Cloning


Do you need any more help?
Have you solved your problem? Otherwise, enter the query in the search box below.