- How to Use telnet Command in Linux?
- Installing Telnet in Different Linux Distributions
- CentOS, Fedora, and RHEL
- Ubuntu and Debian-Based Distributions
- How to Use telnet in Linux
- Check for Open Ports
- Download Web Page to File
- Test SMTP Communication
- Connect to Remote System
- Как пользоваться telnet
- Что такое telnet?
- Стандартные команды консоли telnet
- Как установить telnet
- Проверка доступности сервера
- Проверка доступности порта
- Отладка
- Консоль telnet
- Тестирование сайта
- Подключение к удаленному серверу
How to Use telnet Command in Linux?
Home » Networking » How to Use telnet Command in Linux?
The telnet command (short for teletype network) utilizes the telnet network protocol to connect to remote machines and manage them through a TCP/IP network. The protocol uses port 23 to establish a connection and provides a way to manage remote systems using the CLI.
Although telnet is similar to SSH, the two are different because SSH is a much more secure option as it uses encryption. telnet , on the other hand, sends data without encryption, making it an easy target for hackers.
In this tutorial, you will learn to use the telnet command in Linux.

- A system running Linux (for Windows users, learn about telnet on Windows).
- An account with root privileges.
- Access to the terminal (Ctrl+Alt+T).
Installing Telnet in Different Linux Distributions
Depending on the Linux distribution you are using, follow the steps below to download and install telnet .
CentOS, Fedora, and RHEL
CentOS, Fedora, and RHEL use yum (Yellowdog Update Manager) as the primary package manager. Follow the steps below:
1. Update the system package repository to make sure the latest version is installed:
2. Run the following commands to install telnet and the telnet server packages required for it to function properly:
sudo yum install telnet telnet-server -y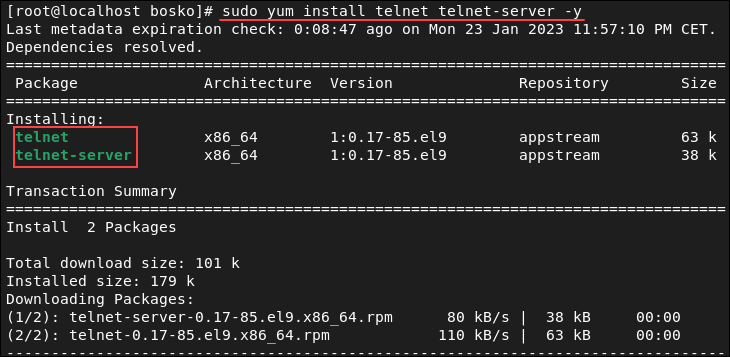
The command installs the two packages. The -y flag automatically answers Yes to any prompts during the installation.
3. After the installation completes, start and enable the telnet service by running:
systemctl start telnet.socket systemctl enable telnet.socket4. Allow the telnet port (the default port is 23) through the firewall on the remote machine. Run the following command:
sudo firewall-cmd --permanent --add-port=23/tcp5. Reload the firewall to apply the changes:

The telnet port is now allowed through the firewall.
Ubuntu and Debian-Based Distributions
Ubuntu and other Debian-based distributions use the apt package manager by default. Follow the steps below to install telnet :
1. Update the system package repository:
2. Run the following command to install telnet :
sudo apt install telnetd -y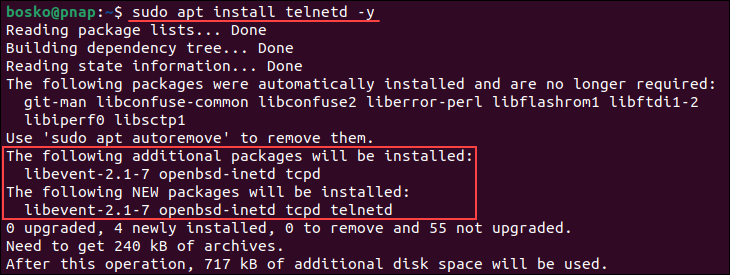
Wait for the installation to complete. The service should start automatically.
3. Check if telnet is properly installed by running:
sudo systemctl status inetd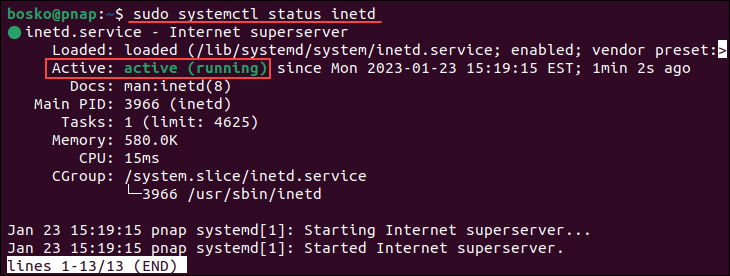
The output shows that the daemon is up and running.
4. Allow port 23 through the firewall on the remote machine by running:

The telnet port is now allowed through the firewall.
Note: The command above is for the ufw firewall. If you are using a different firewall, follow the instructions for that specific program.
How to Use telnet in Linux
A vital prerequisite for using telnet is to have it installed on both the local and remote machine, and that the default port 23 is allowed through the firewall on the remote machine.
The syntax for the telnet command is:
telnet [options] [remote_server_address] [port]The [options] and [port] parameters are optional. For [remote_server_address] , telnet accepts symbolic and numeric addresses.
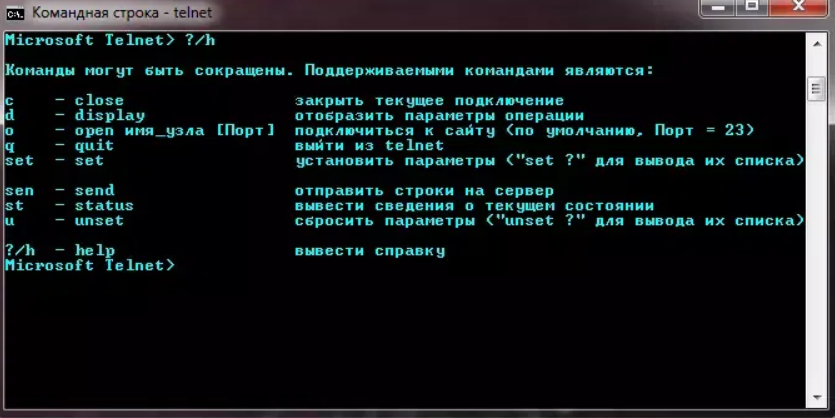
Running the command without options or without specifying an address opens the telnet interactive mode:
![]()
Use the interactive shell to connect to remote servers, print the connection status, etc.
To end a session and exit telnet , run:
The sections below provide practical telnet use case examples.
Check for Open Ports
Although it is not a secure option for establishing a remote connection, telnet is a great way to check if a specific port is open on a server. Check if a certain port is answering any calls by specifying the port number in the command. Doing so allows you to see what’s going on in a network and if a port is responsive or not.
1. Use the following syntax:
telnet [server_address] [port]2. Not specifying a port number defaults to port 23. For example, to check if port 22 is open on a server, run:

The connection breaks, which means that the specified port is not open.
3. However, trying port 80 yields a different result:

The output shows that the port is open since the connection was established.
Download Web Page to File
telnet allows users to connect to port 80 of a website and download the HTML source code to the terminal. This allows you to save and inspect the source code, check it for errors, etc.
1. For example, the following command connects to port 80 on google.com:
2. After establishing the connection, download the HTML web page by running:

The screenshot above shows that the command has downloaded the homepage source code.
3. Save the code to a file or inspect it in the terminal.
Test SMTP Communication
Another useful feature of telnet is that it allows users to test the SMTP port by sending emails directly from the command line. To do so, you need an email server that doesn’t require authentication. It is a great way to troubleshoot problems in an email client.
Note: Want to send and read email using the CLI? See how to use the Linux mail command.
Follow the steps below to send an email using telnet :
1. Connect to the server via the SMTP port:
telnet [server_address] [port]For [server_address] , specify the SMTP server address. For example, for Gmail it is smtp.gmail.com, while the SMTP [port] can be 25, 465, 587, etc., depending on the provider.
Important: Since May 2022, Google has prohibited access to Google accounts for less secure apps and won’t accept connections from telnet .
2. Greet the server with HELO or EHLO :
5. Specify the subject and email body, separated by a blank line:
SUBJECT: This is the email subject. "" This is the email body.Note: Most mail servers flag unsolicited anonymous mail, which means that it will likely end up in the spam folder.
Connect to Remote System
If you decide to use telnet for remote connections despite its lack of security, do it by specifying the remote machine’s IP address.
Make sure that telnet is installed on both machines and port 23 is allowed through the firewall on the remote machine.
When prompted, enter the account username and password to log in to the system. After logging in, you can operate the other machine remotely.
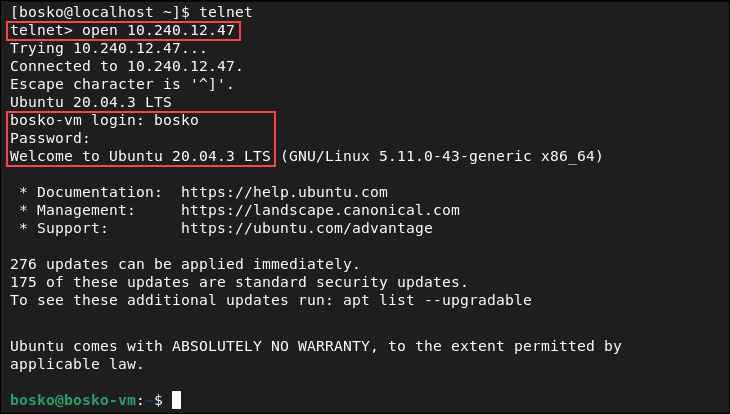
After the connection is established, you are in control of the remote machine.
This tutorial showed how to use the telnet command in Linux. Although it has poor security features and isn’t recommended for remote connections, the command has other uses that make it beneficial.
Next, see how SSH works and why it is more secure than telnet .
Как пользоваться telnet

Соединение с удаленным портом и установление интерактивного канала связи для передачи команд или получения данных – все это возможно при помощи утилиты telnet. Иногда ее называют универсальным браузером для терминала, потому что программа способна работать с различными протоколами.
Что такое telnet?
Протокол telnet, созданный на основе TCP, позволяет передавать на удаленный сервер простые текстовые команды для ручного управления процессами и включения взаимодействия между ними. Несмотря на повальный переход на SSH, утилита продолжает повсеместно использоваться.
Под хостом подразумевается удаленный компьютер (домен или IP-адрес), порт – тот порт, через который осуществляется подключение. Перечень опций следующий:
- -4 – вручную включить поддержку стандарта IPv4;
- -6 – то же самое относительно IPv6;
- -8 – применять 8-битную кодировку вроде Unicode;
- -E – отключить поддержку Escape-последовательностей;
- -a – автоматическое подключение под логином из переменного окружения USER;
- -b – использовать локальный сокет;
- -d – активировать режим отладки;
- -p – включить эмуляцию rlogin;
- -l – указание пользователя авторизации.
Перечисленные опции предназначены для подключения к удаленному серверу. Но это лишь начало, далее следует ввод команд для управления процессами. Здесь возможно включение двух различных режимов:
- построчный – сначала строка полностью вводится в терминал на локальном компьютере и только затем целиком отправляется на сервер;
- посимвольный – отправка осуществляется посимвольно, в этом случае критичны любые ошибки ввода, потому что даже Backspace передается в виде определенной комбинации из символов.
Стандартные команды консоли telnet
- CLOSE – отключиться от удаленного сервера;
- ENCRYPT – включить шифрование информации;
- LOGOUT – выйти из программы с закрытием соединения;
- MODE – переключение режима со строчного на символьный или наоборот;
- STATUS – отобразить текущий статус соединения;
- SEND – отправить один из специальных символов telnet;
- SET – установить значение параметра;
- OPEN – открыть соединение с удаленным сервером;
- DISPLAY – отобразить применяемые спецсимволы;
- SLC – изменить используемые спецсимволы.
Это основной перечень команд, более подробно о них написано в официальной документации разработчика программы.
Как установить telnet
Теперь проведем несколько тренировочных подключений, чтобы на практике разобраться в работе утилиты. Но предварительно ее требуется инсталлировать на компьютер (на примере Ubuntu). Для этого используется команда:
По завершении процедуры можно приступать к запуску и использованию.
Проверка доступности сервера
Первая и самая важная команда – это проверка доступности сервера, к которому осуществляется подключение. Она позволяет подтвердить установление соединения. Выглядит она так:
Фактически это аналог PING, поэтому она вводится только при использовании telnet, чтобы перед инициацией других процессов убедиться в том, что сервер воспринимает команды.
Проверка доступности порта
То же относится к режиму проверки порта на удаленном сервере. Это осуществляется командами:
$ telnet localhost 123 $ telnet localhost 22
Первая строка в приведенном примере выдает ответ, что на соединение никто не отвечает. Вторая же инициирует ответ, что доступно соединение по протоколу SSH.
Отладка
Режим отладки востребован в ситуациях, когда пользователю важно видеть подробности работы утилиты (в окне консоли). Для этого команда запуска вводится с префиксом -d:
$ sudo telnet -d localhost 22
Консоль telnet
Встречаются ситуации, когда необходимо передать команды в утилиту telnet, запущенную именно на сервере, а не на локальном компьютере пользователя. В этом случае требуется открыть консоль, для чего используется спецсимвол. По умолчанию это «^[«.
Чтобы ввести его, достаточно нажать комбинацию клавиш . После этого на экране будет отображаться приглашение ввода telnet. Сначала рекомендуется посмотреть текущий перечень доступных команд, он отображается после ввода команды . Также на этом этапе есть возможность посмотреть статус подключения:
По желанию можно опробовать другие команды, доступные для ввода в текущей сессии.
Тестирование сайта
Распространенный вариант применения telnet заключается в подключении к определенному сайту через консоль. Страницы отображаются не в привычном «красивом» виде, а списком информации, которая передается с сервера или на него. Пример команды:
После подключения достаточно ввести команду /GET, и веб-сервер вернет страницу и заголовки, которые при обычном подключении передаются в браузер.
Подключение к удаленному серверу
Отказ от telnet чаще связывается с тем, что передаваемые команды легко «подслушать» извне. В этом случае появляются риски несанкционированного подключения. Но опробовать такой режим вполне допускается в качестве изучения матчасти. Пример команды:
Порт по умолчанию – 23, поэтому команду легко «упростить» и убрать номер. Подключение все равно будет производиться по тому же принципу. После запроса остается ввести логин и пароль доступа, после чего приступать к управлению удаленным компьютером.