- Как определить тип файла файла с помощью Linux
- Найдите тип файла любого файла или группы файлов с помощью команды FILE
- Как работает команда File
- Как использовать команду «Файл»
- Настройте вывод из команды File
- Обработка нескольких файлов
- Сжатые файлы
- Linux File Command: How to Determine File Type in Linux
- File Command Syntax
- File Command Options
- File Command Examples
- Test Multiple Files
- Test All Files in a Directory
- Test Files in a Range
- Test Files from a List
- Test Special Files
- Test Compressed Files
- Test Parsed Version of File
- Display Brief Output
- Add Separators to Output
- Remove File Name Padding from Output
Как определить тип файла файла с помощью Linux
Найдите тип файла любого файла или группы файлов с помощью команды FILE
Большинство людей смотрят на расширение файла, а затем угадывают тип файла с этим расширением. Например, когда вы видите файл с расширением gif, jpg, bmp или png, вы думаете о файле изображения, а когда вы видите файл с расширением zip, вы предполагаете, что файл был сжат с помощью утилиты сжатия zip ,
В действительности, файл может иметь одно расширение, но быть чем-то совершенно другим. В Linux вы узнаете истинный тип файла с помощью команды file .
Как работает команда File
Команда file выполняет три набора тестов для файла:
Первый набор тестов для возврата правильного ответа приводит к печати типа файла.
Тесты файловой системы проверяют отдачу от системного вызова stat. Программа проверяет, является ли файл пустым и является ли он специальным файлом. Если тип файла найден в системном заголовочном файле, он возвращается как допустимый тип файла.
Магические тесты проверяют содержимое файла и, в частности, несколько байтов в начале, которые помогают определить тип файла. Различные файлы используются, чтобы помочь сопоставить файл с его типом файла, и они хранятся в:
/etc/magic
/usr/share/misc/magic.mgc
/usr/share/misc/magic
Переопределите эти файлы, поместив файл в вашу домашнюю папку с именем $ HOME/.magic.mgc или $ HOME/.magic.
Финальные тесты – языковые тесты. Файл проверяется, чтобы увидеть, является ли он текстовым файлом. Тестируя первые несколько байтов файла, тест может определить, является ли файл ASCII, UTF-8, UTF-16 или другим форматом, который идентифицирует файл как текстовый файл. Когда выводится набор символов, файл проверяется на разных языках.
Если ни один из тестов не работает, выводом являются данные.
Как использовать команду «Файл»
Команда file может быть использована следующим образом:
Например, представьте, что у вас есть файл с именем file1, и вы запускаете следующую команду:
file1: данные изображения PNG, 640 x 341, 8-битный/цветной RGB, без чересстрочной развертки
Выходные данные определяют, что file1 – это файл изображения или, точнее, файл переносимой сетевой графики (PNG).
Различные типы файлов дают разные результаты:
- Тип файла ODS : электронная таблица OpenDocument
- Тип файла PDF : документ PDF, версия 1.4
- Тип файла CSV : текст ASCII, с очень длинными строками, с индикаторами строк CRLF
Настройте вывод из команды File
По умолчанию команда file предоставляет имя файла и все детали над файлом. Если вы хотите, чтобы только детали без имени файла повторялись, используйте следующий переключатель:
Данные изображения PNG, 640 x 341, 8-битный/цветной RGB, без чередования
Вы также можете изменить разделитель между именем файла и типом. По умолчанию в качестве разделителя используется двоеточие, но вы можете изменить его на что угодно, например на символ канала, следующим образом:
file1 | Данные изображения PNG, 640 x 341, 8-битный/цветной RGB, без чередования
Обработка нескольких файлов
По умолчанию вы используете команду file для одного файла. Однако вы можете указать имя файла, которое содержит список файлов, которые будут обработаны командой file.
Например, откройте файл с именем testfiles с помощью редактора nano и добавьте в него следующие строки:
Сохраните файл и выполните следующую команду:
Результат будет примерно таким:
Сжатые файлы
По умолчанию, когда вы запускаете команду file для сжатого файла, вы видите что-то вроде этого:
file.zip: данные архива ZIP, по крайней мере V2.0 для извлечения
Хотя это говорит о том, что файл является архивом, вы не знаете его содержимого. Вы можете заглянуть внутрь zip-файла, чтобы увидеть типы файлов в сжатом файле. Следующая команда запускает команду file для файлов внутри ZIP-файла:
Вывод теперь показывает типы файлов файлов в архиве.
Большинство людей используют команду file, чтобы найти основной тип файла.Чтобы узнать больше о возможностях, которые предлагает команда file, введите в окне терминала следующее:
Эта команда открывает документацию по программному обеспечению Linux, включенную в систему.
Linux File Command: How to Determine File Type in Linux
The Linux file command helps determine the type of a file and its data. The command doesn’t take the file extension into account, and instead runs a series of tests to discover the type of file data.
In this tutorial, we will show you how the file command works and how to use it.
File Command Syntax
The file command uses the following basic syntax:
In the syntax above, file name represents the name of the file you want to test. The file command performs three sets of tests trying to determine the file type, in this order:
- Filesystem tests perform a stat(2) system call and check the result against the system header file. This way, the file command determines if the file is a common type for your system (such as a text file, image, directory, etc.).
- Magic tests use a short string of numbers stored near the beginning of the file («magic number») to test if the file is a binary executable and, if so, determine its type. The information needed to perform these tests is stored in /etc/magic or /usr/share/misc/magic from a compiled magic file.
- Language tests use a special tag to determine which programming language a binary executable file is written in.
The command output provides a short description of the file and data type. For instance, using the file command to test a text file:

File Command Options
The file command uses the following options:
| Option | Description |
|---|---|
| —apple | Changes the command output to the one used by older versions of MacOS. |
| -b, —brief | Changes command output to brief mode. |
| -C, —compile | Creates an output file that contains a pre-parsed version of the magic file or directory. |
| -c, —checking-printout | Checks the printout for the parsed version of the magic file. |
| -d | Prints internal debugging information in the standard error format. |
| -E | On filesystem error, issues an error message and exits. |
| -e, —exclude | Excludes a test from the list of tests performed on a file. |
| —exclude-quiet | Excludes tests that the file command doesn’t know about. |
| —extension | Prints a list of valid extensions for the file type. |
| -F, —separator | Uses the provided string as a separator between the file name and file type. |
| -f, —files-from | Uses a provided text file as a list of files to test. The list must contain only one file name per line. |
| -h, —no-deference | Disables following symbolic links. |
| -i, —mime | Changes the command output to a MIME-type string. |
| —mime-type, —mime-encoding | Changes the command output to a MIME-type string and only displays the specified element (type or encoding). |
| -k, —keep-going | Keeps the test going after the first results match. |
| -l, —list | Shows a list of matching patterns in descending order of strength. |
| -L, —deference | Enables following symbolic links. |
| -m, —magic-file | Uses an alternative magic file provided by the user. |
| -N, —no-pad | Doesn’t pad the file names to align with the output. |
| -n, —no-buffer | Flushes the output after checking each file. |
| -p, —preserve-date | Attempts to preserve the last time the file was accessed to make it look like the file command didn’t test it. |
| -P, —parameter | Sets various parameters, such as max bytes or recursion, count, and length limit. |
| -r, —raw | Disables translating unprintable characters. |
| -s, —special-files | Enables reading special files. |
| -S, —no-sandbox | Disables sandboxing on systems that support it. |
| -v, —version | Displays the version of the file command. |
| -z, —uncompress | Checks compressed files. |
| -Z, —uncompress-noreport | Checks compressed files and only displays file type without the compression. |
| -0, —print0 | Displays a null character after the end of the file name. |
| —help | Displays the help message. |
File Command Examples
Below are examples of common use cases for the file command.
Test Multiple Files
To test multiple files simultaneously, append the file names to the end of the file command:
file [file name 1] [file name 2] … [file name n]For instance, testing a directory, a text file, an image, and a webpage:
file Example example.txt sample.png index.html
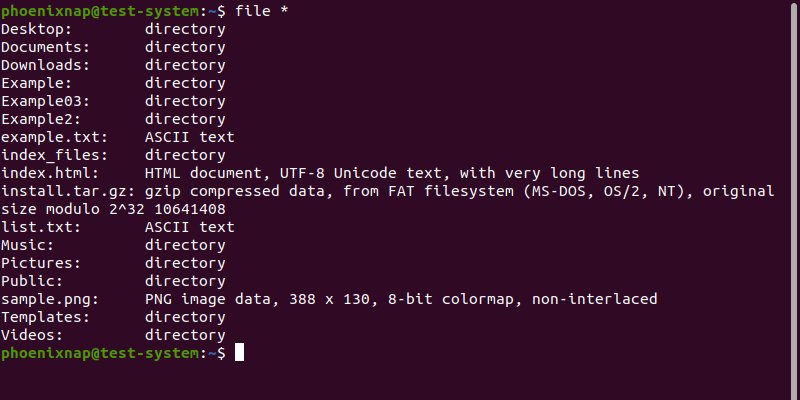
Test All Files in a Directory
Add a wildcard character ( * ) to the file command to test all the files and directories in the current working directory:
Add the path to a directory to the wildcard character to test the contents of that directory:
For instance, to test the contents of the Example directory, use:

Test Files in a Range
The file command lets you test a subset of files in a directory using Regex-style ranges. Select a range by placing the values in brackets. For instance, testing files and directories with names in the a-l range:
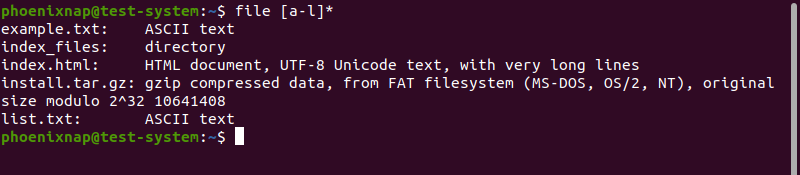
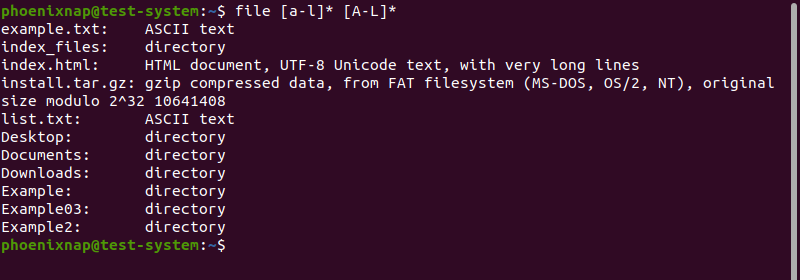
Since Regex-style ranges are case-sensitive, the output in the example above only shows file types for files starting with lowercase a-l. Adding another range lets you include uppercase characters as well:
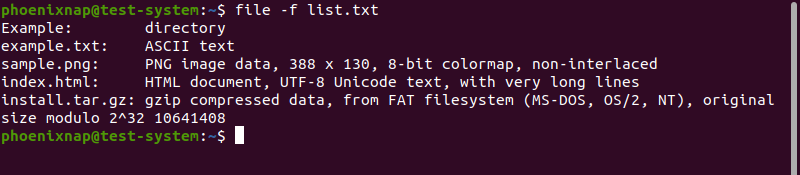
Test Files from a List
The file command lets you use a text file as a list of files to test. The text file must only contain one file name per line.

Use the -f option and add the path to the list file to file command:
Test Special Files
The file command is not always able to read special files, such as system files:

In the example above, the file command output shows that /dev/sda5 is a block special file but doesn’t offer additional details. Using the -s option lets you fully test special files:

Note: If you are not logged in as the root user, attempting to test a special file results in a no read permission error message. Add sudo to the file command to prevent this.
Test Compressed Files
Use the -z option to fully test compressed files, trying to detect their content:

Test Parsed Version of File
Using the -c option displays the check printout for the parsed version of the file:

This option is usually used with the -m option to debug and install a new magic file.
Display Brief Output
Using the -b option displays the brief version of the output. This version of the output only shows file types and omits file names.
file -b Example example.txt sample.png index.html
Add Separators to Output
Using the -F option lets you define a character that acts as a separator between the file name and file type sections of the output. For instance, add a plus sign ( + ) as a separator with:
file -F + Example example.txt sample.png index.html
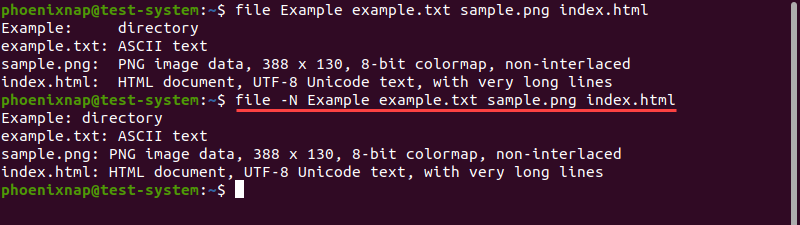
Remove File Name Padding from Output
Use the -N option to remove the padding between the file name and file type sections of the output:
file -N Example example.txt sample.png index.htmlThe resulting output is no longer vertically aligned:
After reading this tutorial, you should be able to use the Linux file command to find out the types of files on your system.
If you’re interested in learning more about Linux commands, have a look at our Linux commands cheat sheet.