Топ — 20 полезных команд CentOS
![]()
Сегодняшняя статья целиком посвящена новичкам, которые только делают первые шаги на этапе знакомства с операционной системой CentOS. В статье мы собрали топ – 20 команд, которые будут полезны в повседневной работе, управлении сервером и в базовом «траблшутинге».
Команды
- Для подключения к серверу, воспользуйтесь любым SSH – клиентом (например, putty). В консоли клиента необходимо указать IP – адрес и выбрать чекбокс SSH
- Для подключения на пользователя root, воспользуйтесь командой su —
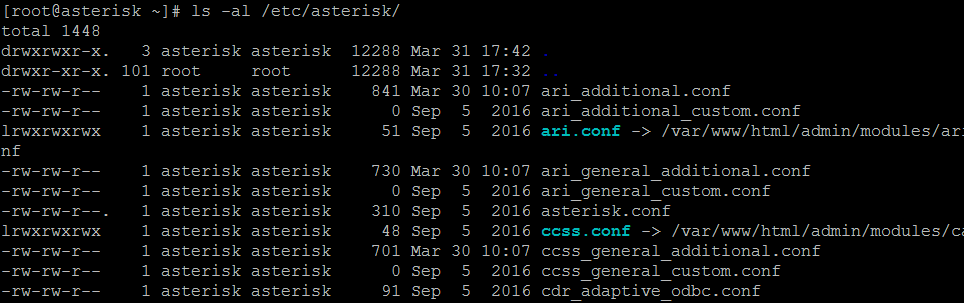
- Чтобы посмотреть содержимое директории, воспользуйтесь командой ls -al . Например, чтобы посмотреть все содержимое в директории IP – АТС Asterisk, дайте команду ls -al /etc/asterisk/
- Если вы хотите перейти в другую директорию (папку), воспользуйтесь командой cd (change directory). Как пример cd /etc/asterisk/
- Для удаления файлов, пользуйтесь командой rm . Например, команда rm –rf /var/spool/asterisk/monitor/2017/03/09/in-74996491913-79851234567-20170309-124606-1489052766.5.wav удалит входящий аудио – запись входящего звонка на номер 74996491913 с мобильного телефона 79851234567 от 09 марта 2017 года. Будьте аккуратны с этой командой 🙂
- Для просмотра или редактирования воспользуйтесь графическим редактором vim . Как пример vim /etc/asterisk/extensions_custom.conf
- Для начала редактирования файла нажмите O
- Сохранения нажмите Esc и :x!
- Для копирования файлов существует команда cp (copy). Как пример cp /etc/asterisk/extensions_custom.conf /home/admin/ . Тем самым, в директорию /home/admin будет добавлен файл extensions_custom.conf.
- Чтобы сменить владельца файла, воспользуйтесь chown (change owner). Чтобы сменить владельца всех файлов в директории /etc/asterisk на пользователя asterisk дайте команду chown –R asterisk:asterisk /etc/asterisk
- Чтобы дать определенные права файлу существует команда chmod . Например, дадим максимальные права файлу /etc/asterisk/extensions_custom.conf командой chmod 777 /etc/asterisk/extensions_custom.conf .
miranda-zhang / linux.md
Ctrl + C is used to kill a process with signal SIGINT , in other words it is a polite kill .
Ctrl + Z is used to suspend a process by sending it the signal SIGTSTP , which is like a sleep signal, that can be undone and the process can be resumed again.
Ctrl+D: log out of current session, similar to exit.
history | grep «command looking for»
- Ctrl+R – type to bring up a recent command
- !! — repeats the last command
- exit – log out of current session
- fg in the foreground or bg in the background
- Ctrl+W – erases one word in the current line
- Ctrl+U – erases the whole line
sudo groupadd ic-api sudo usermod -g ic-api ic-api grep pattern dir — Search for pattern in dir.
-l (or —files-with-matches ) option is used to only print filenames of matching files, and not the matching lines (this could also improve the speed, given that grep stop reading a file at first match with this option).
—include search only files that match the file pattern
grep -ril --include \*.py --include \*.html ".id" grep 'pattern1\|pattern2' filename grep -E 'pattern1|pattern2' filename Find all instances of file
- cal – show this month’s calendar
- uptime – show current uptime
- w – display who is online
- whoami – who you are logged in as
- finger user – display information about user
- htop — a lightweight text-mode process viewer packed with handy features such as killing processes without entering their PID, displaying full command lines, etc with a colour display
Show number of cores only
grep -c ^processor /proc/cpuinfo Show memory and swap usage, show output in gigabytes.
Show the current date and time, in the format of: date+»T»+hour+minute+second+UTC time zone offset
$ date +"%FT%H%M%S%z" 2019-02-19T104943+1100 show disk usage with human readable unit.
show directory space usage, only one level deep.
One line command to just grep the ip:
ip a | grep "scope global" | grep -Po '(? For older version of centOS:
ifconfig | grep "inet " | grep -v 127.0.0.1 | awk ''
netstat - Print network connections, routing tables, interface statistics, masquerade connections, and multicast memberships
-a, --all Show both listening and non-listening (for TCP this means established connections) sockets. With the --interfaces option, show interfaces that are not up
--numeric , -n Show numerical addresses instead of trying to determine symbolic host, port or user names.
-p, --program Show the PID and name of the program to which each socket belongs.
CentOS 7 netstat, which is part of the package net-tools has been officially deprecated, so you should be using ss (part of the package iproute2 ), going forward.
-l, --listening Display only listening sockets (omitted by default).
-n, --numeric Do not try to resolve service names.
-p, --processes Show process using socket.
-t, --tcp Display TCP sockets.
journalctl -u nginx.service --since today
Prints the names and values of all currently defined environment variables
Examine the value of a particular variable
The dollar sign $ can actually be used to combine the values of environment variables in many shell commands. For example, the following command can be used to list the contents of the "Desktop" directory within the current user's home directory.
System wide environment variables
sudo -H nano /etc/environment
It's important to do exact the way above, and not as the root user, as it may cause problems like unable to login. If you use normal sudo to start graphical applications (including editors e.g. gedit), sometimes it results in the configuration files being owned by root, read more about it here.
The only time the file is read is on login, when the PAM stack is activated – specifically pam_env.so, which reads the file.
Logging out and back in would apply the changes – and in fact you must do this if you want all your processes to receive the new environment. All other solutions will only apply the environment to the single shell process, but not to anything you launch through the GUI including new terminal windows.
show which app will be run by default
show the manual for command
- cd dir - change directory to dir
- cd – change to home
- pwd – show current directory
- mkdir dir – create a directory dir
- rm file – delete file
- rm -r dir – delete directory dir
- rm -f file – force remove file
- rm -rf dir – force remove directory dir *
- cp file1 file2 – copy file1 to file2
- cp -r dir1 dir2 – copy dir1 to dir2; create dir2 if it doesn't exist
- mv file1 file2 – rename or move file1 to file2 if file2 is an existing directory, moves file1 into directory file2
- touch file – create or update file
- cat > file – places standard input into file
- more file – output the contents of file
- head file – output the first 10 lines of file
- tail file – output the last 10 lines of file
- tail -f file – output the contents of file as it grows, starting with the last 10 lines
show hidden files with -a , show details with -l
Determine file type, i.e. check if somthing is a symbolic link.
Counting Files in the Current Directory
This uses wc to do a count of the number of lines (-l) in the output of ls -1. http://tldp.org/HOWTO/Bash-Prompt-HOWTO/x700.html
- chmod octal file – change the permissions of file to octal, which can be found separately for user, group, and world by adding:
- 4 – read (r)
- 2 – write (w)
- 1 – execute (x)
- chmod 777 – read, write, execute for all
- chmod 755 – rwx for owner, rx for group and world
- tar cf file.tar files – create a tar named file.tar containing files
- tar xf file.tar – extract the files from file.tar
- tar czf file.tar.gz files – create a tar with Gzip compression
- tar xzf file.tar.gz – extract a tar using Gzip
- tar cjf file.tar.bz2 – create a tar with Bzip2 compression
- tar xjf file.tar.bz2 – extract a tar using Bzip2
- gzip file – compresses file and renames it to file.gz
- gzip -d file.gz – decompresses file.gz back to file
- top – display all running processes
- kill pid – kill process id pid
- killall proc – kill all processes named proc *
- bg – lists stopped or background jobs; resume a stopped job in the background
- fg – brings the most recent job to foreground
- fg n – brings job n to the foreground
Display your currently active processes
Show full command including arguments.
- ping host – ping host and output results
- whois domain – get whois information for domain
- dig domain – get DNS information for domain
- dig -x host – reverse lookup host
- wget file – download file
- wget -c file – continue a stopped download
Ubuntu apt update apt upgrade apt install pkg
Node.js, Javascript package manager
grep "denied" /var/log/audit/audit.log
Graph with gnuplot interactively:
apt update apt install gnuplot-x11 gnuplot
# SET TERMINAL set term gif set output 'frequency.gif' # set title "Word Frequency" # Axes label # set xlabel "Words" # set ylabel "Frequency" set xtics rotate by -90 plot "frequency.dat" using 1:xticlabels(2) with boxes
Create symbolic link link to file
Without -s , then create hard link.