- Support
- Interface Port Labels
- Viewing the Default Configuration
- Information Needed for Configuration
- Configuring Basic Parameters
- Configure Global Parameters
- Configure Fast Ethernet LAN Interfaces
- Configure WAN Interfaces
- Configure the Fast Ethernet WAN Interface
- Базовая конфигурация маршрутизатора
- Пример базовой настройки маршрутизатора
- Настройка интерфейсов маршрутизатора
- Пример настройки интерфейсов на маршрутизаторе
- Проверка настроек портов
Support
This chapter provides procedures for configuring the basic parameters of your Cisco router, including global parameter settings, routing protocols, interfaces, and command-line access. It also describes the default configuration on startup.
Note Individual router models may not support every feature described throughout this guide. Features not supported by a particular router are indicated whenever possible.
This chapter contains the following sections:
•Interface Port Labels
•Viewing the Default Configuration
•Information Needed for Configuration
•Configuring Basic Parameters
•Configuring Static Routes
•Configuring Dynamic Routes
•Configuring Enhanced IGRP
Each section includes a configuration example and verification steps, as available.
For complete information on how to access global configuration mode, see the «Entering Global Configuration Mode» section in Appendix A, «Cisco IOS Basic Skills.» For more information on the commands used in the following tables, see the Cisco IOS Release 12.3 documentation set.
Interface Port Labels
Table 1-1 lists the interfaces supported for each router and their associated port labels on the equipment.
Viewing the Default Configuration
When you first boot up your Cisco router, some basic configuration has already been performed. All of the LAN and WAN interfaces have been created, console and VTY ports are configured, and the inside interface for Network Address Translation has been assigned. Use the show running-config command to view the initial configuration, as shown in Example 1-1.
Example 1-1 Cisco 851 Default Configuration on Startup
Router# show running-config Current configuration : 1090 bytes
service timestamps debug datetime msec
service timestamps log datetime msec
no service password-encryption
speed basic-1.0 basic-2.0 basic-5.5 6.0 9.0 basic-11.0 12.0 18.0 24.0 36.0 48.0
Information Needed for Configuration
You need to gather some or all of the following information, depending on your planned network scenario, prior to configuring your network
•If you are setting up an Internet connection, gather the following information:
– Point-to-Point Protocol (PPP) client name that is assigned as your login name
–PPP authentication type: Challenge Handshake Authentication Protocol (CHAP) or Password Authentication Protocol (PAP)
–PPP password to access your Internet service provider (ISP) account
–DNS server IP address and default gateways
•If you are setting up a connection to a corporate network, you and the network administrator must generate and share the following information for the WAN interfaces of the routers:
–PPP authentication type: CHAP or PAP
–PPP client name to access the router
–PPP password to access the router
•If you are setting up IP routing:
–Generate the addressing scheme for your IP network.
–Determine the IP routing parameter information, including IP address, and ATM permanent virtual circuits (PVCs). These PVC parameters are typically virtual path identifier (VPI), virtual circuit identifier (VCI), and traffic shaping parameters.
–Determine the number of PVCs that your service provider has given you, along with their VPIs and VCIs.
–For each PVC determine the type of AAL5 encapsulation supported. It can be one of the following:
AAL5SNAP—This can be either routed RFC 1483 or bridged RFC 1483. For routed RFC 1483, the service provider must provide you with a static IP address. For bridged RFC 1483, you may use DHCP to obtain your IP address, or you may obtain a static IP address from your service provider.
AAL5MUX PPP—With this type of encapsulation, you need to determine the PPP-related configuration items.
•If you plan to connect over an ADSL or G.SHDSL line:
–Order the appropriate line from your public telephone service provider.
For ADSL lines—Ensure that the ADSL signaling type is DMT (also called ANSI T1.413) or DMT Issue 2.
For G.SHDSL lines—Verify that the G.SHDSL line conforms to the ITU G.991.2 standard and supports Annex A (North America) or Annex B (Europe).
Once you have collected the appropriate information, you can perform a full configuration on your router, beginning with the tasks in the «Configuring Basic Parameters» section.
Configuring Basic Parameters
To configure the router, perform one or more of these tasks:
•Configure Global Parameters
•Configure Fast Ethernet LAN Interfaces
•Configure WAN Interfaces
•Configuring a Loopback Interface
•Configuring Command-Line Access to the Router
A configuration example is presented with each task to show the network configuration following completion of that task.
Configure Global Parameters
Perform these steps to configure selected global parameters for your router:
For complete information on the global parameter commands, see the Cisco IOS Release 12.3 documentation set.
Configure Fast Ethernet LAN Interfaces
The Fast Ethernet LAN interfaces on your router are automatically configured as part of the default VLAN and as such, they are not configured with individual addresses. Access is afforded through the VLAN. You may assign the interfaces to other VLANs if desired. For more information about creating VLANs, see Chapter 5 «Configuring a LAN with DHCP and VLANs.»
Configure WAN Interfaces
The Cisco 851 and Cisco 871 routers each have one Fast Ethernet interface for WAN connection. The Cisco 857, Cisco 877, and Cisco 878 routers each have one ATM interface for WAN connection.
Based on the router model you have, configure the WAN interface(s) using one of the following procedures:
•Configure the Fast Ethernet WAN Interface
•Configure the ATM WAN Interface
Configure the Fast Ethernet WAN Interface
This procedure applies only to the Cisco 851 and Cisco 871 router models. Perform these steps to configure the Fast Ethernet interface, beginning in global configuration mode:
Router(config)# interface fastethernet 4 Базовая конфигурация маршрутизатора
![]()
Для начальной настройки маршрутизатора (здесь и далее в качестве примера взяты устройства компании Cisco) нужно выполнить следующие шаги в режиме конфигурации роутера, перейти к которому можно командой configure terminal :
1. Задаем название устройства
2. Задаем пароль для входа в привилегированный режим.
Router(config)# enable secret password
3. Задаем пароль на подключение через консоль.
Router(config)# line console 0 Router(config-line)# password password Router(config-line)# login
4. Задаем пароль для удаленного доступа по Telnet / SSH.
Router(config-line)# line vty 0 4 Router(config-line)# password password Router(config-line)# login Router(config-line)# transport input
5. Шифруем все пароли введенные на устройстве.
Router(config-line)# exit Router(config)# service password-encryption
6. Задаем баннер, который будет выводится при подключении к устройству. В данном баннере обычно указывается правовая информация о последствиях несанкционированного подключения
Router(config)# banner motd delimiter message delimiter
Router(config)# end Router# copy running-config startup-config
Пример базовой настройки маршрутизатора
В данном руководстве на маршрутизаторе R1 из топологии ниже будет сделана первичная конфигурация:
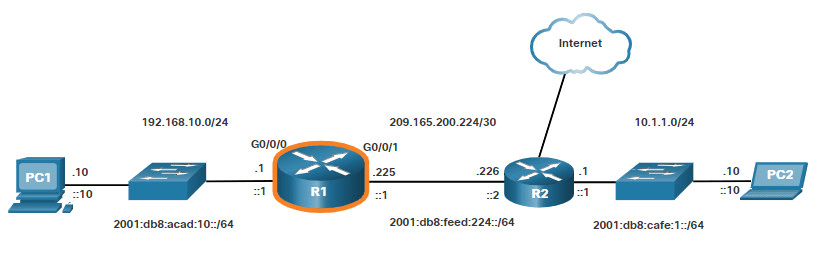
Чтобы настроить маршрутизатор вводим следующие команды:
Router> enable Router# configure terminal Enter configuration commands, one per line. End with CNTL/Z. Router(config)# hostname R1 R1(config)#
Все методы доступа к настройкам маршрутизатора должны быть защищены. Привилегированный режим EXEC дает пользователю полный доступ к устройству и его настройкам. Поэтому нужно надёжно защитить доступ к этому режиму.
Следующие команды позволяют защитить доступ к пользовательскому и привилегированному режимам EXEC, включает Telnet/SSH и шифрует все пароли в конфигурации.
R1(config)# enable secret class R1(config)# R1(config)# line console 0 R1(config-line)# password cisco R1(config-line)# login R1(config-line)# exit R1(config)# R1(config)# line vty 0 4 R1(config-line)# password cisco R1(config-line)# login R1(config-line)# transport input ssh telnet R1(config-line)# exit R1(config)# R1(config)# service password-encryption R1(config)#
Далее сконфигурируем баннер Message of the Day. Обычно такой баннер включает в себя юридическое уведомление предупреждающее пользователей о том, что доступ к устройству разрешен только авторизованным лицам. Данный тип баннера конфигурируется следующим образом:
R1(config)# banner motd # Enter TEXT message. End with a new line and the # *********************************************** WARNING: Unauthorized access is prohibited! *********************************************** # R1(config)#
Настройка интерфейсов маршрутизатора
На данный момент на нашем роутере выполнена первичная настройка. Так как без настроек интерфейсов роутеры не будут доступны для других устройств, далее сконфигурируем его интерфейсы. На маршрутизаторах компании Cisco бывают разные интерфейсы. Например, маршрутизатор Cisco ISR 4321 оснащен двумя гигабитными интерфейсами.
Для настройки интерфейсов маршрутизатора нужно ввести следующие команды:
Router(config)# interface type-and-number Router(config-if)# description description-text Router(config-if)# ip address ipv4-address subnet-mask Router(config-if)# ipv6 address ipv6-address/prefix-length Router(config-if)# no shutdown
Как только порт включиться, на консоли выведется соответствующее сообщение.
Несмотря на то, что команда description не требуется для включения интерфейса, все же рекомендуется ее использовать. Это может быть полезно при устранении неполадок в производственных сетях, предоставляя информацию о типе подключенной сети. Например, если интерфейс подключается к поставщику услуг или провайдеру услуг, команда description будет полезна для ввода внешнего соединения и контактной информации. Длина текста description составляет 240 символов.
Команда no shutdown используется для включения интерфейса, это похоже на включение питания на интерфейсе. Также маршрутизатор следует подключить к другому устройству, чтобы установилась связь на физическом уровне.
Пример настройки интерфейсов на маршрутизаторе
В данном примере на маршрутизаторе R1 включим непосредственно подключенные порты.
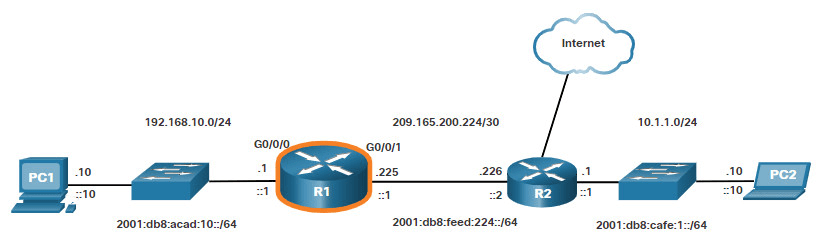
Для настройки портов на R1 введите следующие команды:
R1> enable R1# configure terminal Enter configuration commands, one per line. End with CNTL/Z. R1(config)# interface gigabitEthernet 0/0/0 R1(config-if)# description Link to LAN R1(config-if)# ip address 192.168.10.1 255.255.255.0 R1(config-if)# ipv6 address 2001:db8:acad:10::1/64 R1(config-if)# no shutdown R1(config-if)# exit R1(config)# *Aug 1 01:43:53.435: %LINK-3-UPDOWN: Interface GigabitEthernet0/0/0, changed state to down *Aug 1 01:43:56.447: %LINK-3-UPDOWN: Interface GigabitEthernet0/0/0, changed state to up *Aug 1 01:43:57.447: %LINEPROTO-5-UPDOWN: Line protocol on Interface GigabitEthernet0/0/0, changed state to up R1(config)# R1(config)# R1(config)# interface gigabitEthernet 0/0/1 R1(config-if)# description Link to R2 R1(config-if)# ip address 209.165.200.225 255.255.255.252 R1(config-if)# ipv6 address 2001:db8:feed:224::1/64 R1(config-if)# no shutdown R1(config-if)# exit R1(config)# *Aug 1 01:46:29.170: %LINK-3-UPDOWN: Interface GigabitEthernet0/0/1, changed state to down *Aug 1 01:46:32.171: %LINK-3-UPDOWN: Interface GigabitEthernet0/0/1, changed state to up *Aug 1 01:46:33.171: %LINEPROTO-5-UPDOWN: Line protocol on Interface GigabitEthernet0/0/1, changed state to up R1(config)#
Информационные сообщения говорят нам, что оба порта включены.
Проверка настроек портов
Для проверки настроек портов используются несколько команд. Самыми полезные из них это команды show ip interface brief и show ipv6 interface brief .
R1# show ip interface brief Interface IP-Address OK? Method Status Protocol GigabitEthernet0/0/0 192.168.10.1 YES manual up up GigabitEthernet0/0/1 209.165.200.225 YES manual up up Vlan1 unassigned YES unset administratively down down R1# show ipv6 interface brief GigabitEthernet0/0/0 [up/up] FE80::201:C9FF:FE89:4501 2001:DB8:ACAD:10::1 GigabitEthernet0/0/1 [up/up] FE80::201:C9FF:FE89:4502 2001:DB8:FEED:224::1 Vlan1 [administratively down/down] unassigned R1#