- Installing Komodo on Linux
- Software Prerequisites on Linux
- Adding Perl or Python to the PATH Environment Variable
- Installing the Komodo License on Linux
- Upgrading from Previous Komodo Versions
- Installing Komodo on Linux
- Starting Komodo on Linux
- Uninstalling Komodo on Linux
- Как установить Komodo Edit в Ubuntu 20.04 | 18.04
- Шаг 1. Загрузите Komodo Edit
- Шаг 2: Установите Komodo Edit
- Installing Komodo IDE and Komodo Edit on Ubuntu
- Installing Dependency Packages:
- Creating an ActiveState Account:
- Installing Komodo IDE:
- Installing Komodo Edit:
- About the author
- Shahriar Shovon
Installing Komodo on Linux
Komodo may also run on other Linux based systems, or older versions of the supported operating systems listed above. You will need to verify compatibility yourself, because Komodo is not tested on these other platforms, and platform-specific bugs may exist.
- Debian GNU/Linux 4.0 (“etch”)
- Mandriva
- FreeBSD (with Linux binary compatibility)
- Gentoo
Software Prerequisites on Linux
- GTK+ 2.24 (or higher)
- Glib 2.22 (or higher) — included in most standard Linux distributions.
- Pango 1.14 (or higher)
- X.Org 1.0 (or higher)
- Libstdc++6
- gdk-pixbuf (required on come platforms like Centos 6)
- Gnome libraries (libgnome, libgnomeui)
Non-ASCII Input Requirements (IME):
- SuSE: scim, scim-bridge-gtk and scim-bridge-qt packages.
- Ubuntu: scim, scim-gtk2-immodule, scim-qtimm, and scim-tables-additional packages (if not already installed).
- Fedora Core / RHEL / CentOS: scim, scim-gtk and scim-qtimm packages.
Adding Perl or Python to the PATH Environment Variable
To add Perl or Python to the PATH environment variable, do one of the following:
- Modify your PATH environment variable. For example, if you use the Bash shell, add the following line to your ~/.bashrc file, where installdir> points to the directory where you installed ActivePerl or ActivePython:
- Create a symbolic link to the Perl or Python executable, where installdir> points to the directory where you installed ActivePerl or ActivePython.
ln -s /bin/perl /usr/local/bin/perl ln -s /bin/python /usr/local/bin/python Installing the Komodo License on Linux
NOTE This only applies for Komodo 11.1.0 and lower. Version 11.1.1 and higher are integrated with the ActiveState Platform and do not use the license installer. For more information, see Komodo and the ActiveState Platform.
Komodo IDE comes with a 21-day trial license. To install a permanent license:
- Download the license installer from the My Account page.
- Change the permissions on the downloaded file to allow execution (e.g. chmod +x Komodo—.executable )
- Run the installer (e.g. ./Komodo__.executable ).
Upgrading from Previous Komodo Versions
Newer versions of Komodo should not be installed in the same directory as older versions. For major release upgrades (e.g. x.1 to x+1.0) the installer will automatically put Komodo in a new directory.
For minor releases (e.g. x.0 to x.1) and patch-level releases (x.1.1 to x.1.2), use the auto-update system (Help > Check for Updates). The changes will be applied safely in the current install directory. If you need to update using an installer, completely uninstall the older version before installing the new one, or manually specify a different install directory during the installation process. Your Komodo preferences will be preserved as they are installed in a different directory.
Installing Komodo on Linux
This version of Komodo allows non-root installation on Linux.
To install Komodo on Linux:
- Download the Komodo installer ( .tar.gz file) into a convenient directory.
- Unpack the tarball:
./install.sh -I ~/opt/Komodo-IDE-11 If multiple users are sharing the system and will be using the same installation, install Komodo in a location every user can access (e.g. /opt/Komodo-x.x/ or /usr/local/Komodo-x.x/ ).
- Each Komodo user requires their own license key.
- Do not install Komodo in a path that contains spaces or non-alphanumeric characters.
- Be sure to install Komodo into its own directory (i.e. not directly in an existing directory containing shared files and directories such as /usr/local ).
Once the installer has finished, add Komodo to your PATH with one of the following:
- Add Komodo/bin to your PATH directly:
ln -s /bin/komodo /usr/local/bin/komodo Note: Creating symlinks in system directories such as /usr/bin requires root access.
After completing the installation, you can delete the temporary directory where the Komodo tarball was unpacked.
Starting Komodo on Linux
To start Komodo on Linux enter komodo at the command line or create a shortcut on your desktop or in your toolbar using the full path to the komodo executable.
Uninstalling Komodo on Linux
To uninstall Komodo on Linux:
- Delete the directory that Komodo created during installation.
- If you wish to delete your Komodo preferences, delete the ~/.komodo directory. If you do not delete this directory, subsequent installations of Komodo will use the same preferences.
Note: You cannot relocate an existing Komodo installation to a new directory by simply moving it. You must uninstall Komodo from the existing location and reinstall it in the new location.
Documentation built with Hugo using the Material theme.
Как установить Komodo Edit в Ubuntu 20.04 | 18.04

Это краткое руководство показывает студентам и новым пользователям, как установить Komodo Edit в Ubuntu 20.04 | 18.04.
При поиске кроссплатформенного простого редактора кода (Python, Perl, Ruby, HTML / CSS, JavaScript и др.) Для программирования и веб-разработки вам, вероятно, следует взглянуть на Komodo Edit.
Этот простой, но мощный редактор кода для программистов обеспечивает базовые функции, такие как редактирование и написание базовых программных кодов. Это больше похоже на Notepad ++ на стероидах для систем Windows и других платформ.
Для более продвинутой версии Komodo вам необходимо приобрести Komodo IDE. Он обладает всеми возможностями, необходимыми для создания мощных программ.
Когда вы будете готовы к установке Komodo Edit, выполните следующие действия:
Шаг 1. Загрузите Komodo Edit
Чтобы вручную установить Komodo Edit, вам нужно перейти на его страницу загрузки и получить копию установщика. Страницу загрузки можно найти по ссылке ниже.
На странице скачайте правильный архив ( 32-битный или 64-битный ) для вашей системы. На момент написания последней версии была 12.0.1 .
Место загрузки по умолчанию в системах Ubuntu находится в папке / tmp вашего домашнего каталога.
cd /tmp wget https://downloads.activestate.com/Komodo/releases/12.0.1/Komodo-Edit-12.0.1-18441-linux-x86_64.tar.gz tar xzvf Komodo-Edit-*.tar.gz wget https://downloads.activestate.com/Komodo/releases/12.0.1/Komodo-Edit-12.0.1-18441-linux-x86.tar.gz
Шаг 2: Установите Komodo Edit
После загрузки и извлечения файла, как показано выше, перейдите во вновь извлеченную папку, затем выполните приведенные ниже команды, чтобы начать установку.
cd Komodo-Edit-12.0.1-18441-linux-x86_64 sudo ./install.sh -I /opt/KomodoEdit
Установка довольно проста. После момента установки вы должны получить сообщение, подобное приведенному ниже, что установка прошла успешно.
Komodo Edit 12 has been successfully installed to: /opt/KomodoEdit You might want to add 'komodo' to your PATH by adding the install dir to you PATH. Bash users can add the following to their ~/.bashrc file: export PATH="/opt/KomodoEdit/bin:$PATH" Or you could create a symbolic link to 'komodo', e.g.: ln -s "/opt/KomodoEdit/bin/komodo" /usr/local/bin/komodo Documentation is available in Komodo or on the web here: http://docs.activestate.com/komodo Please send us any feedback you have through one of the channels below: komodo-feedback@activestate.com irc://irc.mozilla.org/komodo https://github.com/Komodo/KomodoEdit/issues Thank you for using Komodo. ==============================================================================
После завершения процесса установки добавьте «komodo» в переменную PATH.
Сначала откройте файл .bashrc в текстовом редакторе:
Затем скопируйте и вставьте строку в файл, затем сохраните ее.
export PATH="/opt/KomodoEdit/bin:$PATH"
Наконец, выполните приведенные ниже команды, чтобы применить конфигурацию.
Вы также можете выполнить эту команду:
sudo ln -s "/opt/KomodoEdit/bin/komodo" /usr/local/bin/komodo
После этого перейдите в Действия Ubuntu ==> Komodo Edit
Когда вы откроете Komodo Edit в первый раз, вам будет предложено настроить его. Я бы принял значение по умолчанию и продолжил.
После настройки начните пользоваться Komodo Edit.
В этом посте показано, как установить Komodo Edit в Ubuntu 20.04 | 18.04.
Installing Komodo IDE and Komodo Edit on Ubuntu
![]()
Komodo IDE is from ActiveState, the company behind ActiveState Perl, Python, Ruby distribution. Komodo IDE supports many programming languages and libraries.
If you’re looking for a simple IDE for programming, you should give Komodo IDE a try.
Komodo IDE is not free. But you can buy it from ActiveState. If you like Komodo IDE but you don’t want to pay for it, then you can use Komodo Edit. Komodo Edit is also from ActiveState, but it’s open source and free. Komodo Edit has many features of Komodo Edit.
In this article, I am going to show you how to install Komodo IDE and Komodo Edit on Ubuntu. So, let’s get started.
Installing Dependency Packages:
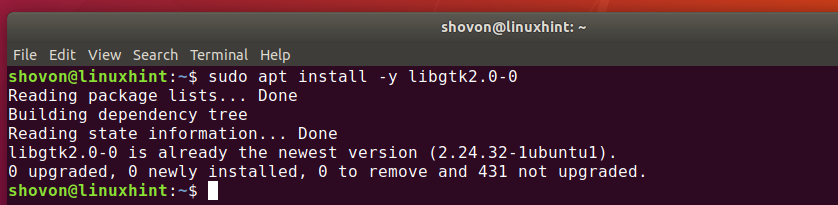
Komodo IDE and Komodo Edit both depends on libgtk2.0. It may not be installed on your Ubuntu machine. But, it is available in the official package repository of Ubuntu. So, it’s easy to install.
First, update the APT package repository cache with the following command:

Now, install libgtk2.0 with the following command:

libgtk2.0 should be installed. In my case, it’s already installed.
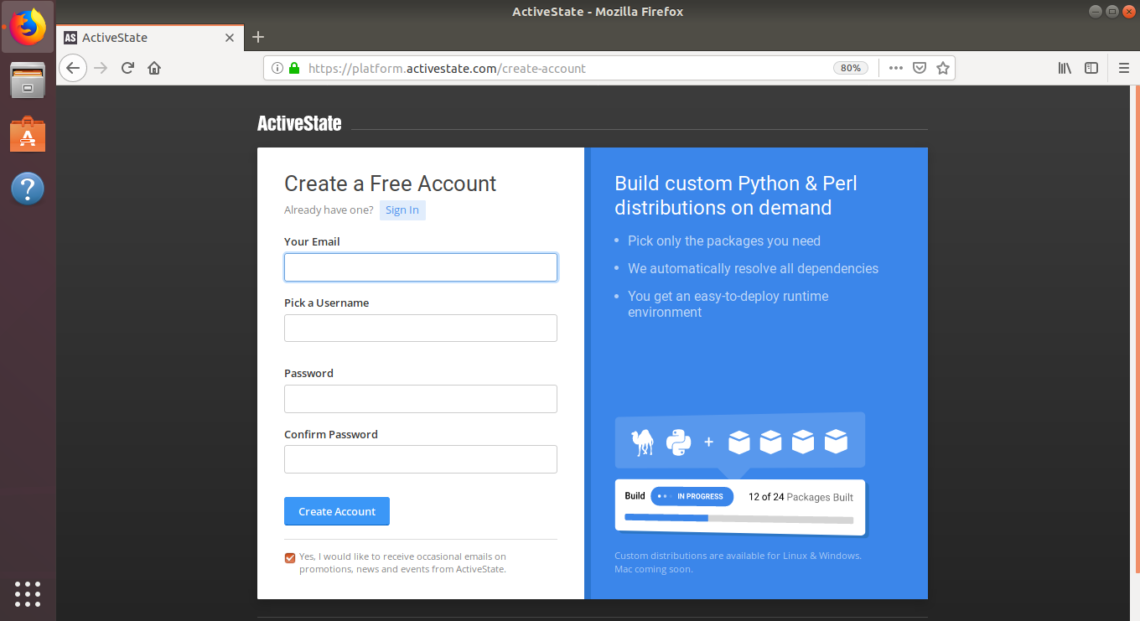
Creating an ActiveState Account:
In order to use Komodo IDE, you need to have an ActiveState account. You can create it for free from the official website of ActiveState.
Installing Komodo IDE:
To download Komodo IDE installer, visit the official Komodo IDE download page from your favorite browser.
Now, click on the 64-bit link as marked in the screenshot below.

Now, select Save File and click on OK.
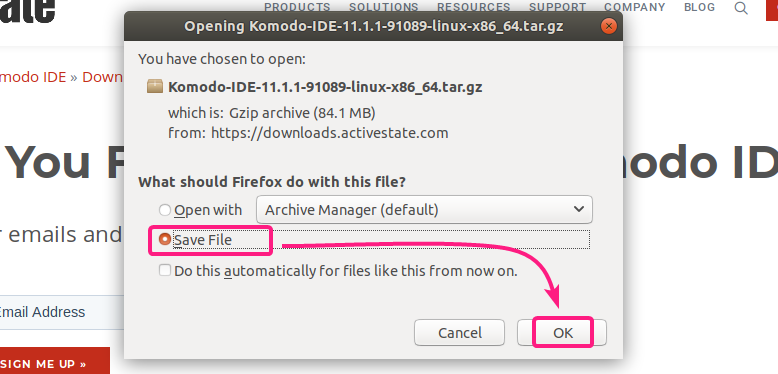
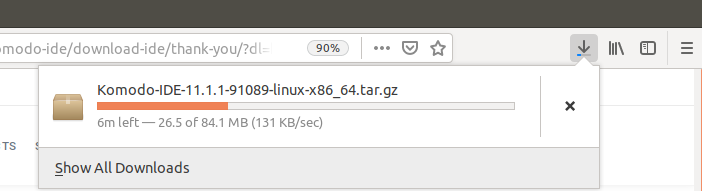
Your browser should start downloading Komodo IDE installer archive.
Once the download is complete, navigate to the ~/Downloads directory as follows:

The Komodo IDE archive should be there.

Now, extract the Komodo IDE archive with the following command:

Once the Komodo IDE archive is extracted, a new directory should be created.

Now, navigate to the cd Komodo-IDE-11.1.1-91089-linux-x86_64/ directory as follows:

Now, run the Komodo IDE installer as follows:

Now, type in the directory path where you want to install Komodo IDE and press .

I am going to install Komodo IDE on ~/.opt/Komodo-IDE-11

Komodo IDE should be installed.

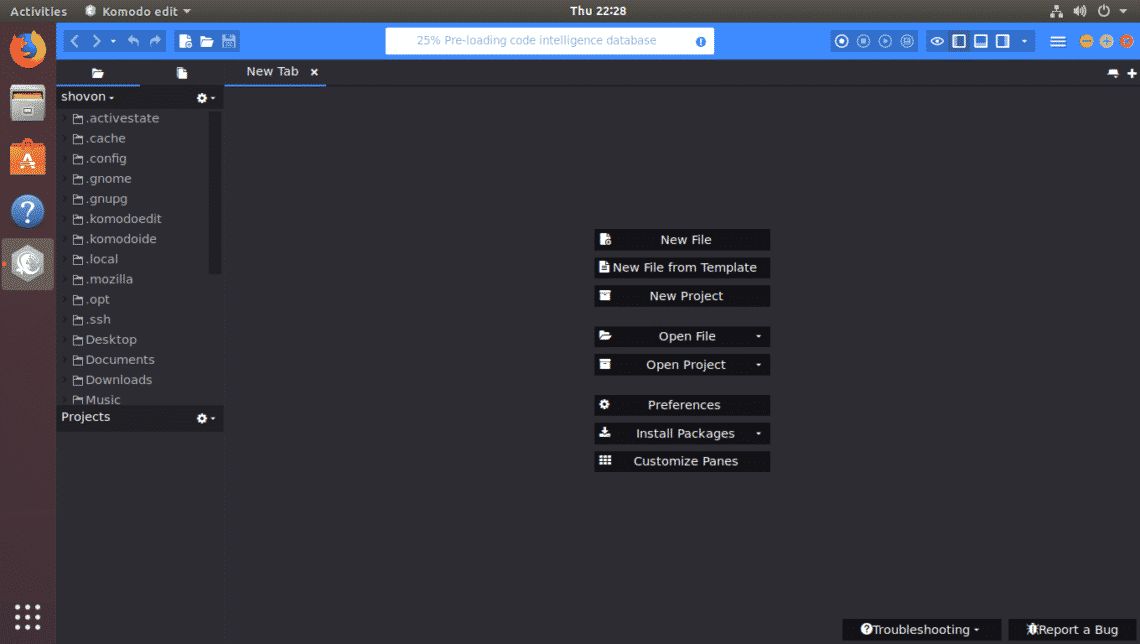
Now, you can find Komodo IDE in the Application Menu of Ubuntu. Click on the Komodo IDE 11 launcher to start Komodo IDE.

As you’re running Komodo IDE for the first time, you will need to configure it.
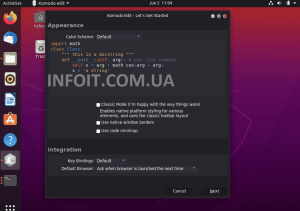
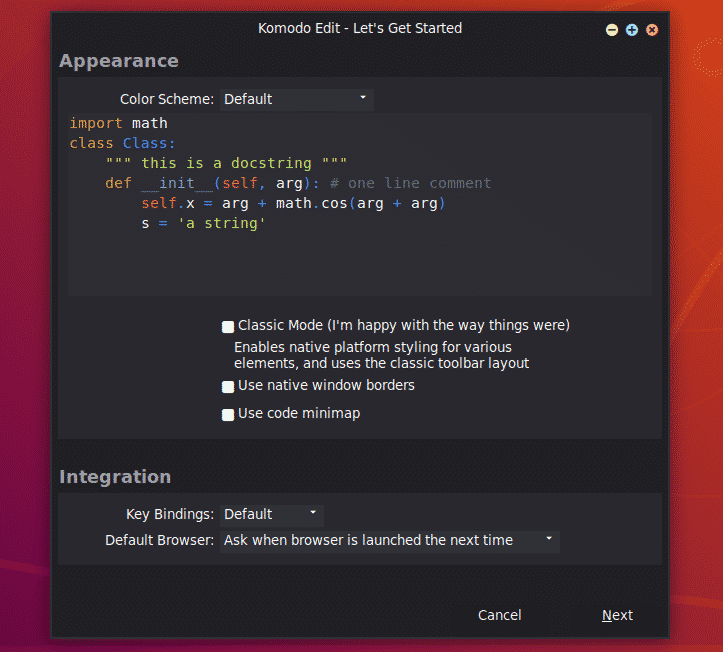
Configure Appearance and Integration settings from here and click on Next.

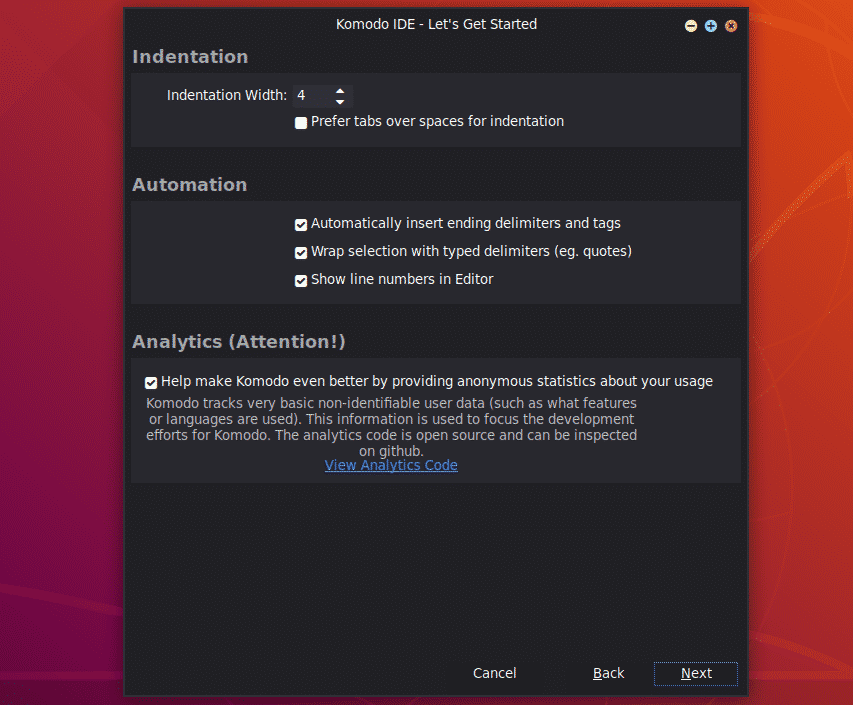
Configure Indentation and Automation settings from here and click on Next.
Now, Komodo IDE will detect the languages and libraries that are installed on your computer and configure itself accordingly. Click on Next.

Now, click on Finish.

You will be asked to sign in. Type in your ActiveState account credentials and click on Sign In.

Once you’re logged in, you can use Komodo IDE. If you didn’t purchase ActiveState licenses, you can still use Komodo IDE in trial mode.

Installing Komodo Edit:
Komodo Edit is a free alternative of Komodo IDE.
To download Komodo Edit, go to the official Komodo Edit download page from your favorite we browser.
Now, click on the 64-bit download link as marked in the screenshot below.

Now, select Save File and click on OK.
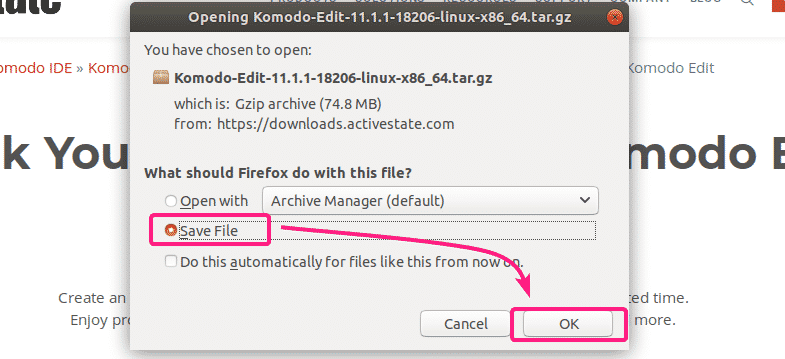
Your browser should start downloading Komodo Edit installer archive.

Once the download is complete, navigate to the ~/Downloads directory with the following command:

The Komodo Edit installer archive should be there.

Now, extract the Komodo Edit archive with the following command:

Once the Komodo Edit installer archive is extracted, a new directory should be created.
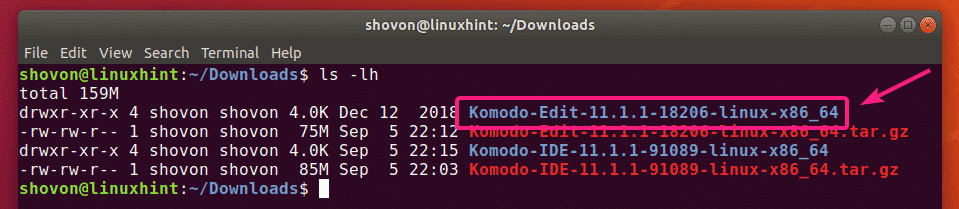
Now, navigate to the Komodo-Edit-11.1.1-18206-linux-x86_64/ directory as follows:

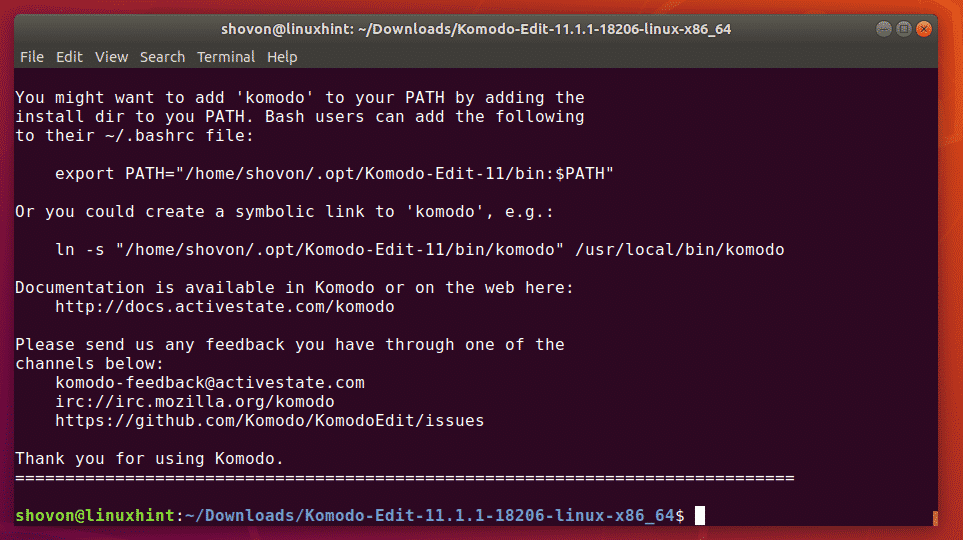
Now, run the Komodo Edit installer as follows:

Now, type in the path where you want to install Komodo Edit and press .

I am going to install it in the path ~/.opt/Komodo-Edit-11

Komdo Edit should be installed.
Now, you should be able to find Komodo Edit in the Application Menu of Ubuntu. Click on the Komodo Edit launcher to start it.

As you’re running Komodo Edit for the first time, you will have to configure Komodo Edit.
Configure Appearance and Integration settings from here and click on Next.
Now, configure Indentation and Automation settings from here and click on Next.

Now, click on Finish.

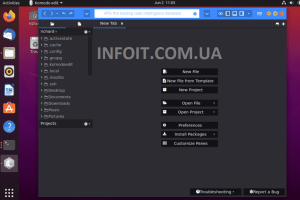
Komodo Edit should start. Now, you can start developing your project with Komodo Edit.
So, that’s how you install Komodo IDE and Komodo Edit on Ubuntu. Thanks for reading this article.
About the author
Shahriar Shovon
Freelancer & Linux System Administrator. Also loves Web API development with Node.js and JavaScript. I was born in Bangladesh. I am currently studying Electronics and Communication Engineering at Khulna University of Engineering & Technology (KUET), one of the demanding public engineering universities of Bangladesh.