- Cisco 1240 Connected Grid Router Hardware Installation Guide
- Book Title
- Appendix — Starting a Router Terminal or Console Session
- Results
- Chapter: Appendix — Starting a Router Terminal or Console Session
- Starting a Router Terminal Session
- Before You Begin
- About the Console Port
- Console Port Settings
- Using the Ctrl-C Command
- Connecting to the Console Port with Microsoft Windows
- Connecting to the Console Port with Mac OS X
- Connecting to the Console Port with Linux
- Маршрутизатор Cisco — начальная настройка
Cisco 1240 Connected Grid Router Hardware Installation Guide
The documentation set for this product strives to use bias-free language. For the purposes of this documentation set, bias-free is defined as language that does not imply discrimination based on age, disability, gender, racial identity, ethnic identity, sexual orientation, socioeconomic status, and intersectionality. Exceptions may be present in the documentation due to language that is hardcoded in the user interfaces of the product software, language used based on RFP documentation, or language that is used by a referenced third-party product. Learn more about how Cisco is using Inclusive Language.
- Unpacking the Router
- Site Preparation and Installation Safety (Read before Installing)
- Hardware Features — Description and Specifications
- Mounting and Grounding the Router
- Opening and Closing the Router Chassis
- Making Network, Power, and Other Connections
- Powering Off the Router
- Unmounting the Router
- Installing Connected Grid Modules
- Antennas
- About the SD Flash Memory Module
- Installing Battery Backup Units (BBUs)
- Installing External, Non-Cisco Radio Modules
- LED Locations and States
- Appendix — Starting a Router Terminal or Console Session
- Appendix — Cable and Connector Specifications
Book Title
Cisco 1240 Connected Grid Router Hardware Installation Guide
Appendix — Starting a Router Terminal or Console Session
Results
Chapter: Appendix — Starting a Router Terminal or Console Session
Starting a Router Terminal Session
This section describes how to start a terminal session with the Cisco 1240 Connected Grid Router (CGR 1240 or router) using the console port. Start a terminal session with the router when you are at the router installation location and want to administer the router with a direct connection using the command-line interface (CLI) software.
These topics are discussed:
Before You Begin
Before you start a terminal session with the router, you must connect a PC or PC terminal to the router console port by following the instructions in Connecting the Console Port.
About the Console Port
Caution: The console port does not support cable glands. When a cable is connected to this port, the router interior is exposed to environmental elements, which can damage the port and the router interior. This port should be exposed only during terminal sessions, when a cable is connected to the port. This port should never be left unattended when in use.
The console port is an asynchronous serial port that allows you to connect to the device for initial configuration through a standard RS-232 port with an RJ-45 connector. Any device connected to this port must be capable of asynchronous transmission.
Console Port Settings
Configure the following parameters for the console port:
Specifies the transmission speed for the connection.
Specifies the number of bits in an 8-bit byte that is used for data.
Specifies the odd or even parity for error detection.
Specifies the stop bits for an asynchronous line.
Using the Ctrl-C Command
The router console port is located on the router exterior and is accessible by removing the seal over the console port (see Console Port).
On many Cisco routers, you can enter Ctrl-C to interrupt the router startup process and then delete or change the admin password, or view or delete the router configuration.
To prevent unauthorized access to the router configurations and passwords, the Ctrl-C command is disabled on the Cisco CGR 1240 Router while it is booting up and loading the system software.
Connecting to the Console Port with Microsoft Windows
To connect to the router console port using Microsoft Windows:
1. Start a terminal emulator application, such as Windows HyperTerminal (included with some versions of Windows OS) or PuTTY .
2. Configure the terminal emulation software with the parameters described in About the Console Port.
3. Connect to the router.
Connecting to the Console Port with Mac OS X
To connect a Mac OS X system USB port to the console using the built-in OS X Terminal utility:
1. Use the Finder to go to Applications > Utilities > Terminal.
2. Connect the OS X USB port to the router.
3. Enter the following commands to find the OS X USB port number:
macbook:user$ cd /dev macbook:user$ ls -ltr /dev/*usb* crw-rw-rw- 1 root wheel 9, 66 Apr 1 16:46 tty.usbmodem1a21
DT-macbook:dev user$
4. Connect to the USB port with the following command followed by the router USB port speed:
macbook:user$ screen /dev/tty.usbmodem1a21 9600
To Disconnect the OS X USB Console from the Terminal Window
Enter Ctrl+A followed by Ctrl+\
Connecting to the Console Port with Linux
To connect a Linux system USB port to the console using the built-in Linux Terminal utility:
1. Open the Linux Terminal window.
2. Connect the Linux USB port to the router.
3. Enter the following commands to find the Linux USB port number:
root@usb-suse# cd /dev root@usb-suse /dev# ls -ltr *ACM* crw-r—r— 1 root root 188, 0 Jan 14 18:02 ttyACM0 root@usb-suse /dev#
4. Connect to the USB port with the following command followed by the router USB port speed:
root@usb-suse /dev# screen /dev/ttyACM0 9600
To Disconnect the Linux USB Console from the Terminal Window
Enter Ctrl+A followed by :, and then type quit.
Маршрутизатор Cisco — начальная настройка
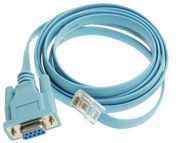
При первоначальной настройки маршрутизатор cisco необходимо подключить к COM порту компьютера, посредством специального консольного кабеля.
Кабель представляет собой с одной стороны разъём DB9 (female/мама) для подключения к COM порту компьютера, а с другой RJ-45 для подключения к консольному порту маршрутизатора (порт обведён в голубой цвет и имеет надпись Console, либо просто надпись Console на голубом фоне).
Новые модели маршрутизаторов, например Cisco 2900 Series Integrated Services Routers (ISR), имеют как RJ-45 консольный порт, так и консольный порт mini-USB Type B.
Mini-USB порт позволяет подключаться к консоли через USB кабель, если вдруг в компьютере отсутствует COM порт. Если настройка роутера производится через USB кабель на компьютере с Microsoft Windows, на компьютер необходимо установить драйвер Cisco Microsoft Windows USB Device Driver.

Консольный порт USB имеет приоритет над RJ-45. При настройке одновременное использование консольных портов не допускается.
Для настройки устройства через консольный кабель на компьютере с Microsoft Windows можно использовать встроенную программу Hyper Terminal, для меня она не очень удобна, поэтому я использую Putty (возможно это просто дело привычки). В программе, будь то Putty, Hyper terminal или ещё какая-либо, необходимо настроить параметры порта (COM) следующим образом:

Настройка COM порта в Putty

После чего, если маршрутизатор включен и соединен с компьютером консольным кабелем, в окне терминала (по нажатию на Enter) появится интерфейс командной строки. Так же здесь можно наблюдать и процесс загрузки устройства.
Можно приступать к настройке устройства.
Логин/пароль по умолчанию обычно либо cisco/cisco либо пустой пароль на вход в привилегированный режим.
Входим в привилегированный режим командой «enable»:
Очищаем существующую конфигурацию командой «erase startup-config»:
Router#
Router#erase startup-config
Erasing the nvram filesystem will remove all configuration files! Continue? [confirm]
[OK]
Erase of nvram: complete
Router#
*Mar 1 00:10:46.519: %SYS-7-NV_BLOCK_INIT: Initialized the geometry of nvram
Router#
Перезагружаем роутер командой «reload» и подтверждаем её:
Router#reload
Proceed with reload? [confirm]
*Mar 1 00:14:52.907: %SYS-5-RELOAD: Reload requested by console. Reload Reason: Reload command.
Так как мы стерли конфигурационный файл startup-config, то после перезагрузки предлагается пройти мастер начальной настройки системы, в котором предлагается вести имя маршрутизатора, пароли для различных режимов, IP адрес на интерфейсе управления и прочее. Я обычно на запрос запуска мастера отвечаю: no , а все необходимые параметры ввожу вручную.

Переходим в режим глобального конфигурирования системы командой «configure terminal» (сперва не забываем перейти в привилегированный )
Router>
Router>enable
Router#configure terminal
Enter configuration commands, one per line. End with CNTL/Z.
Router(config)#
Видно как изменилась строка приглашения на «Router(config)# » — означает, что мы находимся в глобальном режиме конфигурации системы
Задаём пароль на вход в привилегированный режим командой «enable secret»
Router(config)#enable secret 0 pass123
Router(config)#
0 — означает ввод пароля в не зашифрованном виде, но храниться будет он в шифрованном.
Устанавливаем имя маршрутизатора командой «hostname»
Задаём имя домена командой «ip domain-name»
RTR1(config)#
RTR1(config)#ip domain-name test.ru
RTR1(config)#
Прописываем время, дату и часовой пояс. Задать время и дату можно просто в привилегированном режиме, не переходя в режим глобального конфигурирования системы, а вот часовой пояс только в режиме конфигурации.
Время и дата командой «clock set» (например 26 марта 2013 года, 19 часов 32 минуты 30 секунд):
RTR1#
RTR1#clock set 19:32:30 26 Mar 2013
RTR1#
Часовой пояс командой «clock timezone» (например смещение по UTC в +10 часов):
RTR1#
RTR1#configure terminal
Enter configuration commands, one per line. End with CNTL/Z.
RTR1(config)#
RTR1(config)#clock timezone YST 10
RTR1(config)#
Включаем аутентификацию и заводим пользователя.
RTR1(config)#
RTR1(config)#aaa new-model
RTR1(config)#aaa authentication login default local
RTR1(config)#
Команда «aaa new-model» — активирует возможность использования функций и команд для аутентификации, авторизации, аккаунтинга (AAA)
Команда «aaa authentication login default local» — включает аутентификацию при попытке сделать logon, и проверяет пользователя и пароль по локальной базе.
После ввода этих команд, нужно создать пользователя, иначе нельзя будет зайти на маршрутизатор ни по ssh/telnet, ни через консоль.
Создаём пользователя petya с паролем password123:
RTR1(config)#
RTR1(config)#username petya secret 0 password123
RTR1(config)#
Настраиваем сетевой интерфейс. Что бы настроить сетевой интерфейс, нужно перейти из режима глобального конфигурирования в режим конфигурирования интерфейса.
RTR1(config)#
RTR1(config)#interface fastEthernet 0/0
RTR1(config-if)#ip address 192.168.56.254 255.255.255.0
RTR1(config-if)#no shutdown
RTR1(config-if)#
RTR1(config-if)#
Mar 26 19:51:11.851: %LINK-3-UPDOWN: Interface FastEthernet0/0, changed state to up
Mar 26 19:51:12.851: %LINEPROTO-5-UPDOWN: Line protocol on Interface FastEthernet0/0, changed state to up
RTR1(config-if)#
RTR1(config-if)#exit
RTR1(config)#
Команда «interface fastEthernet 0/0» — переводит в режим конфигурирования интерфейса. В данном случае у нас интерфейс называется «fastEthernet «, в зависимости от модели роутера, могут быть другие названия например ethernet или gigabitEthernet. Информацию о состоянии интерфейсов можно посмотреть командой «show interfaces»
Команда «ip address 192.168.56.254 255.255.255.0» — задаёт IP адрес и сетевую маску на интерфейсе
Команда «no shutdown» — включает интерфейс
Команда «exit» — производит выход из режима конфигурации интерфейса в глобальный режим конфигурации.
Разрешаем удаленный доступ к устройству по telnet или ssh. Не все версии IOS поддерживают ssh (необходима поддержка шифрования). Поэтому в некоторых случаях приходится настраивать удаленный доступ и для telnet. Для настройки ssh необходимо сперва сгенерировать ключи.
Генерируем ключи командой «crypto key generate rsa»:
RTR1(config)#
RTR1(config)#crypto key generate rsa
The name for the keys will be: RTR1.test.ru
Choose the size of the key modulus in the range of 360 to 2048 for your
General Purpose Keys. Choosing a key modulus greater than 512 may take
a few minutes.
How many bits in the modulus [512]:
% Generating 512 bit RSA keys . [OK]
RTR1(config)#
Mar 26 20:16:47.879: %SSH-5-ENABLED: SSH 1.5 has been enabled
RTR1(config)#
Как только сгенерировались ключи, в консоли вышло сообщение, что ssh включен. Кстати, для генерации ключей необходимо сперва задать имя домена и желательно выставить правильное время, что я уже сделал выше.
Разрешаем ssh и telnet на линиях виртуальных терминалов:
RTR1(config)#
RTR1(config)#line vty 0 4
RTR1(config-line)#transport input telnet ssh
RTR1(config-line)#exec-timeout 60
RTR1(config-line)#
RTR1(config-line)#exit
RTR1(config)#
Команда «line vty 0 4» — переводит в режим конфигурирования линий VTY с 0 по 4
Команда «transport input telnet ssh» — разрешает вход через telnet и ssh на терминалы vty
Команда «exec-timeout 60» — отключает от линии пользователя после 60 минут бездействия
команда «exit» — выход из режима конфигурировании линий в глобальный режим.
В данном случае разрешён удаленный доступ с любых IP адресов, что бы ограничить, необходимо создавать ACL и вешать их на линии.
Сохраняем конфигурацию. Всё, что мы сейчас настроили будет работать до первой перезагрузки. Что бы конфиг сохранился его нужно сохранить командой «copy running-config startup-config»:
RTR1(config)#exit
RTR1#copy running-config startup-config
Building configuration.
[OK]
RTR1#