- How to Create Your Own IPsec VPN Server in Linux
- Prerequisites:
- Setting Up IPsec/L2TP VPN Server in Linux
- How to Add or Remove a VPN User in Linux
- How to Upgrade Libreswan Installation in Linux
- How to Uninstall the VPN Server in Linux
- On RHEL/CentOS
- On Debian/Ubuntu
- Установка и настройка L2TP VPN-сервера на Ubuntu Server
- Настройка IPSEC
- L2TP
- PPP
- Настройка клиента
- Доступ в Интернет и локальную сеть
- Диагностика проблем
How to Create Your Own IPsec VPN Server in Linux
There are so many benefits of using a VPN (Virtual Private Network), some of which include keeping you safe on the internet by encrypting your traffic and helping you to access blocked content/sites/web applications from anywhere. Not to mention, VPN also helps you to browse the internet anonymously.
In this article, you will learn how to quickly and automatically set up your own IPsec/L2TP VPN server in CentOS/RHEL, Ubuntu, and Debian Linux distributions.
Prerequisites:
- A fresh CentOS/RHEL or Ubuntu/DebianVPS (Virtual Private Server) from any provider such as Linode.
Setting Up IPsec/L2TP VPN Server in Linux
To set up the VPN server, we will use a wonderful collection of shell scripts created by Lin Song, that installs Libreswan as the IPsec server, and xl2tpd as the L2TP provider. The offering also includes scripts to add or delete VPN users, upgrade the VPN installation and much more.
First, log into your VPS via SSH, then run the appropriate commands for your distribution to set up the VPN server. By default, the script will generate random VPN credentials (pre-shared key, VPN username, and password) for you and display them at the end of the installation.
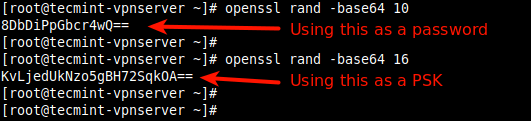
However, if you want to use your own credentials, first you need to generate a strong password and PSK as shown.
# openssl rand -base64 10 # openssl rand -base64 16
Next, set these generated values as described in the following command all values MUST be placed inside ‘single quotes‘ as shown.
- VPN_IPSEC_PSK – Your IPsec pre-shared key.
- VPN_USER – Your VPN username.
- VPN_PASSWORD – Your VPN password.
---------------- On CentOS/RHEL ---------------- # wget https://git.io/vpnsetup-centos -O vpnsetup.sh && VPN_IPSEC_PSK='KvLjedUkNzo5gBH72SqkOA==' VPN_USER='tecmint' VPN_PASSWORD='8DbDiPpGbcr4wQ==' sh vpnsetup.sh ---------------- On Debian and Ubuntu ---------------- # wget https://git.io/vpnsetup -O vpnsetup.sh && VPN_IPSEC_PSK='KvLjedUkNzo5gBH72SqkOA==' VPN_USER='tecmint' VPN_PASSWORD='8DbDiPpGbcr4wQ==' sudo sh vpnsetup.sh
The main packages that will be installed are bind-utils, net-tools, bison, flex, gcc, libcap-ng-devel, libcurl-devel, libselinux-devel, nspr-devel, nss-devel, pam-devel, xl2tpd, iptables-services, systemd-devel, fipscheck-devel, libevent-devel, and fail2ban(to protect SSH), and their respective dependencies. Then it downloads, compiles and installs Libreswan from source, enables and starts the necessary services.
Once the installation is complete, the VPN details will be displayed as shown in the following screenshot.
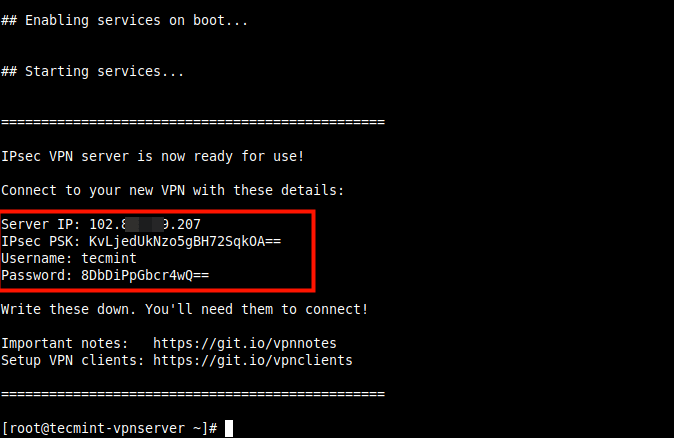
Next, you need to set up a VPN client, for desktops or laptops with a graphical user interface, refer to this guide: How To Setup an L2TP/Ipsec VPN Client on Linux.
To add the VPN connection in a mobile device such as an Android phone, go to Settings –> Network & Internet (or Wireless & Networks –> More) –> Advanced –> VPN. Select the option to add a new VPN. The VPN type should be set to IPSec Xauth PSK, then use the VPN gateway and credentials above.
How to Add or Remove a VPN User in Linux
To create a new VPN user or update an existing VPN user with a new password, download and use the add_vpn_user.sh script using the following wget command.
$ wget -O add_vpn_user.sh https://raw.githubusercontent.com/hwdsl2/setup-ipsec-vpn/master/extras/add_vpn_user.sh $ sudo sh add_vpn_user.sh 'username_to_add' 'user_password'
To delete a VPN user, download and use the del_vpn_user.sh script.
$ wget -O del_vpn_user.sh https://raw.githubusercontent.com/hwdsl2/setup-ipsec-vpn/master/extras/del_vpn_user.sh $ sudo sh del_vpn_user.sh 'username_to_delete'
How to Upgrade Libreswan Installation in Linux
You can upgrade the Libreswan installation using the vpnupgrade.sh or vpnupgrade_centos.sh script. Make sure to edit the SWAN_VER variable to the version you want to install, within the script.
---------------- On CentOS/RHEL ---------------- # wget https://git.io/vpnupgrade-centos -O vpnupgrade.sh && sh vpnupgrade.sh ---------------- On Debian and Ubuntu ---------------- # wget https://git.io/vpnupgrade -O vpnupgrade.sh && sudo sh vpnupgrade.sh
How to Uninstall the VPN Server in Linux
To uninstall the VPN installation, do the following.
On RHEL/CentOS
Then open /etc/sysconfig/iptables configuration file and remove the unneeded rules and edit /etc/sysctl.conf and /etc/rc.local file, and remove the lines after the comment # Added by hwdsl2 VPN script, in both files.
On Debian/Ubuntu
Next, edit /etc/iptables.rules configuration file and remove any unneeded rules. Additionally, edit /etc/iptables/rules.v4 if it exists.
Then edit /etc/sysctl.conf and /etc/rc.local files, remove the lines after the comment # Added by hwdsl2 VPN script, in both files. Do not remove exit 0 if it exists.
Optionally, you can remove certain files and directories that were created during the VPN set up.
# rm -f /etc/ipsec.conf* /etc/ipsec.secrets* /etc/ppp/chap-secrets* /etc/ppp/options.xl2tpd* /etc/pam.d/pluto /etc/sysconfig/pluto /etc/default/pluto # rm -rf /etc/ipsec.d /etc/xl2tpd
To set up a site-to-site IPSec-based VPN with Strongswan, check out our guides:
At this point, your own VPN server is up and running. You can share any queries or give us feedback using the comment form below.
Установка и настройка L2TP VPN-сервера на Ubuntu Server

Обновлено: 18.05.2020 Опубликовано: 18.01.2020
- VPN-сервер, использующий туннельный протокол L2TP.
- Защита соединения посредством общего ключа + аутентификация пользователя.
- Доступ к локальной сети.
Мы выполним следующие настройки:
Настройка IPSEC
Для управления IPSec используется пакет strongswan — установим его командой:
apt-get install strongswan
Открываем конфигурационный файл для настройки ipsec:
Для config setup добавим:
config setup
virtual_private=%v4:10.0.0.0/8,%v4:192.168.0.0/16,%v4:172.16.0.0/12
protostack=netkey
* где virtual_private для нас является наиболее важным параметром и определяет приватные сети. В данном примере просто перечислены сети, зарезервированные под локальные — мы можем указать и другие.
conn l2tpvpn
type=transport
authby=secret
pfs=no
rekey=no
keyingtries=2
left=%any
leftprotoport=udp/l2tp
leftid=@l2tpvpnserver
right=%any
rightprotoport=udp/%any
auto=add
- type — тип соединения. Возможны варианты tunnel ( хост-хост, хост-подсеть или подсеть-подсеть); transport (хост-хост); passthrough (без обработки IPsec).
- authby — способы аутентификации двух узлов. Возможны варианты secret (по паролю) или rsasig (цифровые подписи RSA).
- pfs — расшифровывается как Perfect Forward Secrecy. Позволяет активировать совершенную секретность в канале ключей соединения.
- rekey — перепроверить соединение, когда оно истекает.
- keyingtries — число попыток, чтобы «договориться» о соединении или его замене.
- left — IP-адрес левого участника (сервера). %any означает, что адрес может быть любой.
- leftprotoport — определяет протокол и порт, на котором будет работать левая сторона (сервер). В данном примере указан UDP и порт 1701.
- leftid — идентификация левого участника соединения.
- right — IP-адрес правого участника (клиента). %any означает, что адрес может быть любой.
- rightprotoport — определяет протокол и порт, на котором будет работать правая сторона (клиент). В данном примере указан UDP и любой порт.
- auto — операция, которая должна запуститься автоматически при старте IPsec.
Создаем секретный ключ — для этого открываем на редактирование файл:
%any %any : PSK «my_key_password»
* в данном примере мы устанавливаем общий пароль my_key_password для соединений с любого IP.
Разрешаем автозапуск strongswan и перезапускаем службу:
systemctl enable strongswan
systemctl restart strongswan
L2TP
Устанавливаем сервер L2TP:
Открываем файл настройки сервера:
[global]
port = 1701
access control = no
ipsec saref = yes
force userspace = yes
auth file = /etc/ppp/chap-secrets
[lns default]
ip range = 176.16.10.10-176.16.10.200
local ip = 176.16.10.1
name = l2tpserver
pppoptfile = /etc/ppp/options.xl2tpd
flow bit = yes
exclusive = no
hidden bit = no
length bit = yes
require authentication = yes
require chap = yes
refuse pap = yes
- port — порт UDP, на котором работает VPN. По умолчанию, 1701.
- access control — принимать или нет запросы только от клиентов с определенными IP, перечисленными в настройках клиентов.
- ipsec saref — указывает использовать или нет ipsec Security Association, позволяющий отслеживать несколько клиентов с одинаковыми IP-адресами.
- force userspace — повышает производительность за счет декапсуляции пакетов L2TP.
- auth file — путь к файлу аутентификации.
- ip range — диапазон адресов, которые назначаются подключенным клиентам.
- local ip — IP-адрес сервера в сети VPN.
- name — имя сервера для процесса согласования.
- pppoptfile — путь к файлу с настройкой pppd.
- flow bit — позволяет добавлять в пакеты порядковые номера.
- exclusive — если поставить в yes, сервер разрешит только одно соединение с клиентом.
- hidden bit — скрывать или нет AVP.
- length bit — использовать ли бит длины, указывающий полезную нагрузку.
- require authentication — требовать ли аутентификацию.
- require chap — требовать ли аутентификацию PPP по протоколу CHAP.
- refuse pap — требовать ли аутентификацию PPP по протоколу PAP.
Разрешаем автозапуск vpn-сервера и перезапускаем его:
PPP
Открываем на редактирование конфигурационный файл:
noccp
auth
crtscts
mtu 1410
mru 1410
nodefaultroute
lock
noproxyarp
silent
modem
asyncmap 0
hide-password
require-mschap-v2
ms-dns 77.88.8.8
ms-dns 8.8.8.8
Создаем пользователя. Для этого открываем файл:
«user1» l2tpserver «password1» «172.16.10.10»
«user2» l2tpserver «password2» *
Настройка клиента
В параметрах сети и Интернет в разделе VPN создаем новое соединение:


- Имя подключения — произвольное имя.
- Имя или адрес сервера — адрес сервера VPN, к которому мы будем подключаться.
- Тип VPN — для нашего случая, выбираем L2TP/IPsec с предварительным ключом.
- Общий ключ — ключ, который мы задали в файле /etc/ipsec.secrets.
- Тип данных для входа — выбираем пользователь и пароль.
- Имя пользователя и пароль — логин и пароль, которые мы задали в файле /etc/ppp/chap-secrets.
Доступ в Интернет и локальную сеть
После подключения к сети VPN мы не сможем ни выйти в Интернет, ни подключиться к узлам локальной сети. Чтобы это исправить, открываем на редактирование файл:
* мы разрешили форвард сетевых запросов и настроили сервер в качестве шлюза.
После применяем настройку:
sysctl -p /etc/sysctl.d/99-sysctl.conf
Добавляем правило в iptables:
iptables -t nat -A POSTROUTING -o eth0 -j MASQUERADE
* данное правило включает маскарадинг на интерфейсе eth0. Вам необходимо подставить в команду значение своего сетевого адаптера.
В случае с единым сетевым интерфейсом больше ничего делать не потребуется — Ubuntu начнет работать как Интернет-шлюз.
В случае с несколькими сетевыми адаптерами, настраиваем сетевой экран:
iptables -A FORWARD -i eth1 -o eth0 -m state —state RELATED,ESTABLISHED -j ACCEPT
iptables -A FORWARD -i eth1 -o eth0 -j ACCEPT
* предполагается, что eth1 используется для внутренней сети, а eth0 — внешней.
Диагностика проблем
Описанная выше настройка не предполагает наличие лога. Для этого открываем конфигурационный файл для ppp:
.
logfile /var/log/xl2tpd/xl2tpd.log
debug
Создадим каталог для лога:
Перезапускаем сервис xl2tpd:
Пробуем подключиться к серверу — в случае наличия проблем, наблюдаем за логом:
tail -f /var/log/xl2tpd/xl2tpd.log

Настройка L2TP VPN-сервера на Ubuntu для возможности подкючения стандартными средствами Windows