- GPT fdisk
- Installation
- List partitions
- Backup and restore partition table
- Create a partition table and partitions
- Create new table
- Create partitions
- Partition number
- First and last sector
- Partition type
- Write changes to disk
- Tips and tricks
- Convert between MBR and GPT
- Sort partitions
- Recover GPT header
- Expand a GPT disk
- Prevent GPT partition automounting
- gdisk EFI application
- See also
- Convert GPT to MBR layout in any Linux Drives
GPT fdisk
GPT fdisk—consisting of the gdisk, cgdisk, sgdisk, and fixparts programs—is a set of text-mode partitioning tools made by Rod Smith. They work on Globally Unique Identifier (GUID) Partition Table (GPT) disks, rather than on the older (and once more common) Master Boot Record (MBR) partition tables.
gdisk, cgdisk and sgdisk all have the same functionality but provide different user interfaces. gdisk is text-mode interactive, sgdisk is command-line, and cgdisk has a curses-based interface. This article covers gdisk(8) and sgdisk(8) utilities.
- For basic partitioning functionality with a text user interface, cgdisk(8) can be used.
- GPT fdisk website has detailed walkthroughs for gdisk, cgdisk, sgdisk and FixParts.
Installation
List partitions
To list partition tables and partitions on a block device, you can run the following, where device is a name like /dev/sda , /dev/nvme0n1 , /dev/mmcblk0 , etc.:
or alternatively the same action using sgdisk:
Backup and restore partition table
Before making changes to a disk, you may want to backup the partition table and partition scheme of the drive. You can also use a backup to copy the same partition layout to numerous drives.
Using sgdisk you can create a binary backup consisting of the protective MBR, the main GPT header, the backup GPT header, and one copy of the partition table. The example below will save the partition table of /dev/sda to a file sgdisk-sda.bin :
# sgdisk -b=sgdisk-sda.bin /dev/sda
You can later restore the backup by running:
# sgdisk -l=sgdisk-sda.bin /dev/sda
If you want to clone your current device’s partition layout ( /dev/sda in this case) to another drive ( /dev/sdc ) run:
If both drives will be in the same computer, you need to randomize the disk and partition GUIDs:
Create a partition table and partitions
The first step to partitioning a disk is making a partition table. After that, the actual partitions are created according to the desired partition scheme.
Before beginning, you may wish to backup your current partition table and scheme.
The following shows how to use gdisk to perform both the creation of a partition table and the creation of the actual partitions. Alternatively, you may use the curses-based version called cgdisk; however, the following instructions do not apply to it. See cgdisk(8) for its usage.
gdisk performs partition alignment automatically on a 2048 512-byte sector (1 MiB) block size base which should be compatible with all Advanced Format HDDs and the vast majority of SSDs if not all.
To use gdisk, run the program with the name of the block device you want to change/edit. This example uses /dev/sda :
Create new table
Warning: If you create a new partition table on a disk with data on it, it will erase all the data on the disk. Make sure this is what you want to do.
Tip: Check that your NVMe drives and Advanced Format hard disk drives are using the optimal logical sector size before partitioning.
To create a new GUID Partition Table and clear all current partition data, type o at the prompt. Skip this step if the table you require has already been created.
Create partitions
Create a new partition with the n command. You must enter the partition number, first sector, last sector and the partition type.
Note: See Partitioning#Partition scheme for considerations concerning the size and location of partitions.
Partition number
A partition number is the number assigned to a partition, e.g. a partition with number 1 on a disk /dev/sda would be /dev/sda1 , /dev/nvme0n1p1 on /dev/nvme0n1 and /dev/mmcblk0p1 on /dev/mmcblk0 . See Device file#Partition for details on the naming scheme. Partition numbers may not always match the order of partitions on disk, in which case they can be sorted.
It is advised to choose the default number suggested by gdisk.
First and last sector
The first and last sectors of the partition can be specified in sector numbers or as positions measured in kibibytes ( K ), mebibytes ( M ), gibibytes ( G ), tebibytes ( T ), or pebibytes ( P );
The position can be specified in:
- absolute terms from the start of the disk. E.g. 40M as a first sector specifies a position 40 MiB from the start of the disk.
- relative terms by preceding the size with +size or —size . E.g. +2G to specify a point 2 GiB after the default start sector, or -200M to specify a point 200 MiB before the last available sector.
Pressing the Enter key with no input specifies the default value, which is the start of the largest available block for the first sector and the end of the same block for the last sector.
Note: When partitioning make sure to specify partition sizes using relative terms with the +size notation and not use sizes smaller than 1 MiB. Such partitions will always be aligned according to the device properties.
Tip: Leave a 1 MiB free space somewhere in the first 2 TiB of the disk (e.g. by using +1M as the first sector of a partition) in case you ever need to create a BIOS boot partition.
Partition type
Select the partition’s type by entering gdisk’s internal type code or specifying the partition type GUID manually. The default, Linux filesystem (GUID 0FC63DAF-8483-4772-8E79-3D69D8477DE4 , gdisk’s internal code 8300 ), should be fine for most use cases.
- Press L to show gdisk’s internal code list.
- It is advised to follow the Discoverable Partitions Specification since systemd-gpt-auto-generator(8) will automount them. See #Prevent GPT partition automounting if you want to disable automounting for a partition.
Repeat this procedure until you have the partitions you desire.
Write changes to disk
Write the table to disk and exit via the w command.
Tips and tricks
Convert between MBR and GPT
gdisk, sgdisk and cgdisk have the ability to convert MBR and BSD disklabels to GPT without data loss. Upon conversion, all the MBR primary partitions and the logical partitions become GPT partitions with the correct partition type GUIDs and Unique partition GUIDs created for each partition.
After conversion, the boot loader will need to be reinstalled to configure it to boot from GPT.
- GPT stores a secondary table at the end of disk. This data structure consumes 33 512-byte sectors (16.5 KiB) by default. MBR does not have a similar data structure at its end, which means that the last partition on an MBR disk sometimes extends to the very end of the disk and prevents complete conversion. If this happens to you, you must abandon the conversion and resize the final partition.
This article or section needs expansion.
- There are known corruption issues with the backup GPT on laptops that are Intel chipset based, and run in RAID mode. The solution is to use AHCI instead of RAID, if possible.
To convert an MBR partition table to GPT using sgdisk, use the -g / —mbrtogpt option:
To convert GPT to MBR use the -m / —gpttombr option. Note that it is not possible to convert more than four partitions from GPT to MBR.
Sort partitions
This applies for when a new partition is created in the space between two partitions or a partition is deleted. /dev/sda is used in this example.
After sorting the partitions if you are not using Persistent block device naming, it might be required to adjust the /etc/fstab and/or the /etc/crypttab configuration files.
Note: The kernel must read the new partition table for the partitions (e.g. /dev/sda1 ) to be usable. Reboot the system or tell the kernel to reread the partition table.
Recover GPT header
In case main GPT header or backup GPT header gets damaged, you can recover one from the other with gdisk. /dev/sda is used in this example.
choose r for recovery and transformation options (experts only). From there choose either
When done write the table to disk and exit via the w command.
Expand a GPT disk
After enlarging a disk (e.g. in hardware RAID or a virtual machine disk) the newly added free space will not be immediately usable since GPT keeps data at the end of the disk. You must relocate the backup GPT header to the new end of the disk.
Run sgdisk with the option -e / —move-second-header , e.g.:
Afterwards print the partition table; the total free space should now be increased.
Prevent GPT partition automounting
systemd-gpt-auto-generator(8) will automount partitions following the Discoverable Partitions Specification. Sometimes that may not be desirable.
The automounting can be disabled by setting the partition attribute 63 «do not automount» on the partition.
Press p to print the partition table and take note of the partition number(s) of the for which you want to disable automounting.
Press x extra functionality (experts only).
Press a set attributes. Input the partition number and set the attribute 63 . Under Set fields are: it should now show 63 (do not automount) . Press Enter to end attribute changing. Repeat this for all partitions you want to prevent from automounting.
When done write the table to disk and exit via the w command.
Alternatively using sgdisk, the attribute can be set using the -A / —attributes= option; see sgdisk(8) for usage. For example, to set partition attribute 63 «do not automount» on /dev/sda2 run:
gdisk EFI application
This article or section is out of date.
Reason: gdisk_x64.efi does not seem to work anymore and is apparently unmaintained. (Discuss in Talk:GPT fdisk)
There is no package for the EFI version of gdisk, but Rod Smith provides a prebuilt gdisk-1.04 EFI binary on SourceForge. Download gdisk-efi-*.zip and extract the archive. To use it, copy gdisk_x64.efi to the EFI system partition and launch it from your boot loader or UEFI Shell.
gdisk_x64.efi allows you to edit the partition table before the operating system is even booted. It is used the same way as the gdisk binary on Linux.
Note: gdisk_x64.efi cannot access the file system, thus it cannot backup the partition table to a file or restore it from a backup file.
See README-efi.txt for more information.
See also
Convert GPT to MBR layout in any Linux Drives
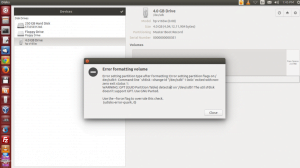
Here we can see how to change from GPT to MBR (Microsoft Master Boot Record), I need to format my pen drive while Installing Linux Mint Using USB, So I have formatted it using gdisk command, After that while I’m trying to format my pen drive using Fdisk it won’t get format, It gives’s the Below Error
Here we can see how to get fix the Error by Converting the GPT to MBR type.
If you using RPM based Machine’s, We can Install gdisk using below command
If you using deb based Machine’s, We can Install gdisk using below command
Then we have to Convert the GPT to MBR
We will get the Below Command Option
GPT fdisk (gdisk) version 0.8.8 Partition table scan: MBR: MBR only BSD: not present APM: not present GPT: not present *************************************************************** Found invalid GPT and valid MBR; converting MBR to GPT format in memory. THIS OPERATION IS POTENTIALLY DESTRUCTIVE! Exit by typing 'q' if you don't want to convert your MBR partitions to GPT format! *************************************************************** Warning! Secondary partition table overlaps the last partition by 33 blocks! You will need to delete this partition or resize it in another utility. Command (? for help):- Recovery/transformation command (? for help):
- Then Convert by giving the command g to convert GPT to MBR
- If you need to see the Preview use P
- Then Write the Changes and Exit the gdisk using w
- Now we can Format the Pen Drive, as usual, using Disk Utility
I followed the procedures and successfully loaded some weird 8081 port configurations needed for the app, however I discovered it…
tried many times — followed all steps but was unable to setup custom context I always get -> The connection…
Hello Babin Lonston, Your tutorial is very helpful to me to Install the prometheus and nodeexporter on the server. Can…
