- How to obtain the number of CPUs/cores in Linux from the command line?
- Получаем информацию о железе сервера в Linux
- Информация об оперативной памяти (RAM) в Linux
- Как узнать информацию о процессоре (CPU) в Linux?
- Информация о жестких дисках сервера в Linux
- Утилита dmidecode: получения информации о материнской плате, BIOS и др.
How to obtain the number of CPUs/cores in Linux from the command line?
Note that both of these will end up counting twice as many cores as actually exist if you’re on a system with hyperthreading (e.g, P4, or Core i7).
cat /proc/cpuinfo | awk ‘/^processor/
The first line return 1 Core less then existing. Better cat /proc/cpuinfo | awk ‘/^processor/
Processing the contents of /proc/cpuinfo is needlessly baroque. Use nproc which is part of coreutils, so it should be available on most Linux installs.
Command nproc prints the number of processing units available to the current process, which may be less than the number of online processors.
To find the number of all installed cores/processors use nproc —all
This doesn’t work with hyperthreading if I need the number of physical cores. Returns 8 on my quad core i7 box.
The most portable solution I have found is the getconf command:
getconf _NPROCESSORS_ONLN This works on both Linux and Mac OS X. Another benefit of this over some of the other approaches is that getconf has been around for a long time. Some of the older Linux machines I have to do development on don’t have the nproc or lscpu commands available, but they have getconf .
Editor’s note: While the getconf utility is POSIX-mandated, the specific _NPROCESSORS_ONLN and _NPROCESSORS_CONF values are not. That said, as stated, they work on Linux platforms as well as on macOS; on FreeBSD/PC-BSD, you must omit the leading _ .
This worked for me on Red Hat Entreprise Linux 5.4, Centos 6.5 & 7 and Mac OSX 10.9 (Mavericks). It seems this it the most portable, as lscpu is not installed by default on these systems. Thanks!
@CiroSantilli六四事件法轮功纳米比亚威视 From github.com/gstrauss/plasma/blob/master/plasma_sysconf.c it looks like I was wrong: it’s only optional. «sysconf _SC_NPROCESSORS_ONLN and _SC_NPROCESSORS_CONF are not required by standards, but are provided on numerous unix platforms and documented as optional by Open Group.»
@HaseebJadoon, you missed enclosing the getconf command in quotes /bin/sh -c ‘getconf _NPROCESSORS_ONLN’ . Though you asked a long time ago, just wanted to share my suggestion if it is helpful for you or someone else.
- The problem with the /proc/cpuinfo -based answers is that they parse information that was meant for human consumption and thus lacks a stable format designed for machine parsing: the output format can differ across platforms and runtime conditions; using lscpu -p on Linux (and sysctl on macOS) bypasses that problem.
- getconf _NPROCESSORS_ONLN / getconf NPROCESSORS_ONLN doesn’t distinguish between logical and physical CPUs.
Here’s a sh (POSIX-compliant) snippet that works on Linux and macOS for determining the number of — online — logical or physical CPUs; see the comments for details.
Uses lscpu for Linux, and sysctl for macOS.
Terminology note: CPU refers to the smallest processing unit as seen by the OS. Non-hyper-threading cores each correspond to 1 CPU, whereas hyper-threading cores contain more than 1 (typically: 2) — logical — CPU.
Linux uses the following taxonomy [1] , starting with the smallest unit:
CPU < core < socket < book < node
with each level comprising 1 or more instances of the next lower level.
#!/bin/sh # macOS: Use `sysctl -n hw.*cpu_max`, which returns the values of # interest directly. # CAVEAT: Using the "_max" key suffixes means that the *maximum* # available number of CPUs is reported, whereas the # current power-management mode could make *fewer* CPUs # available; dropping the "_max" suffix would report the # number of *currently* available ones; see [1] below. # # Linux: Parse output from `lscpu -p`, where each output line represents # a distinct (logical) CPU. # Note: Newer versions of `lscpu` support more flexible output # formats, but we stick with the parseable legacy format # generated by `-p` to support older distros, too. # `-p` reports *online* CPUs only - i.e., on hot-pluggable # systems, currently disabled (offline) CPUs are NOT # reported. # Number of LOGICAL CPUs (includes those reported by hyper-threading cores) # Linux: Simply count the number of (non-comment) output lines from `lscpu -p`, # which tells us the number of *logical* CPUs. logicalCpuCount=$([ $(uname) = 'Darwin' ] && sysctl -n hw.logicalcpu_max || lscpu -p | egrep -v '^#' | wc -l) # Number of PHYSICAL CPUs (cores). # Linux: The 2nd column contains the core ID, with each core ID having 1 or # - in the case of hyperthreading - more logical CPUs. # Counting the *unique* cores across lines tells us the # number of *physical* CPUs (cores). physicalCpuCount=$([ $(uname) = 'Darwin' ] && sysctl -n hw.physicalcpu_max || lscpu -p | egrep -v '^#' | sort -u -t, -k 2,4 | wc -l) # Print the values. cat Note that BSD-derived systems other than macOS - e.g., FreeBSD - only support the hw.ncpu key for sysctl , which are deprecated on macOS; I'm unclear on which of the new keys hw.npu corresponds to: hw.(logical|physical)cpu_[max] .
Tip of the hat to @teambob for helping to correct the physical-CPU-count lscpu command.
Caveat: lscpu -p output does NOT include a "book" column (the man page mentions "books" as an entity between socket and node in the taxonomic hierarchy). If "books" are in play on a given Linux system (does anybody know when and how?), the physical-CPU-count command may under-report (this is based on the assumption that lscpu reports IDs that are non-unique across higher-level entities; e.g.: 2 different cores from 2 different sockets could have the same ID).
If you save the code above as, say, shell script cpus , make it executable with chmod +x cpus and place it in folder in your $PATH , you'll see output such as the following:
$ cpus logical 4 physical 4
Получаем информацию о железе сервера в Linux

31.01.2020
VyacheslavK
CentOS, Linux
Комментариев пока нет
Вы можете узнать, какое железо установлено в вашем сервере из BIOS/UEFI, или через отдельный управляющий интерфейс сервера, который есть у большинства промышленных серверов (HPE ILO, Dell iDRAC, IBM BMC, IPMI и т.д.). А что делать, если у сервера нет интерфейса управления (или он не доступен), а перезагружать сервер перезагружать не желательно? В этой статье на примере CentOS мы рассмотрим основные команды и утилиты Linux, которые позволят получить подробные сведения об аппаратном обеспечении сервера: оперативной памяти, процессоре, жестких дисках, материнской плате и настройках BIOS.
Информация об оперативной памяти (RAM) в Linux
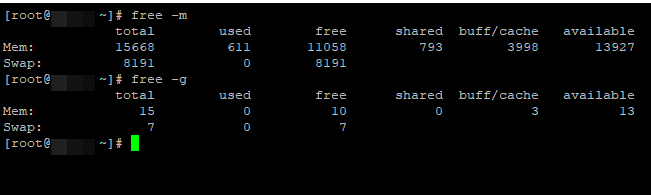
Вы можете получить информацию о количестве оперативной памяти на сервере с помощь встроенных средств Linux CentOS (данные команды не дают подробной информации, но вполне приемлемы для быстрой оценки).
Первая покажет количество памяти в мегабайтах, вторая в гигабайтах (информация о количестве оперативной памяти указано в значении Mem: total).

Тут же будет и показан размер swap.
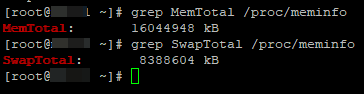
Также вы можете получить информацию о RAM из файла /proc/meminfo:
# grep MemTotal /proc/meminfo
# grep SwapTotal /proc/meminfo

Первый вариант на мой взгляд удобнее, так как вы сразу видите и используемую память, и свободную.
Так же существует еще несколько вариантов проверки количества ОЗУ на сервере:
16044948 K total memory 625540 K used memory 2677508 K active memory 514664 K inactive memory 11327980 K free memory 169676 K buffer memory 3921752 K swap cache 8388604 K total swap 0 K used swap 8388604 K free swap 3633471 non-nice user cpu ticks 2229 nice user cpu ticks 11250866 system cpu ticks 5484997226 idle cpu ticks 4290610 IO-wait cpu ticks 0 IRQ cpu ticks 1059724 softirq cpu ticks 0 stolen cpu ticks 337077 pages paged in 115989880 pages paged out 0 pages swapped in 0 pages swapped out 3806699383 interrupts 3782319298 CPU context switches 1572865665 boot time 5825288 forks
Vmstat показывает не только физическую память сервера, но и всю статистику по виртуальной памяти.
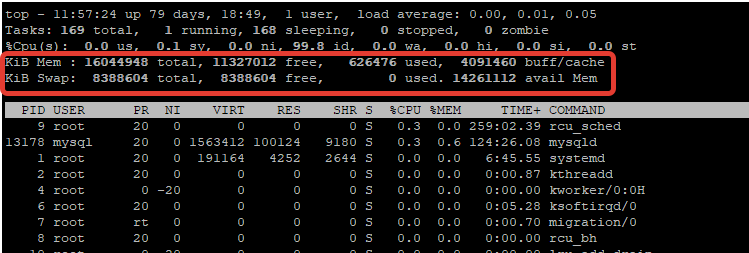
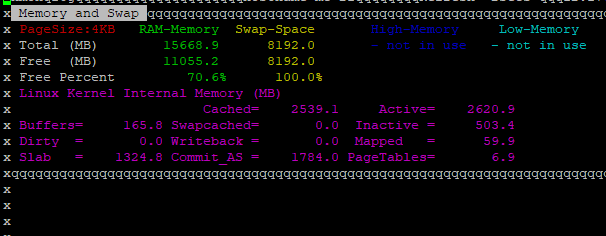
Либо запустите команду top и посмотрите информацию о RAM в самом верхнем блоке:

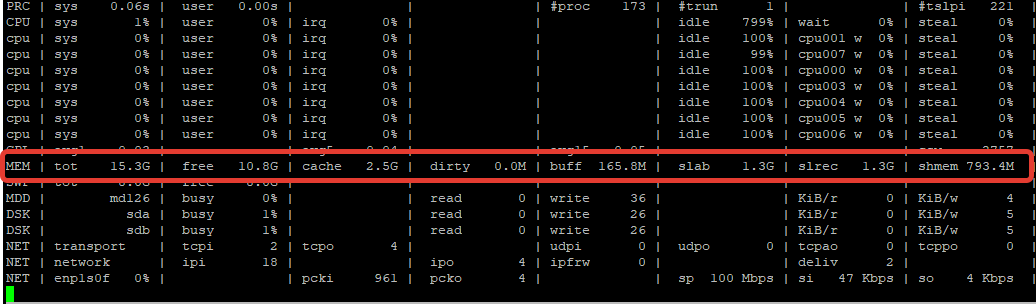
Так же, есть удобная утилита atop, которая покажет вам количество ОЗУ на сервере, а также информацию по занятой, кешированной и свободной памяти.
Вы можете установить утилиту atop из EPEL репозитория с помощью yum (dnf):

Должна быть в вашем арсенале и не менее удобная утилита nmon. Установите ее на сервер:
Выполните команду nmon, и для проверки ОЗУ нажмите m:

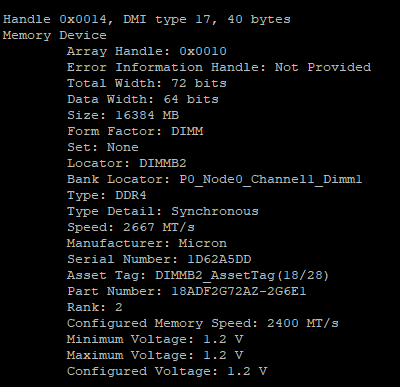
Но все вышеперечисленные утилиты, показывают лишь объем памяти, а модель скорость и другие характеристики нет. Если нужна более подробная информация о бланках памяти (производитель, тип, частота), можно воспользоваться утилитой dmidecode:

Как видите, dmidecode выводит более подробную информацию о установленных модулях памяти.
Как узнать информацию о процессоре (CPU) в Linux?
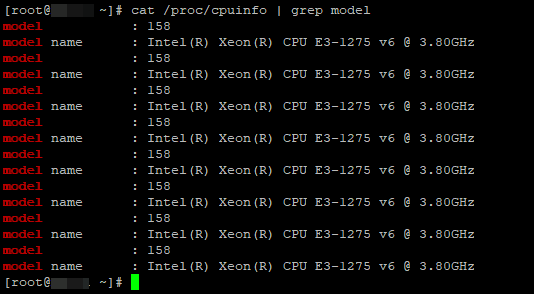
Информацию о процессоре в Linux можно получить несколькими способами. Начнем с самого простого — получение информации из файла /proc/cpuinfo:
# cat /proc/cpuinfo | grep model

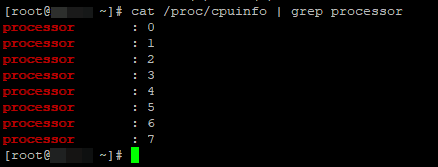
Чтобы узнать количество ядер, выполните:
# cat /proc/cpuinfo | grep processor

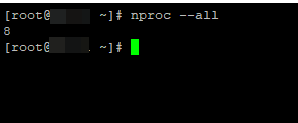
В моем случае на сервере 8 ядер.
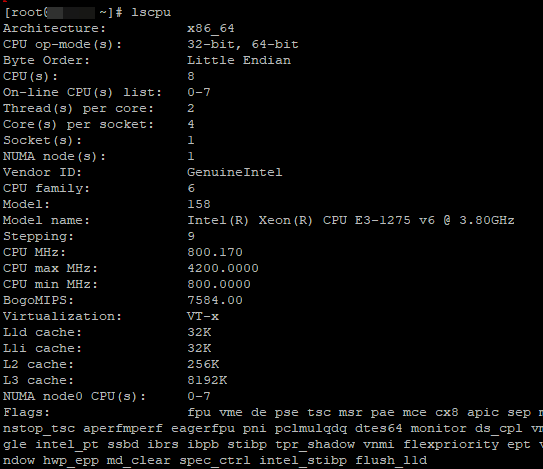
Более подробную информацию о процессоре, можно узнать командой lscpu:

Утилита lscpu покажет вам количество ядер, модель процессора, максимальную частоту, рамеры кэшей CPU, ноды NUMA и многое другое.
Количество ядер, так же можно узнать запустив команду atop или nproc --all:

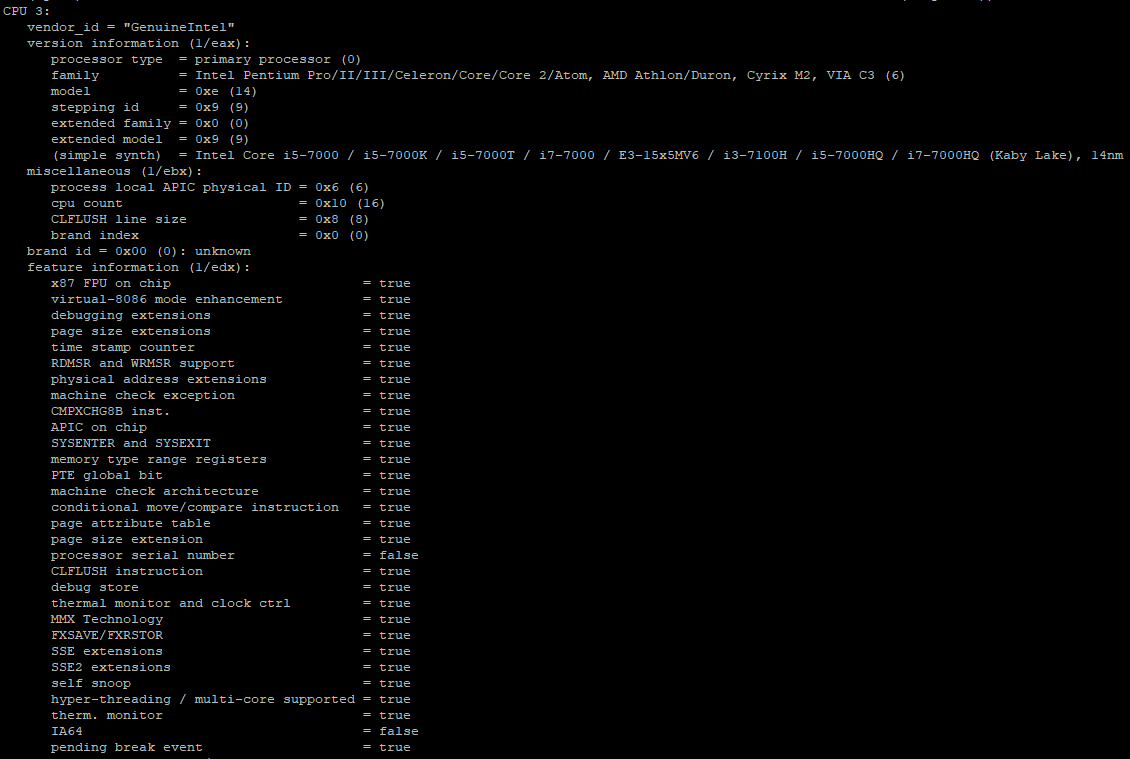
Для отображения подробной информации, можно дополнительно установить утилиту cpuid:
После установки запустите командой:

Вы получите информацию не только о модели процессора, но тип и семейство процессора, конфигурацию кеша, функцию управления питанием и другое.
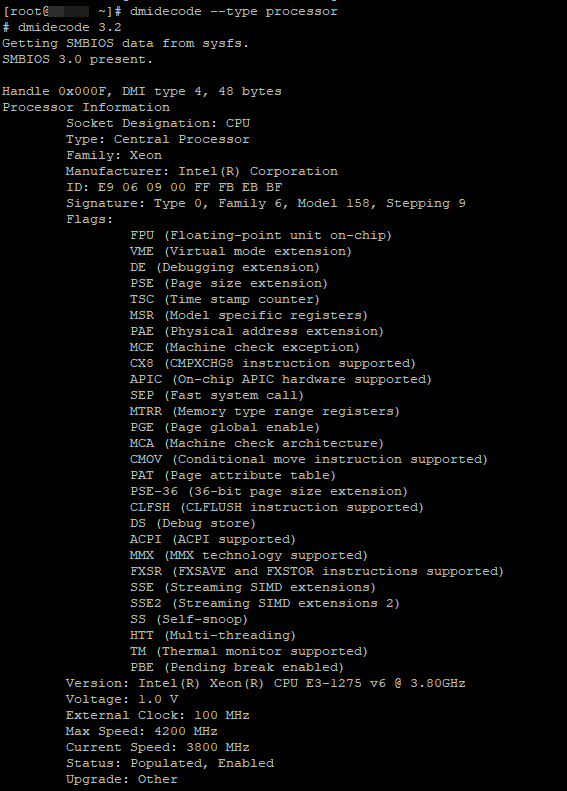
С помощью утилиты demidecodev вы так же можете узнать всю информацию об установленных на сервере процессорах:

И, пожалуй, последняя утилита для проверки процессора inxi. Это скрипт на bash, который покажет вам модель процессора, размер кеша, частоту и дополнительные возможности процессора. Установим его:

Информация о жестких дисках сервера в Linux
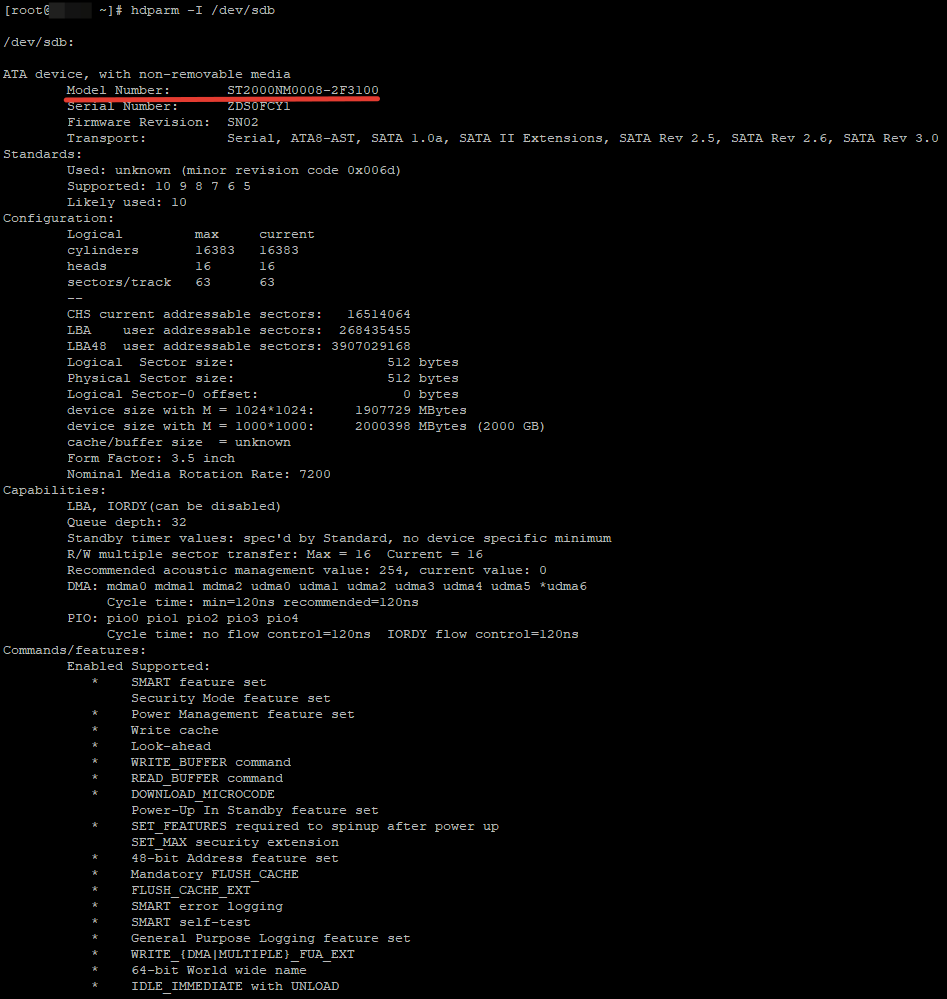
Чтобы получить информацию о жестких дисках в системе, я обычно использую утилиту hdparm. Сначала нужно установить ее из репозитория:
Чтобы получить инфу по жесткому диску, нужно указать название устройства:

Как видите, при проверке отображается модель диска, серийный номер, версия прошивки диска, цилиндрах, rpm, поддерживаемые функции и ряд другой информации.
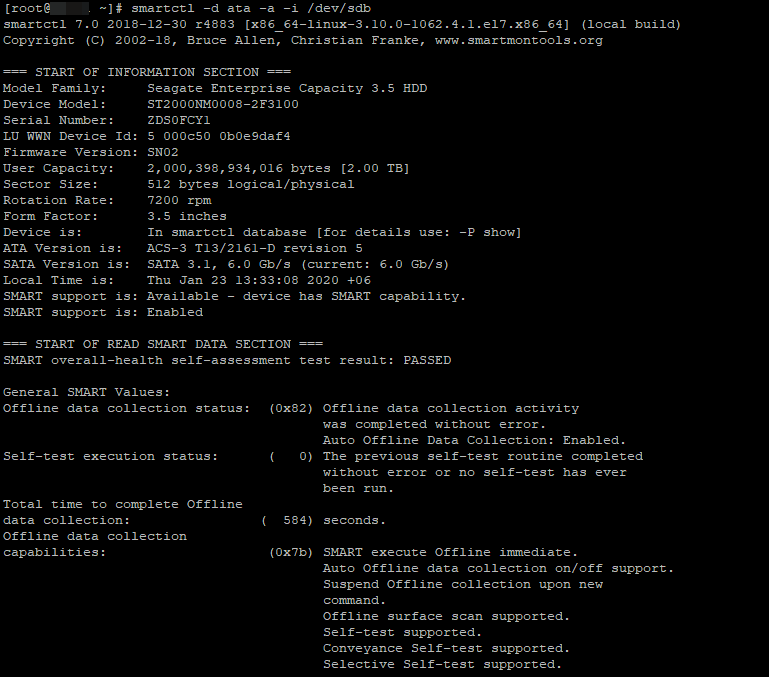
Вторая не менее популярная утилита это smartctl (она по умолчанию уже установлена в системе). Чтобы вывести информацию о диске, выполните:
# smartctl -d ata -a -i /dev/sdb
Информация будет предоставлена так же подробно:

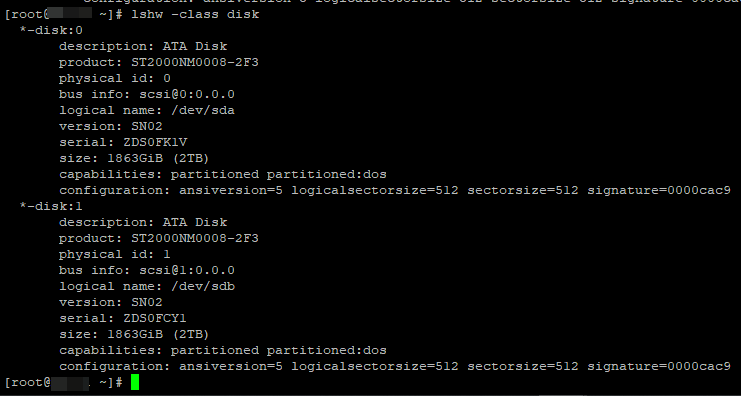
Очередная, очень удобная утилита lshw. Установите ее:

Утилита dmidecode: получения информации о материнской плате, BIOS и др.
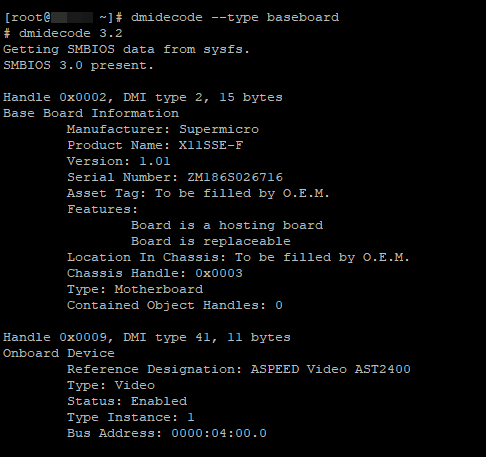
В данном разделе я приведу примеры более расширенного использования утилиты dmidecode. Dmidecode позволяет получить информацию об аппаратном обеспечении сервера на основе данных из BIOS по стандарту SMBIOS/DMI.
С помощью dmidecode мы можем получить информацию о материнской плате, bios, шасси и слотах сервера. Например:
# dmidecode --type baseboard – получим информацию о материнской плате.

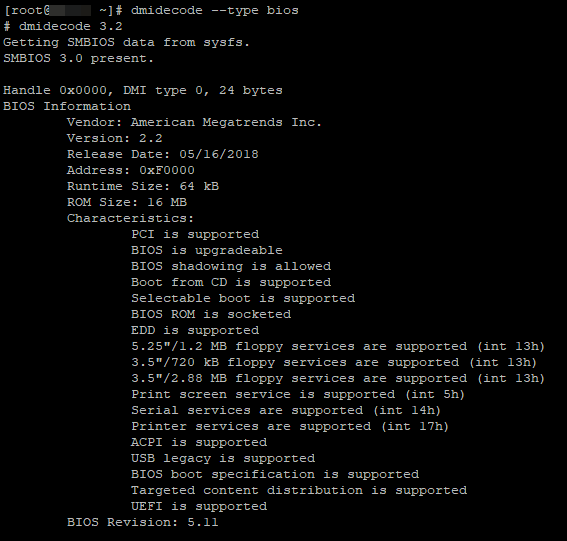
# dmidecode --type bios – информация о BIOS (версия, поддерживаемые функции).

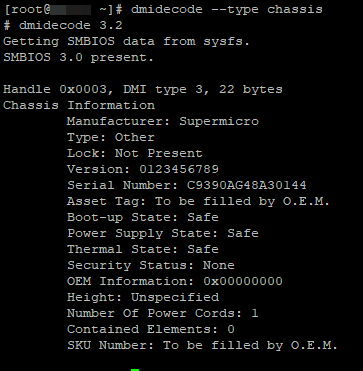
# dmidecode --type chassis – сведения о корпусе (шасси) сервера.

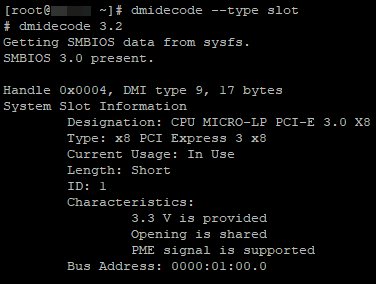
# dmidecode --type slot – сведения о используемых слотах на материнской плате.

Чтобы собрать вообще всю информацию о железе вашего сервера Linux, можно воспользоваться ранее указанную утилиту lshw:
# lshw -html > server_info.html
Вся информация будет выгружена в html файл.

Итак, мы рассмотрели, как получить информацию о аппаратном обеспечении вашего сервера. Надеюсь, информация будет полезна многим пользователям, а может и администраторам.
Предыдущая статья Следующая статья