RootUsers
Guides, tutorials, reviews and news for System Administrators.
How To Join CentOS Linux To An Active Directory Domain
Here we’ll show you how to add your Linux system to a Microsoft Windows Active Directory (AD) domain through the command line. This will allow us to SSH into the Linux server with user accounts in our AD domain, providing a central source of cross-platform authentication.
There are a number of ways to do this, however this is the easiest way that I’ve found to do it entirely through the command line.
In this example I am using CentOS 7 and Windows Server 2012 R2, however the version of Windows should not matter. We are assuming that our domain is already setup and configured, we’re simply joining our CentOS server to an existing domain.
Preparing CentOS
First we want to install all of the below packages in CentOS.
yum install sssd realmd oddjob oddjob-mkhomedir adcli samba-common samba-common-tools krb5-workstation openldap-clients policycoreutils-python -y
The CentOS server will need to be able to resolve the Active Directory domain in order to successfully join it. In this instance my DNS server in /etc/resolv.conf is set to one of the Active Directory servers hosting the example.com domain that I wish to join.
[[email protected] ~]# cat /etc/resolv.conf search example.com nameserver 192.168.1.2
Join CentOS To Windows Domain
Now that we’ve got that out of the way we can actually join the domain, this can be done with the ‘realm join’ command as shown below. You will need to specify the username of a user in the domain that has privileges to join a computer to the domain.
[[email protected] ~]# realm join --user=administrator example.com Password for administrator:
Once you enter the password for your specific account, the /etc/sssd/sssd.conf and /etc/krb.conf files will be automatically configured. This is really great as editing these manually usually leads to all sorts of trivial problems when joining the domain. The /etc/krb5.keytab file is also created during this process.
If this fails, you can add -v to the end of the command for highly verbose output, which should give you more detailed information regarding the problem for further troubleshooting.
We can confirm that we’re in the realm (Linux terminology for the domain) by running the ‘realm list’ command, as shown below.
[[email protected] ~]# realm list example.com type: kerberos realm-name: EXAMPLE.COM domain-name: example.com configured: kerberos-member server-software: active-directory client-software: sssd required-package: oddjob required-package: oddjob-mkhomedir required-package: sssd required-package: adcli required-package: samba-common-tools login-formats: %[email protected] login-policy: allow-realm-logins
Once this has completed successfully, a computer object will be created in Active Directory in the default computers container as shown below.
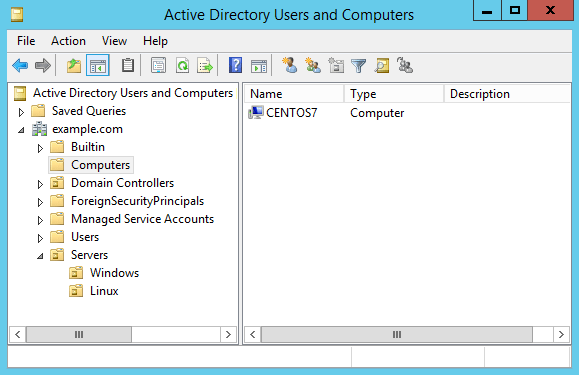
To keep things neat I like to move this into some other organizational unit (OU) for Linux servers rather than leaving things in the default computers container, however this doesn’t really matter for this exercise.
Now that our Linux server is a member of the Active Directory domain we can perform some tests. By default if we want to specify any users in the domain, we need to specify the domain name. For example with the ‘id’ command below, we get nothing back for ‘administrator’, however ‘[email protected]’ shows the UID for the account as well as all the groups the account is a member of in the Active Directory domain.
[[email protected] ~]# id administrator id: administrator: no such user [[email protected] ~]# id [email protected] uid=1829600500([email protected]) gid=1829600513(domain [email protected]) groups=1829600513(domain [email protected]),1829600512(domain [email protected]),1829600572(denied rodc password replication [email protected]),1829600519(enterprise [email protected]),1829600518(schema [email protected]),1829600520(group policy creator [email protected])
We can change this behaviour by modifying the /etc/sssd/sssd.conf file, the following lines need to change from:
use_fully_qualified_names = True fallback_homedir = /home/%u@%d
To the below, which does not require the fully qualified domain name (FQDN) to be specified. This also modifies the user directory in /home from having the FQDN specified after the username.
use_fully_qualified_names = False fallback_homedir = /home/%u
To apply these changes, restart sssd.
[[email protected] ~]# systemctl restart sssd
Now we should be able to find user accounts without specifying the domain, as shown below this now works where it did not previously.
[[email protected] ~]# id administrator uid=1829600500(administrator) gid=1829600513(domain users) groups=1829600513(domain users),1829600512(domain admins),1829600572(denied rodc password replication group),1829600520(group policy creator owners),1829600519(enterprise admins),1829600518(schema admins)
If this is still not correctly working for you, I suggest that you take a look at flushing your sssd cache.
Configuring SSH and Sudo Access
Now that we have successfully joined our CentOS server to the example.com domain, we can SSH in as any domain user from Active Directory with default settings.
[[email protected] ~]# ssh [email protected] [email protected]'s password: Creating home directory for user1.
We can further restrict SSH access by modifying the /etc/ssh/sshd_config file and make use of things like AllowUsers or AllowGroups to only allow certain user or groups from AD to have access. See our guide to the sshd_config file for further information. Don’t forget to restart sshd if you make any changes to this file in order to apply them.
We can also modify our sudoers configuration to allow our user account from the domain the desired level of access. I usually create an Active Directory group called something like ‘sudoers’, put my user in it, then allow this group sudo access by creating a file in /etc/sudoers.d/ which allows root access to be centrally controlled by AD.
Below is an example of this, the ‘sudoers’ group will have full root access.
[[email protected] ~]# cat /etc/sudoers.d/sudoers %sudoers ALL=(ALL) ALL
This group only exists in Active Directory, our Linux server can see that user1 is a member of the sudoers group in Active Directory, and respects this group configuration and allows user1 root privileges as per the above configuration.
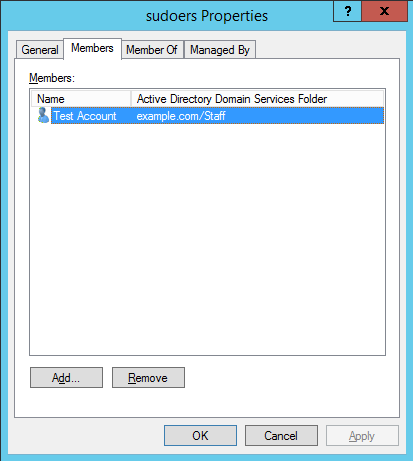
The username of Test Account is ‘user1’.
With this in place, our user1 account in the example.com Active Directory domain will now be able to use the sudo command to run commands with root privileges.
[[email protected] ~]$ sudo su [sudo] password for user1: [[email protected] user1]# [[email protected] user1]# whoami root
That’s all there is to it, we can now SSH to a Linux server with a user account from our Active Directory domain and even grant specific users or groups from AD specific levels of access.
Leaving The Domain
If you want to reverse the process and remove yourself from the domain, simply run the ‘realm leave’ command followed by the domain name, as shown below.
[[email protected] ~]# realm leave example.com
This will complete without any further user input. It will delete the computer object that was created in Active Directory, remove the keytab file, and set the sssd.conf and krb5.conf files back to default.
Summary
We have demonstrated how you can easily add your CentOS Linux system to a Microsoft Windows Active Directory domain, and then grant SSH or sudo access based on the user or group from the domain.
If you have a large number of Linux servers and an existing Windows domain you can easily use this process to add your Linux servers to the Windows domain, allowing for centralised user authentication which is far easier to manage when compared to having local user accounts spread out on every Linux server.
Share this:
Добавить Linux CentOS в домен Active Directory с помощью SSSD
Во многих мануалах в Интернете для присоединения Linux к домену Active Directory используется Samba и Winbind. В этой статье мы покажем альтернативный способ добавления в домен с помощью пакета realmd (Realm Discovery) и службы SSSD (System Security Services Daemon). В этой статье мы покажем, как добавить сервер CentOS 8.1 в ваш домен Active Directory (на базе Windows Server 2016).
Realmd позволяет произвести настройку сетевой аутентификации и членства в домене (AD или IPA/FreeIPA) без сложных настроек. Информация о домене обнаруживается автоматически. Realmd использует SSSD для аутентификации и проверки учетных записей.
Для успешного присоединения и членства в домене Active Directory вам нужно выполнить следующие требования:
- Настроить синхронизацию времени с контроллером домена Active Directory. Иначе SSSD не сможет корректно работать, т.к. эта служба поддерживает только Kerberos (не может использовать NTLM для аутентификации в домене). Соответственно разница во времени между DC и Linux клиентом не должна быть больше 5 минут.
- Необходимо изменить настройки DNS на клиенте Linux CentOS. Он должен указывать на DNS сервер на контроллерах домена AD.
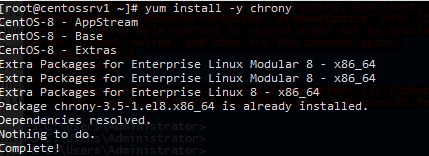
Установите в CentOS клиент ntp chrony:
Затем в конфигурационном файле /etc/chrony.conf укажите адреса NTP серверов для синхронизации времени (это могут быть ваши контроллеры домена AD).
server dc01.test.com iburst
Запустите службу NTP и добавьте ее в автозагрузку
# systemctl start chronyd
# systemctl enable chronyd
Теперь в файл /etc/resolv.conf добавьте адреса DNS-серверов, которые отвечают за разрешение имён в вашем домене Active Directory:
search vmblog.ru nameserver 192.168.1.201 nameserver 192.168.1.200

Теперь нужно установить необходимые пакеты из репозитория CentOS:
# yum install adcli krb5-workstation realmd sssd

Совет. Если у вас другой дистрибутив CentOS или старая версия Linux, убедитесь, что версия пакет SSSD новее, чем 1.9.0. Полноценная поддержка AD в SSDD появилась, начиная с этой версии. В моем примере используется sssd-2.2.
Проверьте, что утилита rearm может обнаружить ваш домен:
# realm discover vmblog.ru –verbos
Если утилита успешно обнаружит ваш домен AD, появится примерно такой лог:
* Resolving: _ldap._tcp.vmblog.ru * Performing LDAP DSE lookup on: 192.168.1.201 * Successfully discovered: vmblog.ru vmblog.ru type: kerberos realm-name: VMBLOG.RU domain-name: vmblog.ru configured: no server-software: active-directory client-software: sssd required-package: oddjob required-package: oddjob-mkhomedir required-package: sssd required-package: adcli required-package: samba-common-tools

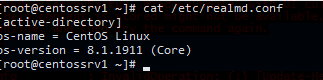
Теперь в конфигурационном файле /etc/realmd.conf нужно указать значения атрибутов operatingSystem и operatingSystemVersion.
[active-directory] os-name = CentOS Linux os-version = 8.1.1911 (Core)
Теперь можно добавить ваш сервер CentOS в Active Directory. Для этого используется команда realm join . В следующей команде мы указали имя пользователя с правами добавления в домен и OU, в который нужно поместить учетную запись вашего компьютера Linux.
# realm join —user=aivanov —computer-ou=»OU=Servers,OU=MSK,DC=vmblog,DC=ru» vmblog.ru
Утилита запросит пароль пользователя AD. После выполнения команды откройте консоль Active Directory Users and Computers (dsa.msc), и убедитесь, что в указанном контейнере AD появилась учетная запись для вашего сервера CentOS.

Выполните команду realm list и убедитесь, что появилась строка
server-software: active-directory
Это означает что данный сервер является членом домена Active Directory.
Чтобы не вводить полное имя домена при входе пользователей, можете добавить в файл /etc/sssd/sssd.conf строку:
use_fully_qualified_names = False