- Роутинг и policy-routing в Linux при помощи iproute2
- ip route
- ip rule
- Простой пример
- Доступность сервера через несколько аплинков
- Балансировка трафика между аплинками
- Использование маркировки пакетов при помощи iptables
- How to Add and Delete Static Route in Linux using IP Command
- Viewing the existing routing table
- Adding a static route using IP command
- Permanently adding static route (RHEL, Fedora, CentOS)
- Permanently adding static route (Ubuntu / Debian)
- Deleting a static route
Роутинг и policy-routing в Linux при помощи iproute2
Речь в статье пойдет о роутинге сетевых пакетов в Linux. А конкретно – о типе роутинга под названием policy-routing (роутинг на основании политик). Этот тип роутинга позволяет маршрутизировать пакеты на основании ряда достаточно гибких правил, в отличие от классического механизма маршрутизации destination-routing (роутинг на основании адреса назначения). Policy-routing применяется в случае наличия нескольких сетевых интерфейсов и необходимости отправлять определенные пакеты на определенный интерфейс, причем пакеты определяются не по адресу назначения или не только по адресу назначения. Например, policy-routing может использоваться для: балансировки трафика между несколькими внешними каналами (аплинками), обеспечения доступа к серверу в случае нескольких аплинков, при необходимости отправлять пакеты с разных внутренних адресов через разные внешние интерфейсы, даже для отправки пакетов на разные TCP-порты через разные интерфейсы и т.д.
Для управления сетевыми интерфейсами, маршрутизацией и шейпированием в Linux служит пакет утилит iproute2.
Этот набор утилит лишь задает настройки, реально вся работа выполняется ядром Linux. Для поддержки ядром policy-routing оно должно быть собрано с включенными опциями IP: advanced router (CONFIG_IP_ADVANCED_ROUTER) и IP: policy routing (CONFIG_IP_MULTIPLE_TABLES), находящимися в разделе Networking support -> Networking options -> TCP/IP networking.
ip route
Для настройки роутинга служит команда ip route. Выполненная без параметров, она покажет список текущих правил маршрутизации (не все правила, об этом чуть позже):
# ip route 192.168.12.0/24 dev eth0 proto kernel scope link src 192.168.12.101 default via 192.168.12.1 dev eth0
Так будет выглядеть роутинг при использовании на интерфейсе eth0 IP-адреса 192.168.12.101 с маской подсети 255.255.255.0 и шлюзом по умолчанию 192.168.12.1.
Мы видим, что трафик на подсеть 192.168.12.0/24 уходит через интерфейс eth0. proto kernel означает, что роутинг был задан ядром автоматически при задании IP интерфейса. scope link означает, что эта запись является действительной только для этого интерфейса (eth0). src 192.168.12.101 задает IP-адрес отправителя для пакетов, попадающих под это правило роутинга.
Трафик на любые другие хосты, не попадающие в подсеть 192.168.12.0/24 будет уходить на шлюз 192.168.12.1 через интерфейс eth0 ( default via 192.168.12.1 dev eth0 ). Кстати, при отправке пакетов на шлюз, IP-адрес назначения не изменяется, просто в Ethernet-фрейме в качестве MAC-адреса получателя будет указан MAC-адрес шлюза (часто даже специалисты со стажем путаются в этом моменте). Шлюз в свою очередь меняет IP-адрес отправителя, если используется NAT, либо просто отправляет пакет дальше. В данном случае используются приватный адрес (192.168.12.101), так что шлюз скорее всего делает NAT.
А теперь залезем в роутинг поглубже. На самом деле, таблиц маршрутизации несколько, а также можно создавать свои таблицы маршрутизации. Изначально предопределены таблицы local, main и default. В таблицу local ядро заносит записи для локальных IP адресов (чтобы трафик на эти IP-адреса оставался локальным и не пытался уходить во внешнюю сеть), а также для бродкастов. Таблица main является основной и именно она используется, если в команде не указано какую таблицу использовать (т.е. выше мы видели именно таблицу main). Таблица default изначально пуста. Давайте бегло взглянем на содержимое таблицы local:
# ip route show table local broadcast 127.255.255.255 dev lo proto kernel scope link src 127.0.0.1 broadcast 192.168.12.255 dev eth0 proto kernel scope link src 192.168.12.101 broadcast 192.168.12.0 dev eth0 proto kernel scope link src 192.168.12.101 local 192.168.12.101 dev eth0 proto kernel scope host src 192.168.12.101 broadcast 127.0.0.0 dev lo proto kernel scope link src 127.0.0.1 local 127.0.0.1 dev lo proto kernel scope host src 127.0.0.1 local 127.0.0.0/8 dev lo proto kernel scope host src 127.0.0.1
broadcast и local определяют типы записей (выше мы рассматривали тип default ). Тип broadcast означает, что пакеты соответствующие этой записи будут отправлены как broadcast-пакеты, в соответствии с настройками интерфейса. local – пакеты будут отправлены локально. scope host указывает, что эта запись действительная только для этого хоста.
Для просмотра содержимого конкретной таблицы используется команда ip route show table TABLE_NAME . Для просмотра содержимого всех таблиц в качестве TABLE_NAME следует указывать all , unspec или 0 . Все таблицы на самом деле имеют цифровые идентификаторы, их символьные имена задаются в файле /etc/iproute2/rt_tables и используются лишь для удобства.
ip rule
Как же ядро выбирает, в какую таблицу отправлять пакеты? Все логично – для этого есть правила. В нашем случае:
# ip rule 0: from all lookup local 32766: from all lookup main 32767: from all lookup default
- from – мы уже рассматривали выше, это проверка отправителя пакета.
- to – получатель пакета.
- iif – имя интерфейса, на который пришел пакет.
- oif – имя интерфейса, с которого уходит пакет. Это условие действует только для пакетов, исходящих из локальных сокетов, привязанных к конкретному интерфейсу.
- tos – значение поля TOS IP-пакета.
- fwmark – проверка значения FWMARK пакета. Это условие дает потрясающую гибкость правил. При помощи правил iptables можно отфильтровать пакеты по огромному количеству признаков и установить определенные значения FWMARK. А затем эти значения учитывать при роутинге.
Простой пример
Теперь рассмотрим простой пример. У нас есть некий шлюз, на него приходят пакеты с IP 192.168.1.20. Пакеты с этого IP нужно отправлять на шлюз 10.1.0.1. Чтобы это реализовать делаем следующее:
Создаем таблицу с единственным правилом:
# ip route add default via 10.1.0.1 table 120
# ip rule add from 192.168.1.20 table 120
Доступность сервера через несколько аплинков

Теперь более реалистичный пример. Имеется два аплинка до двух провайдеров, необходимо обеспечить доступность сервера с обоих каналов:
В качестве маршрута по умолчанию используется один из провайдеров, не важно какой. При этом веб-сервер будет доступен только через сеть этого провайдера. Запросы через сеть другого провайдера приходить будут, но ответные пакеты будут уходить на шлюз по умолчанию и ничего из этого не выйдет.
Решается это весьма просто:
Определяем таблицы:
# ip route add default via 11.22.33.1 table 101 # ip route add default via 55.66.77.1 table 102
# ip rule add from 11.22.33.44 table 101 # ip rule add from 55.66.77.88 table 102
Думаю теперь уже объяснять смысл этих строк не надо. Аналогичным образом можно сделать доступность сервера по более чем двум аплинкам.
Балансировка трафика между аплинками
# ip route replace default scope global \ nexthop via 11.22.33.1 dev eth0 weight 1 \ nexthop via 55.66.77.1 dev eth1 weight 1
Эта запись заменит существующий default-роутинг в таблице main. При этом маршрут будет выбираться в зависимости от веса шлюза ( weight ). Например, при указании весов 7 и 3, через первый шлюз будет уходить 70% соединений, а через второй – 30%. Есть один момент, который при этом надо учитывать: ядро кэширует маршруты, и маршрут для какого-либо хоста через определенный шлюз будет висеть в таблице еще некоторое время после последнего обращения к этой записи. А маршрут до часто используемых хостов может не успевать сбрасываться и будет все время обновляться в кэше, оставаясь на одном и том же шлюзе. Если это проблема, то можно иногда очищать кэш вручную командой ip route flush cache .
Использование маркировки пакетов при помощи iptables
Допустим нам нужно, чтобы пакеты на 80 порт уходили только через 11.22.33.1. Для этого делаем следующее:
# iptables -t mangle -A OUTPUT -p tcp -m tcp --dport 80 -j MARK --set-mark 0x2 # ip route add default via 11.22.33.1 dev eth0 table 102 # ip rule add fwmark 0x2/0x2 lookup 102
Первой командой маркируем все пакеты, идущие на 80 порт. Второй командой создаем таблицу маршрутизации. Третьей командой заворачиваем все пакеты с указанной маркировкой в нужную таблицу.
Опять же все просто. Рассмотрим также использование модуля iptables CONNMARK. Он позволяет отслеживать и маркировать все пакеты, относящиеся к определенному соединению. Например, можно маркировать пакеты по определенному признаку еще в цепочке INPUT, а затем автоматически маркировать пакеты, относящиеся к этим соединениям и в цепочке OUTPUT. Используется он так:
# iptables -t mangle -A INPUT -i eth0 -j CONNMARK --set-mark 0x2 # iptables -t mangle -A INPUT -i eth1 -j CONNMARK --set-mark 0x4 # iptables -t mangle -A OUTPUT -j CONNMARK --restore-mark
Пакеты, приходящие с eth0 маркируются 2, а с eth1 – 4 (строки 1 и 2). Правило на третьей строке проверяет принадлежность пакета к тому или иному соединению и восстанавливает маркировки (которые были заданы для входящих) для исходящих пакетов.
Надеюсь изложенный материал поможет вам оценить всю гибкость роутинга в Linux. Спасибо за внимание 🙂
How to Add and Delete Static Route in Linux using IP Command
Part of the skill set for any Linux user, and particularly a systems administrator, is the ability to perform some network tweaks on a Linux system. This includes adding and deleting routes to enable the system to communicate with other systems o a local network. In this guide, we explore exactly how you can go about adding and deleting routes on a Linux system.
Viewing the existing routing table
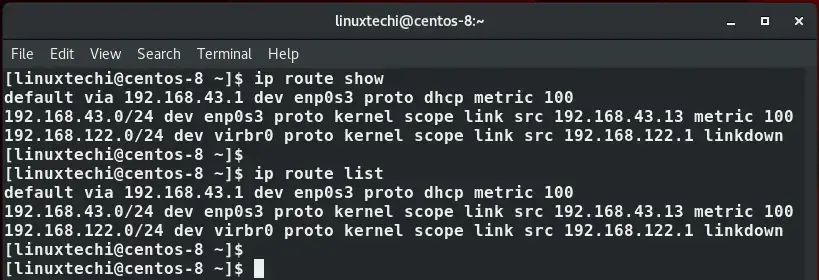
Before we embark on adding or deleting routes, it’s prudent to check the existing default routes on a system. To do so, simply launch your terminal and issue the command:
$ ip route show Or $ ip route list
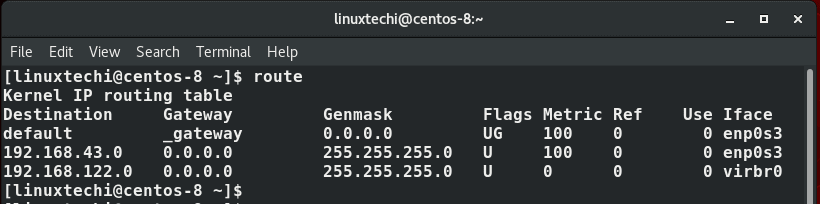
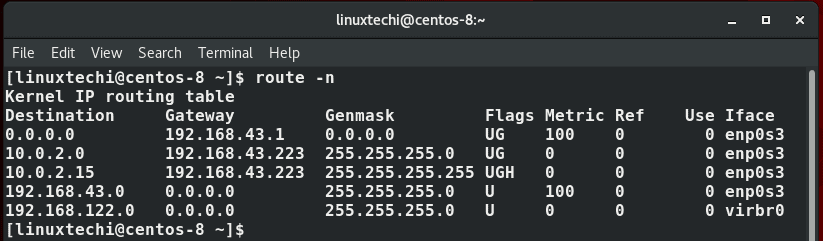
Similar statistics can be displayed using route command,
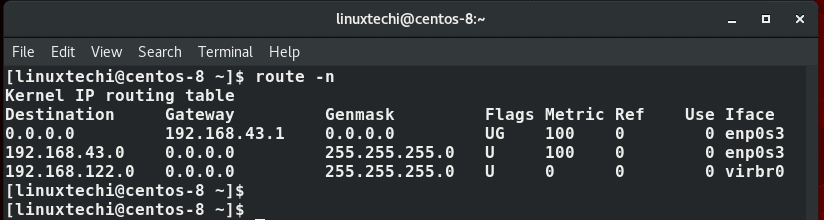
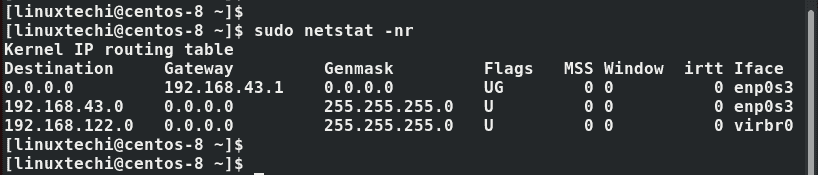
Also, you can use the good old netstat command, which is usually used for printing interface statistics as well as the routing table to achieve the same result.
With the default routing statistics in mind, let’s now move a step further and add some routes to our system.
Adding a static route using IP command
Suppose you want to take a backup of a Linux machine and push the backup file to another backup server in the subnet 10.0.2.0/24 . However, for one reason or the other, you cannot reach the backup server via the default gateway. In this case, you will have to create a new route for backup server subnet via another IP, say 192.168.43.223 via the interface enp0s3 .
The command for this will be
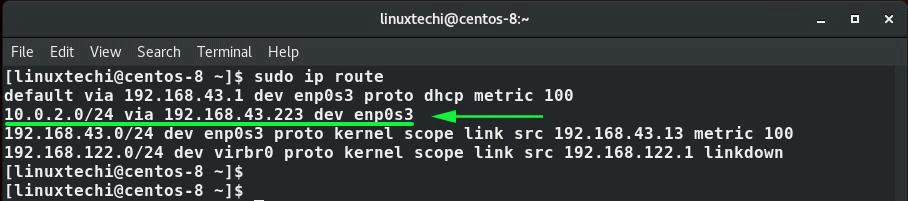
$ sudo ip route add 10.0.2.0/24 via 192.168.43.223 dev enp0s3

- 10.0.2.0 -> is the network you want to connect to
- /24 -> is the subnet mask
- 192.168.43.223 -> is the IP through which we will reach the server
- enp0s3 -> is the network interface
You can confirm whether new static route add been in route table using “ip route show” command.
To add the specific IP of the backup server, say 10.0.2.15 run the command:
$ sudo ip route add 10.0.2.15 via 192.168.43.223 dev enp0s3

Once again, you can check the routing changes to see if the changes exist using the ip route show command:

Permanently adding static route (RHEL, Fedora, CentOS)
The routes we have just added are temporary and will not survive a reboot. To make the routes persistent, you need to manually add them.
In the /etc/sysconfig/network-scripts/ directory, create an interface file route-interface where the interface attribute is your network interface name. In our case, this will be route-enp0s3 .
$ vim /etc/sysconfig/network-scripts/route-enps03
Next, we will add the routes as shown:
10.0.2.0/32 via 192.168.43.1 10.0.2.15 via 192.168.43.1
Save the file and exit. Then restart NetworkManager Service
$ sudo systemctl restart NetworkManager
Permanently adding static route (Ubuntu / Debian)
For Debian distributions, edit the file /etc/network/interfaces
$ sudo vim /etc/network/interfaces
Append the following line:
up route add -net 10.0.2.0 netmask 255.255.255.0 gw 192.168.43.1 dev enp0s3
Save and exit the file. Finally, for the changes to come into effect, run below commands
$ sudo ifdown enp0s3 && sudo ifup enp0s3
Deleting a static route
To delete a specific route, use the ip route del command. For example, to remove the route address we just added, run the command:
$ sudo ip route del 10.0.2.0/24 via 192.168.43.223 dev enp0s3

To delete a single IP route in a subnet run the command
$ sudo ip route del 10.0.2.15 via 192.168.43.223 dev enp0s3

To delete default route run:
$ sudo ip route del default
To add a default route run below ‘ip route add’ command,
$ sudo ip route add default via dev interface
$ sudo ip route add default via 192.168.43.1 dev eth0
We hope that this tutorial was informative and provided you with insights into how you can go about adding and deleting static route in Linux.
Also Read : 12 ip Command Examples for Linux Users