Swap
This page provides an introduction to swap space and paging on GNU/Linux. It covers creation and activation of swap partitions and swap files.
Linux divides its physical RAM (random access memory) into chunks of memory called pages. Swapping is the process whereby a page of memory is copied to the preconfigured space on the hard disk, called swap space, to free up that page of memory. The combined sizes of the physical memory and the swap space is the amount of virtual memory available.
Support for swap is provided by the Linux kernel and user-space utilities from the util-linux package.
Swap space
Swap space can take the form of a disk partition or a file. Users may create a swap space during installation or at any later time as desired. Swap space can be used for two purposes, to extend the virtual memory beyond the installed physical memory (RAM), and also for suspend-to-disk support.
If it is beneficial to extend the virtual memory with swap depends on the amount of installed physical memory. If the amount of physical memory is less than the amount of memory required to run all the desired programs, then it may be beneficial to enable swap. This avoids out of memory conditions, where the Linux kernel OOM killer mechanism will automatically attempt to free up memory by killing processes. To increase the amount of virtual memory to the required amount, add the necessary difference (or more) as swap space.
The biggest drawback of enabling swap is its lower performance, see section #Performance. Hence, enabling swap is a matter of personal preference: some prefer programs to be killed over enabling swap and others prefer enabling swap and slower system when the physical memory is exhausted.
The factual accuracy of this article or section is disputed.
Reason: Linus Torvalds says that swap partitions are preferable: «all the normal distributions set things up with swap partitions, not files, because honestly, swapfiles tend to be slower and have various other complexity issues.» (Discuss in Talk:Swap)
Or to show physical memory as well as swap usage:
Swap partition
A swap partition can be created with most GNU/Linux partitioning tools. Swap partitions are designated as type 82 on MBR and 0657FD6D-A4AB-43C4-84E5-0933C84B4F4F on GPT.
To set up a partition as Linux swap area, the mkswap(8) command is used. For example:
To enable the device for paging:
To enable this swap partition on boot, add an entry to /etc/fstab :
UUID=device_UUID none swap defaults 0 0
where the device_UUID is the UUID of the swap space.
Note: The fstab-entry is optional if the swap partition is located on a device using GPT. See #Activation by systemd.
Warning: Enabling discard on RAID setups using mdadm will cause system lockup on boot and during runtime, if using swapon.
Activation by systemd
systemd activates swap partitions based on two different mechanisms. Both are executables in /usr/lib/systemd/system-generators . The generators are run on start-up and create native systemd units for mounts. The first, systemd-fstab-generator , reads the fstab to generate units, including a unit for swap. The second, systemd-gpt-auto-generator inspects the root disk to generate units. It operates on GPT disks only, and can identify swap partitions by their type GUID, see systemd#GPT partition automounting for more information.
Disabling swap
To deactivate specific swap space:
Alternatively use the -a switch to deactivate all swap space.
Since swap is managed by systemd, it will be activated again on the next system startup. To disable the automatic activation of detected swap space permanently, run systemctl —type swap to find the responsible .swap unit and mask it.
Swap file
As an alternative to creating an entire partition, a swap file offers the ability to vary its size on-the-fly, and is more easily removed altogether. This may be especially desirable if disk space is at a premium (e.g. a modestly-sized SSD).
Swap file creation
Use dd to create a swap file the size of your choosing. For example, creating an 8 GiB swap file:
# dd if=/dev/zero of=/swapfile bs=1M count=8k status=progress
Note: Using dd to allocate a swap file is the most portable solution, see swapon(8) § Files with holes for details.
Set the right permissions (a world-readable swap file is a huge local vulnerability):
After creating the correctly sized file, format it to swap:
Finally, edit the fstab configuration to add an entry for the swap file:
/swapfile none swap defaults 0 0
For additional information, see fstab#Usage.
Note: The swap file must be specified by its location on the file system, not by its UUID or LABEL.
Swap file removal
To remove a swap file, it must be turned off first and then can be removed:
# swapoff /swapfile # rm -f /swapfile
Finally, remove the relevant entry from /etc/fstab .
Compressed block device in RAM
zswap is available by default if you use a swap file or partition, but you can avoid swap files or partitions altogether by using a compressed block device in RAM, using zram. See Improving performance#zram or zswap for more information on the differences between using zram or zswap.
Swap encryption
Performance
Swap operations are usually significantly slower than directly accessing data in RAM. Disabling swap entirely to improve performance can sometimes lead to a degradation, since it decreases the memory available for virtual file system (VFS) caches, causing more frequent and costly disk usage.
Swap values can be adjusted to help performance:
Swappiness
When memory usage reaches a certain threshold, the kernel starts looking at active memory and seeing what it can free up. File data can be written out to the file system (if changed), unloaded and re-loaded later; other data must be written to swap before it can be unloaded.
Note: There is a common misconception that swappiness affects the memory threshold or prevents using swap space, but it only affects the preference for freeing up file pages over swap. See: this article for a more detailed explanation or the the kernel source code where it is used.
To check the current swappiness value:
Alternatively, the files /sys/fs/cgroup/memory/memory.swappiness (cgroup v1-specific) or /proc/sys/vm/swappiness can be read in order to obtain the raw integer value.
To temporarily set the swappiness value:
To set the swappiness value permanently, create a sysctl.d(5) configuration file. For example:
/etc/sysctl.d/99-swappiness.conf
To have the boot loader set swappiness when loading the kernel, add a kernel parameter, e.g. sysctl.vm.swappiness=10 .
To test and more on why this may work, take a look at this article. For a more recent counter-argument, see this article.
VFS cache pressure
Another sysctl parameter that affects swap performance is vm.vfs_cache_pressure , which controls the tendency of the kernel to reclaim the memory which is used for caching of VFS caches, versus pagecache and swap. Increasing this value increases the rate at which VFS caches are reclaimed[1]. For more information, see the Linux kernel documentation.
Priority
If you have more than one swap file or swap partition you should consider assigning a priority value (0 to 32767) for each swap area. The system will use swap areas of higher priority before using swap areas of lower priority. For example, if you have a faster disk ( /dev/sda ) and a slower disk ( /dev/sdb ), assign a higher priority to the swap area located on the fastest device. Priorities can be assigned in fstab via the pri parameter:
/dev/sda1 none swap defaults,pri=100 0 0 /dev/sdb2 none swap defaults,pri=10 0 0
Or via the —priority parameter of swapon:
# swapon --priority 100 /dev/sda1
If two or more areas have the same priority, and it is the highest priority available, pages are allocated on a round-robin basis between them.
Striping
There is no necessity to use RAID for swap performance reasons. The kernel itself can stripe swapping on several devices, if you just give them the same priority in the /etc/fstab file. Refer to The Software-RAID HOWTO for details.
See also
Добавить swap раздел в linux
Настраивал очередной новый VDS сервер. Обнаружил, что после установки из стандартного шаблона хостинга, сервер без swap файла. Мониторинг zabbix после установки ругается на отсутствие свопа. Не стал отключать триггер, решил быстро добавить своп, в принципе, он может пригодиться.
Если у вас есть желание научиться профессионально строить и поддерживать высокодоступные виртуальные и кластерные среды, рекомендую познакомиться с онлайн-курсом Администратор Linux. Виртуализация и кластеризация в OTUS. Курс не для новичков, для поступления нужно пройти вступительный тест.
Инструкция подойдет практически к любому линуксу, не зависимо от версии. Для начала проверим, есть ли у нас swap раздел или нет:
Если в выводе пусто, значит раздела нет.
Первым делом создаем файл для наших целей:
# dd if=/dev/zero of=/swap bs=1024 count=1000000
Размер файла 1Гб, равен объему памяти на сервере. Можно сделать и в 2 раза больше, но не вижу в этом необходимости. Вы выбирайте размер на свое усмотрение.
Форматируем файл в формат свопа:
Подключаем файл к системе:
# chmod 0600 /swap # swapon /swap
Проверяем результат работы:
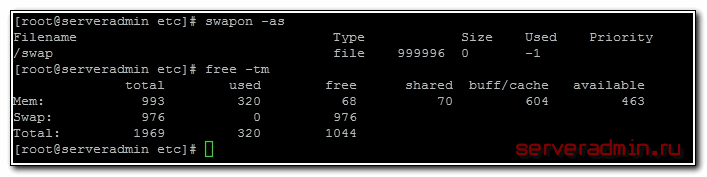
Все в порядке, раздел добавлен. Теперь нам нужно сделать так, чтобы swap раздел монтировался при загрузке. Для этого добавляем в fstab строку:
/swap swap swap defaults 0 0
Не забываем в конце файла сделать переход на новую строку. Сохраняем fstab, перезагружаемся и проверяем.
Если вдруг решите, что своп вам больше не нужен, отключить его так же просто, как и подключить:
Дальше можно удалять сам файл и вычищать его из fstab.
Онлайн курс по Linux
- Умение строить отказоустойчивые кластера виртуализации для запуска современных сервисов, рассчитанных под высокую нагрузку.
- Будете разбираться в современных технологиях кластеризации, оркестрации и виртуализации.
- Научитесь выбирать технологии для построения отказоустойчивых систем под высокую нагрузку.
- Практические навыки внедрения виртуализации KVM, oVirt, Xen.
- Кластеризация сервисов на базе pacemaker,k8s, nomad и построение дисковых кластеров на базе ceph, glaster, linstore.