- How to Create a New Ext4 File System (Partition) in Linux
- Creating a New Partition in Linux
- Formatting New Ext4 Partition
- Mounting New Ext4 Parition in File System
- Related Posts
- 13 thoughts on “How to Create a New Ext4 File System (Partition) in Linux”
- How to Create Partitions in Linux
- Option 1: Partition a Disk Using parted Command
- Step 1: List Partitions
- Step 2: Open Storage Disk
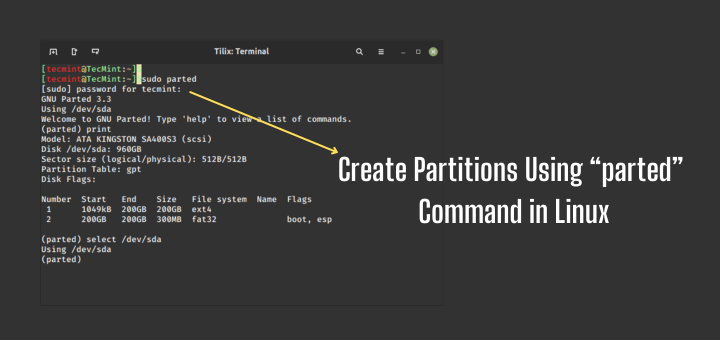
- Step 3: Make a Partition Table
- Step 4: Check Table
- Step 5: Create Partition
- Option 2: Partition a Disk Using fdisk Command
- Step 1: List Existing Partitions
- Step 2: Select Storage Disk
- Step 3: Create a New Partition
- Step 4: Write on Disk
- Format the Partition
- Mount the Partition
How to Create a New Ext4 File System (Partition) in Linux
The ext4 or fourth extended filesystem is a widely-used journaling file system for Linux. It was designed as a progressive revision of the ext3 file system and overcomes a number of limitations in ext3.
It has significant advantages over its predecessor such as improved design, better performance, reliability, and new features. Although it is best suited for hard drives, it can also be used on removable devices.
This article will show you how to create a new ext4 file system (partition) in Linux. We will first of all look at how to create a new partition in Linux, format it with the ext4 file system and mount it.
Note: For the purpose of this article:
- We will assume that you have added a new hard drive to your Linux machine, in which you will create the new ext4 partition, and
- If you are operating the system as an administrative user, use the sudo command to gain root privileges to run the commands shown in this article.
Creating a New Partition in Linux
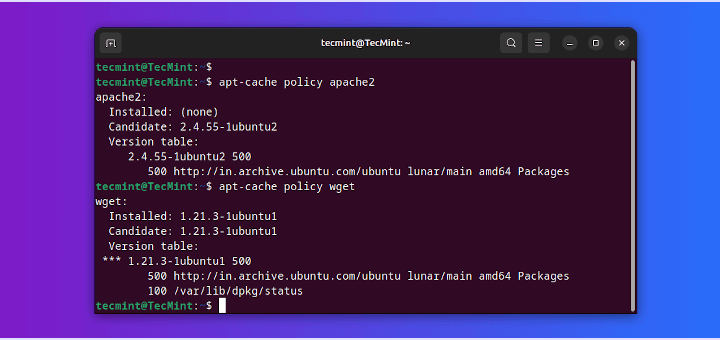
List the partitions using the fdisk -l or parted -l commands to identify the hard drive you want to partition.

Looking at the output in the screenshot above, we have two hard disks added on the test system and we will partition disk /dev/sdb .
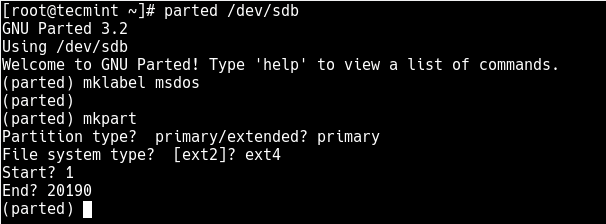
Now use parted command to start creating the partition on the selected storage device.
Then create a partition using the mkpart command, give it additional parameters like “primary” or “logical” depending on the partition type that you wish to create. Then select ext4 as the file system type, set the start and end to establish the size of the partition:
(parted) mkpart Partition type? primary/extended? primary File system type? [ext2]? ext4 Start? 1 End? 20190
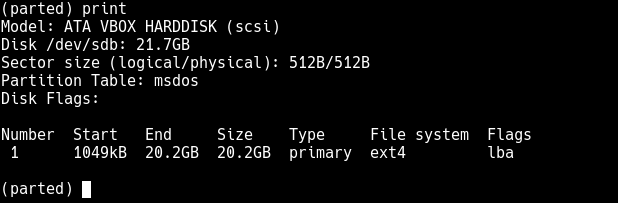
To print the partition table on the device /dev/sdb or detailed information about the new partition, run the print command.
Now exit the program using the quit command.
Formatting New Ext4 Partition
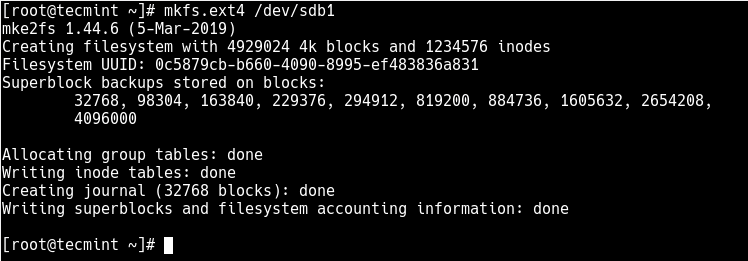
Next, you need to properly format the new partition with the ext4 file system type using the mkfs.ext4 or mke4fs command as follows.
# mkfs.ext4 /dev/sdb1 OR # mke4fs -t ext4 /dev/sdb1
Then label the partition using the e4label command as follows.
# e4label /dev/sdb1 disk2-part1 OR # e2label /dev/sdb1 disk2-part1
Mounting New Ext4 Parition in File System
Next, create a mount point and mount the newly created ext4 partition file system.
# mkdir /mnt/disk2-part1 # mount /dev/sdb1 //mnt/disk2-part1
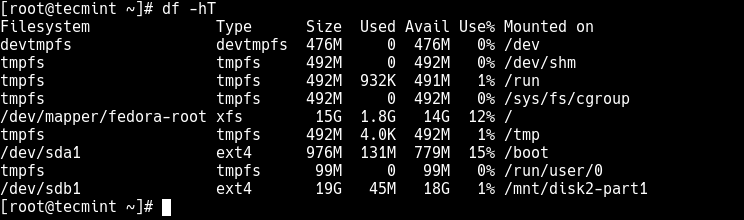
Now using the df command, you can list all file systems on your system together with their sizes in a human readable format (-h) , and their mount points and file system types (-T) :
Lastly, add the following entry in your /etc/fstab to enable persistent mounting of the file system, even after a reboot.
/dev/sdb1 /mnt/disk2-part1 ext4 defaults 0 0
You might also like to read these following related articles:
That’s all! In this article, we’ve explained how to create a new partition in Linux, format it with ext4 file system type and mount it as a filesystem. For more information or to share any queries with us, use the feedback form below.
I am an experienced GNU/Linux expert and a full-stack software developer with over a decade in the field of Linux and Open Source technologies
Each tutorial at TecMint is created by a team of experienced Linux system administrators so that it meets our high-quality standards.
Related Posts
13 thoughts on “How to Create a New Ext4 File System (Partition) in Linux”
Hello, I don’t know how Ravi Saive found out the size of the partition, but I’ve found you can use percent to size the partition (you can reply 100% to the question End? and it uses the whole free space available) Reply
Another thing that is missing is what sector size should be considered (physical or logical). In this example, it did not matter because both were the same. However, in my case the two are not the same. Which to choose? I would think that it is the logical sector size, but if we are dealing with /dev/sda (in my case), perhaps this indicates the use of the physical sector size. Reply
This would be a wonderful tutorial if I knew how you got the size for the new partition. It seems that you pulled the number 20190 out of thin air! How do I get the right number if I want to use the whole disk? Reply
0% and 100% as start and end work. Looks like the author copied some really old instructions. mklabel gpt should be your go-to today, otherwise, you will get errors with disks over 2.5ishTB Reply
Thanks for this article. Is there a way of renaming /mnt/disk2-part1 to something else than “disk2-part1“? Reply
# e2abel /dev/sdb1 disk2-part1
I prefer to use GParted to do my disk manipulations. With GParted I do not need to learn and remember cryptic, unintuitive commands. With a GUI application, there is much less chance of using the wrong option or misspelling a command and completely wiping out the entire disk. Reply
People for whom these instructions would be beneficial do not use servers. OTOH, people who use or deal with servers have this procedure memorized. Judging by the questions and comments so far, it seems that the posters have very little idea of what is being done. By using a GUI tool like GParted, they would SEE what is happening with the disk they are trying to partition rather than having to imagine it. I am all for using CLI but when it is actually an improvement on GUI. This is 2021 and, in the 30 years of Linux’s existence, many CLI procedures have been released as GUI tools. For some reason, Linux tech writers are pushing the command line as if it was The Greatest Thing Since Sliced Bread. Sure, CLI may be l33t but it certainly IS NOT inviting and encouraging to new Linux users. How many articles are there extolling the virtues of MS-DOS or even the current Windows command line? Reply
How to Create Partitions in Linux
Creating disk partitions enables you to split your hard drive into multiple sections that act independently.
In Linux, users must structure storage devices (USB and hard drives) before using them. Partitioning is also useful when you are installing multiple operating systems on a single machine.
In this step-by-step tutorial, you will learn how to create a partition using the Linux parted or fdisk command.
- A system running Linux
- A user account with sudo or root privileges
- Access to a terminal window / command line (Activities >Search >Terminal)
Option 1: Partition a Disk Using parted Command
Follow the steps below to partition a disk in Linux by using the parted command.
Step 1: List Partitions
Before making a partition, list available storage devices and partitions. This action helps identify the storage device you want to partition.
Run the following command with sudo to list storage devices and partitions:
The terminal prints out available storage devices with information about:
- Model – Model of the storage device.
- Disk – Name and size of the disk.
- Sectorsize – Logical and physical size of the memory. Not to be confused with available disk space.
- PartitionTable – Partition table type (msdos, gpt, aix, amiga, bsd, dvh, mac, pc98, sun, and loop).
- DiskFlags – Partitions with information on size, type, file system, and flags.
- Primary – Holds the operating system files. Only four primary partitions can be created.
- Extended – Special type of partition in which more than the four primary partitions can be created.
- Logical – Partition that has been created inside of an extended partition.
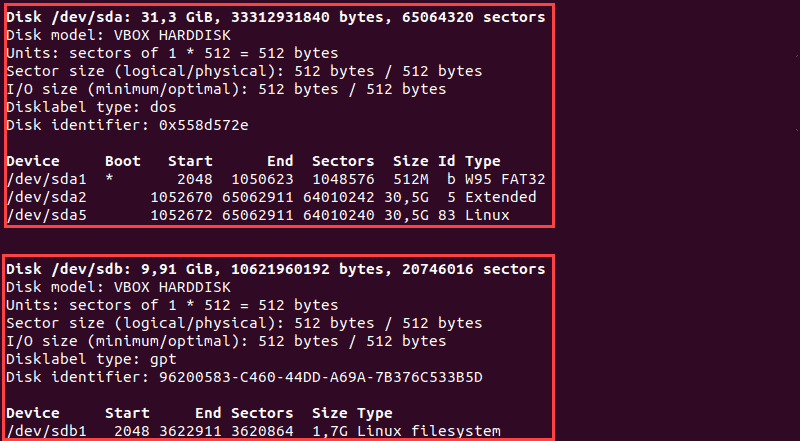
In our example, there are two storage devices ( /dev/sda and /dev/sdb ):
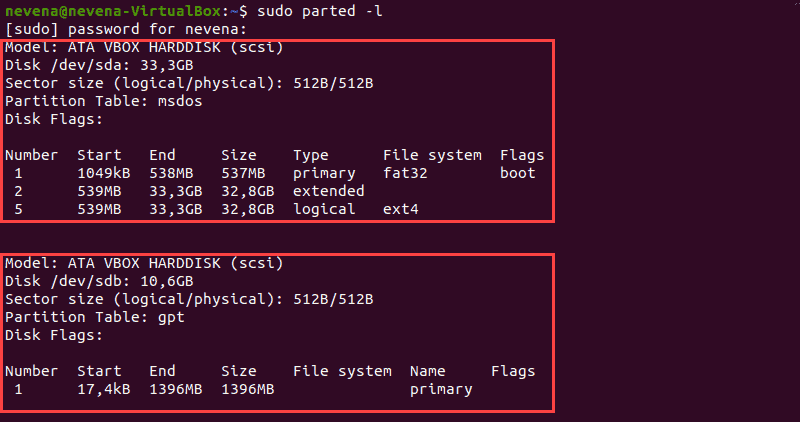
Note: The first storage disk ( dev/sda or dev/vda ) contains the operating system. Creating a partition on this disk can make your system unbootable. Only create partitions on secondary disks ( dev/sdb , dev/sdc , dev/vdb , or dev/vdc ).
Step 2: Open Storage Disk
Open the storage disk that you intend to partition by running the following command:

Always specify the storage device. If you don’t specify a disk name, the disk is randomly selected. To change the disk to dev/sdb run:
The dev/sdb disk is open:

Step 3: Make a Partition Table
Create a partition table before partitioning the disk. A partition table is located at the start of a hard drive and it stores data about the size and location of each partition.
Partition table types are: aix, amiga, bsd, dvh, gpt, mac, ms-dos, pc98, sun, and loop.
The create a partition table, enter the following:
mklabel [partition_table_type]For example, to create a gpt partition table, run the following command:
Type Yes to execute:

Note: The two most commonly used partition table types are gpt and msdos. The latter supports up to sixteen partitions and formats up to 16TB of space while gpt formats up to 9.4ZB and supports up to 128 partitions.
Step 4: Check Table
Run the print command to review the partition table. The output displays information about the storage device:
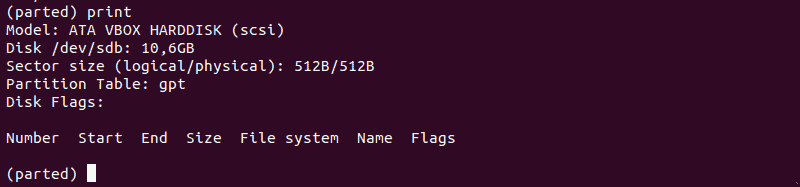
Note: Run help mkpart command to get additional help on how to create a new partition.
Step 5: Create Partition
Let’s make a new 1854MB-partition using the ext4 file system. The assigned disk start shall be 1MB and the disk end is at 1855MB.
To create a new partition, enter the following:
mkpart primary ext4 1MB 1855MBAfter that, run the print command to review information on the newly created partition. The information is displayed under the Disk Flags section:
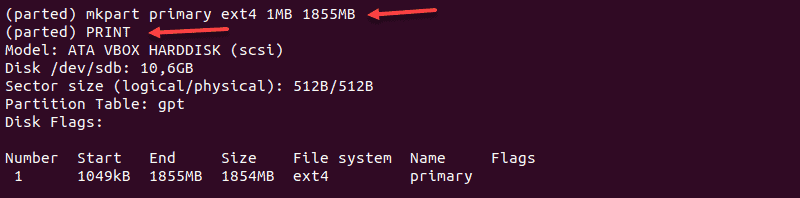
In a gpt partition table, the partition type is the mandatory partition name. In our example, primary is the name of the partition, not the partition type.
To save your actions and quit, enter the quit command. Changes are saved automatically with this command.

Note: The “You may need to update /etc/fstab file” message signals that the partition can be mounted automatically at boot time.
Option 2: Partition a Disk Using fdisk Command
Follow the steps below to partition a disk in Linux by using the fdisk command.
Step 1: List Existing Partitions
Run the following command to list all existing partitions:
The output contains information about storage disks and partitions:
Step 2: Select Storage Disk
Select the storage disk you want to create partitions on by running the following command:
The /dev/sdb storage disk is open:

Step 3: Create a New Partition
1. Run the n command to create a new partition.
2. Select the partition number by typing the default number (2).
3. After that, you are asked for the starting and ending sector of your hard drive. It is best to type the default number in this section (3622912).
4. The last prompt is related to the size of the partition. You can choose to have several sectors or to set the size in megabytes or gigabytes. Type +2GB to set the size of the partition to 2GB.
A message appears confirming that the partition is created.

Step 4: Write on Disk
The system created the partition, but the changes are not written on the disk.
1. To write the changes on disk, run the w command:

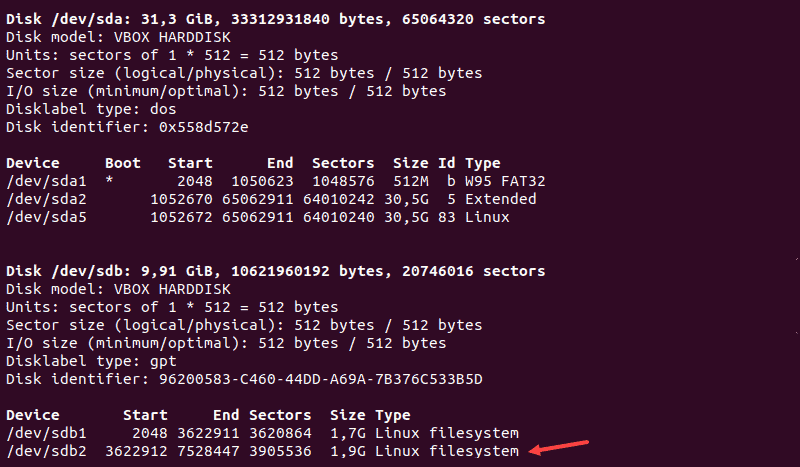
2. Verify that the partition is created by running the following command:
As you can see, the partition /dev/sdb2 has been created.
Format the Partition
Once a partition has been created with the parted of fdisk command, format it before using it.
Format the partition by running the following command:
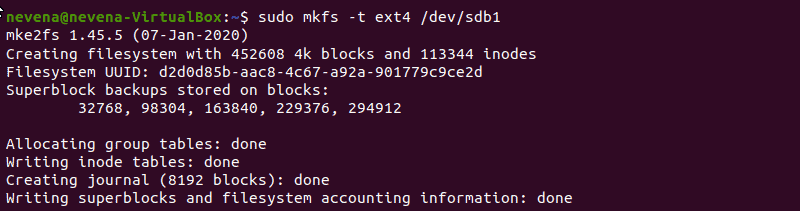
Note: Check out our guide and learn how to format and mount disk partitions in Linux using ext4, FAT32, or NTFS file system!
Mount the Partition
To begin interacting with the disk, create a mount point and mount the partition to it.
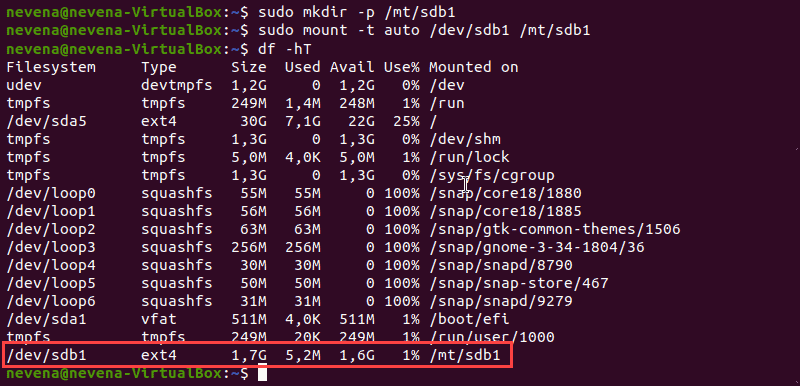
1. Create a mount point by running the following command:
2. After that, mount the partition by entering:
sudo mount -t auto /dev/sbd1 /mt/sdb1The terminal does not print out an output if the commands are executed successfully.
3. Verify if partition is mounted by using the df hT command:
Note: If you have NTFS partitions on your hard drive, check out our article on how to mount NTFS partitions in Linux.
After following this step-by-step tutorial, you should have a better understanding on how to partition a disk in Linux by using the parted or fdisk command.
For more Linux commands, see our Linux Commands Cheat Sheet.
Dejan is the Head of Content at phoenixNAP with over 8 years of experience in Web publishing and technical writing. Prior to joining PNAP, he was Chief Editor of several websites striving to advocate for emerging technologies. He is dedicated to simplifying complex notions and providing meaningful insight into data center and cloud technology.
sudo stands for SuperUser DO, and it’s used to temporarily elevate privileges in Linux. This guide will show.
Setting file and directory permission properly is important in multi-user systems such as Linux. You can set.
This article helps you install Ubuntu 20.04 on your machine. The latest Ubuntu Focal Fossa was released on.
Since there is no way to upgrade from CentOS 7 to CentOS 8, users need to go through the entire installation.