- How To Format USB Drive in Linux Command Line
- Step 1 – Attach USB to System
- Step 2 – Format USB Drive in Linux
- Conclusion
- How to Format USB Drive on Linux
- Method 1: Format USB Drive through the Terminal
- Method 2: Format USB Drive through the Disks Utility
- Advantages of Formatting Your USB Drive
- Conclusion
- How To Format USB In Linux (5 Easy Ways)
- How to Format USB in Linux
- Using GParted
- GNOME Disks
- Make File System (mkfs)
- Using dd
- Using Shred
- Problems When Formatting USB
How To Format USB Drive in Linux Command Line
USB formatting is the process of erasing all data from the disk and prepare it for use. Sometimes we are required to change the filesystem on our USB drive, In that case, we have to format the USB drive with the new filesystem type. Formatting a USB drive in Ubuntu using Terminal commands is much easier than formatting it in Windows systems.
This tutorial will help Ubuntu (Linux) users with the simple steps for format a USB flash drive using the command line.
Step 1 – Attach USB to System
Insert a USB drive into your system and identify your USB drive correctly. This is the step you need to take care, because you may format the wrong disk if not correctly identify your disk.
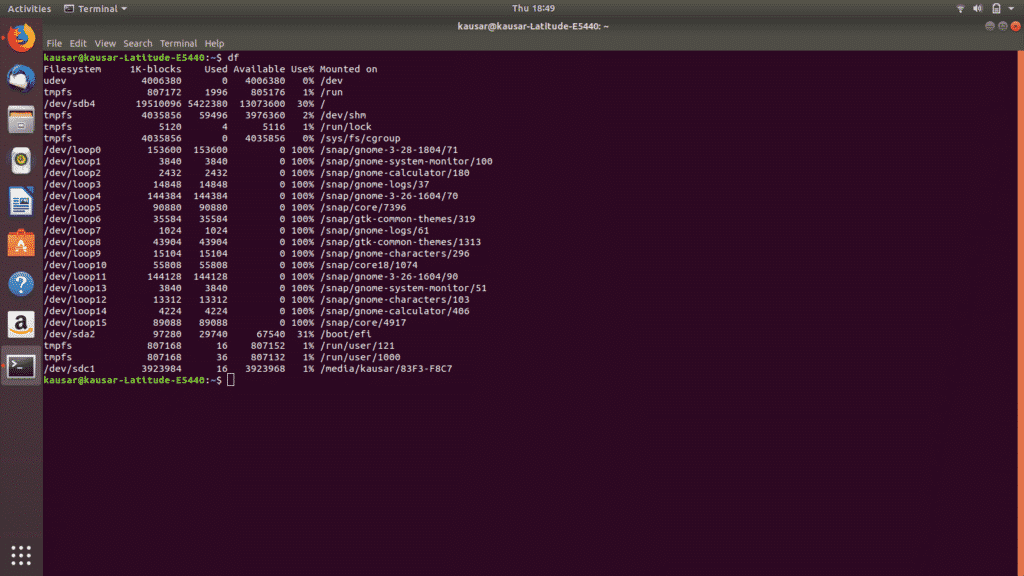
Filesystem Size Used Avail Use% Mounted on /dev/sda1 28G 24G 2.3G 92% / udev 1.4G 12K 1.4G 1% /dev tmpfs 277M 1.2M 276M 1% /run none 5.0M 0 5.0M 0% /run/lock none 1.4G 34M 1.4G 3% /run/shm /dev/sdc1 14.8G 1.4G 13.4G 10% /media/tecadmin
Now, You can see that the USD drive is attached as /dev/sdc1 device. Which is mounted on /media/tecadmin.
Step 2 – Format USB Drive in Linux
Whenever we attach a USB drive in Ubuntu, it is automatically mounted to the system. We can not format any disk on Linux systems that are already mounted. So first un-mount /dev/sdc1 USB drive on your system.
Now, Use one of the following commands as per the file system you want. To format a USB drive, most of the users prefer VFAT and NTFS file systems because they can be easily used on the Windows operating system.
Similarly, you can format a USB Flash drive with any required file system.
Conclusion
In this tutorial, you have learned to format a USB drive on a Linux system via the command-line interface.
How to Format USB Drive on Linux
![]()
A USB is a handy appendage that offers numerous options in terms of customization and allocation. However, to harness its capabilities, one needs to know how it works. We often need to change a file system for improved adaptability to a system or erasing data for any given purpose.
In times like this, we need formatting. However, it is seen as a tedious task many don’t want to stumble upon. So in this article, we guide you step by step as to how you can format your USB drive. This can be done with the terminal or the “Disks” software. So, without further ado, let’s jump into it.
USB formatting is seen as a strenuous task for many users. In the case of windows, there are several things one needs to look out for. However, it is comparatively easier in Linux. So, worry not, after going through this article, you will surely be capable of formatting your drive without any issues whatsoever.
Method 1: Format USB Drive through the Terminal
We can easily format our drive via the Terminal. Just log into your system and open the Terminal window through the Dash. You can alternatively use the “Ctrl + Alt + T ” shortcut to open it directly.
A new terminal window will open. Enter the following command.
The df command returns a list of the details of all the partitions mounted to your device, including the total space in each partition, the used space, and the available space.
From this list, locate your USB drive partition. You can do that by reading the path of your partition from the Linux file manager and then searching for that path in the list of partitions that came up in df.
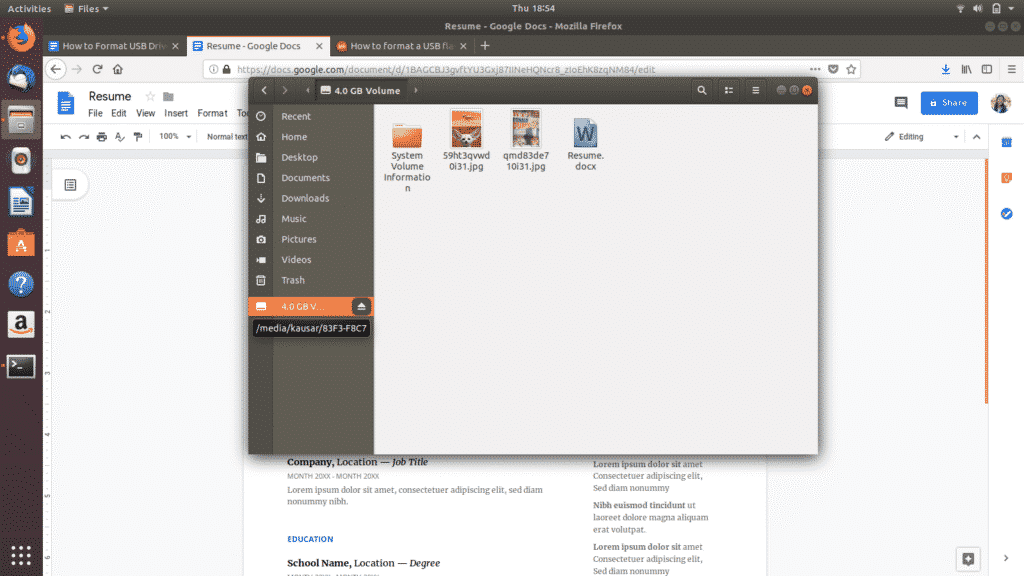
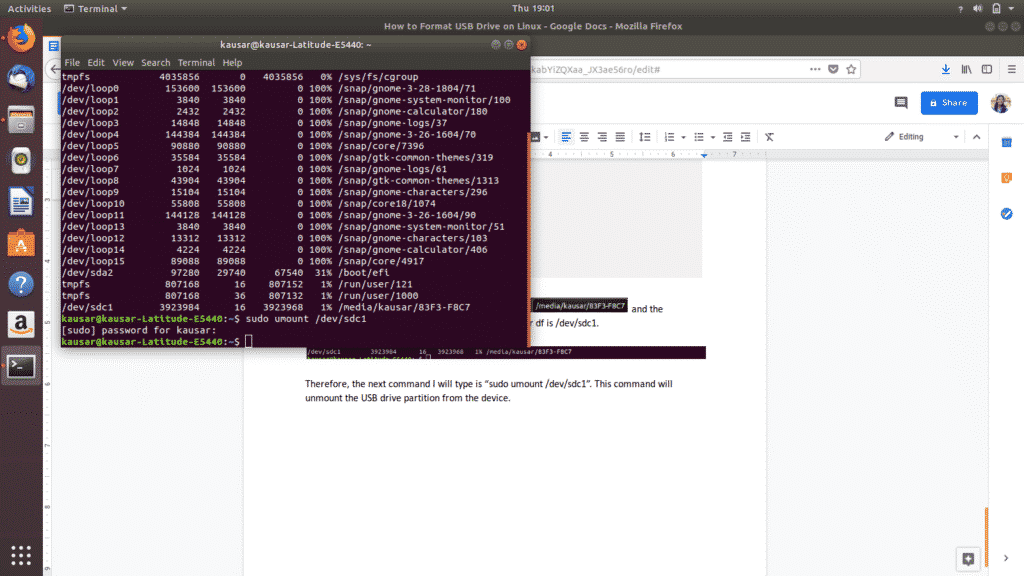
As you can see, in the USB drive shown here, the partition is mounted on media/kausar/83F3-F8C7 , and the corresponding Filesystem name which comes up under df is /dev/sdc1.

Therefore, the next command to execute is as follows.
This command will unmount the USB drive partition from the device. Type your Linux password and press Enter.
The final step is to format the USB drive. This is done with the command:
Note: This command formats the drive with the FAT32 format file system.

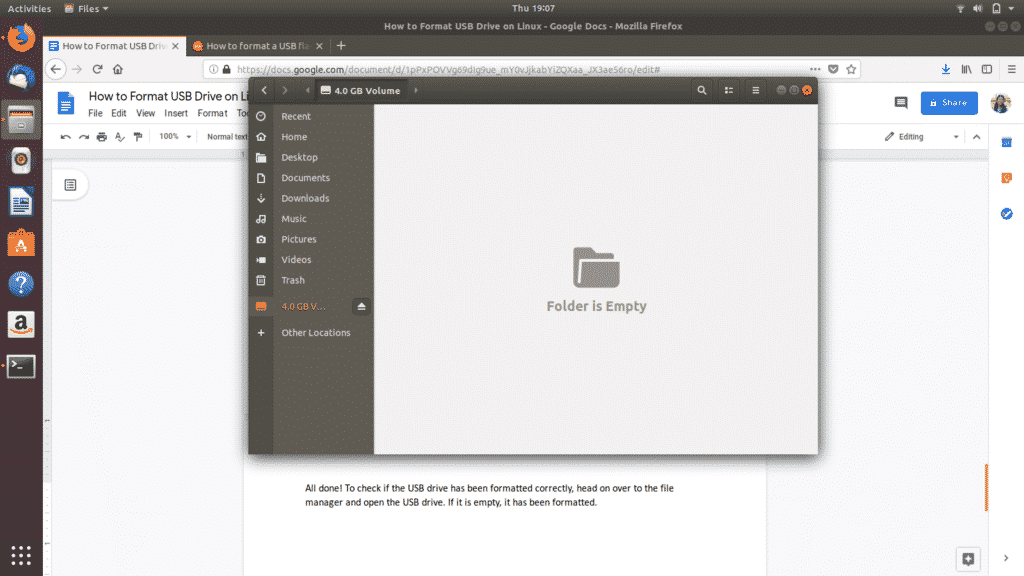
All done! To check if the USB drive has been formatted correctly, head on to the file manager and open the USB drive. If it is empty, then it has been successfully formatted.
Method 2: Format USB Drive through the Disks Utility
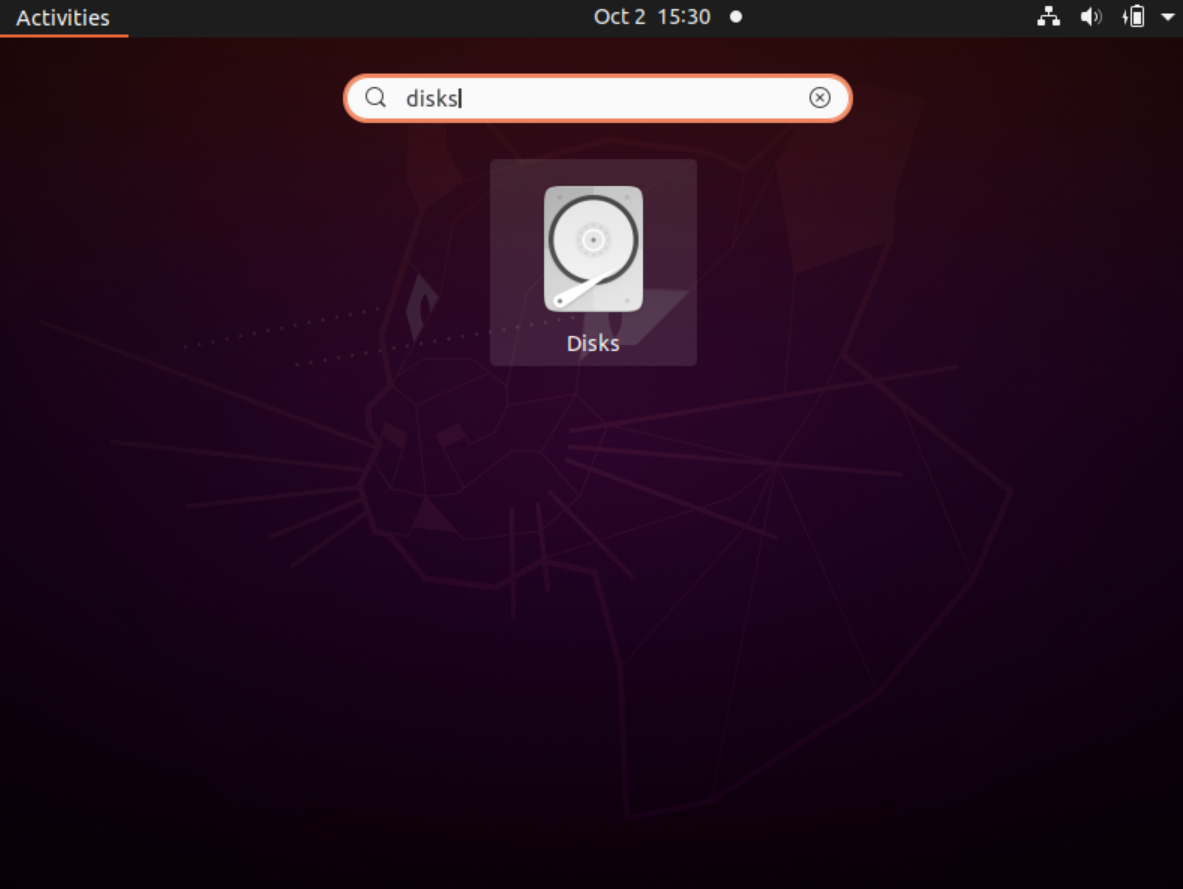
To access the Disks utility, navigate to the Dash icon. The Ubuntu Dash holds all the Ubuntu software available and installed on your device.
Type “Disks” in the resulting search bar and click on the Disks application that comes up.
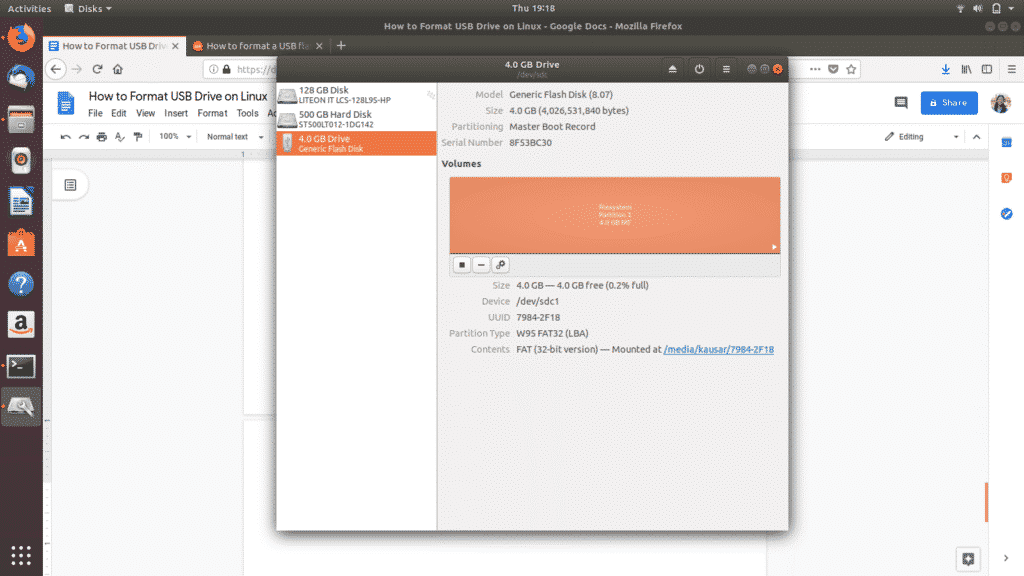
It will open up in a new window. Locate your USB drive in the list of which appear in the left panel and click on it.
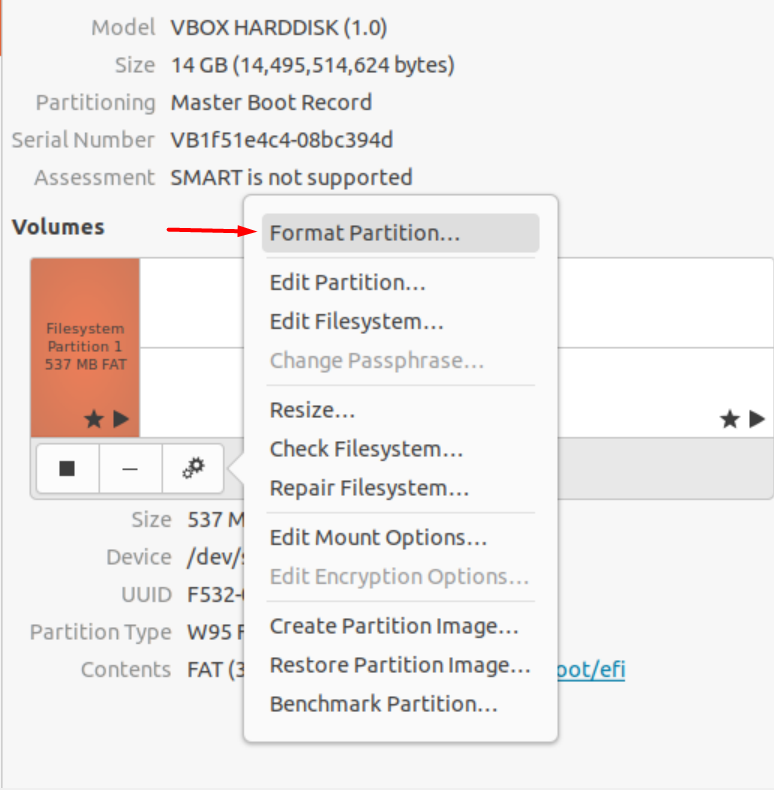
Next, under “Volumes”, of the three icons you see, click on the third gear icon. A dropdown menu will appear. From the options displayed, click on “Format Partition”.
Set the name of your USB drive and select which type of file system format to format your USB too. Then select “Next”.
A warning will pop up asking you to confirm the deletion of all your data in the USB drive. Select “Format” displayed in red on the top right corner to proceed with the formatting.
And that’s it. You’re done. These are the two easiest ways to format your USB drive and make it 100% available in space.
There are other methods of formatting a USB drive on Linux as well. For example, you can download 3rd party software like “GParted” from Ubuntu Software or the CLI.
GParted is a software that manages partitions and their allocations, resizing, copying and redistribution. In case you experience trouble using the two methods described above, GParted offers a simple GUI to format USB drives and is an overall useful tool to have.
Advantages of Formatting Your USB Drive
Formatting your USB drive in time of need can bring several perks with it as it:
- Debugs and fixes certain errors that were not repairable before. It also rids the USB drive of malignant files, which may harm the USB connects system.
- Improves the overall adaptability and performance of the drive.
- Results in storage conservation, allowing space for newer files in need.
- Opens the way for installing new file systems that may go well with other systems you want to use or simply working with updated systems.
Conclusion
By formatting your USB drive, you bring out the best performance for that particular drive while having more room for your utilities. Moreover, formatting can come a long way, whether it be cleaning up your device for top-notch performance or reformatting it for a newer system.
How To Format USB In Linux (5 Easy Ways)

Formatting a USB Drive in Linux is a straightforward process for the most part, but you may encounter a few roadblocks along the way.
For instance, users are often unsure as to what file system they should format the USB with. Generally, you should stick to ext4 for the best performance and stability. But if cross-platform compatibility is a concern, you can instead go with exFAT or FAT32.
Users have also reported facing issues with the USB not being usable after formatting. We’ve detailed how you can format the USB properly and resolve all such issues in this article.
How to Format USB in Linux
We’ll use ext4 as an example, but you can choose your preferred file system when formatting the USB. Remember to backup any important data beforehand. Also, make sure you specify the correct device to format when performing the command-line methods, as it’s easy to mess this up and format the wrong drive.
Using GParted
GParted is a GUI-based partition manager. Using GParted is generally the easiest way to format USB drives on most distros, so if you’re new to Linux, this should be your go-to option. Here are the necessary steps for this:
- First, you’ll have to install GParted. On Debian-based distros, you can do so with the following command:
sudo apt install gparted - Open GParted and enter your password to authenticate.
- Select the USB from the top right.

- Right-click the USB and select Unmount.
- Next, right-click the data partition and select Format To > ext4.

- Click on Apply all operations.
- Afterward, right-click it once more and select Mount.
- If the Mount option is greyed out, execute the following commands in the terminal:
sudo mkdir /mnt/usb
sudo mount /mnt/usb


GNOME Disks
GNOME Disks is the default partition manager for GNOME desktop environments. It’s pre-installed in most of the popular Linux distros, including Ubuntu. Here are the steps to format your USB using this utility:
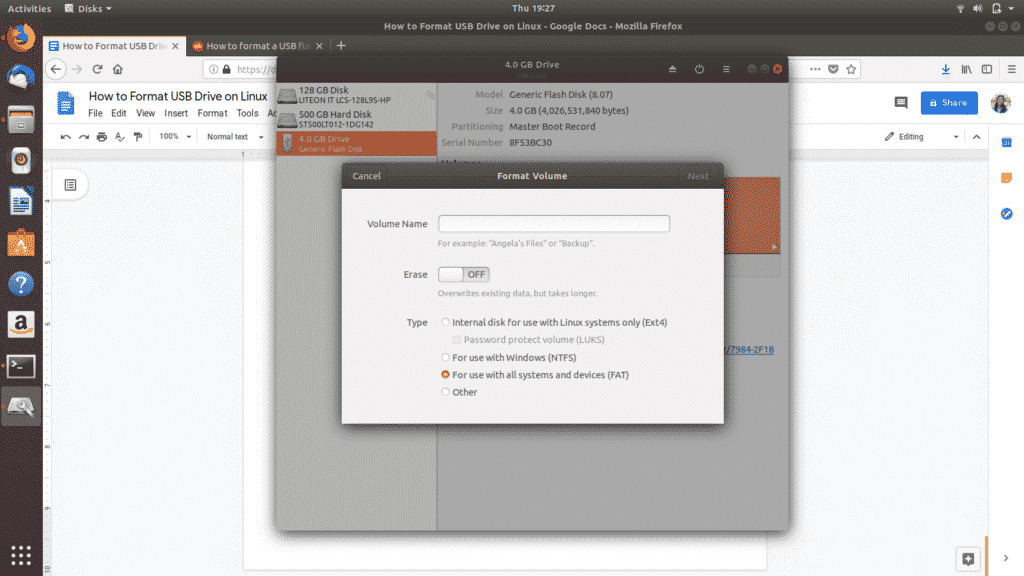
- Open the Disks utility and select the USB.
- Select the partition you want to format and click on the settings cog.
- Select Format partition and rename the volume if you want.

- You can enable Erase to overwrite the existing data, and you can also select the filesystem. Afterward, press Next > Format.

- If you want to format the entire drive at once instead, click on the triple-dot button and select Format Disk > Format.

- Press the + button to create a partition in the unallocated space.
- Adjust the partition size and other values as before and create the partition.
- Now, mount the USB to make it accessible again.


Make File System (mkfs)
GParted performs the disk operations through the mkfs utility. So, you can think of this method as using GParted but via the command line, although their origins are actually the other way around. In any case, here are the steps to format your USB using mkfs:
- Use df -h to check the USB’s device path.
- Unmount the USB using sudo umount .

- Type sudo mkfs -t .
- Replace with your preferred filesystem (ext4, vfat, nfts, etc.) and execute the command.

- Afterward, mount the USB with the following commands:
sudo mkdir /mnt/usb
sudo mount /mnt/usb


Using dd
You can use dd to either zero-fill or write random data to your USB drive, essentially formatting it and making the data unrecoverable. This is a good idea if you plan to lend the USB or sell it to someone.
Using dd is very simple; the base syntax is as follows:
dd if=source of=
For instance, if you wanted to write random data instead of zeroes to a USB mounted at /dev/sdb1 , you would use the following command:
dd if=/dev/urandom of=/dev/sdb1 bs=16M

Using Shred
Shred is essentially dd but more secure. Its overwriting patterns are optimized to destroy as much residual data as possible, so this is your best bet if you’re trying to wipe the USB completely.
The base syntax for Shred is shred . In our example, we’ll use the -f option to force write, -n to specify the number of times to overwrite, and -v to display the ongoing operation. But for the full list of options, you can check the shred man page.

Problems When Formatting USB
A commonly reported issue regarding USBs is that users installed Linux onto the USB, and now it’s not usable for data transfer. Reverting a bootable USB to a non-bootable state is very simple; all you have to do is format it.
The USB not being mountable after formatting is another common problem. This time, it usually happens because the formatting tools in Linux are capable of removing everything from the drive, including the filesystem signatures. As there are no partitions to mount, you’ll have to create one first.
If sudo mount doesn’t let you auto-mount, you should create a mount point first and then mount the device manually as such:
sudo mkdir /mnt/usb
sudo mount /mnt/usb
Finally, another problem worth mentioning is that the formatting process gets interrupted, and the USB doesn’t get detected afterward. Users generally use lsusb , and when they find that the system isn’t detecting the USB at all, they assume they bricked the device.
While this is certainly a possibility, we’ve found that simple fixes like restarting the PC and reseating the USB a few times are surprisingly effective at resolving this issue.
Anup Thapa primarily covers Windows systems, networking, and computer hardware at TechNewsToday. Anup has been writing professionally for almost 5 years, and tinkering with PCs for much longer. His love for all things tech started when he got his first PC over 15 years ago. It was a Pentium IV system running Windows XP on a single 256 MB stick. He spent his formative years glued to this PC, troubleshooting any hardware or software problems he encountered by himself. Professionally, Anup has had brief forays into a variety of fields from coding and hardware installation to writing. In doing so, he’s worked with people of different backgrounds and skill levels, from average joes to industry leaders and experts. This has given him not just a versatile skill set, but also a unique perspective for writing that enables him to concisely communicate complex information and solve his reader’s problems efficiently. You can reach out to him at anup@technewstoday.com.