- How to Install Linux with Windows for Dualboot
- Basics
- Prepare the Partition for Installing in Windows
- 1. Backup Important Data
- 2. Shrink a Windows Partition
- Boot from USB in Windows
- Prepare the Partition for Installing in Windows
- How to Install Linux on Windows 10
- 1. Choose a partitioning method
- 2. Create Partitions
- 2. Install Bootloader
- 3. Complete Installation
- Wrapping Up
How to Install Linux with Windows for Dualboot
Maybe you already have read a lot of articles on the Internet and are interested in the open-source operating system that is called Linux. Maybe you even have installed it on VirtualBox or run in Live mode and learned how it looks and works. But now, you can have a question «How to install it on my computer and start using it every day?». If you are a beginner, you probably don’t want to lose Windows, because when something goes wrong you always can switch to Windows and continue work. And, of course, all your applications and games are installed on Windows. You can install Linux with Windows for Dualboot. It was an ideal option for me a few years ago.
In this guide, I will explain how to install Linux on Windows 10 or 11. Everything will be performed in Windows 11, but it should work in Windows 10, 8 and 7 too.
I assume that you already have installed Windows and you already have decided where to get disk space for the Linux installation but don’t know how to do it. Here you will get a detailed explanation of this. Most of PC and notebooks with Windows 10 or 11 have UEFI instead of regular BIOS nowadays, so I will use it in this article. But if you have an old BIOS, there will not be many differences during the installation process.
Basics
If you want to install Linux on the same drive as Windows, you have to create a few additional partitions. At least one, preferably two. Linux users do not install Linux on one partition like Windows, although this option is possible. Linux is very flexible, so it allows to place system and user files on different partitions. It gives a big benefit for system reinstallation. You can reinstall the system on the system partition independently from your home partition and your files will not be deleted.
Here are these partitions:
Minimum system requirements for storage size are different for various distributions. Usually, it is between 10 and 30 GB. But it is only enough for installing the operating system and multiple additional applications. If you want to install a lot of applications and games you should add extra 30-60 GB. I recommend using for Linux root partition 50-100 GB, as same as for drive C for Windows. A home partition must be as large as possible.
Previously, I recommended making a swap partition as well. But in modern distributions, a file is usually used for this purpose instead of a separate partition. So if you are a beginner, you can leave it as is by default.
Prepare the Partition for Installing in Windows
1. Backup Important Data
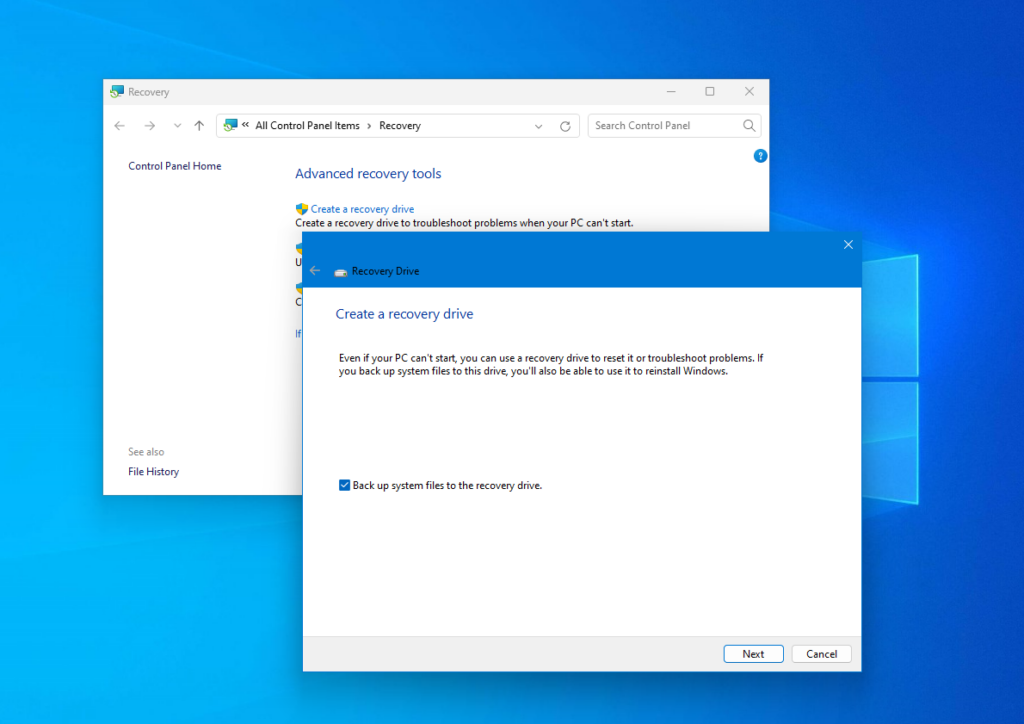
You must free up some space near existing Windows 10 or 11 before you be able to install Linux there. If you don’t want to lose your data, you should create a backup for important data before you start doing something. If everything goes well, your system and files will be fine. But the filesystem may be corrupted by any sudden failure, for example, a power cut or you can do something wrong. So, make sure that you have copied your important files to an external drive and created a system restore the image using Control Panel or Settings utility:
You also can use third-party tools, for example, Acronis or Clonezilla. If you want to shrink not a system partition, you can just copy important files from there.
2. Shrink a Windows Partition
Now, let’s prepare the partition for installing Windows and Linux. The simplest way to do this — use the default Disk Management tool in Windows.
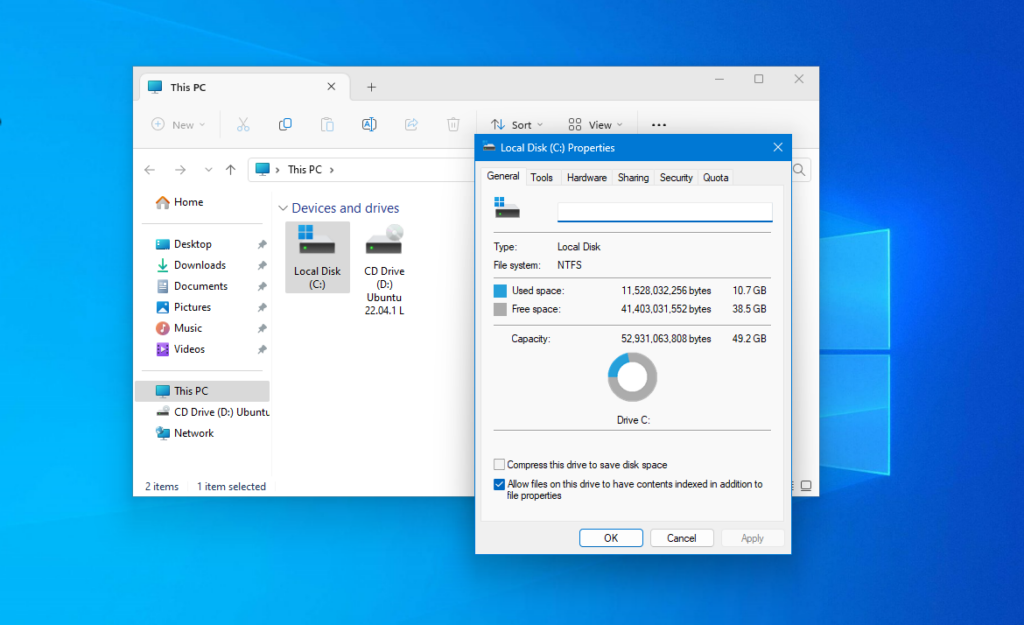
First of all, you can open This PC and view information about the drive, which you want to use for installing Linux:
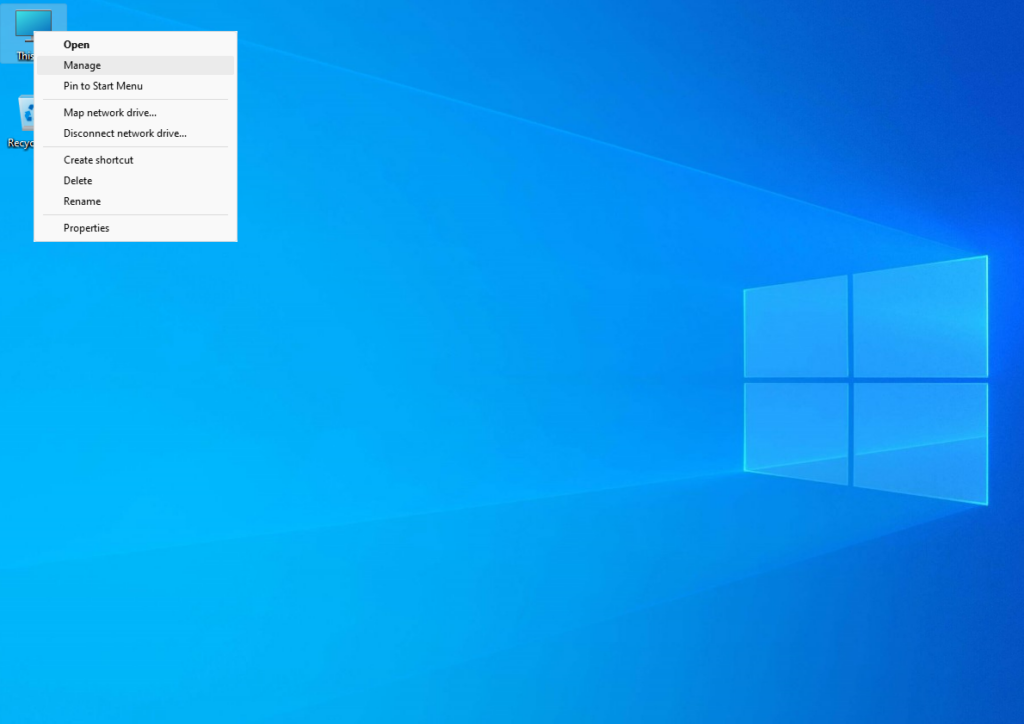
Then, open the contextual menu for the This PC shortcut and click on Manage:
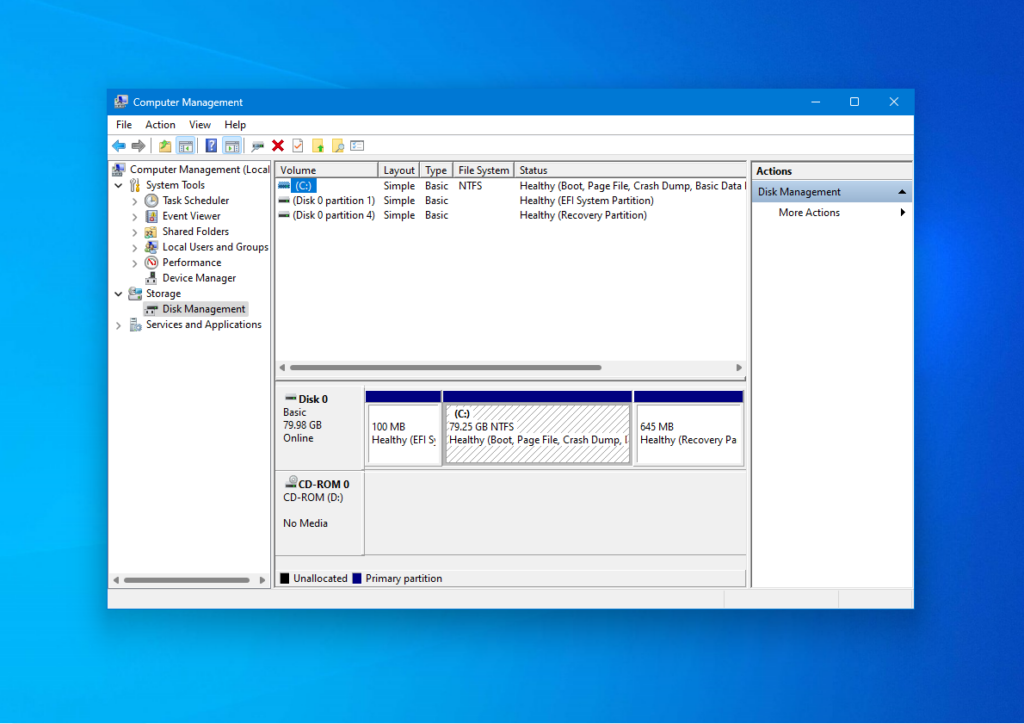
Then, open the Disk Management tool:
Here you can see the disks list, and system drive C: on Disk 0. If you have an additional drive for files it will be marked by D or E letter. I will explain how to shrink the system drive C: to get a free space. For other drives, everything is similar.
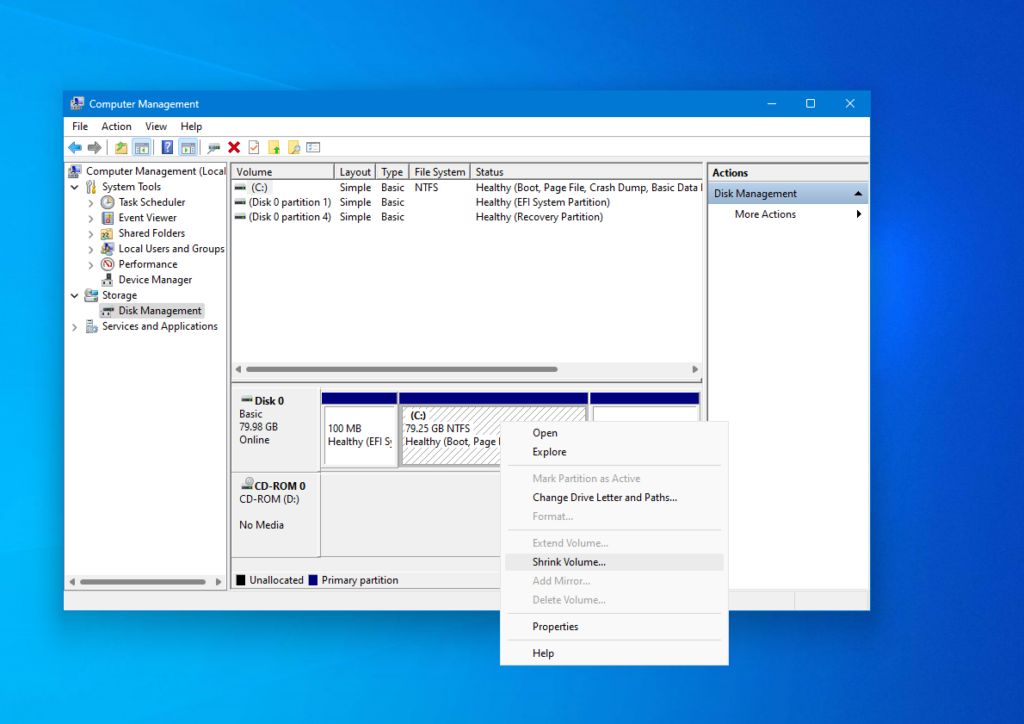
Open the contextual menu for the selected drive and choose the Shrink Volume option:
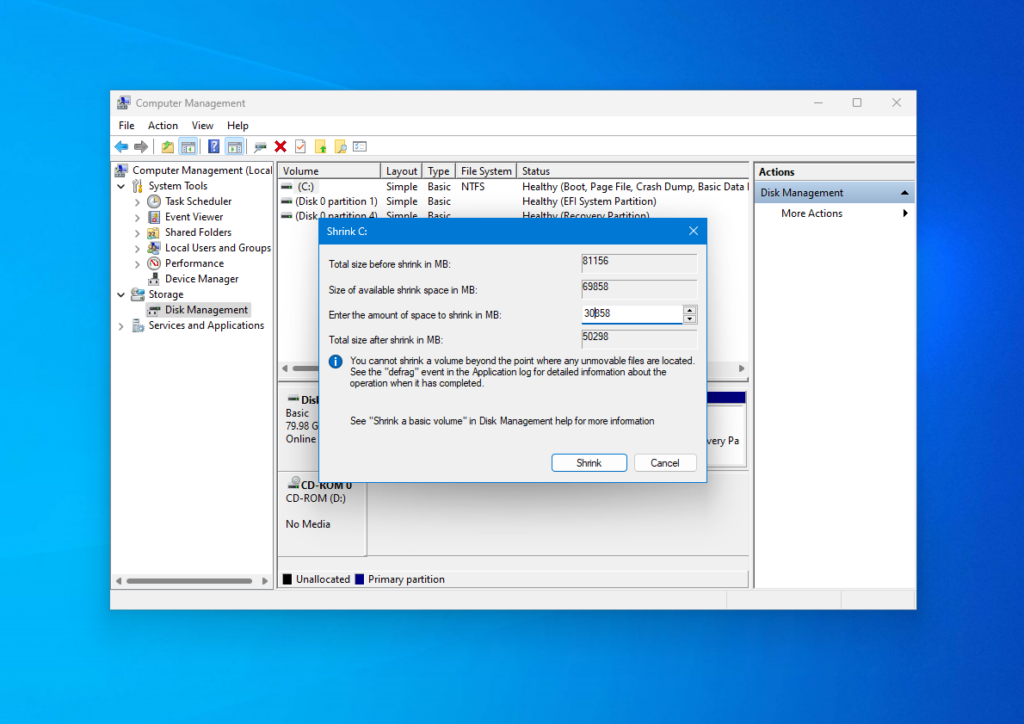
Enter how many megabytes to reduce the volume in the Enter the amount of space to shrink in MB field and press the Shrink button.
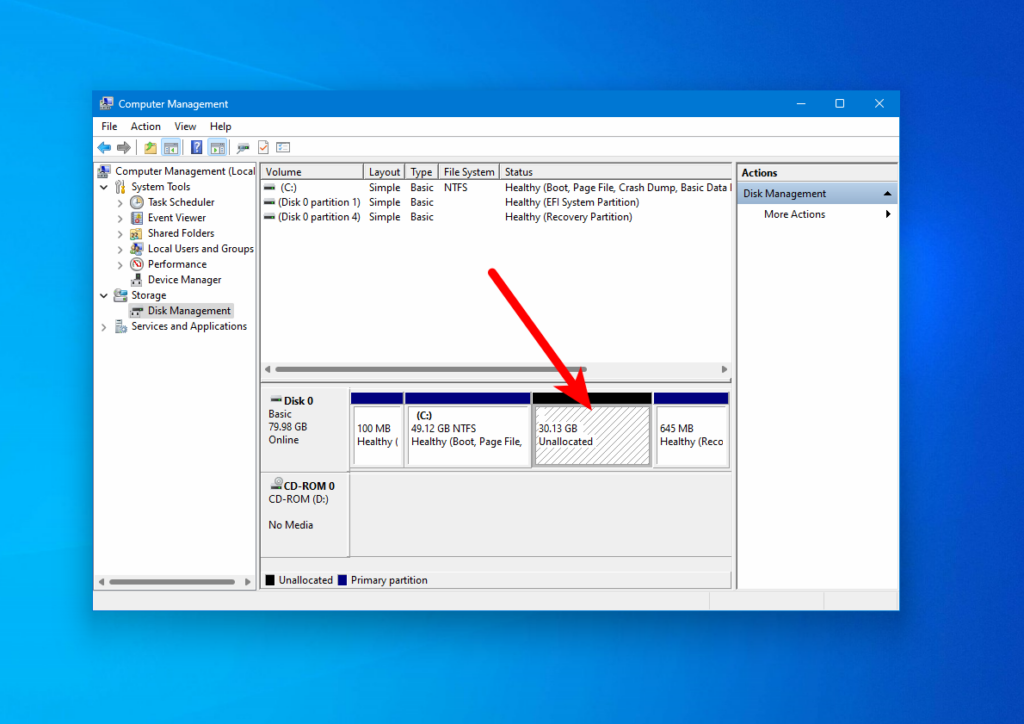
Pay attention, that you can’t enter a value that is larger than the amount of free space on the drive. So free up some space if you haven’t already. After this, you will see Unallocated Space which can be used for creating required partitions.
That’s it. Now you have space to install Linux with Windows. There is no sense to create Linux partitions in the Disk Management utility. We have done all operations which probably can corrupt Windows, and can continue creating Linux partitions using Linux tools.
Boot from USB in Windows
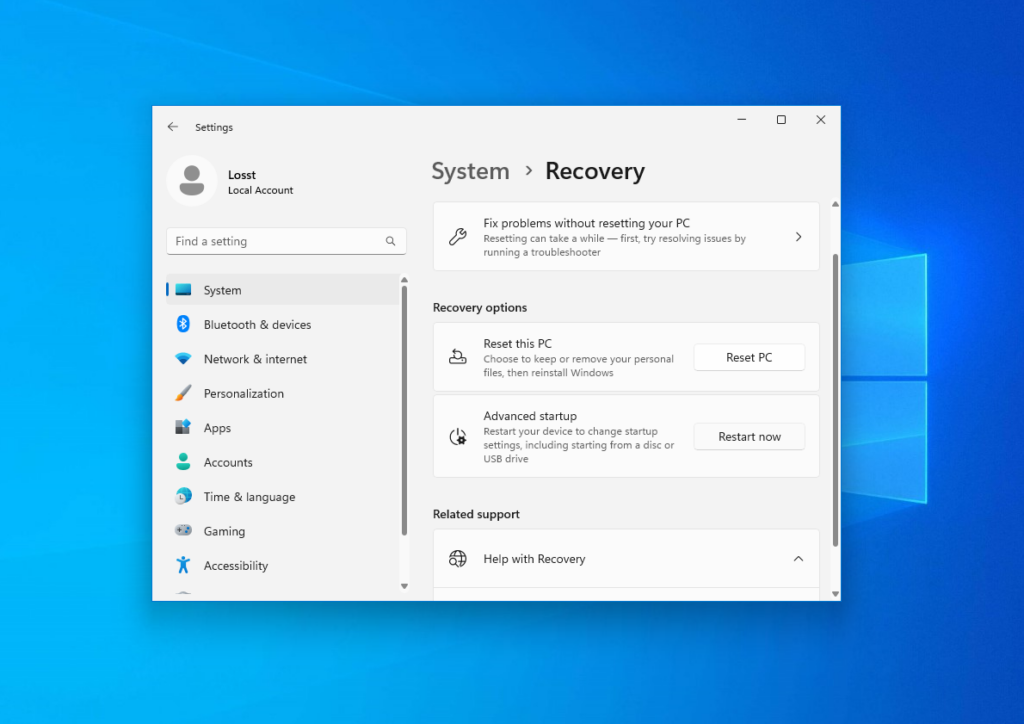
Most computers with Windows 10 and 11 have UEFI. This means that you can have trouble entering to BIOS setup interface and choosing the right device for booting. But you can reboot into the BIOS interface directly from Windows. Just open Settings, then System, and Recovery. Find there the Advanced Setup and press Restart Now:
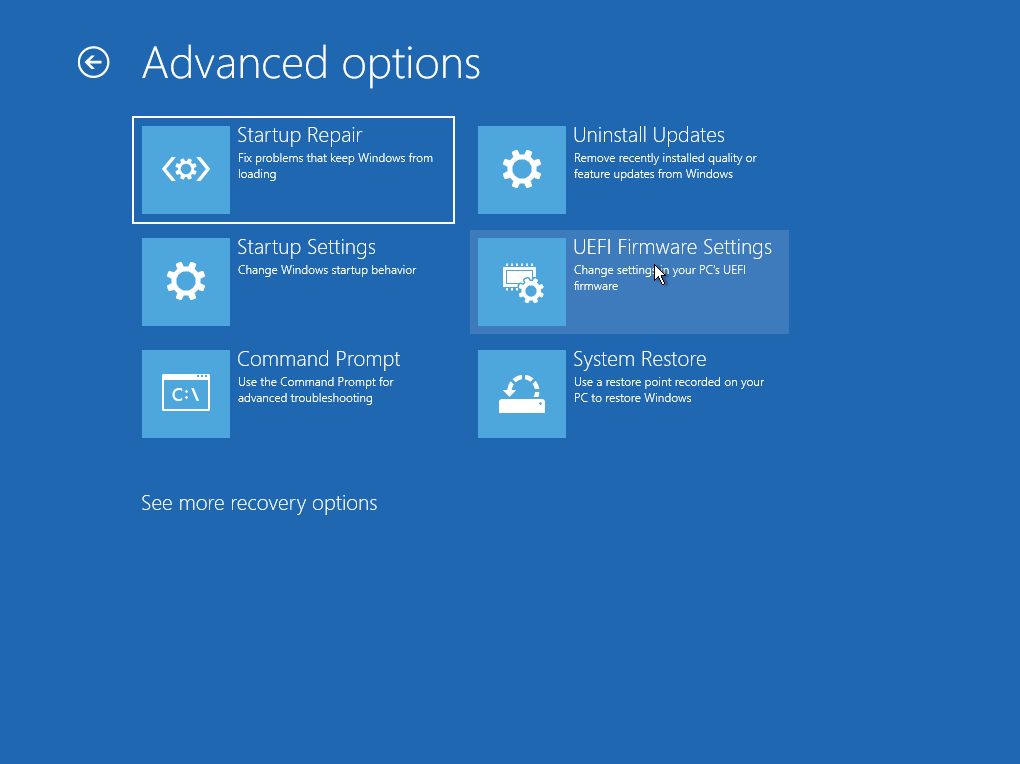
Then, click on Troubleshoot -> Advanced Options -> EFI Firmware Settings after reboot:
Here you can configure which device will be used for booting and boot your Linux USB drive.
Prepare the Partition for Installing in Windows
It is not the next step of this guide but an alternative option for how to shrink Windows partitions in Linux. If you don’t want to use the Disk Management tool in Windows, you can do the same thing using any LiveCD Linux distribution and the application for disk management that is called Gparted.
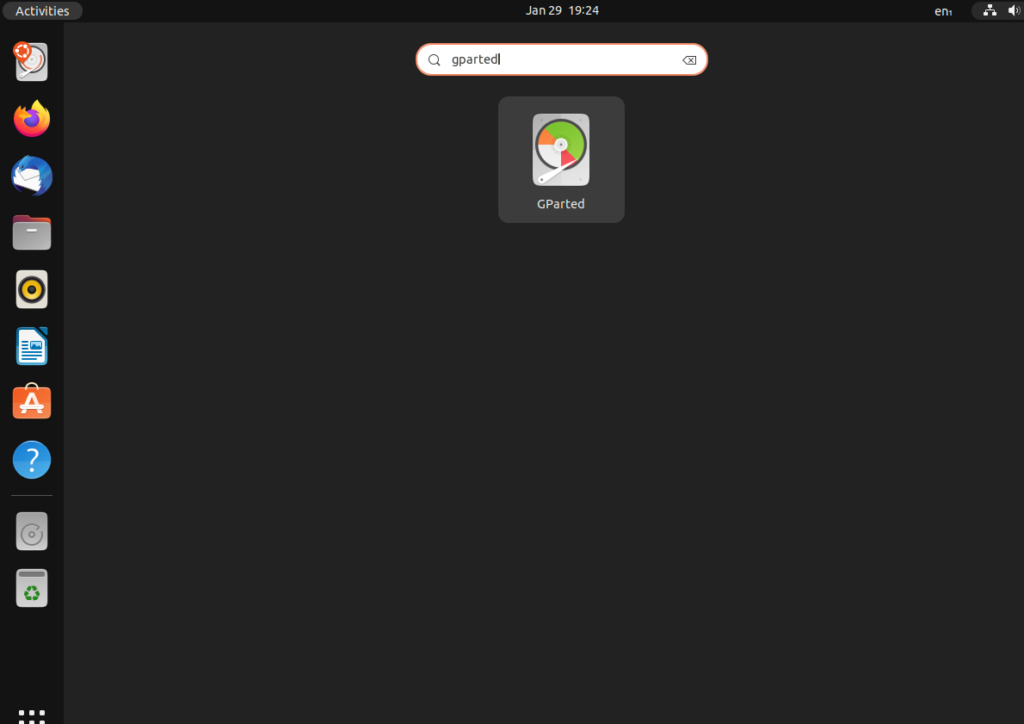
For example, you can do it in Ubuntu. Boot into LiveCD, open the Activities menu, and type Gparted there:
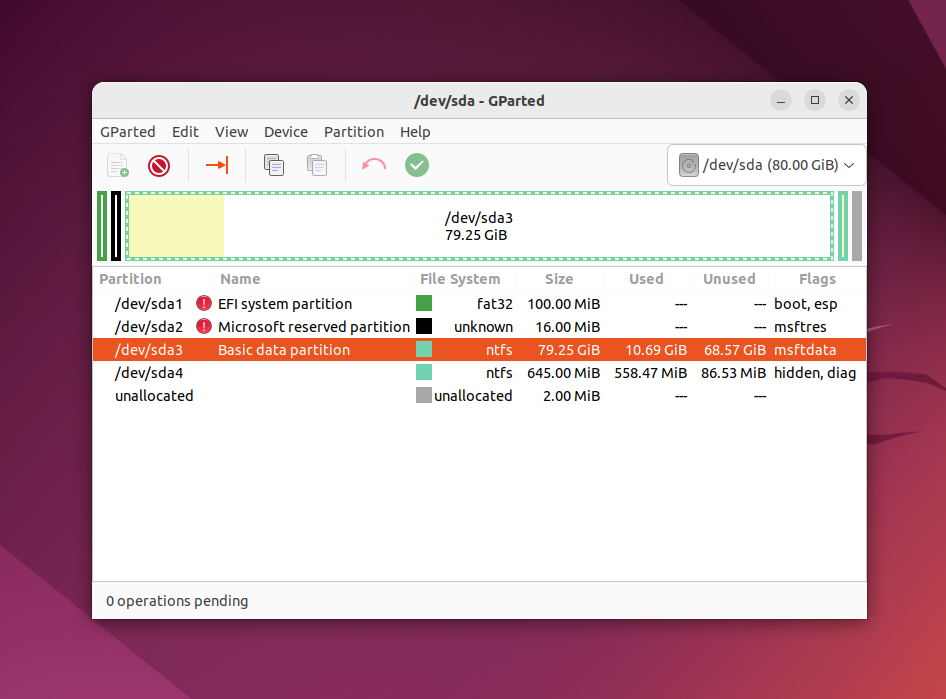
The main window of the application will look like this:
Note, that the Linux partition naming strategy differs from Windows. Partitions are just files in the special dev filesystem in Linux. You will understand later how it works, but at this moment you should know that each partition has a name that is started from /dev/sd. Then, you can see a letter which reflects a physical drive (sda, sdb, sdc, sdd, etc). At the end of the disk name, a decimal number is appended which reflects the partition number. For example, sda1, sda2.
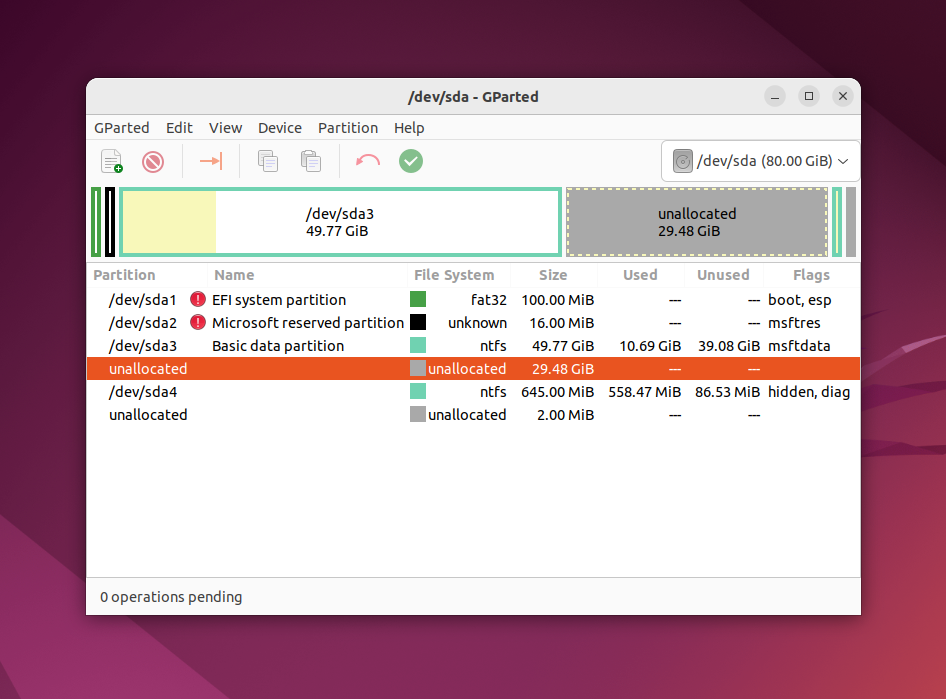
You can see not only the drive name but also the filesystem, size, and free space for each disk in Gparted. Use this information to find out which name has your Windows partition. In this example, you can see a lot of partitions but you shouldn’t delete them if you don’t want to break your system. Here is their description:
- /dev/sda1 — EFI partition with bootloader files;
- /dev/sda2 — a partition reserved by Windows;
- /dev/sda3 — a system partition with Windows installed, drive C;
- /dev/sda4 — a recovery partition for Windows.
Here the /dev/sda3 partition has NTFS filesystem and took 79 Gb as same as the system Windows partition, so that’s what we need.
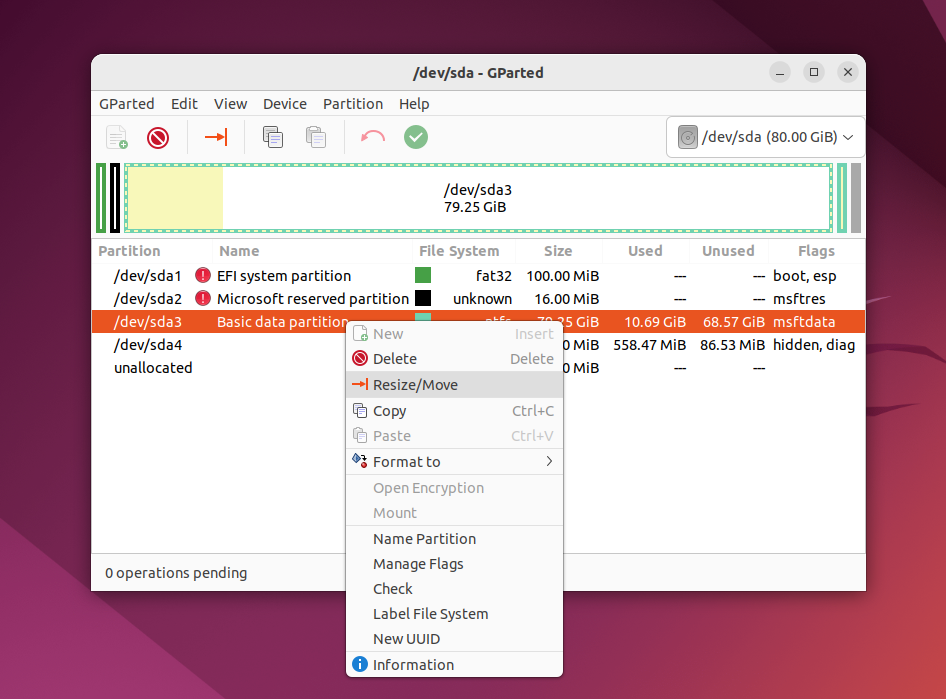
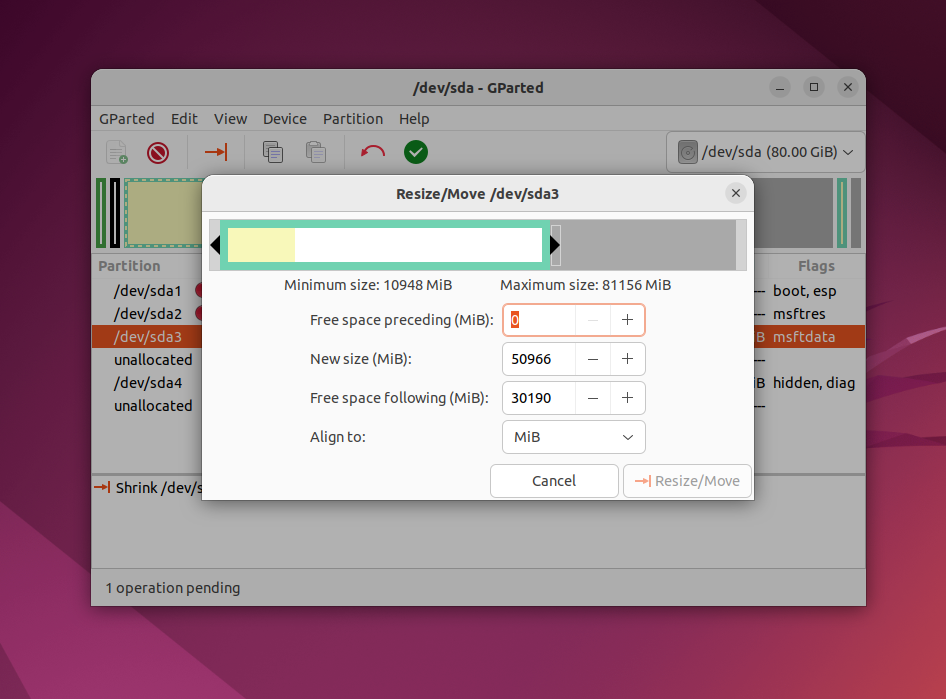
Let’s do the same thing as in the previous example — shrink the partition size for /dev/sda3 (C) to 50 Gb to install Linux on Windows. Make right-click on the /dev/sda3 partition and select the Resize/Move section:
In the next window, you can enter the wanted size manually in the New size field or use the slider:
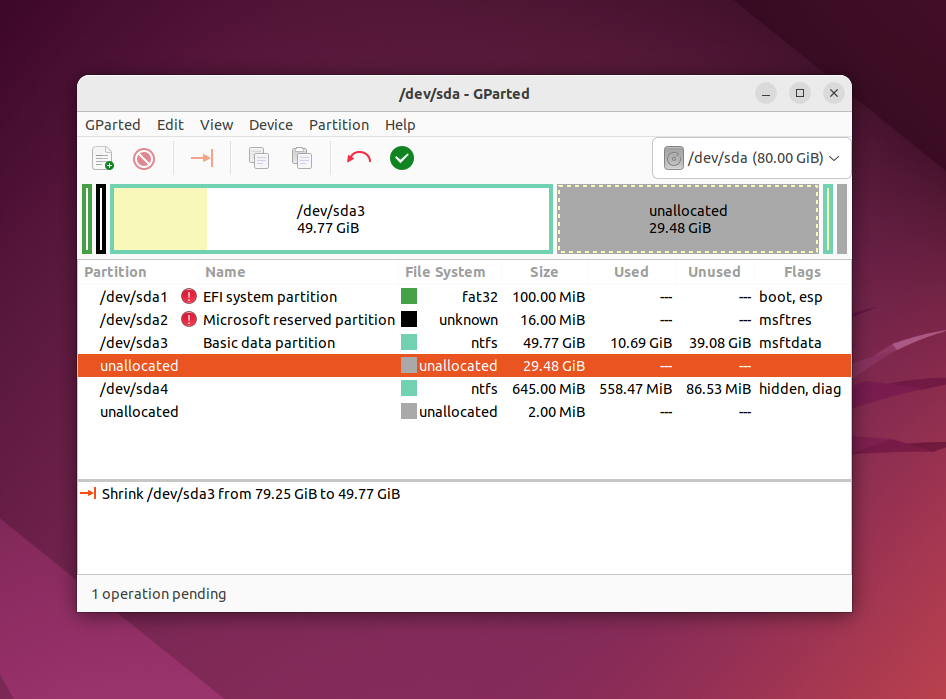
After this, press Resize/Move. You will see freed space but there are no real changes on the physical drive.
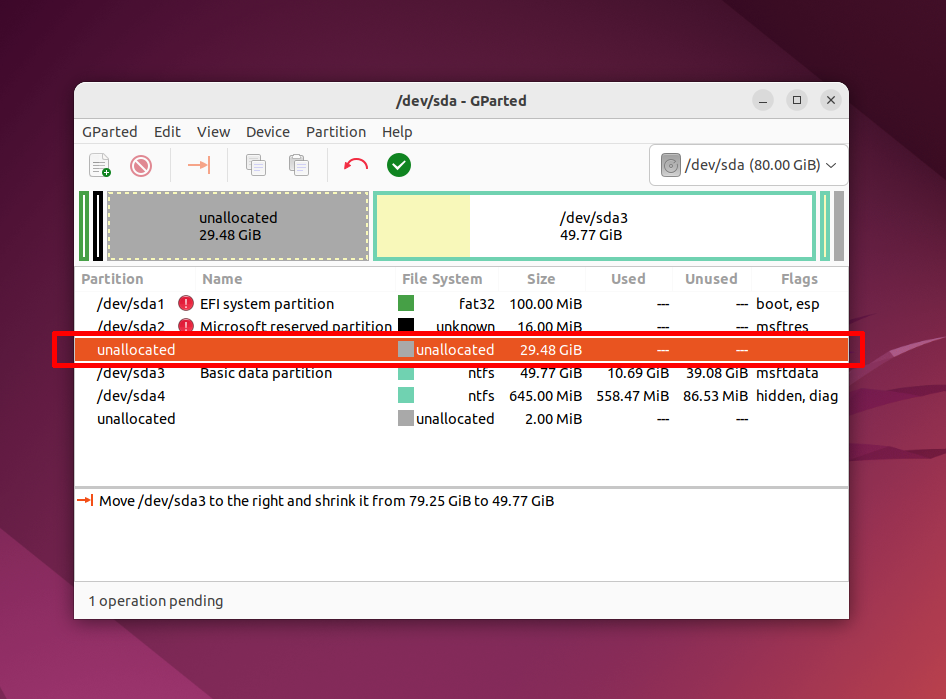
Pay attention, that you shouldn’t move the start of a system partition. You can carefully shrink a partition size by adding free space after it, but don’t try to get free space before it like this:
In this case, the Windows bootloader can be corrupted. It can be restored easily but I think you don’t want extra trouble.
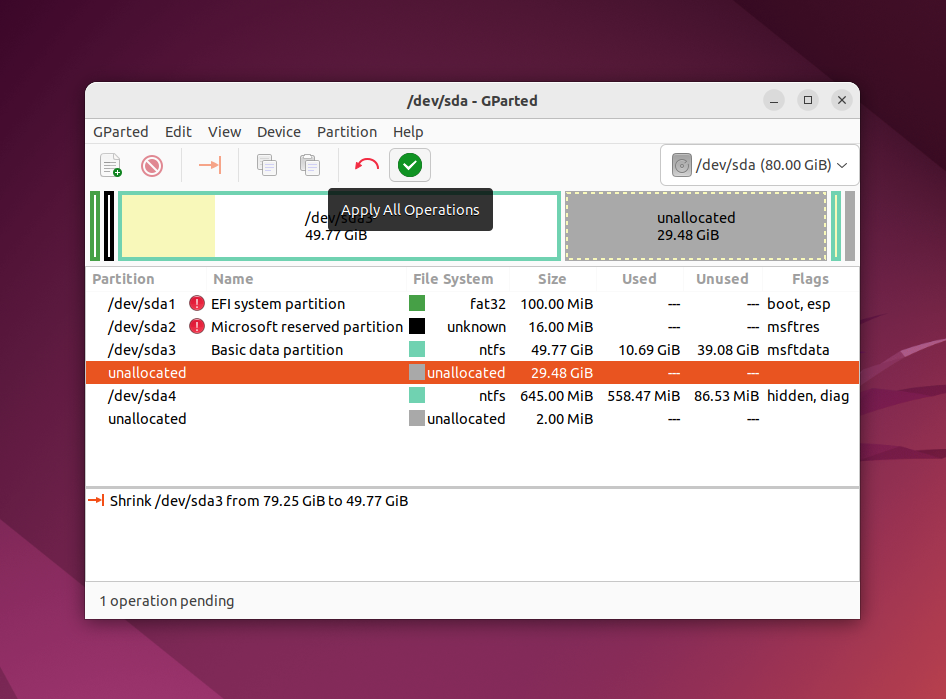
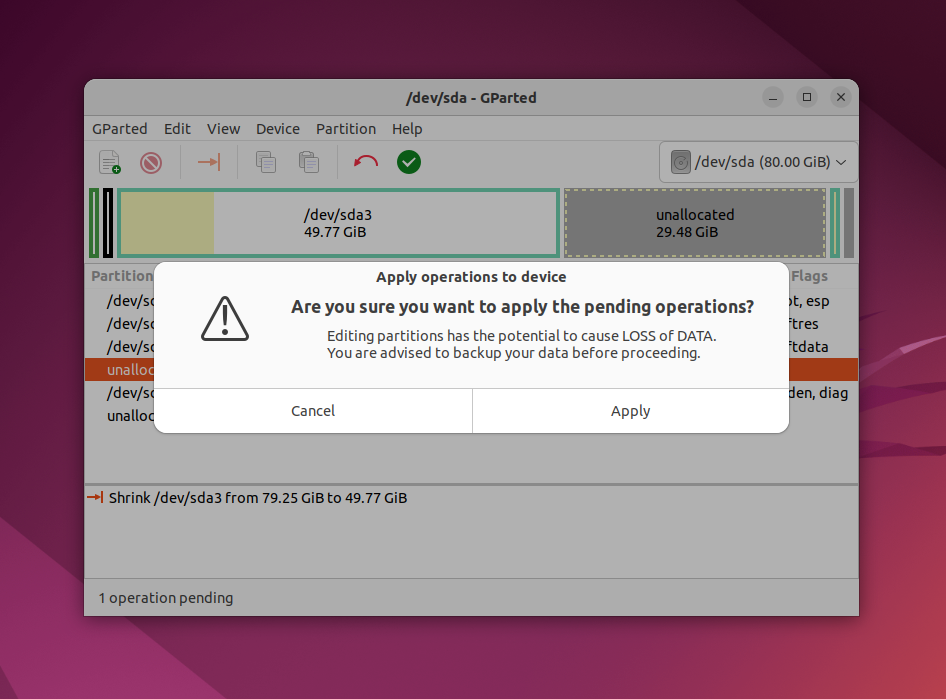
When you are done with this, press the green button or select Apply All Operations in the Edit menu.
The application will ask for confirmation. Ensure that the confirmation alert looks the same as in the following screenshot:
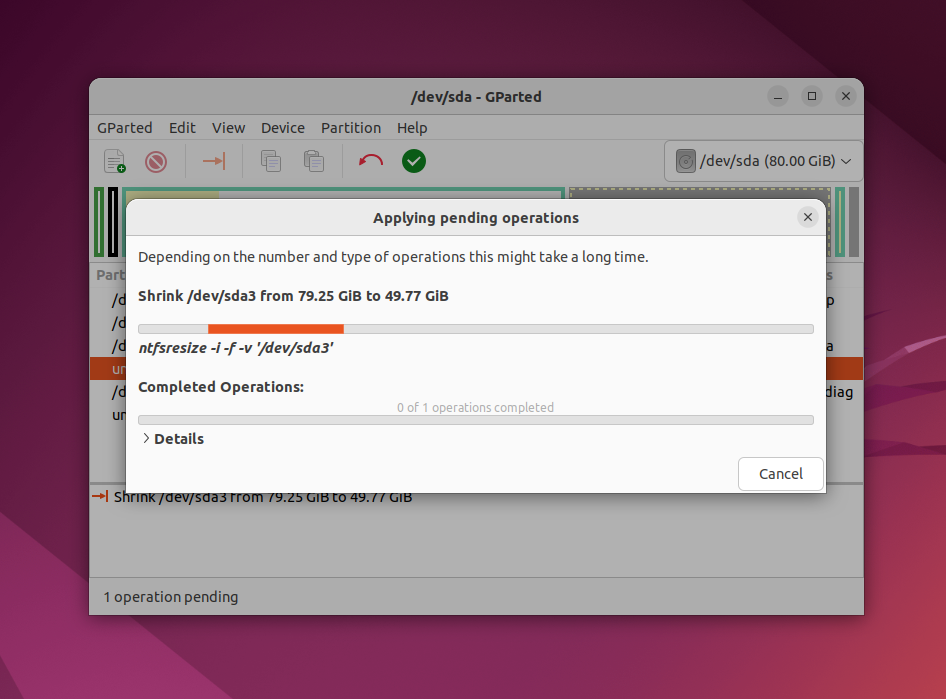
If the application warns that you are trying to move the start sector of the partition, you have done something wrong and you should cancel all and try again. Reducing the size of the filesystem can take a few minutes:
After this, you will see that the /dev/sda3 partition was reduced and free space appeared after it.
That’s it. I will not explain how to create Linux partitions here, let’s do it in the Linux installation tool.
How to Install Linux on Windows 10
I will not explain in detail how to install Ubuntu or any other distribution. It already has been explained in a lot of articles on the Internet or this site. Let’s have a look at how to do disk partitioning. You can use any distribution, actions will be pretty same. But I will use Ubuntu as an example in this article because it is the most popular Linux distribution for beginners.
1. Choose a partitioning method
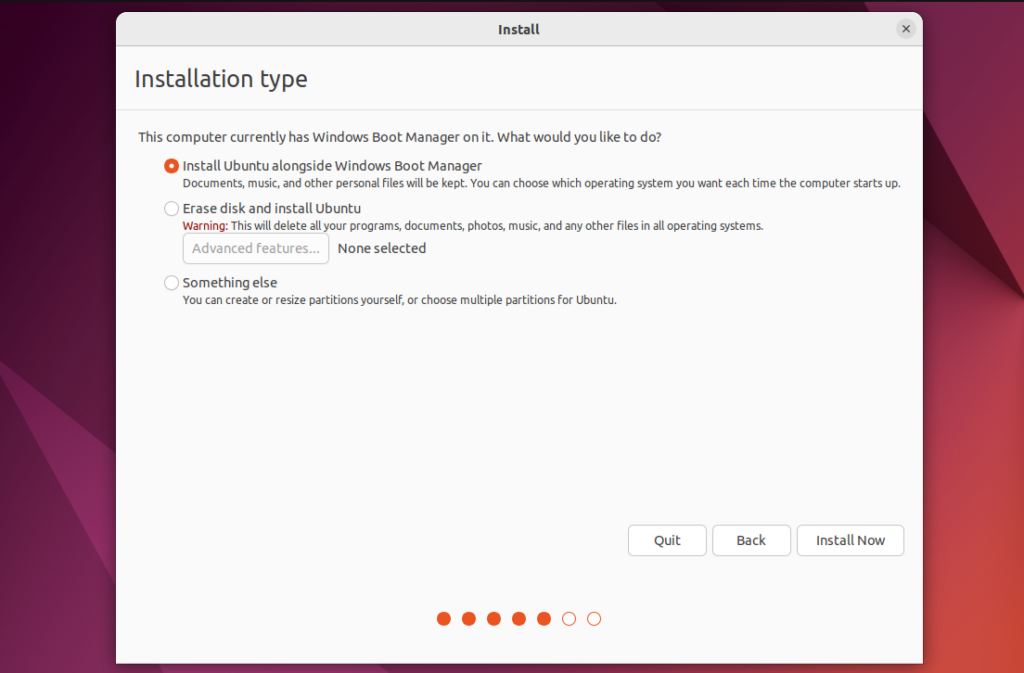
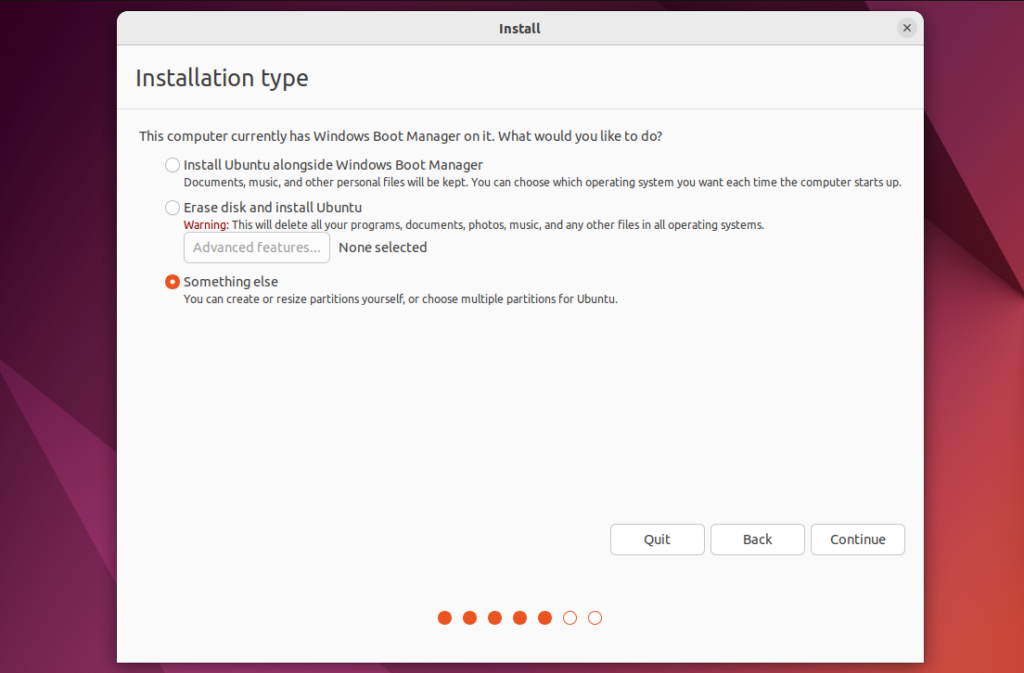
You can choose the partitioning method in the Installation type step. By default the Install Ubuntu alongside Windows Boot Manager option will be selected. In this case, Ubuntu will be installed in the free space automatically:
But I recommend choosing the manual method. Select Something else option for this. In this case, you will have more control over the installation process:
2. Create Partitions
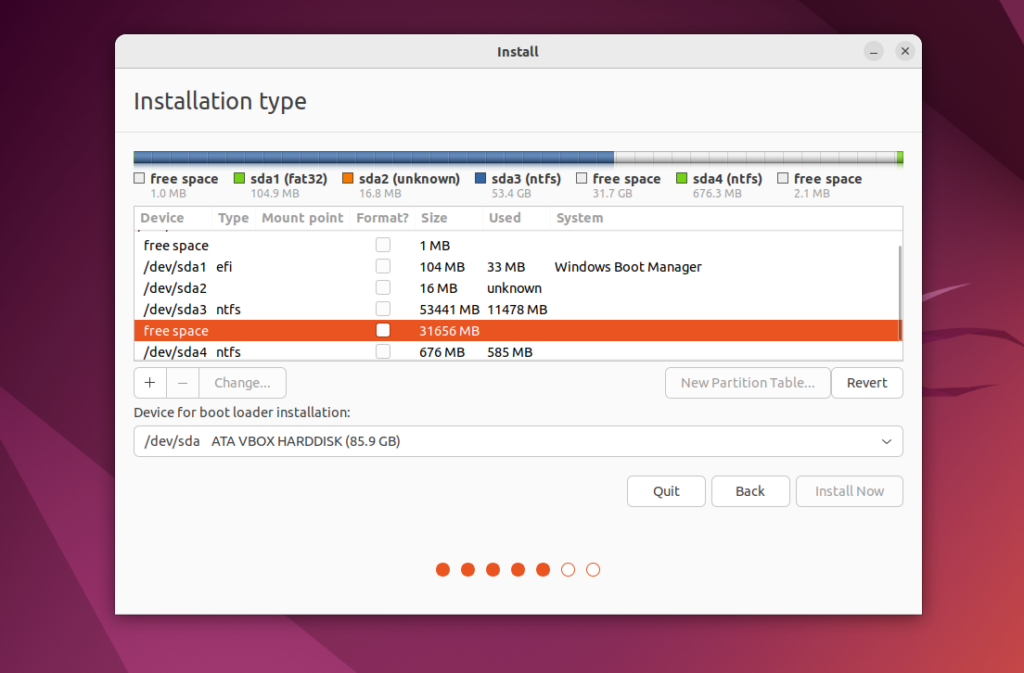
If you choose the manual partitioning method, you will see this window on the next step:
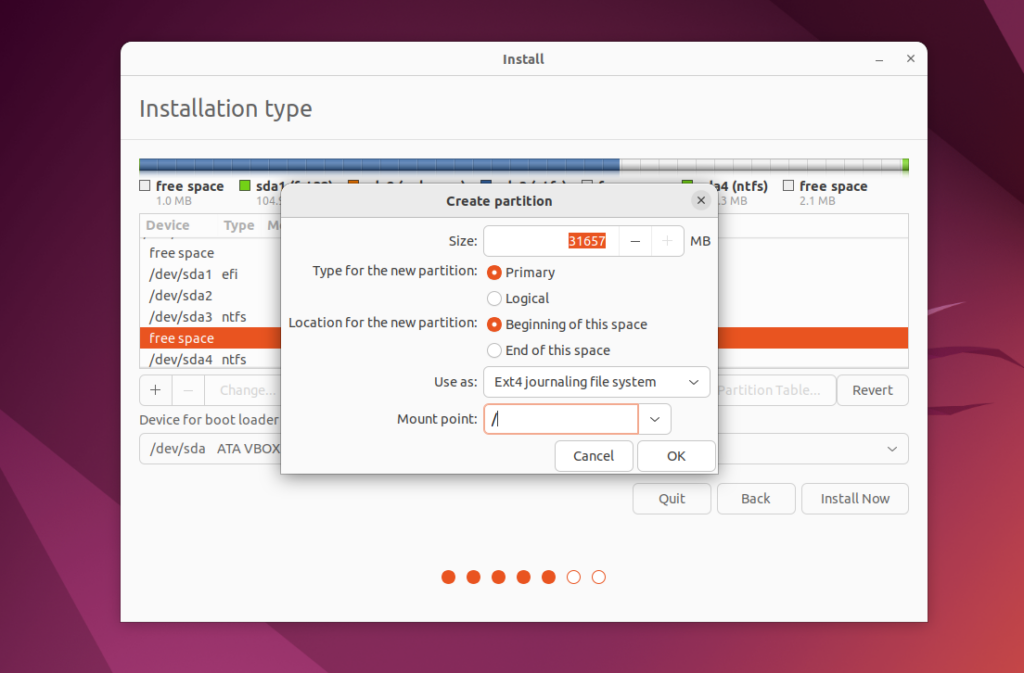
Click on Free space and then click on the plus button to create a new partition. Then enter a size for a new partition and mountpoint. You must create at least a root partition. It must be not less than 25 GB. But I recommend allocating for this partition 50 — 100 GB. Then, specify / as the mountpoint.
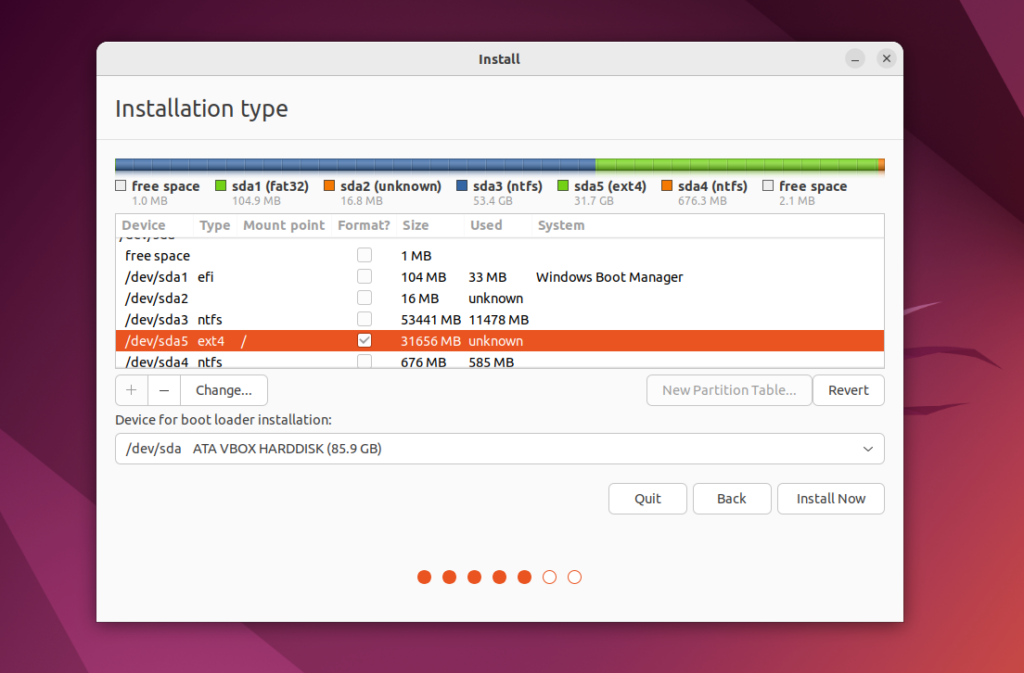
After this, the partition will appear in the list:
You can create a home partition in the same way if you have space for it. But use /home as the mountpoint.
2. Install Bootloader
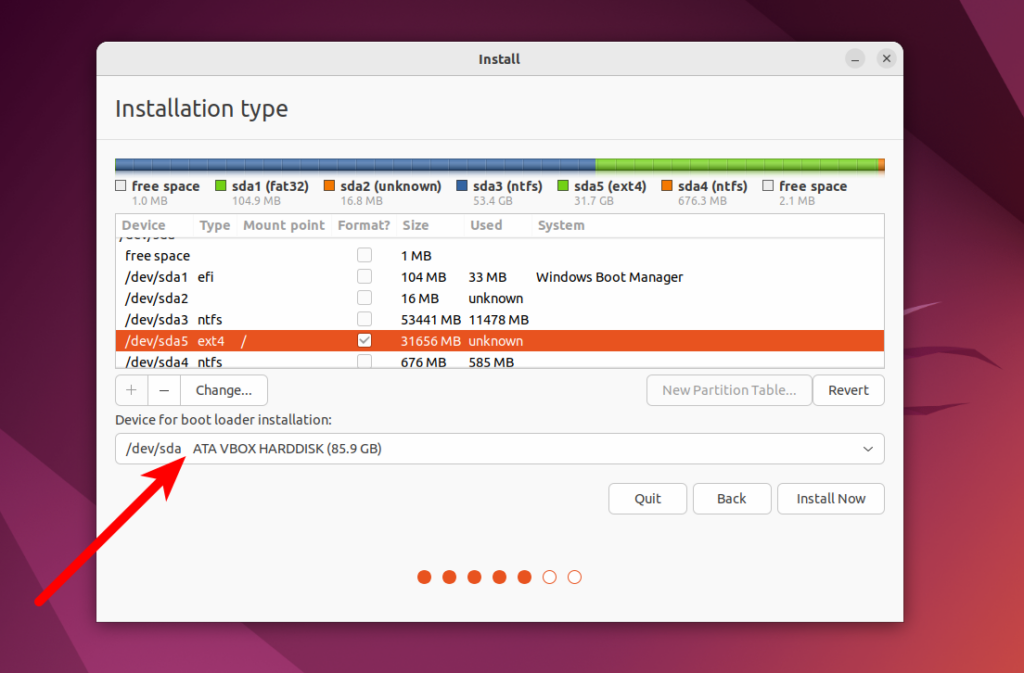
In UEFI systems bootloader should be installed on the EFI partition. So it is important to choose this partition or even a drive which has this partition for installing a bootloader. In this case, this is /dev/sda1. You can configure it using the Device for bootloader installation section at the bottom of the window:
Systemd mounts this partition automatically, so you don’t have to specify mountpoint for it. If everything is done correctly, you will see the Grub bootloader after installing, and there you will be able to select a operating system for booting.
If you are installing Linux on a non-UEFI system, you can leave the default value for bootloader configuration. There are multiple ways to install a bootloader and they depend on the partition table. It will be described in another article.
Then, you can continue the installation process as usual, and installing Linux with Windows 10 or 11 will be completed successfully.
3. Complete Installation
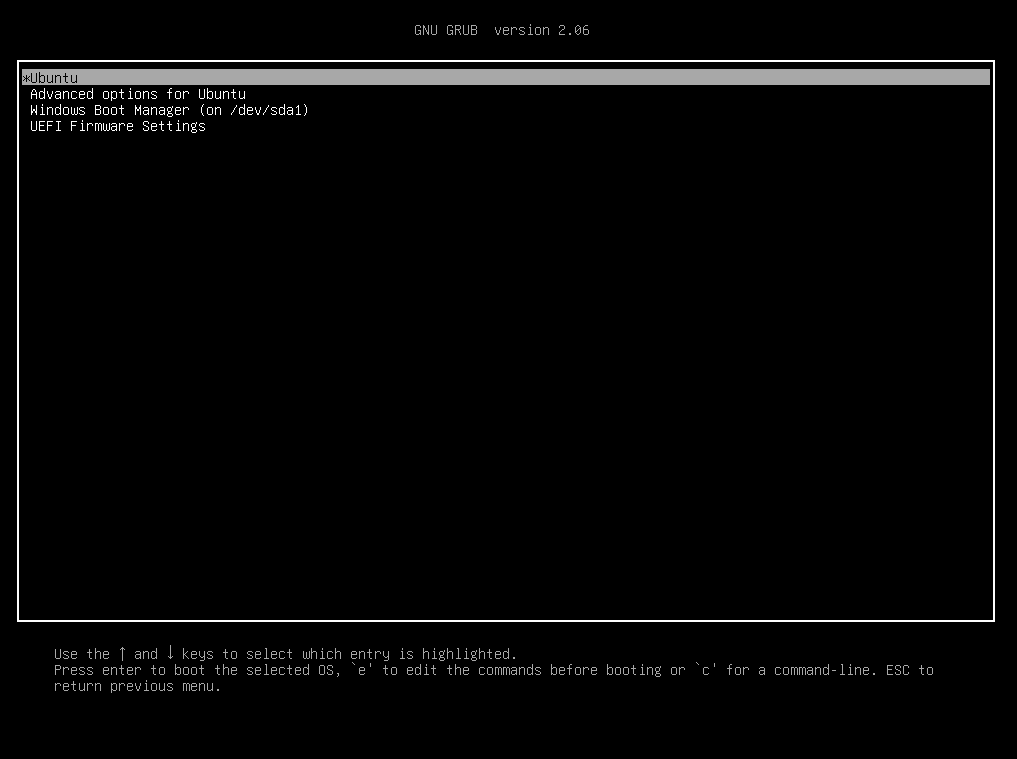
Many users want to know: «How to boot into my Windows after all of this?» Don’t worry, the Grub bootloader will find the Windows bootloader and will output the menu where you can select a operating system for booting:
So dual-booting for Windows and Linux will be configured automatically. If everything goes wrong and you don’t see the Grub bootloader, you always can repair the Windows bootloader or reinstall Grub using LiveCD. If everything is done correctly, you will be able to access your Windows.
Wrapping Up
In this article, we have explained how to install Linux on Windows 10 or 11, how to resize and create partitions on the Windows drive and specify those partitions for Linux installation. There is no sense to explain how to install each Linux distribution. There are dozens of different distributions and all actions will be pretty same. If you have any questions or suggestions on how to improve the article, use the comments form below!
Found a mistake in the text? Let me know about that. Highlight the text with the mistake and press Ctrl+Enter.
