Android Development Setup under Ubuntu Linux
So you want to be an Android developer, and you have an Android phone and an Ubuntu Linux computer ready. Rejoice, all you need is out there. With the Android SDK (including adb ), the Android Studio (or Eclipse + ADT before 2015) IDE and some Linux twiddling, we will get you ready.
1 Setting up the SDK
First we want adb [doc] (android debug bridge) for diagnostics. Unfortunately, in 2020 you cannot download the Android SDK directly anymore, instead we have three choices: Debian repository, command tools or Android Studio. If you just want to connect your phone by USB, the repo is easiest:
apt-get install adb android-sdk-platform-tools-common
For the second option, Google really doesnt want us to go headless [forum] [blog] but we can download the command tools [doc] (85MB) with the included sdkmanager [doc] put carefully into a specifically named android-sdk directory. We only need to download the build tools [rel] (1.1GB) which apparently include the platform tools [rel]; the platform [rel] comes later.
export JAVA_HOME=/usr/lib/jvm/java-1.11.0-openjdk-amd64 # . or so export ANDROID_SDK_ROOT=/opt/android-sdk cd $ANDROID_SDK_ROOT unzip commandlinetools-linux-*_latest.zip cd cmdline-tools # thanks, Google mkdir latest # for making this mv * latest # harder than necessary cd latest/bin # and confusing to boot ./sdkmanager --list ./sdkmanager "build-tools;30.0.3" ./sdkmanager --licenses # just to make sure we didnt ./sdkmanager --update # miss something "important" ./sdkmanager --list_installed cd $ANDROID_SDK_ROOT/platform-tools ./adb version
And finally, the third option by GUI is to install Android Studio IDE where upon starting bin/studio.sh , a wizard dialog will download the Android SDK to a location of your choice; alternatively an existing SDK path can be specified. After that you go Tools-> SDK Manager , where you can see that «the SDK» comprises platform and tools.
As of 2021, platform API Level 29 is the minimum version for app deployment in the GPlay store [docs]; the open source-only F-Droid store has no such limitations. The wizard above will install the newest platform, so you have to remove it and add API 29 yourself.
2 Setting up the Hardware Phone
This is a multi-step thing [doc]. First, get your phone ready, go to Settings-> About phone and click Kernel version 7 times (seriously, I am not making this up) to get «Developer mode». Then activate Security-> Unknown Sources and Development-> USB Debugging , to be found in Settings-> Applications (Android 2), Settings-> Security (Android 4), Settings-> Other-> Developer options (Android 11) or similar. Restart your phone for good measure.
Second, on your Linux machine, make sure that the kernel gives you access to plugged USB devices, and that the device is recognized.
nano -w /etc/group plugdev:myuser nano -w /etc/udev/rules.d/51-android.rules SUBSYSTEM=="usb", ATTR=="1004", MODE="0666", GROUP="plugdev"
. where idVendor or alternatively idProduct must match your phone type [list], e.g. productId= 9139 for YotaPhone 2 or vendorId= 109b for HiSense (e.g. A5 Pro CC). If you installed by apt-get , the rules list should already be sufficient.
As root, systemctl restart udev , and re-login if you were not yet member of group plugdev before. Finally, plugin the phone via USB and go:
adb kill-server # just to be sure adb start-server # might require root adb devices
Your phone should be visible in the adb output, and with adb shell you should be able to start all kinds of activity [xda1] [xda2]. And with the next app start, Android Studio (or Eclipse until 2015) should ask you whether you want the emulator or the physical phone.
3 Setting up the Emulation
You will be tempted to think this was it, but we still need two more things things, namely install an Android platform version (e.g. API Level 29), and create an emulated phone (or tablet) [docs].
If you have Android Studio installed, go to Tools-> AVD Manager and create a suitable device by click-fest. Otherwise we use our command tools again:
cd $ANDROID_SDK_ROOT/cmdline-tools/latest/bin ./sdkmanager --list_installed # 1.1GB ./sdkmanager "platforms;android-29" # 1.3GB ./sdkmanager "system-images;android-29;default;x86_64" # 4.4GB ./avdmanager create avd --name myphone-29 --package "system-images;android-29;default;x86_64" ./avdmanager list avd # still 4.4GB
. but you should probably only do that for integration into another tool chain; otherwise better stay with Android Studio from here. One last thing is the emulator running faster with KVM enabled [doc], which in turn requires hardware virtualization in your UEFI (or BIOS) firmware [blog].
apt-get install cpu-checker kvm-ok # . and if it is not ok: apt-get install qemu-kvm libvirt-bin ubuntu-vm-builder bridge-utils
. and this should accelerate the otherwise pretty slow emulation considerably.
4 Setting up the Development Environment
We assume a downloaded and installed Android Studio [dl] (or Eclipse with Android Development Tools before 2015).
If you followed the instructions above, there is really not much to set up anymore: We have the SDK tools = build + platform tools (newest), one platform (API 29), a system image (API 29) and derived emulated device (API 29). The SDK tools exist only once but we can have multiple platforms.
Confusing as this multitude of tools is [forum], we are in for something worse: app build automation with Gradle [doc] or previously Maven [forum] [cmp], both of which have a dynamic dependency graph that is updated automatically in the best case, and produces labyrinthine failures otherwise. Good luck.
From the development setup side, we are done though. Now create your first project and try your hand at app setup.
5 Eclipse (2010)
Once upon a time before 2015, the first version of this guide had Eclipse + ADT as IDE; ANDROID_SDK_ROOT was called ANDROID_HOME back then.
Setting up the SDK
You will want an Eclipse (probably the JEE version) and then you need install the ADT plugin (android developer tools, not to be confused with the previously mentioned Android SDK) from Google. You can do without Eclipse, but it is an eternal pain in the butt. Open the Eclipse update manager and get everything from https://dl-ssl. google.com/android/ eclipse/ .
After Eclipse restart, go via menubar to Window-> Preferences-> Android and set the ANDROID_HOME location. It might also be a smart idea to set ANDROID_HOME in ~/.bashrc or wherever you keep your variables.
One eternal source of disdain is the fact that source code is not installed alongside the android.jar package. As of 2011, you can solve this via the Eclipse update manager. Install everything from http://adt-addons. googlecode.com/ svn/trunk/source/ com.android.ide. eclipse.source. update/ and you can F3 your way through the Android source.
Setting Up the Emulation
In Eclipse menubar, choose Window-> Android SDK Manager and install the platform versions you like.
After that, again in Eclipse menubar, choose Window-> AVD Manager (android virtual device) and create an emulated phone. You will probably want to have a 20 MB SD card emulated in there.
Now in Eclipse, create a new Android project. It will be a stub with one text view only. Rightclick on the project, choose Run As->Android Application and the emulator will take a long time to come, while your application will be pretty quick. Do not close the emulator between deployments; a new install will overwrite the old one, and keeping the emulator open will save you a lot of time.
. and that was when APK were built locally by Ant and not by some byzantine, always-online Gradle dependency graph that only Google understands. On the plus side, the IDEA [dl] base of Android Studio makes for a much smoother and more interactive IDE than Eclipse ever was. And the source code of the Android libraries is available too.
Conclusion
So this was the short ride through Android development setup. To take your time, read up more details, and start the actual development, please follow the Android developer guide. Most of all, have fun coding!
Set up Android Development Environment for Linux
Set up android development environment for your Linux Machine ? yea its a bit complex based on the distro you are using , If you using popular distro like Ubundu its much easier but if you are using some other like Arch or Manjaro it may get complex.
I am also faced such an issue , previously my distro was Linux Mint (Debian) so there is no such issue facing while set up android environment. But When I switch to Arch based Manjaro Linux the things get changed, Android SDK is available with AUR package in Manjaro but when I tried to install it gets failed during the package build time.
So I think instead of adding android sdk via CLI or software manager , manually set up android development environment for my Manjaro linux. The thing is quite easy just download the android sdk for linux from Android Developer website there you can see android developer site is suggesting Android Studio , Its a great IDE for developing native android application, but if you are planning to build Hybrid app or your system resources are limited (bcoz Android Studio required a minimum of 8GB of ram and better processing power for smooth run). In that case you just need to download stand alone android sdk package only. that you can found at other download section SDK tools only.
Now you need a JDK for running android sdk. so just download a latest compatible version JDK from Oracle web site. I’m using Java SE Development Kit 8u51 , package file jdk-8u51-linux-x64 for my arch distro.
Now you have Android SDK and JDK ready , you may have few dependency packages as well. make sure you already installed following packages.
lib32-libstdc++5 lib32-libx11 lib32-ncurses lib32-zlib lib32-sdl lib32-libxext Lets Set up android development environment for your Linux distro, Its works on all Linux distro.
simply extract the downloaded zip files Android SDK and JDK to your home (or your preferred localtion). make sure both folders have all the files. In my case for android sdk the folder name is android-sdk-linux and JDK is just jdk.
Now simply open you environment variable files, it may vary based on distro you are using. If you are using Debian based you can use .bashrc or .bashprofile file. If you are in Red hat or Arch based distro it might be /etc/profile in arch based system you can also use other files too , /etc/bash.bashrc and /etc/environment.
Now just open this file any one of them (in my case it is /etc/profile) with your preffered editor.
Then add the following path to your file for set up android environment variable . like ANDROID_HOME and JAVA.
export PATH=$PATH:"/home/User/jdk/ bin" export PATH=$PATH:"/home/User/ android-sdk-linux/tools" export PATH=$PATH:"/home/User/ android-sdk-linux/build-tools" export ANDROID_HOME In the above path User should be your user name and path should be your preferred path you use to extract the zip file before.
now just update your environment variables by using following command based on your distro the file name may change.
Now just run following command in your CLI.
it will open up the android sdk manager now simply choose the sdk versions and build tools you required to work with.

Set up android environment for linux machine
and just mark and install the required versions.
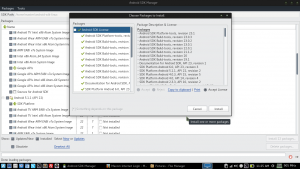
android sdk for linux machine
Its simple and done, You have set up android development environment for you favorite Linux distro. expect some good hybrid app development tutorial soon.