- How to access to internet on Linux using Android Tethering
- Tethering on Linux
- USB Tethering
- Wifi Tethering
- Bluetooth Tethering
- Android tethering
- Wi-Fi access point
- USB tethering
- Using systemd-networkd with udev
- USB tethering with EasyTether
- Reverse tethering
- Tethering via Bluetooth
- Tethering with SOCKS proxy
- Tools needed
- Instructions
- Tetherbot
- Proxoid
- Android Proxy Server
- Как использовать телефон с Android для Интернет-доступа на компьютере без Wi-Fi в Linux
- Как использовать телефон с Android как USB модем в Linux
- Что делать, если пункт USB-модем не активен или отсутствует
- Что нужно помнить при использовании мобильного телефона для Интернета
- Как включить передачу файлов между компьютером и телефоном
How to access to internet on Linux using Android Tethering
It’s been over 30 years since the World Wide Web was introduced to the world. Over time, the internet took its toll and now has roughly around 45 million web pages compared to 10,000 websites earlier. We really do have come a long way.
Emerging from the primitive world of 2G signals we are now living in the era where mostly every device has an internet connection and if not of its own, gets one from another system. The technical term for sharing your phone’s internet connection to another phone or system is known as Tethering.
Tethering on Linux
Tethering the internet through your phone to your Linux desktop can be done mainly via three simple ways.
USB Tethering
Connection over USB is just as simple as connecting your phone to a charger point. However, just like electricity is essential to charge your phone, internet connection in your phone is necessary to share it with others. Rare is the case when your charging cable is not suitable to be used as a data-transfer wire and you need to buy an apt one separately.
The connection is automatically established by plugging in your USB cable to both your computer and phone. A dialog box of confirmation highlighting the name of your device pops up.

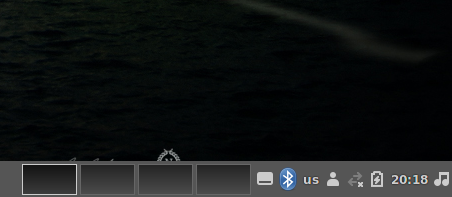
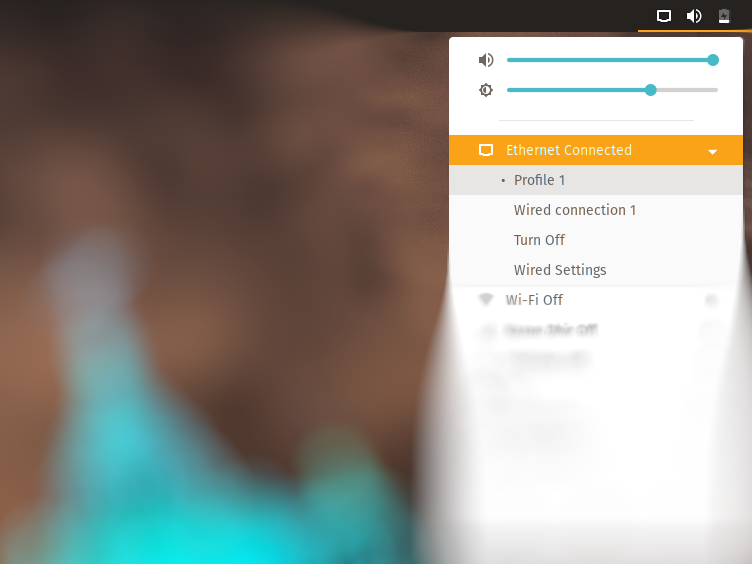
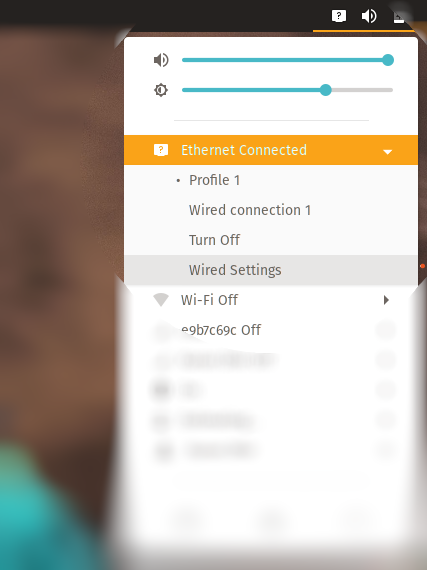
Now, Under the Settings in your phone select Wireless and Network (or Network and Internet ). Click on the More tab and choose Tethering & Portable Hotspot and Enable USB Tethering . On the top right corner of your Linux machine, bring down the Network Connections toolbar as shown, where a tab Ethernet Connected is visible.
Your system’s internet connection is ready!
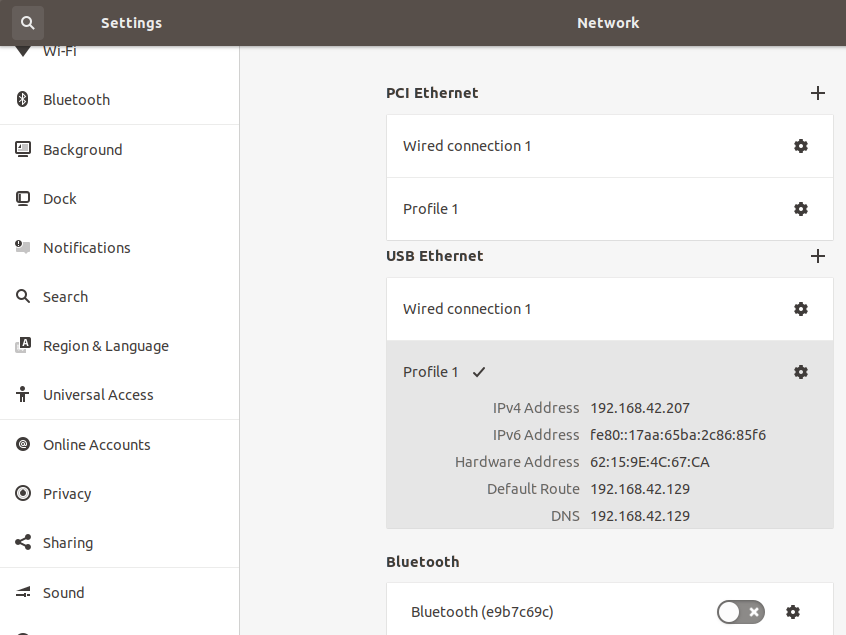
However, in a few cases you might have to further enable the Wired Settings window, where you can add a new connection and also view the IP address of your attached device. Here in this case, it is named Profile 1 .
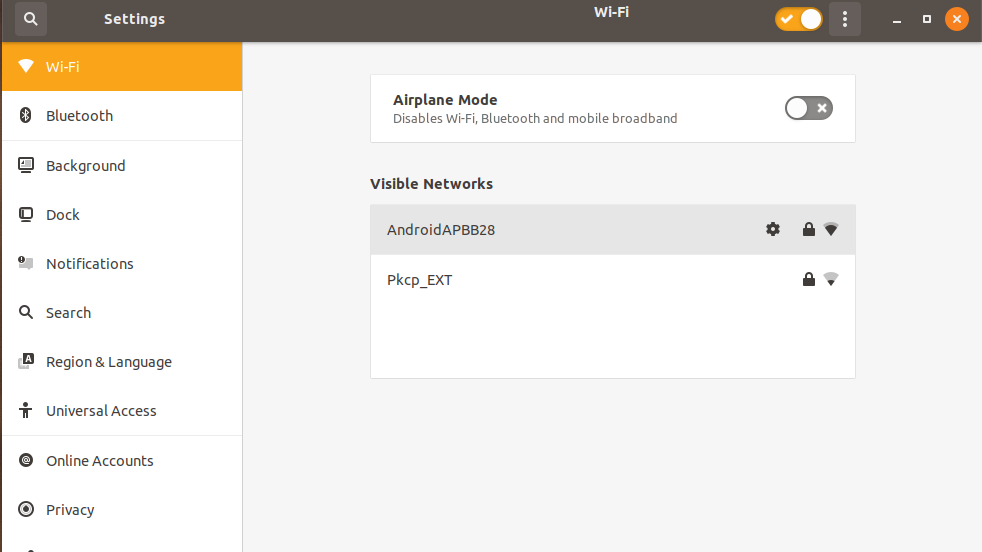
Wifi Tethering
Following the same process as mentioned above, in your Android phone, open Settings and go to Network & Internet . Next, select Mobile Hotspot and Tethering and turn on the Mobile Hotspot . In your Linux system, again under the Network Connections , turn Wifi On
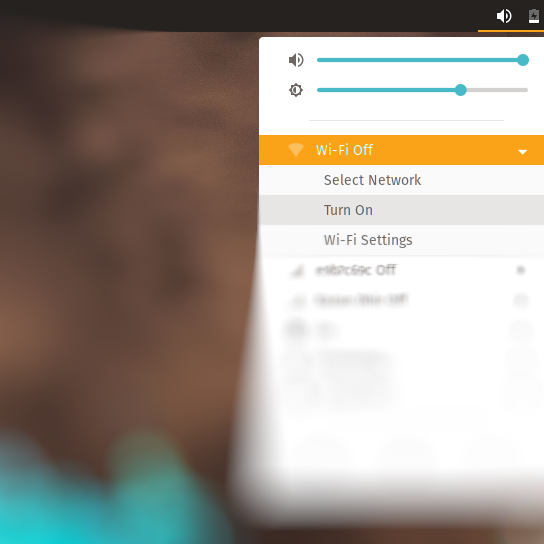
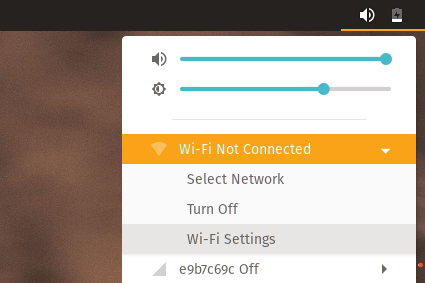
Here you can view all the available networks and connect with anyone by just entering the password available in your phone under Mobile Hotspot .
The Wi-Fi symbol in the top panel will now indicate that it’s connected.
Bluetooth Tethering
Yes! The bluetooth connection can be used not only to transfer data files but for passing on your phone’s internet connection to your Linux machine. Navigating through the Network Connections tab, switch on the Bluetooth on your Linux distro and go to Bluetooth Settings .
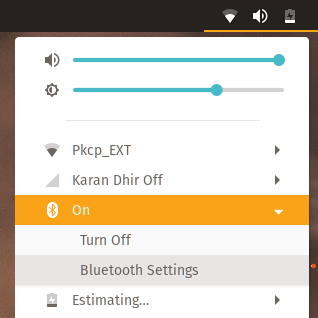
Make sure you have turned on Bluetooth in your phone too. Both of your devices will discover each other so click on the device’s name and a confirmation pin message will show up on both of the devices. If the pin matches, click confirm and Bluetooth pairing will be established.
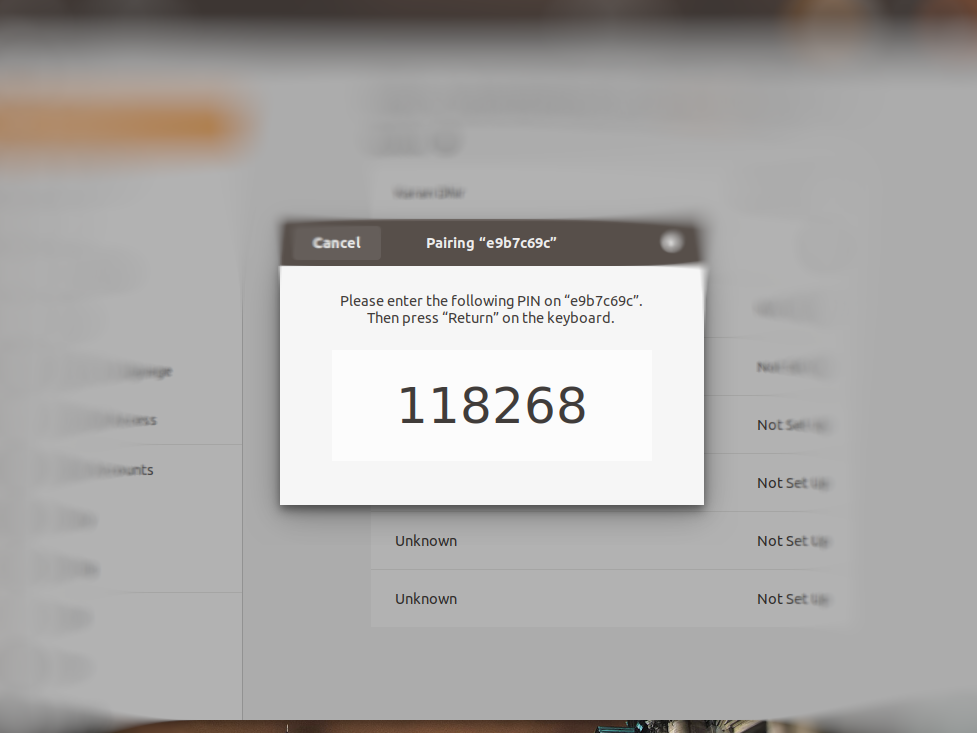
Now, again go to the Network Connections tab and under the paired device, here e9b7c69c , select the option to Connect to Internet .
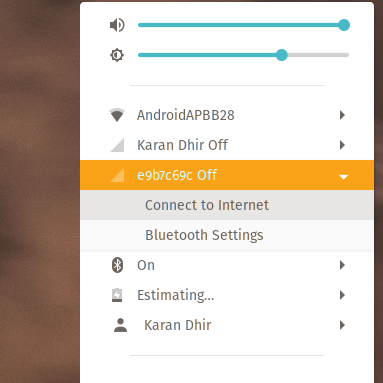
The Bluetooth symbol in the top panel will now indicate that it’s connected.
Go ahead and explore the unlimited boundaries of the internet on your Linux system! Thanks to the unimaginable scope of technology, without a doubt, your cellphone will always be at your rescue whenever a sudden need of an internet connection is required to your system.
Help us improve this content by editing this page on GitHub
Android tethering
Tethering is a way to have internet access on your PC through your smartphone using its network connection. USB tethering and Wi-Fi access point tethering are natively supported since Android 2.2 «Froyo». USB #Reverse tethering, to have internet access on your smartphone through your PC, is also possible.
Wi-Fi access point
Using an Android phone as a Wi-Fi access point (to a 3G/4G mobile internet connection) is available for devices running Android 2.2 «Froyo» or newer.
Enable it via one of the following:
- Settings > Wireless & networks > Internet tethering > Wi-Fi access point
- Settings > More. > Tethering & mobile hotspot > Mobile Wi-Fi hotspot
Note: On some phones, this method will discharge the battery rapidly and tends to cause intense heating, unlike USB.
USB tethering
This article or section needs expansion.
Reason: Should have a new section for RNDIS networking, which mostly just works. (Discuss in Talk:Android tethering)
USB tethering is available since Android 2.2 «Froyo».
- Connect the phone to your computer via USB (the USB connection mode — Phone Portal, Memory Card or Charge only — is not important, but please note that you will not be able to change the USB mode during tethering)
- Enable the tethering option from your phone. This is usually done from one of:
- Settings -> Wireless & networks -> Internet tethering (or Tethering & portable hotspot, for more recent versions)
- Settings -> More. -> Tethering & mobile hotspot -> USB tethering
Note: The network interface name may change depending on the USB port you use. You may want to change the interface name to create a unique name for your device regardless of the USB port.
- If you are using a cellular data plan and you have recently entered a new billing period, you may need to restart your phone.
Using systemd-networkd with udev
Using systemd-networkd you can automatically adjust the networking to use the phone as the gateway when plugged in.
/etc/udev/rules.d/90-android-tethering.rules
# Execute pairing program when appropriate ACTION=="add|remove", SUBSYSTEM=="net", ATTR=="18d1" ENV=="rndis_host", SYMLINK+="android"
You may have to adjust the idVendor attribute depending on your phone. You can check using udevadm:
$ udevadm info /sys/class/net/enp0s26u1u2
Then create the corresponding systemd-networkd file:
/etc/systemd/network/50-enp0s26u1u2.network
[Match] Name=enp0s26u1u2 [Network] DHCP=ipv4
USB tethering with EasyTether
Get the easytether linux client software. The commands to set it up and run it are as follows.
# pacman -U easytether-0.8.5-2-x86_64.pkg.tar.xz # easytether-usb # dhcpcd tap-easytether
Make sure you have the EasyTether android app installed on your phone for it to connect to. Note: The Lite app disables some connections and you must have the paid app for full functionality. For this reason, using the AziLink setup is recommended instead.
Reverse tethering
Reverse tethering is to provide internet connection to Android through PC. gnirehtet AUR provides reverse tethering.
Connect your phone to your computer via USB like mentioned above and start:
Tethering via Bluetooth
Android (from at least 4.0 onwards, possibly earlier) can provide a Bluetooth personal-area network (PAN) in access point mode.
NetworkManager can perform this action and handle the network initialisation itself; consult its documentation for more details.
Alternatively: pair and ensure you can connect your computer and Android device, as described on Bluetooth, then, substituting the address of the Android device (here given as AA_BB_CC_DD_EE_FF ), do:
$ dbus-send --system --type=method_call --dest=org.bluez /org/bluez/hci0/dev_AA_BB_CC_DD_EE_FF org.bluez.Network1.Connect string:'nap'
This will create a network interface bnep0 . Finally, configure a network connection on this interface; Android offers DHCP by default.
Tethering with SOCKS proxy
With this method tethering is achieved by port forwarding from the phone to the PC. This is suitable only for browsing. For Firefox, you should set network.proxy.socks_remote_dns to true in about:config ( address bar )
Tools needed
Instructions
Tetherbot
Tetherbot is an experimental SOCKS proxy and Port Bouncer that should allow you to connect your laptop to the internet using the internet connection (EDGE, 3G or Wifi) of your T-Mobile G1 Cellphone. It is discontinued and its website is down, but still can be accessed from Wayback Machine[1] where its APK can also be downloaded from.
In order to do SOCKS proxy via Tetherbot to connect your browser to the Internet, do:
- For your phone, open the application Tetherbot, decline Phone & Storage permissions, and press the Start Socks button
- Forward the port to your local computer:
# adb forward tcp:1080 tcp:1080
Note: Remember to disable these proxy settings in your web browser if you want to stop using your phone’s connection.
Proxoid
Follow the instructions demonstrated in the following link.
Android Proxy Server
Currently available on the Google Play store and supports HTTP/HTTPS, Socks5, Shadowsocks, and TCP Relay proxies.
To initiate a SOCKS proxy to connect your browser to the Internet, do:
- Open the app Android Proxy Server, and enable the Socks5 Proxy ticker
- Forward the port to your local computer:
# adb forward tcp:1088 tcp:1088
Note: Remember to disable these proxy settings in your web browser if you want to stop using your phone’s connection.
Как использовать телефон с Android для Интернет-доступа на компьютере без Wi-Fi в Linux
В статье «Как делиться мобильным Интернетом с другими телефонами и компьютерами» мы уже рассказывали как использовать мобильный телефон в качестве Точки Доступа, но что если у компьютера нет Wi-Fi адаптера или для него не установлены драйверы?
Данная статья посвящена ответу на этот вопрос — в ней рассказано, как компьютер подключить к мобильному Интернету с помощью USB кабеля.
На самом деле, данный метод даже проще создания мобильной Точки Доступа.
Как использовать телефон с Android как USB модем в Linux
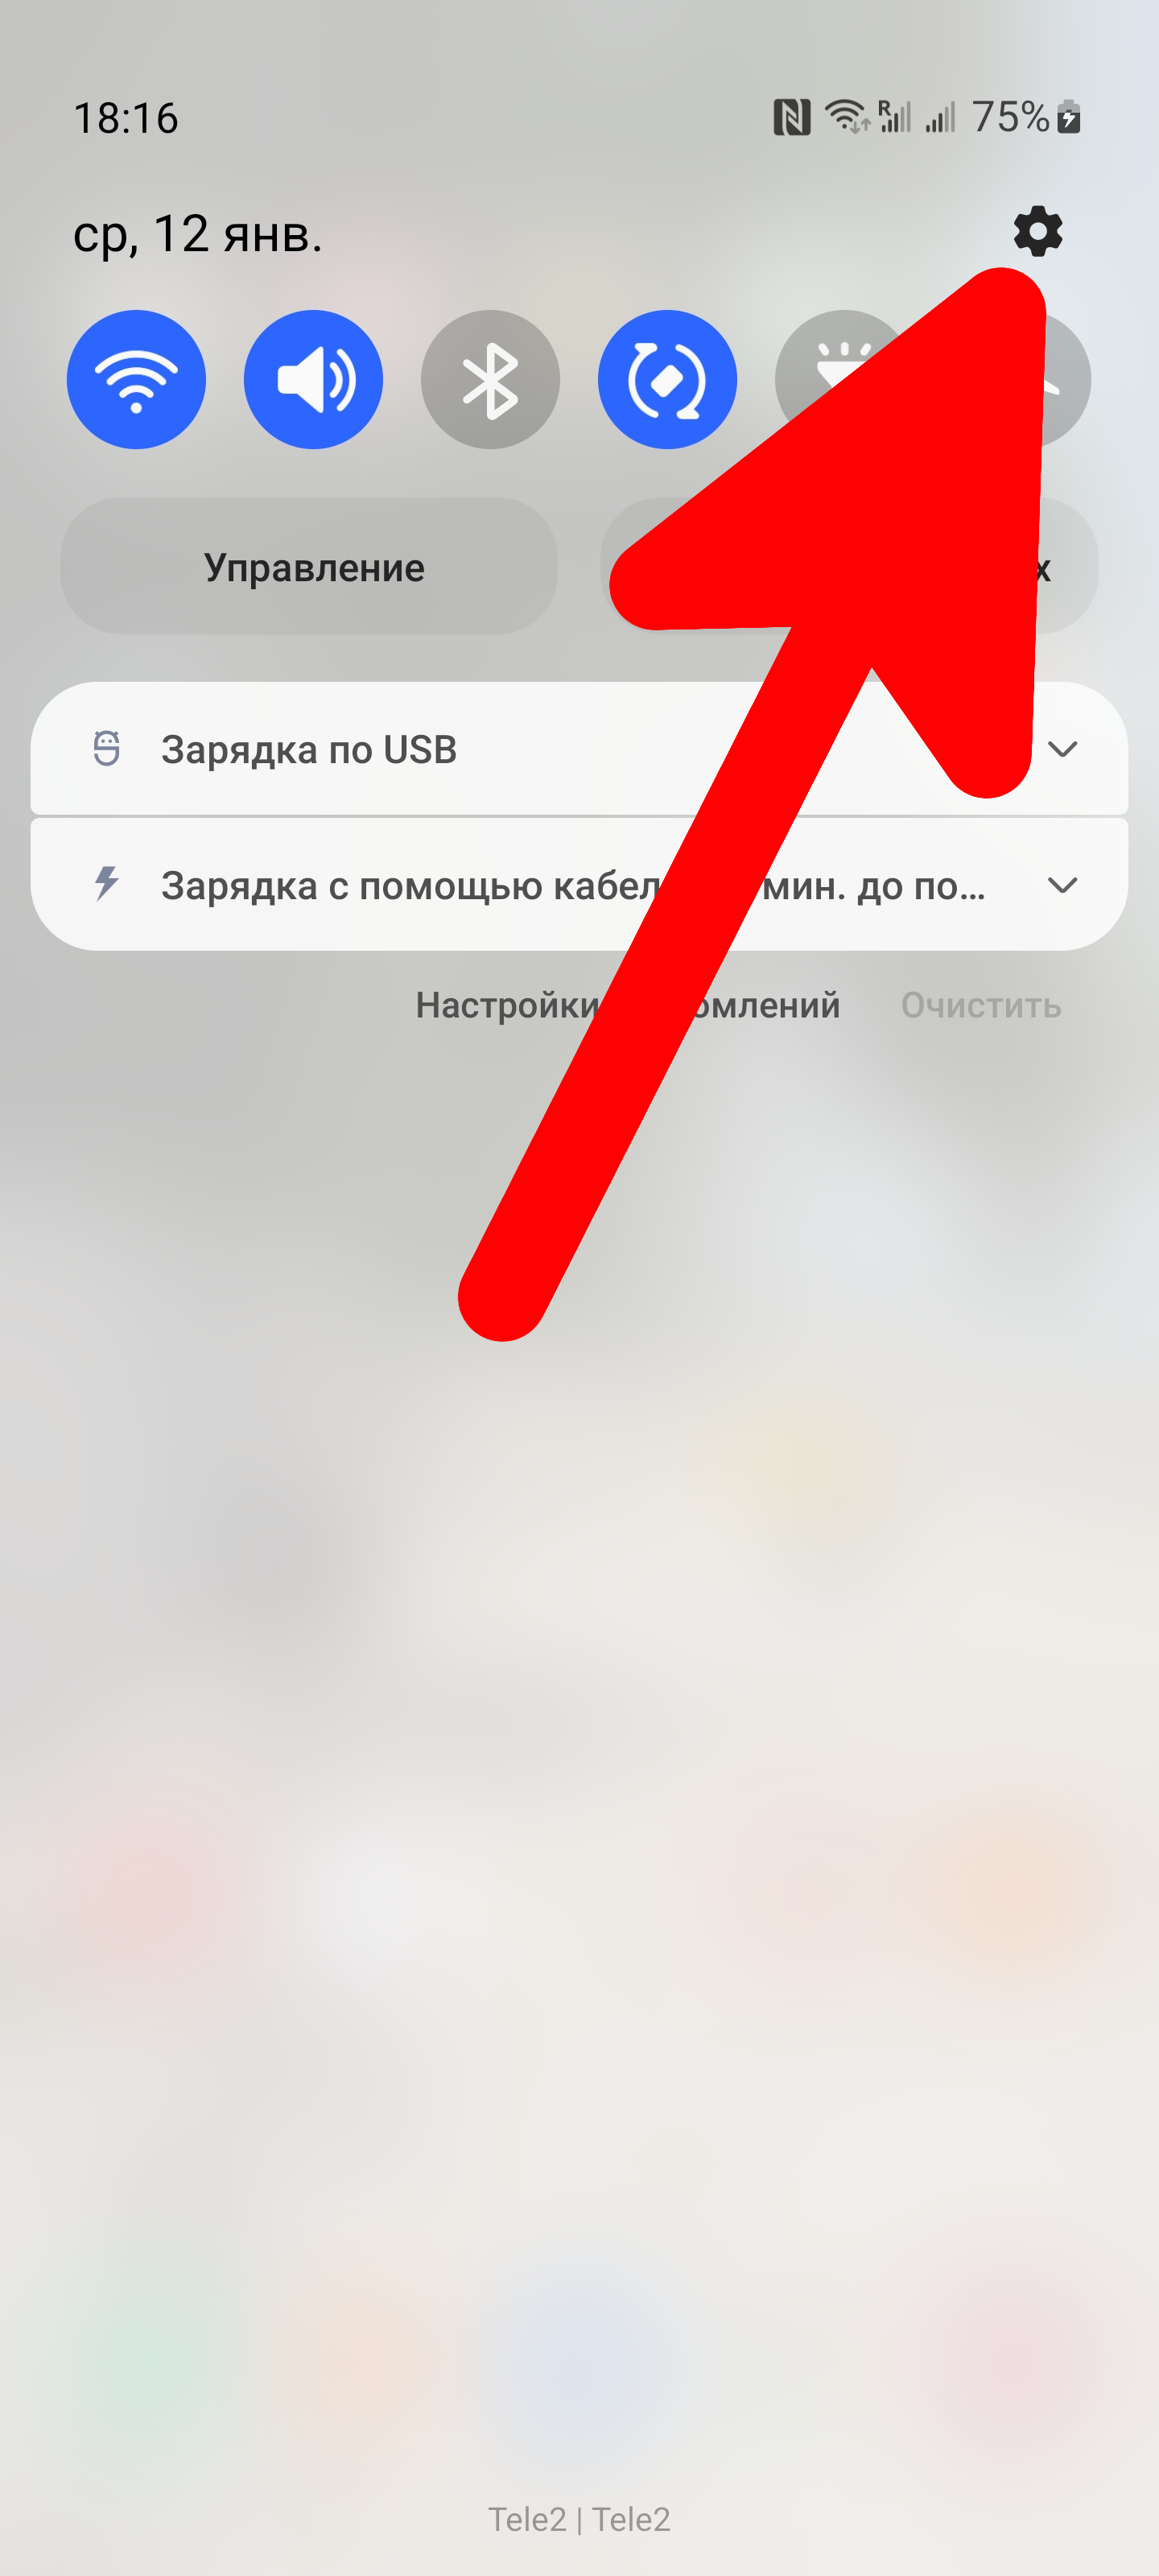
Как можно видеть на скриншоте, у компьютера отсутствует Интернет-подключение.

Начните с того, что подключите телефон к компьютеру по USB кабелю.
Затем перейдите в настройки вашего телефона, это можно сделав развернув шторку движением сверху вниз и нажав значок шестерёнки.
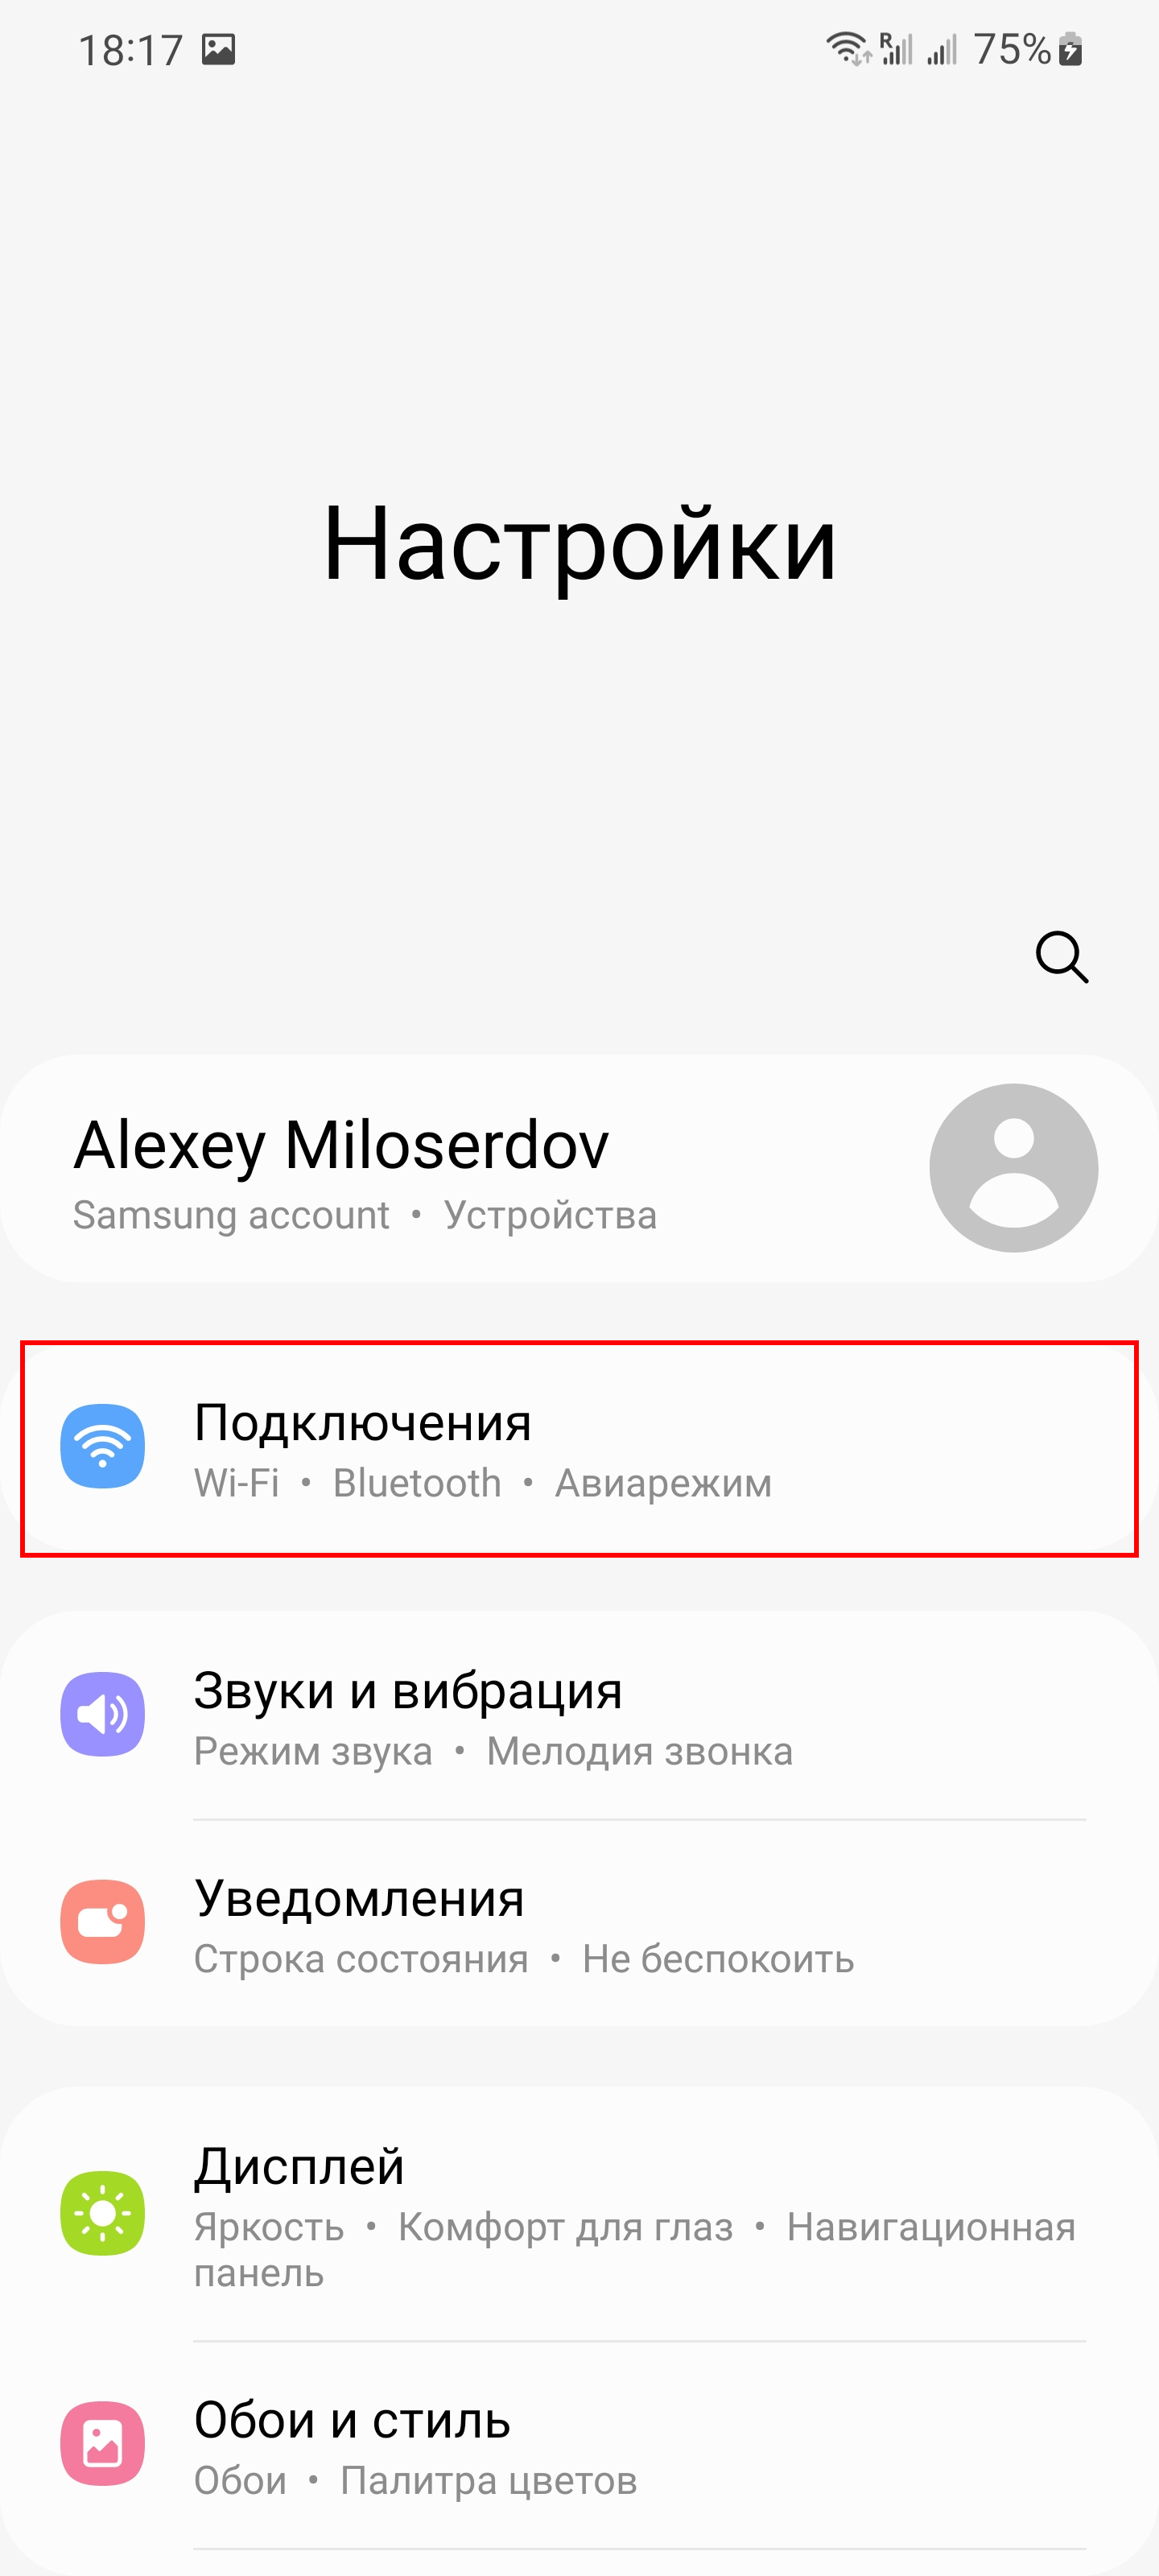
Далее название пунктов настроек может различаться на разных моделях телефонов, но суть будет везде одинаковая.
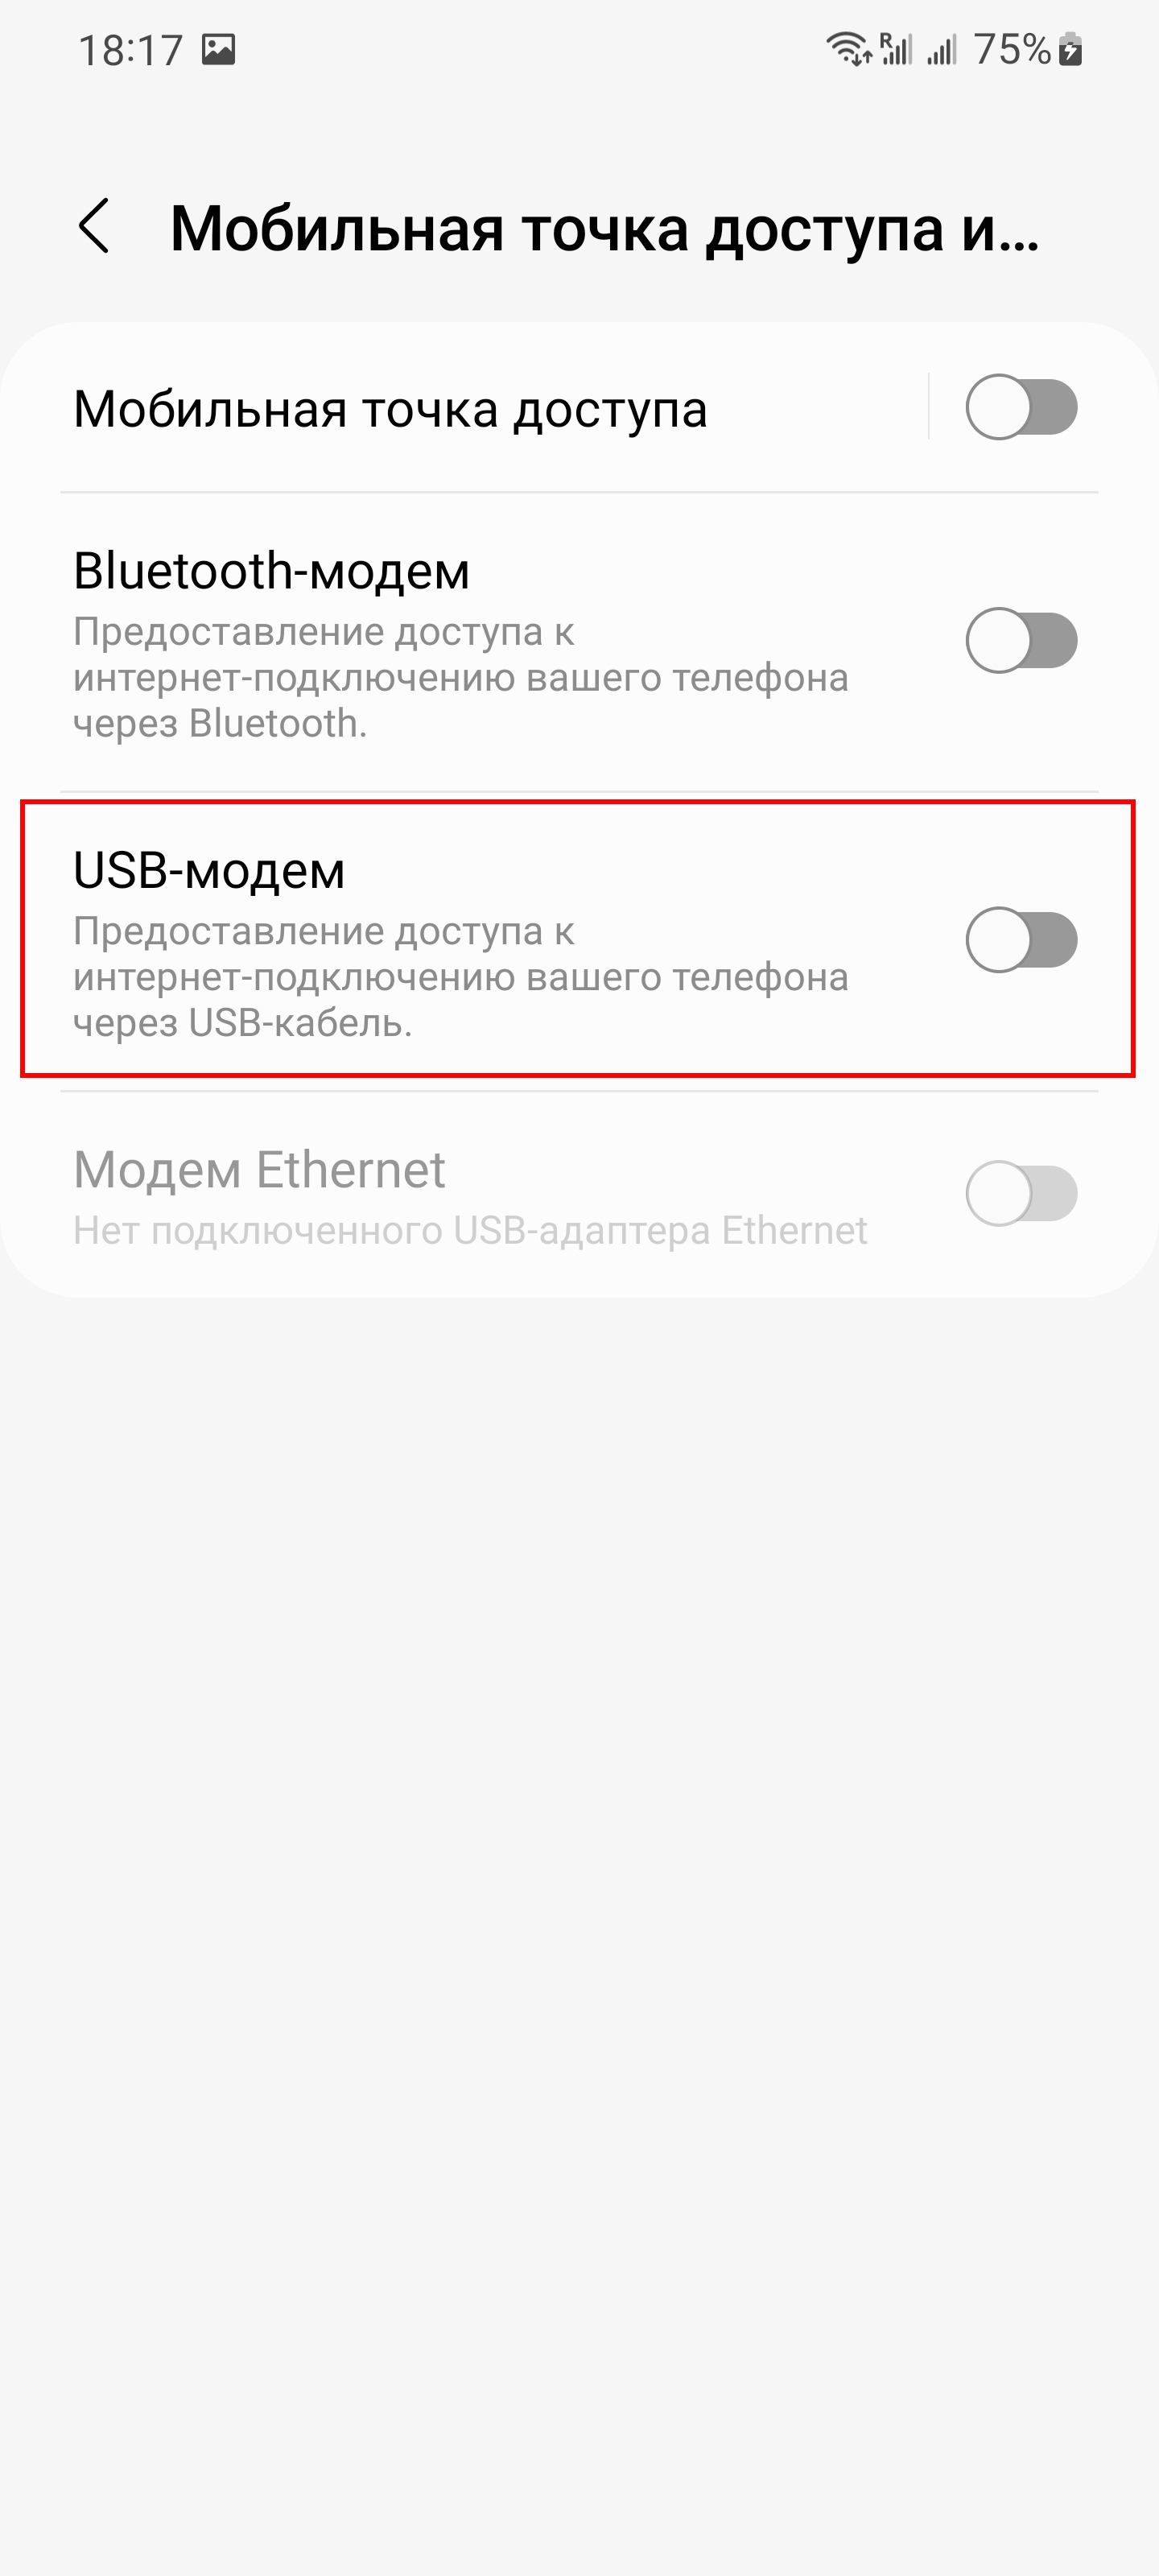
Перейдите в раздел «Подключения».
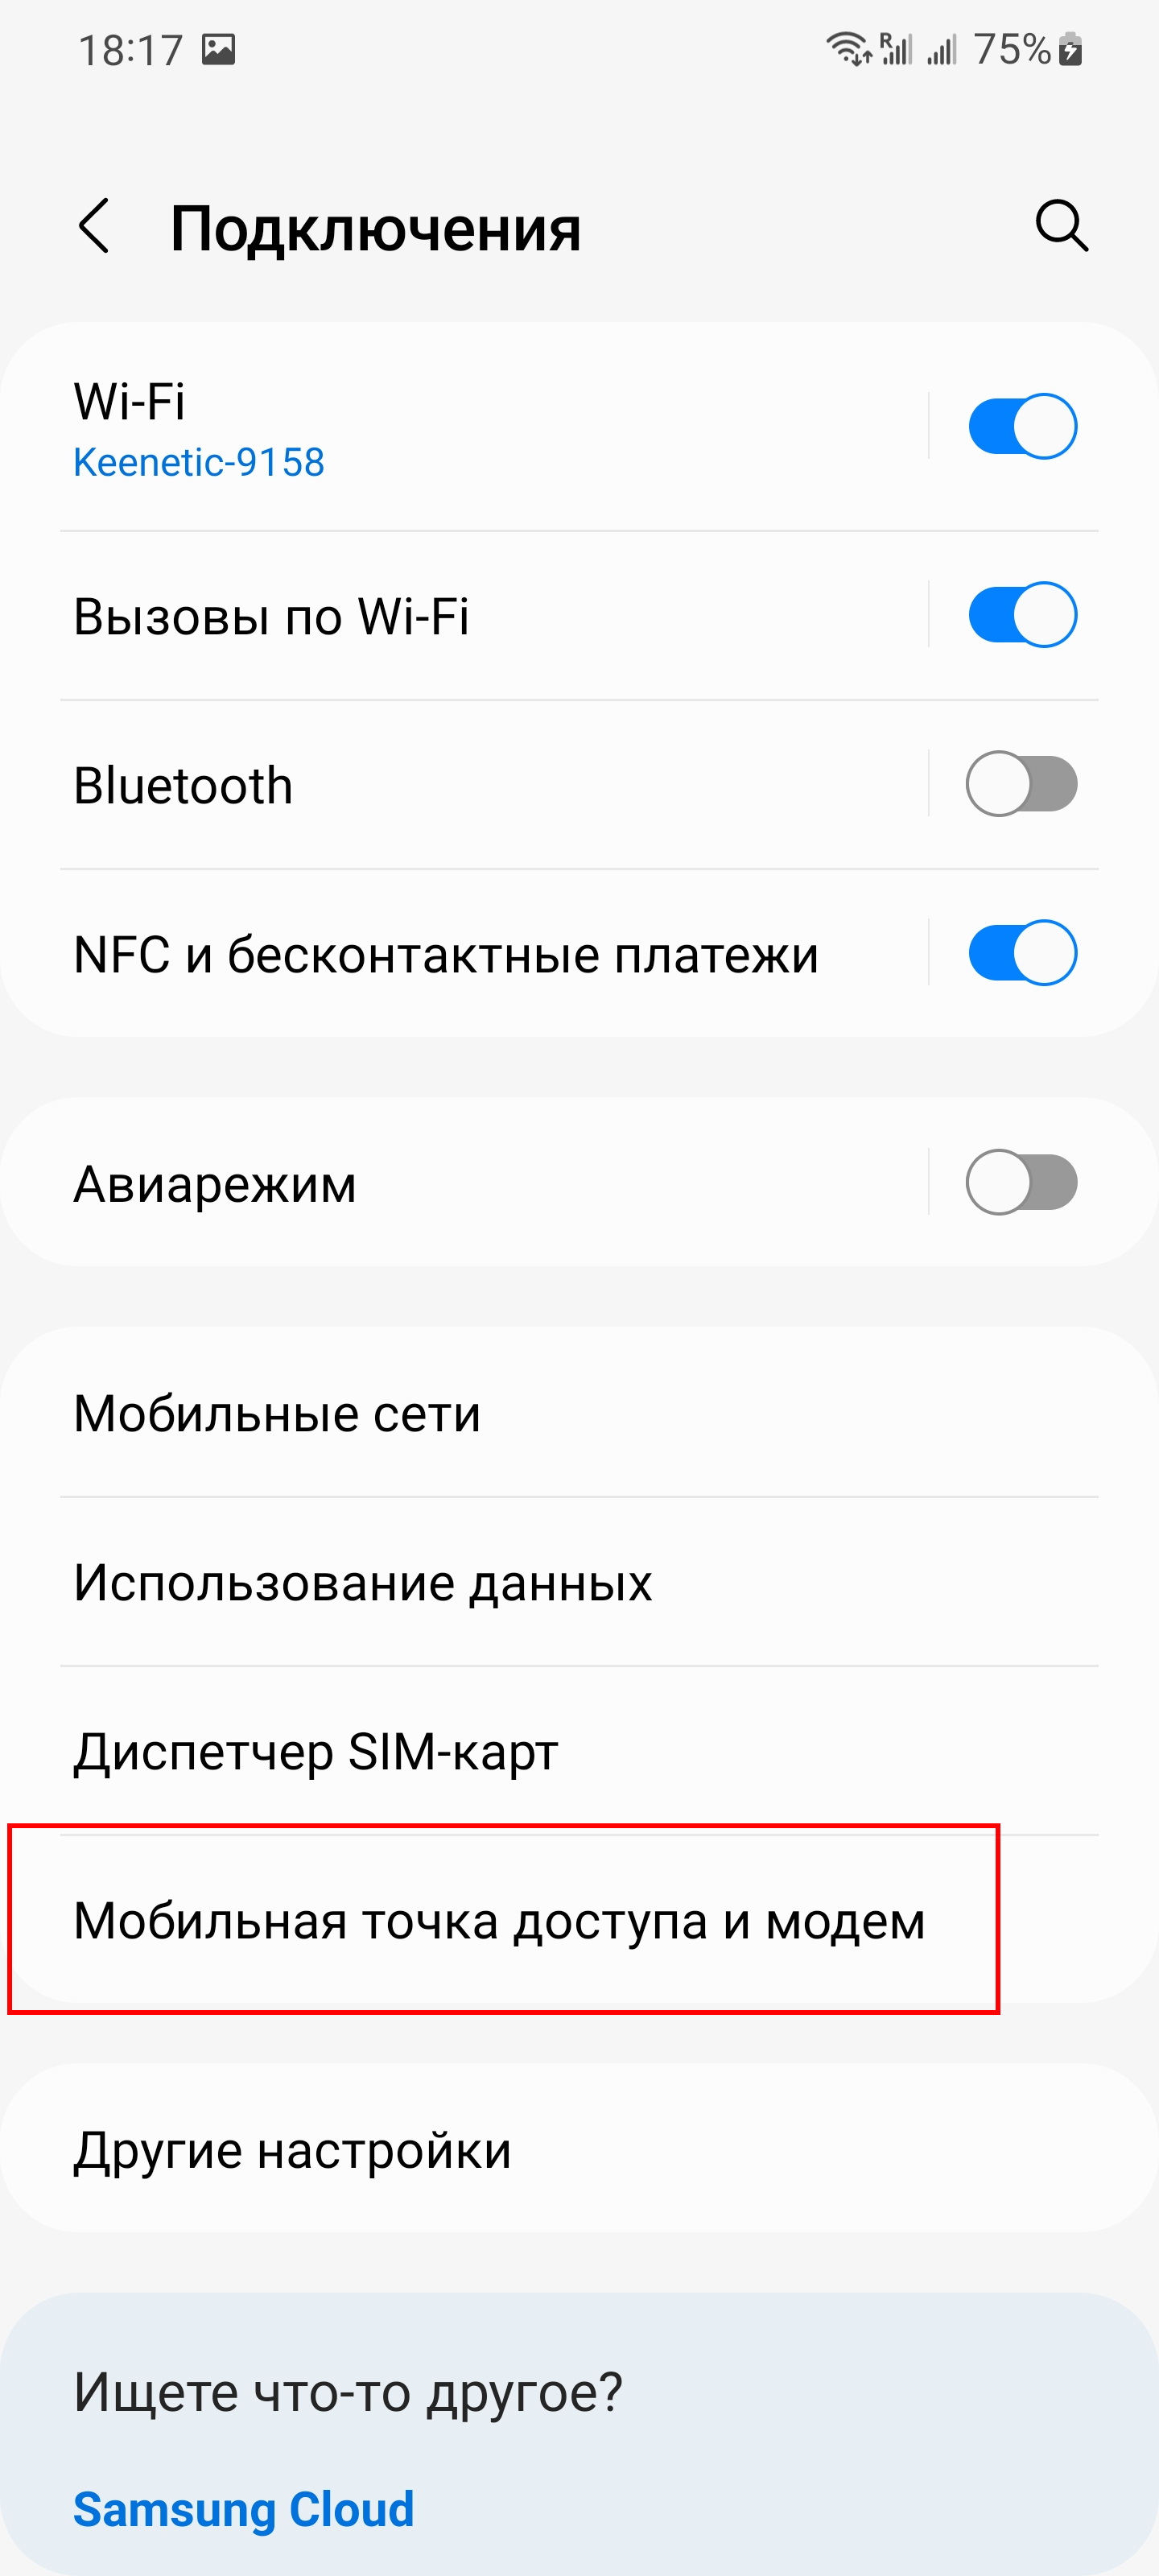
Найдите там пункт «Мобильная точка доступа и модем».
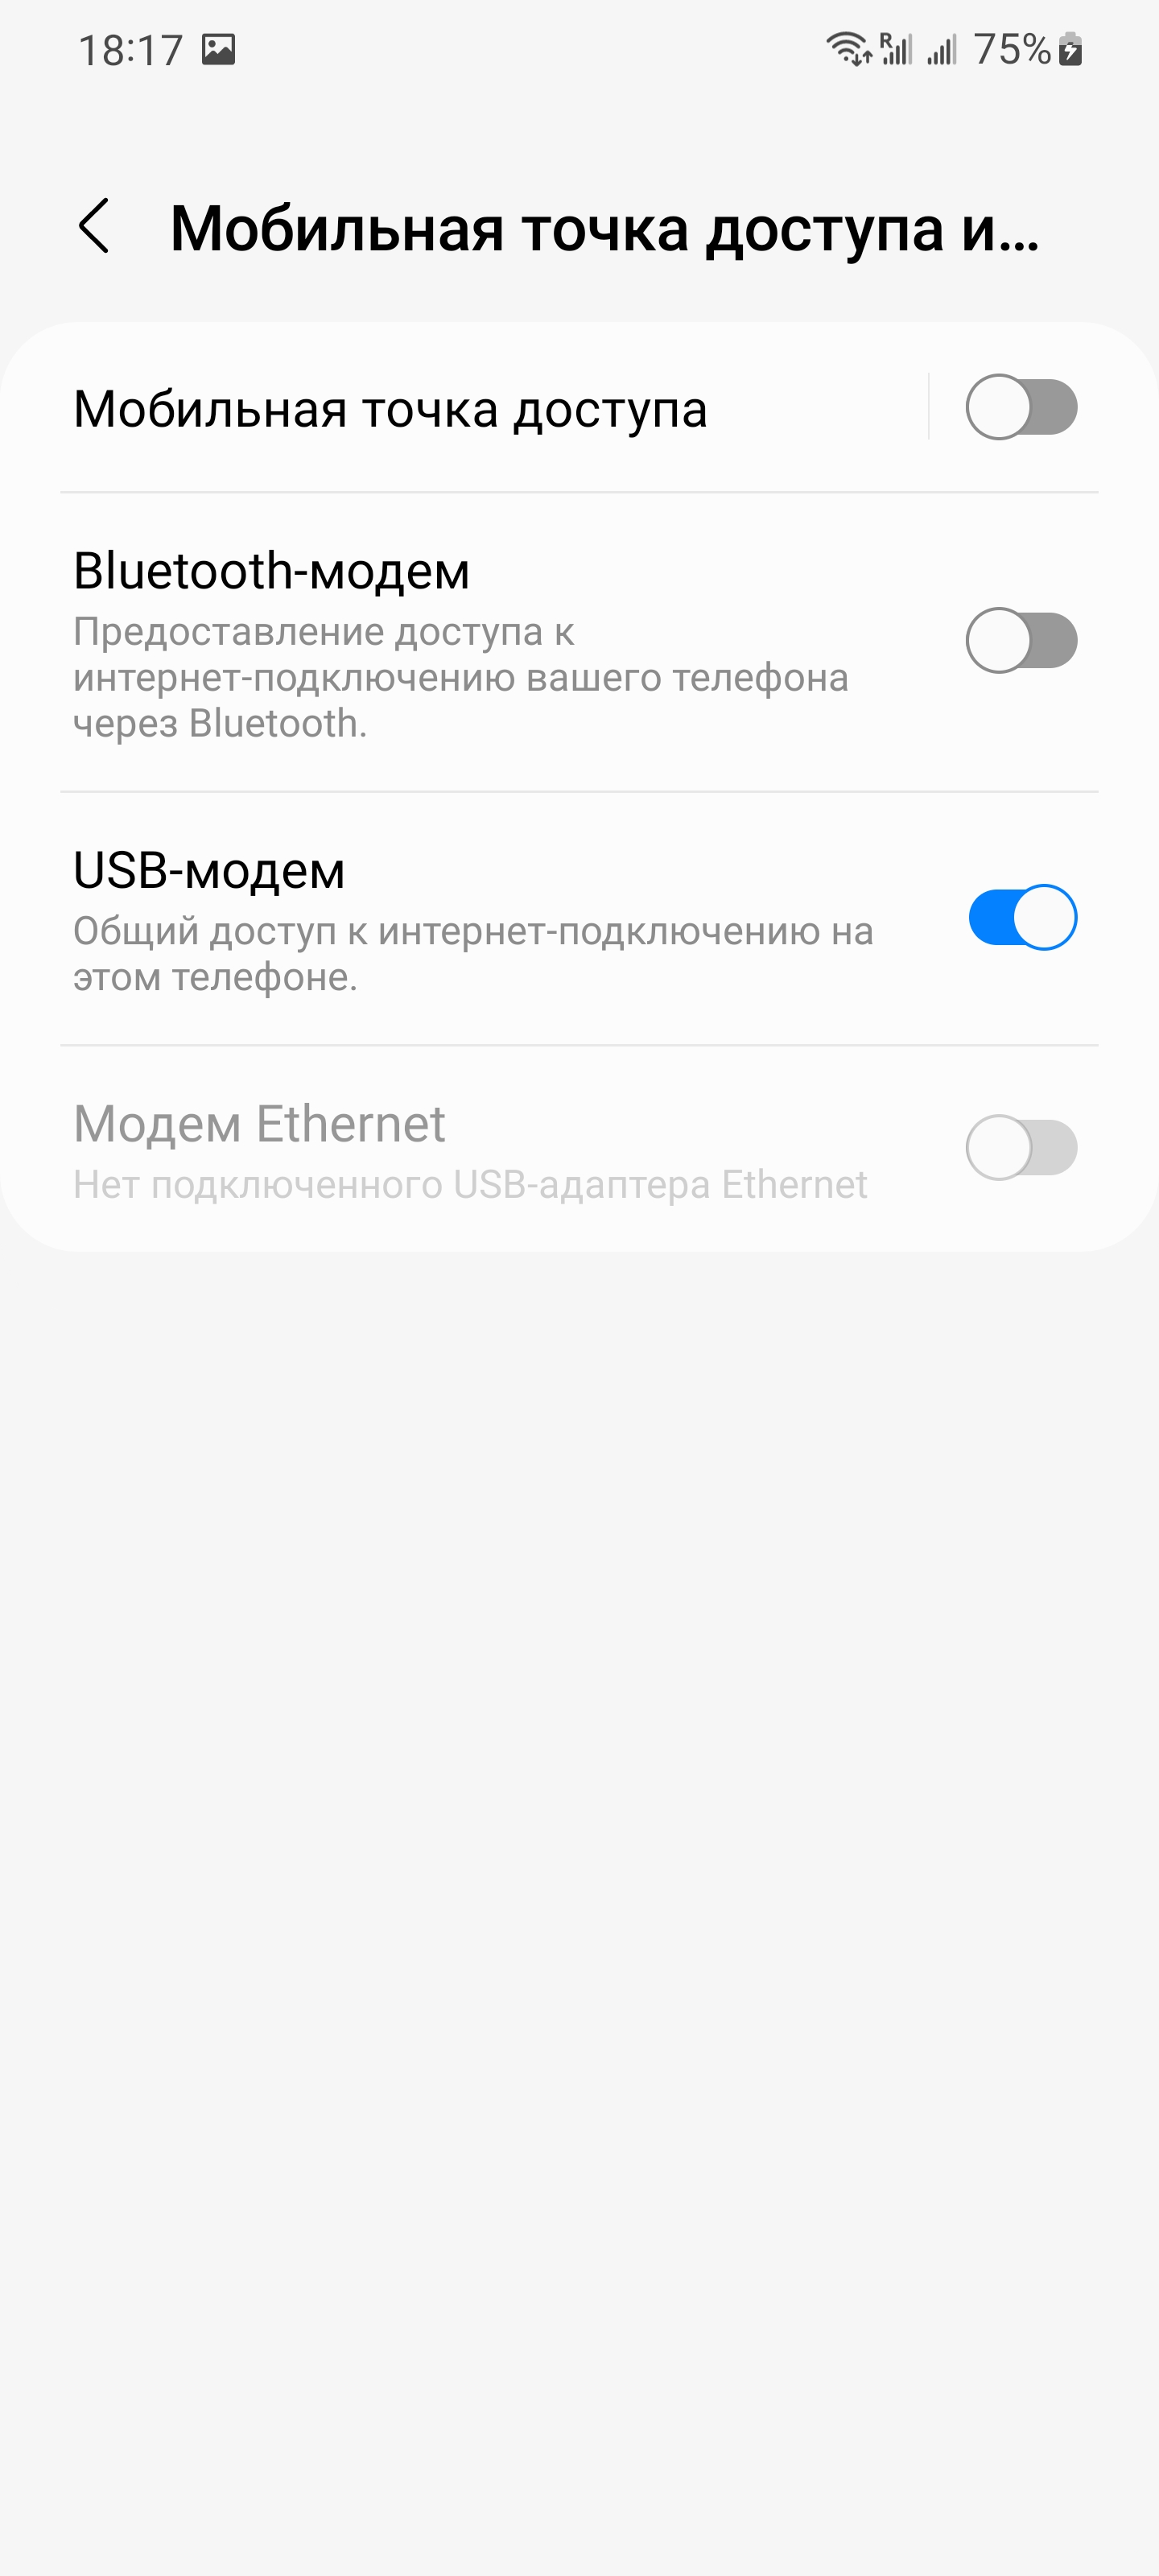
Включите «USB-модем».
Всё готово — теперь ваш компьютер онлайн и может подключаться к Интернету. Вы можете установить драйверы Wi-Fi или выполнять другие нужные вам действия в сети.
Какая-либо дополнительная настройка на компьютере не требуется. Теперь компьютер подключён к сети — подключение через USB-модем имеет значок проводного подключения.
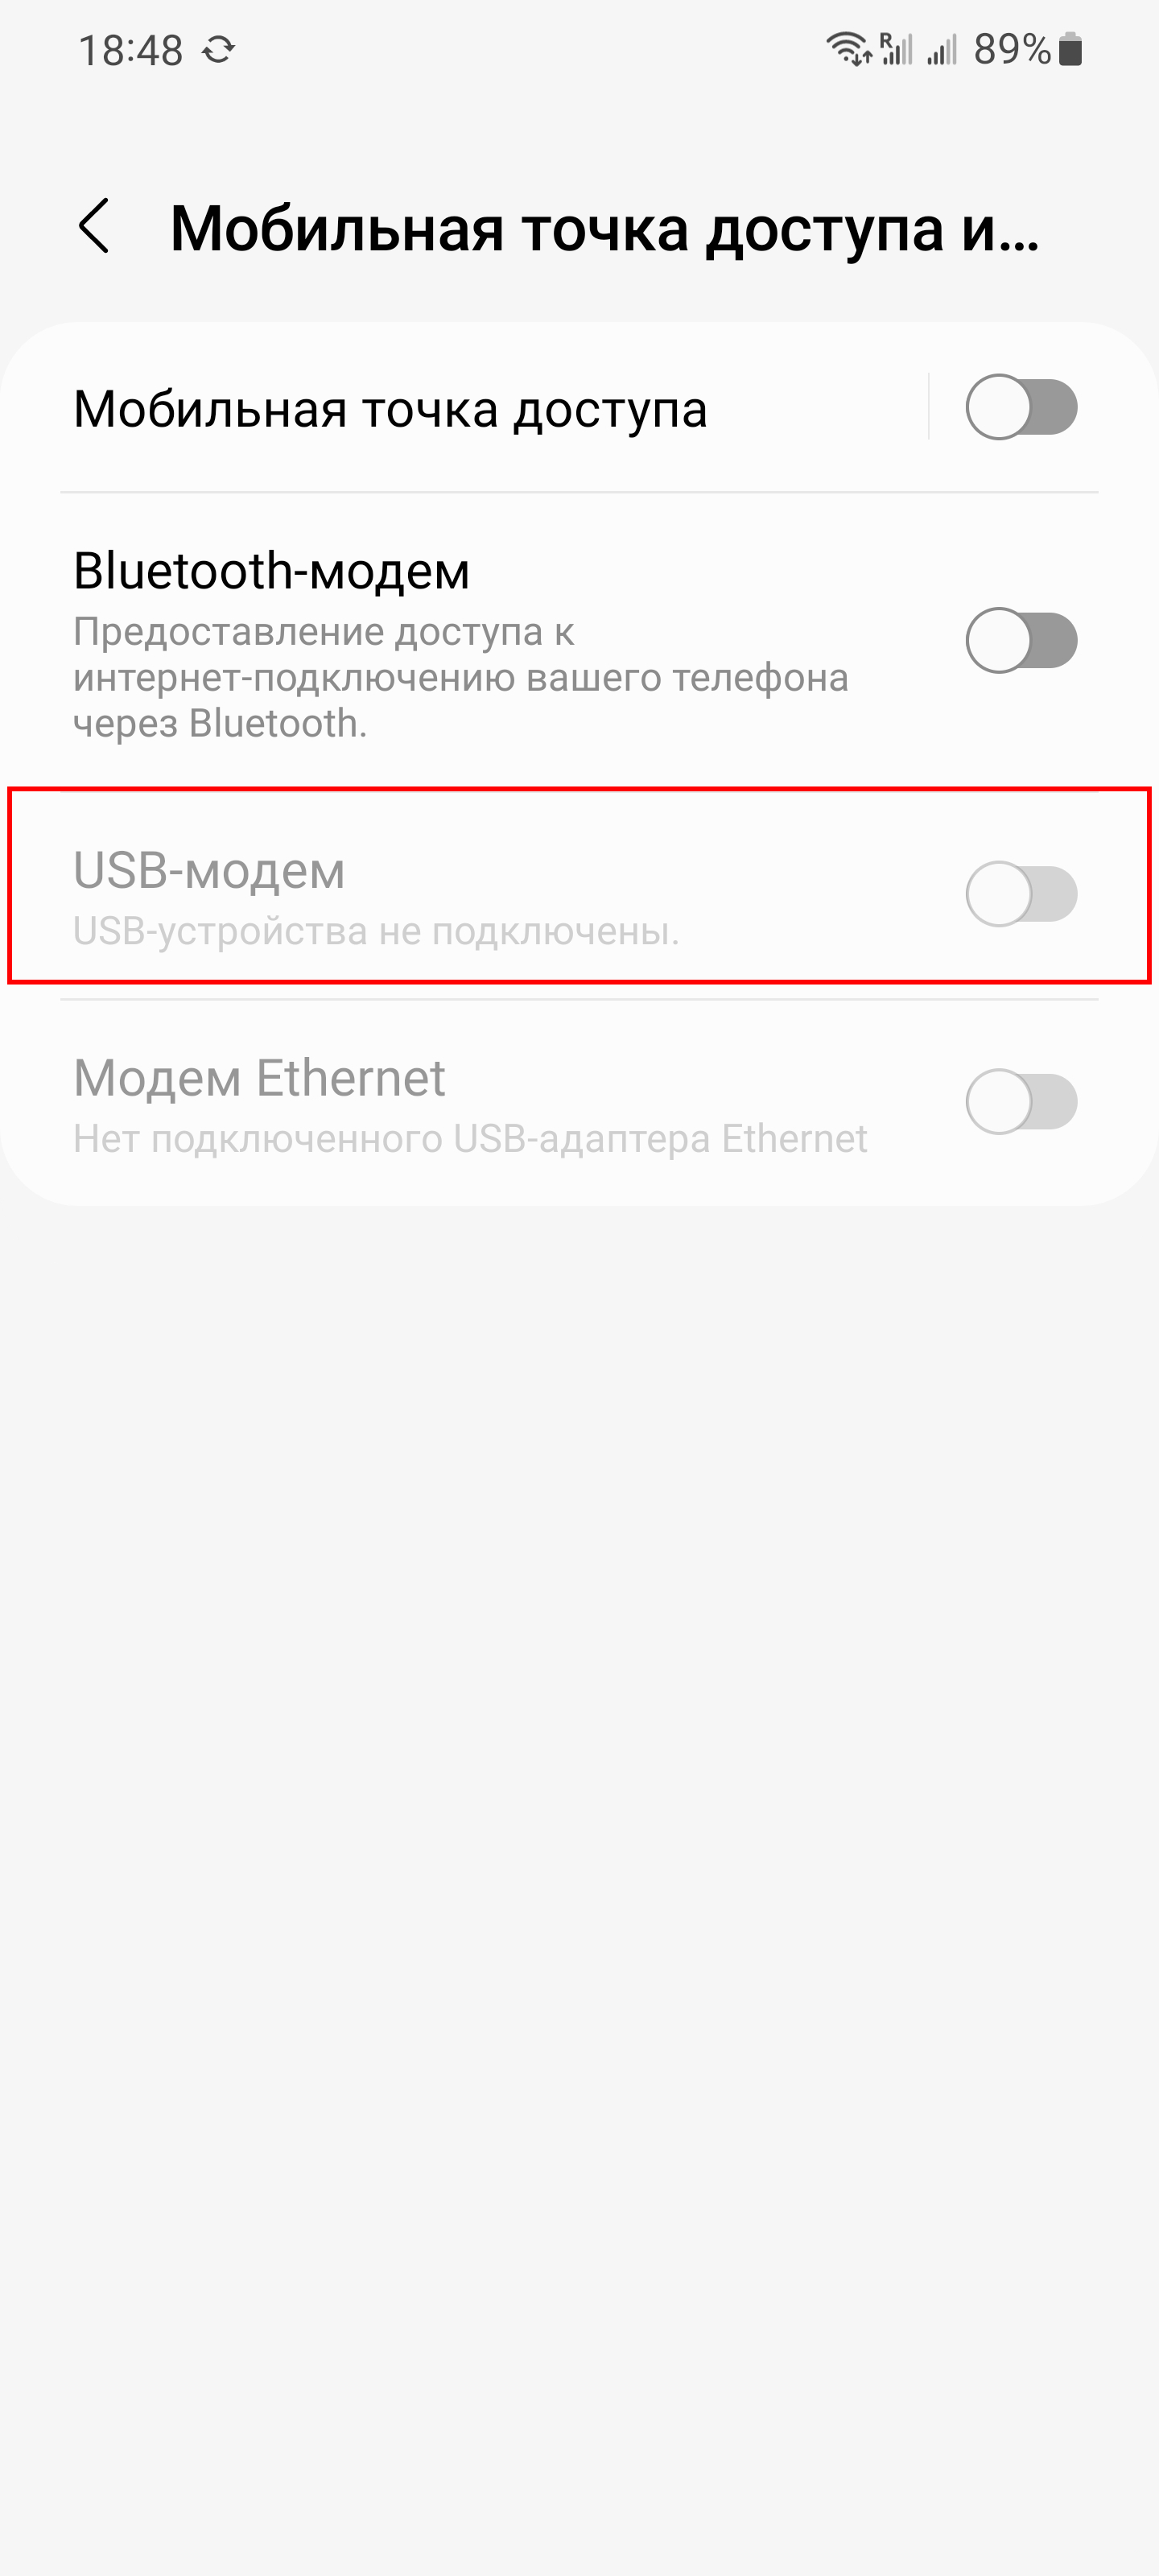
Что делать, если пункт USB-модем не активен или отсутствует
Пункт USB-модем может быть неактивен в двух случаях:
- Телефон не подключён к компьютеру USB кабелем
- USB кабель не поддерживает передачу данных
Попробуйте другой USB кабель — тот который шёл в комплекте с телефоном должен поддерживать передачу данных.
Что нужно помнить при использовании мобильного телефона для Интернета
- Обратите внимание, что если телефон не подключён к Wi-Fi, то будут использоваться мобильные данные — если у вас не безлимитный тариф, то это будет вам стоить денег.
- Вы можете подключить телефон к Wi-Fi сети и при этом использовать его в качестве USB модема. В результате получится, что ваш компьютер использует через телефон Wi-Fi, а не мобильные данные.
- Если при включении USB модема на компьютере по-прежнему нет Интернет-доступа, то проверьте, отключены ли другие сетевые соединения: например, по Wi-Fi или по проводу компьютер может быть подключён к роутеру, на котором отсутствует Интернет (отключён за неуплату или повреждён кабель).
- При отключении телефона от USB кабеля, а затем последующем подключении его к компьютеру нужно будет каждый раз заново включать USB-модем в телефоне
- Во время работы мобильного телефона как USB модема вы не можете передавать и получать файлы с него
Как включить передачу файлов между компьютером и телефоном
Когда включён USB модем, то невозможно обмениваться файлами между компьютером и телефоном.
Для того, чтобы сделать возможным копирование файлов, вы можете отключить телефон от компьютера, а затем заново подключить и при запросе разрешения на передачу файлов предоставить его.
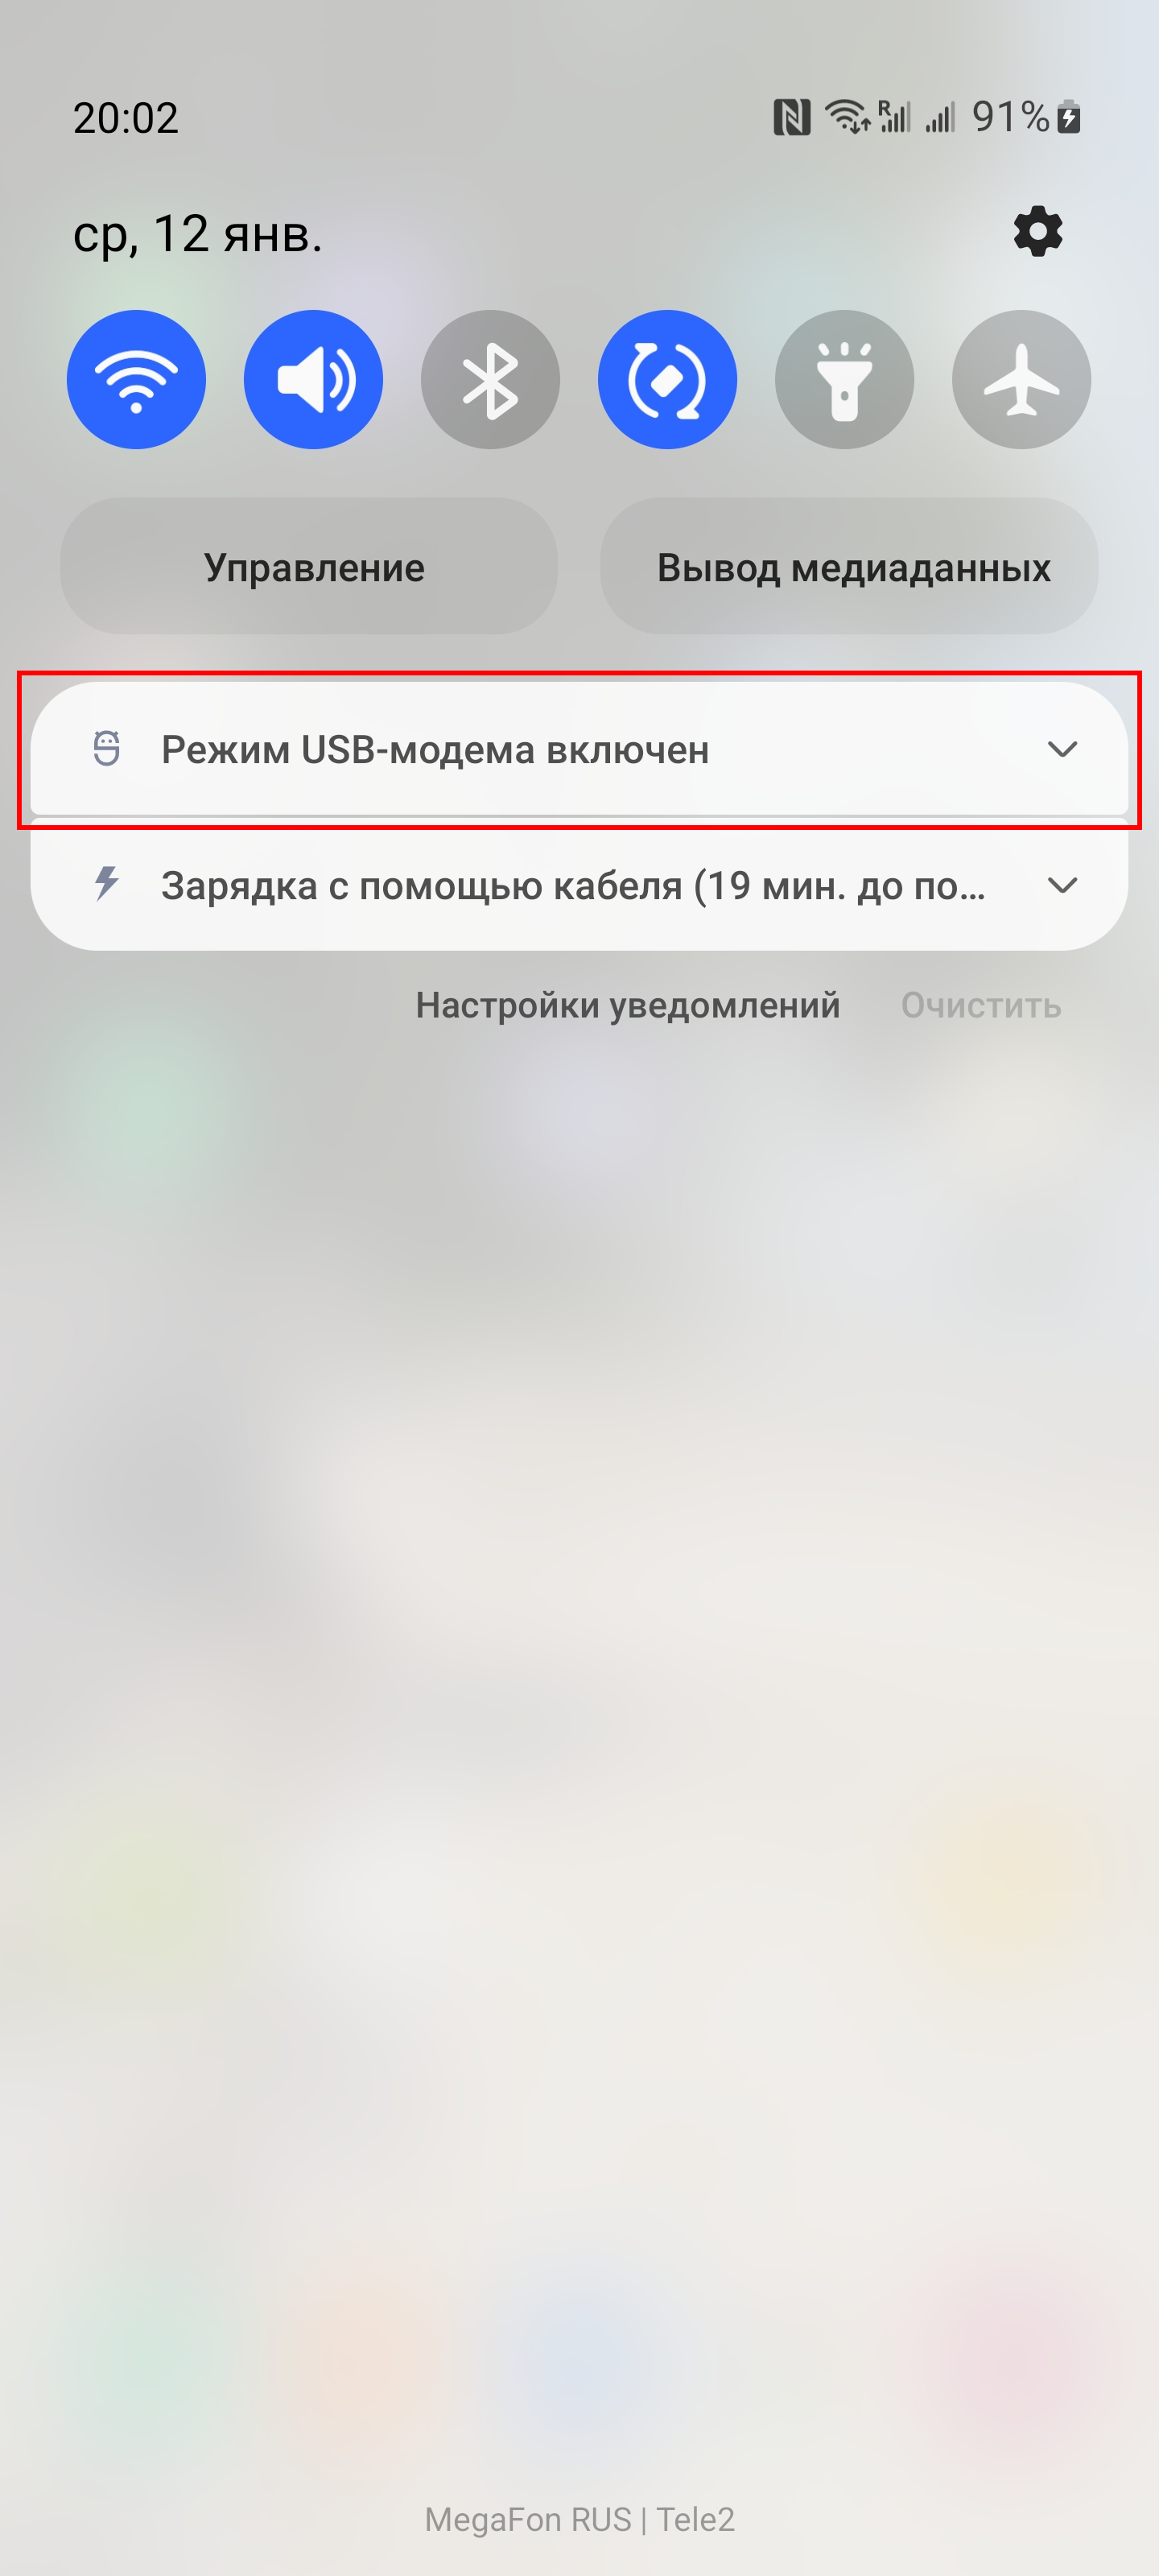
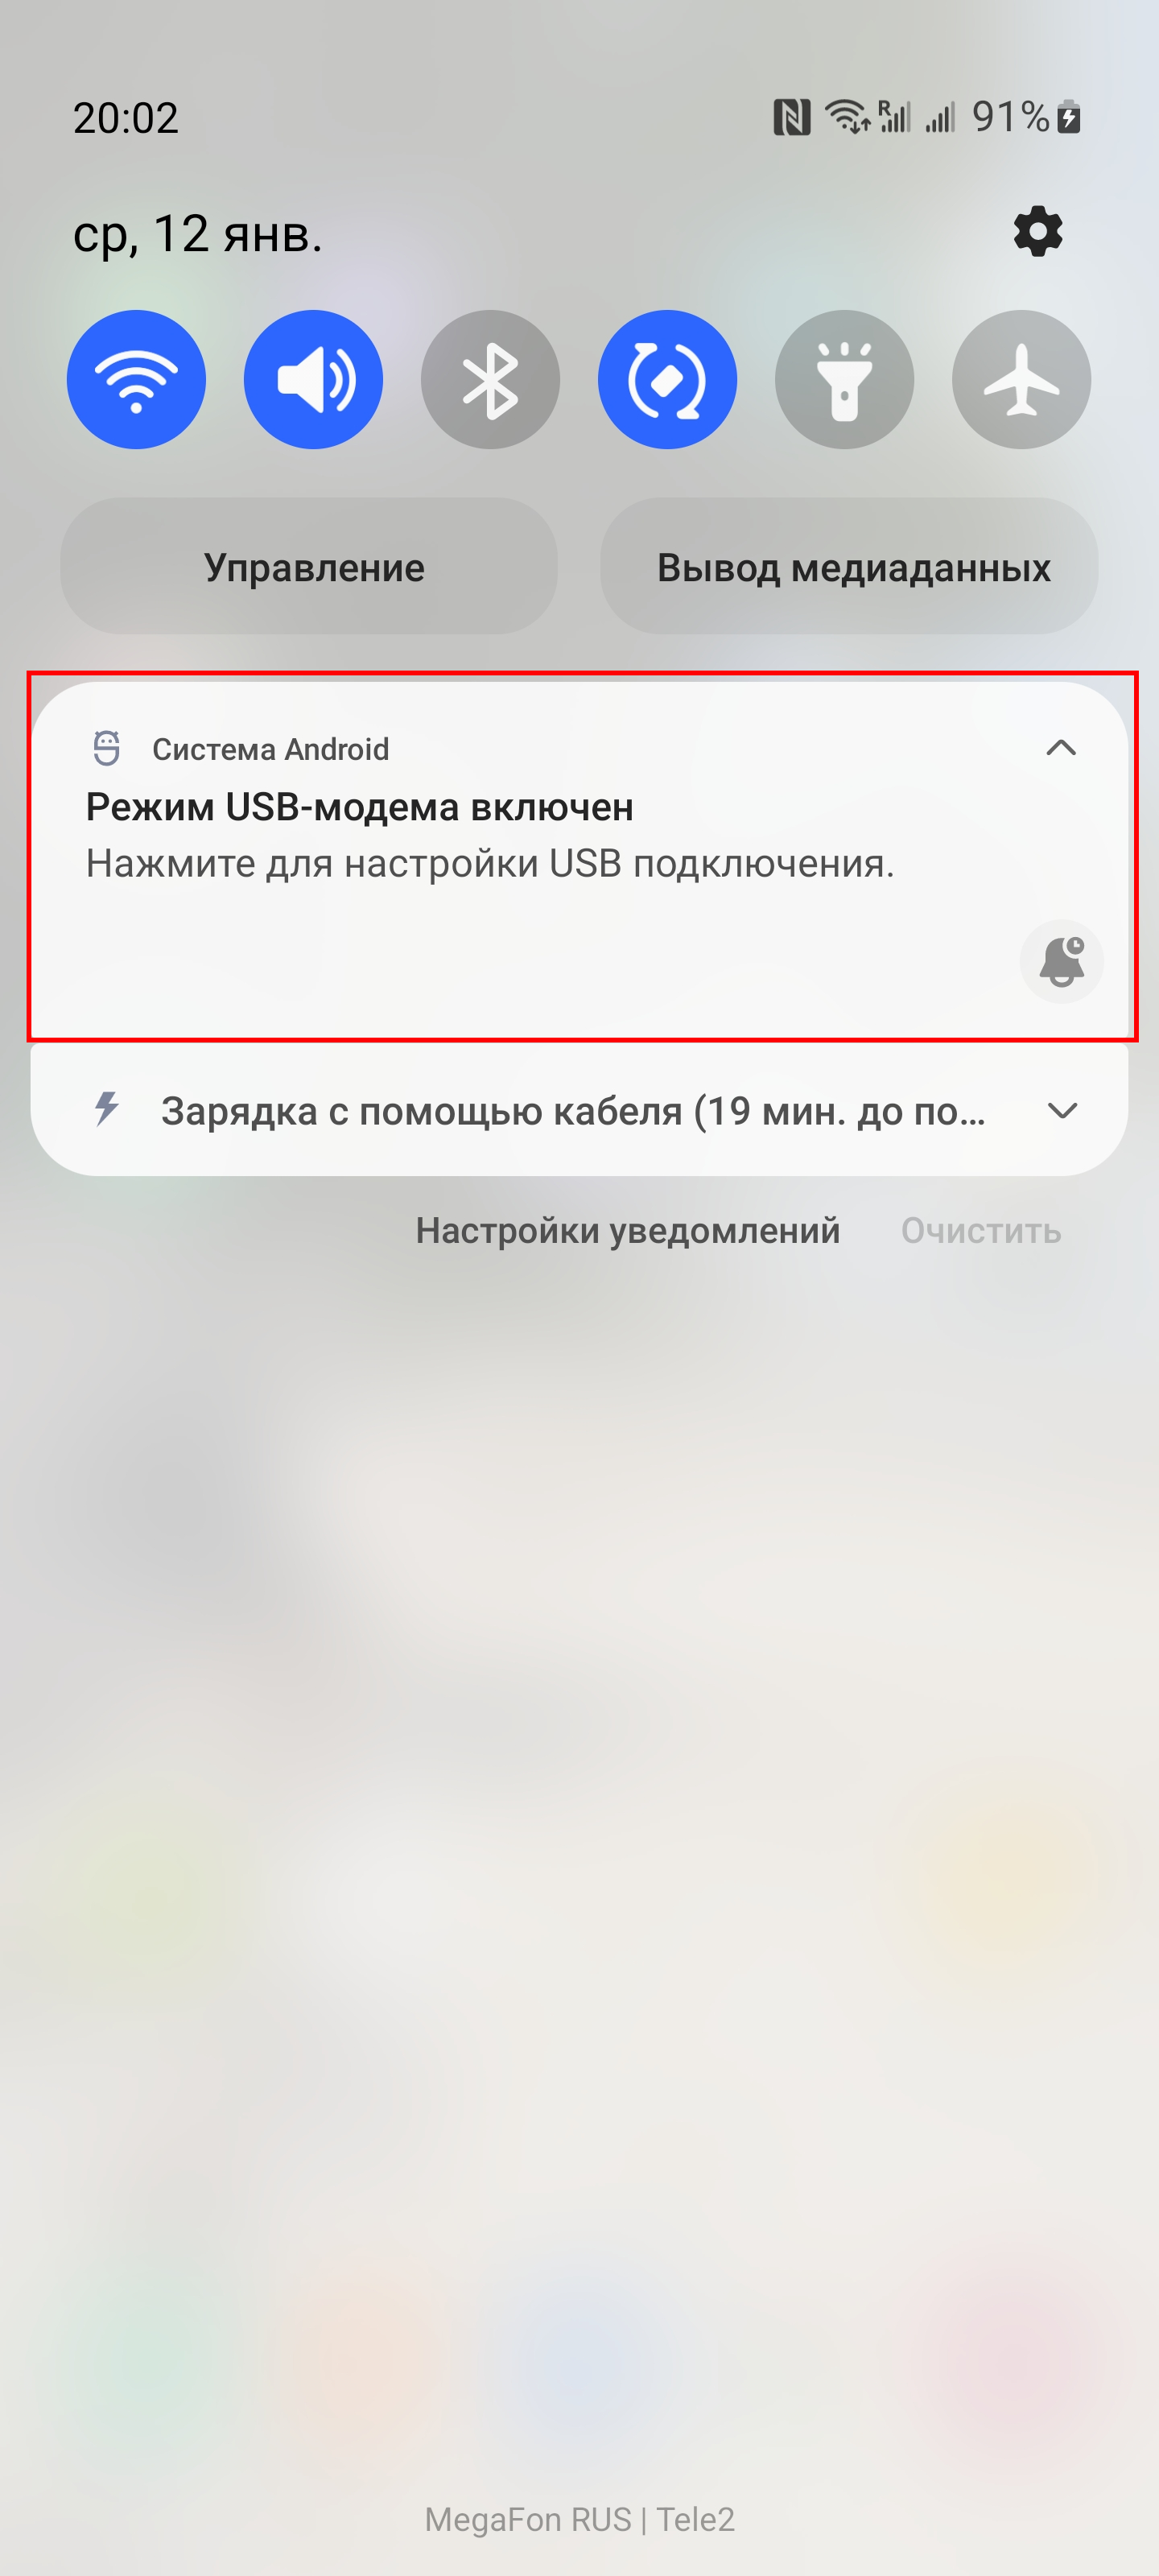
Другой вариант — отключить USB модем и включить передачу данных (либо только зарядку) в настройках телефона без его отключения от USB кабеля. Для этого раскройте шторку и разверните уведомление «Режим USB-модема включен».
Нажмите для настройки USB подключения на соответствующую надпись.
Вместо «USB-модем» выберите «Передача файлов» или «Только зарядка телефона».