- Before Getting Started
- Download
- Install
- BIOS
- Creating Installation Media
- Creating a LiveDVD
- To create a LiveUsb
- Final Install
- Cross-grading from Ubuntu To Ubuntu GNOME
- Basic or Auto Installation
- Side by Side
- Manual Installation
- Accessibility Options
- After Install
- How to Install GNOME Desktop Environment in Linux Mint
- Things to know before installing GNOME on Linux Mint
- Install GNOME Desktop Environment in Linux Mint
- Switching to GNOME
- Bonus Tip: How to Apply Themes with consistency
- Wrapping Up
- How to install GNOME on Ubuntu
- Installing GNOME on Ubuntu
- Installing GNOME Desktop minimal version
- Installing GNOME Desktop full version
- Installing GNOME using the tasksel command
- Installing Vanilla GNOME on Ubuntu
- Switching to GNOME
- Uninstalling GNOME desktop
- Conclusion
Before Getting Started
Before installing Ubuntu GNOME, you need to do a very important step:
Download
Once your personal files have been backed up, you can confidently move forward with download and then install.
Install
BIOS
The first action you’ll want to take is to enter into your BIOS. If you’ve never done this before, it can be achieved by pushing F2 Key or DEL Key or F10 Key while your computer is turning on. Lenovo has a special button to enter the bios that looks like an arrow with a curve in it. This may take a few tries, but one of the buttons will work.
Once you’re in the BIOS, poke around a bit using the arrow keys to navigate, and the enter key to «click». Spend a little time looking around and search for things you don’t understand.
The real thing you’re looking for is the Boot Order. Before the install, you will need to change this so that your CD drive or USB drive is the first device to boot from.
Creating Installation Media
There are several ways to install Ubuntu GNOME, and each has its advantages. USB is faster than DVD. Either way should work provided your system supports booting from a USB drive if you follow these directions exactly. If either of these methods doesn’t work, Please Contact Us!.
You need to create or borrow an Ubuntu GNOME DVD or USB-stick. Once you have an Ubuntu DVD or USB it should work as an installer and as a LiveDVD or LiveUSB.
Creating a LiveDVD
- A blank DVD-R or DVD-RW Note: you cannot use a CD, because they are not big enough.
- A computer that supports booting from a DVD. Most do, unless they don’t have a DVD drive.
Once you have burned the disc and changed your boot order (as described in BIOS), just put the disc in your drive, and reboot. Follow the guide of your choice from Final Install to complete the installation.
To create a LiveUsb
- A computer that supports booting from a USB (Check your bios).
- A USB drive of 2GB or more.
- Your preferred Download of Ubuntu GNOME.
Once you have created the LiveUSB and changed your boot order (as described in BIOS), just put the disc in your drive, and reboot. Follow the guide of your choice from Final Install to complete the installation.
For more information, please have a read at: Installing from USB.
Final Install
Cross-grading from Ubuntu To Ubuntu GNOME
First, you install the Ubuntu GNOME desktop, and enable GDM.
sudo apt-get install ubuntu-gnome-desktop^
Optionally, you can remove unneeded packages from Ubuntu.
sudo apt-get purge ubuntu-default-settings
sudo apt-get purge ubuntu-desktop
Basic or Auto Installation
This could be the easiest and shortest installation type. However, you should note that this will wipe any other system installed on the machine you are installing Ubuntu GNOME on.
Side by Side
This is the ideal type of install for the user who wants to be able to switch between Ubuntu GNOME and their existing OS at startup.
Manual Installation
This is the most customizable type of installation. It gives you more control over the installation process but a basic knowledge of Ubuntu Partitioning is required — also see HOWTO use Manual Partitioning during Installation. It is not a rocket science, yet you need to proceed with caution. In another word, you need to know what you’re doing. There are lots of information on the internet (videos, HOWTOs, articles, etc).
Accessibility Options
To install with accessibility options enabled, press F5 after you select your language and pick the options that you require. To use the speech installer, press CTRL + S after the disc has loaded. This will also enable GNOME screen reader on the installed system. Once your system is installed, the accessibility features can be re-enabled via the System Settings, in case you disable them by mistake.
After Install
Refer to our HowTo section for ideas about what to do next.
UbuntuGNOME/Installation (последним исправлял пользователь 200-90-252-22 2015-12-14 21:08:47)
The material on this wiki is available under a free license, see Copyright / License for details.
How to Install GNOME Desktop Environment in Linux Mint
Linux Mint is an excellent Linux distribution, especially for beginners.
I like that it stays on the familiar Ubuntu/Debian front and yet it does several things better than Ubuntu. One of them is that it doesn’t push Snaps down my throat.
However, I am not a fan of the Cinnamon desktop as I never really liked the Windows XP or 7’s default setup either.
As I was looking for the stability that Linux Mint offered with the ability to use GNOME and here’s what I got in the end:

Nothing too fancy but this is my Linux Mint 21 running GNOME 42.5.
And if you want to install GNOME on Linux Mint, this guide is for you.
Things to know before installing GNOME on Linux Mint
You really should have good enough reasons to install GNOME on Mint. If you are just feeling experimental, try it in a virtual machine. I performed this tutorial with Linux Mint installed in VirtualBox.
The thing about installing a desktop environment other than the one provided by the distribution is that the removal part complicates the matter.
Cinnamon uses some GNOME elements. If you decide to remove GNOME later, it may impact some parts of Cinnamon.
This could be a cause of panic for inexperienced users. Of course, reinstalling the Cinnamon desktop from the TTY screen could be a possible solution here.
The gist of all this is that if you easily get spooked and don’t like troubleshooting, you should not do these ‘experiments’ on your main computer.
With that aside, let’s see the simple procedure of getting GNOME on Linux Mint.
Install GNOME Desktop Environment in Linux Mint
Here you have two options. Either you can go with a complete GNOME desktop which includes all the GNOME utilities, or you can go with the stripped-down version having the least amount of GNOME packages.
And I will be covering both.
To install GNOME with the least amount of GNOME utilities, you’d have to install a package named vanilla-GNOME using the given command:
sudo apt install vanilla-gnome-desktopAnd if you want to have a complete GNOME experience, you can simply install the gnome package:
Once you execute any of the two shown commands, you will be asked to choose the preferred display manager in the next step.
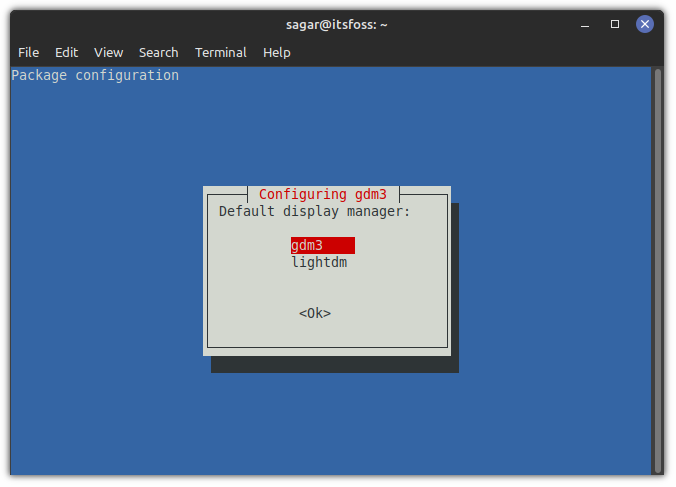
gdm3 is a display manager for the GNOME desktop while Linux Mint uses lightdm by default and both should work just fine, but I will suggest you go with gdm3 to have the complete GNOME experience.
Switching to GNOME
Once done, log out and hit enter once, and there you’d see a small gear icon. From here, choose GNOME:

And now, you have GNOME with Linux Mint as a base!
Bonus Tip: How to Apply Themes with consistency
You can use that Cinnamon themes, but most of them don’t work as expected, so I will recommend using GNOME themes such as Adwaita to have consistency around the desktop.
For me, the default fonts do not work at all, and I prefer something close to what Fedora offers. So open GNOME tweaks from the system menu and make changes as shown:

- Cantarell Regular (11) for both interface and document text.
- Noto Sans Mono Regular (13) for monospace text.
- Cantarell Bold (11) for window titles.
And it turned out to be far better than the default Ubuntu font scheme.
Since you have GNOME, you can use our detailed guide on installing and changing GNOME themes on Linux to make it as your heart desires.
Wrapping Up
As you can see, installing GNOME on Linux Mint is quite simple. And as I mentioned earlier, the removal part could complicate things as it has the possibility of removing some GNOME packages required by Cinnamon.
What is powering your main machine right now? I’m on Pop!_OS.
How to install GNOME on Ubuntu

G NOME is a popular desktop environment that comes pre-installed with Ubuntu with the latest release in every version. It was first released in 1999 and came up with a new release every six months. The current stable release, GNOME 42.0, was released on 23 March 2022.
GNOME is a highly customizable, user-friendly, compatible desktop environment with an attractive user interface. Other than GNOME, other desktop environments like Cinnamon, Mate, KDE, Budgie, Xfce, etc., serve the purpose well.
Installing GNOME on Ubuntu
If you switched your desktop environment, or it is corrupted, you can reinstall GNOME using some simple commands.
Installing GNOME Desktop minimal version
GNOME Desktop minimal is an Ubuntu flavor lighter than the full variant. It contains limited applications compared to the full version of the GNOME desktop. It is recommended for users with old hardware or low system resource usage. Open a terminal window and execute the following commands to install the minimal version.
First of all, update the system repositories by executing the following command:

updating System repositories
Now, execute the following command to install the GNOME Desktop minimal:
sudo apt install ubuntu-desktop-minimal

Installing minimal Ubuntu Desktop
Once it is successfully installed, reboot your system.

Installing GNOME Desktop full version
The full version of the GNOME desktop comes with all the necessary applications and libraries. It is like a complete package with all basic applications like Firefox for web browsing, Rhythmbox for music, LibreOffice as the default OfficeSuite, etc. To install the whole GNOME desktop, execute the following command in a terminal window:
sudo apt install ubuntu-gnome-desktop

Installing full Ubuntu Desktop
Reboot the system once it is installed.

Installing GNOME using the tasksel command
You can also install GNOME using the tasksel command. Tasksel is a command-line utility that allows us to choose from a predefined collection of software. If you don’t have tasksel installed on your system, it will show the error: command not found as shown below.
To install tasksel, execute the following command:

Now, run tasksel using the following command:
Choose “Ubuntu Desktop” to install the whole GNOME desktop and “Ubuntu minimal desktop” for the minimal installation.

Note: Don’t select any of the live CD from the menu.
Navigate using the arrow keys, and select the appropriate option using the space key. Press the tab to switch to the “Ok” button and press Enter to continue.
On Ubuntu 20.04, tasksel will work fine and only show the software as of Ubuntu 20.02. However, running tasksel on Ubuntu 21.10 or Ubuntu 22.04 will list the software collection as on Debian 11 instead of Ubuntu. It will show a predefined collection of software, as shown below.

Ubuntu GNOME desktop-installation
Wait till the software is installed successfully.
You can also install the GNOME desktop directly without navigating through the user interface by executing the following command:
sudo tasksel install ubuntu-desktop
Installing Vanilla GNOME on Ubuntu
Vanilla GNOME is the original GNOME Desktop. It is not modified or packaged with any other software. To be clear, Ubuntu GNOME is the modified version of the Vanilla GNOME that is to be integrated with the Ubuntu operating system. Every update of Ubuntu is loaded with the GNOME Ubuntu default desktop environment. If we compare, Vanilla GNOME differs from the Ubuntu GNOME a lot. It does not have a side panel as in Ubuntu GNOME. There are minor changes in icon sets, fonts, etc. To install Vanilla GNOME, Execute the following command:
sudo apt install vanilla-gnome-desktop

Installing Vanilla GNOME Desktop
Reboot the system after installation is successful.

Like the Ubuntu GNOME desktop, Vanilla GNOME also offers a minimal installation. It will only install the core applications. There will be a clean system with low memory usage. To install the minimal version of the Vanilla GNOME, Execute the following command:
sudo apt install gnome-session gnome-terminal
Switching to GNOME
After installing GNOME from any of the above methods, You have to switch your desktop environment from Ubuntu to GNOME. To do so, log out from the system through the drop-down menu at the top-right corner.

Click on your username. When the password screen appears, A setting bar at the bottom-right corner of your screen will show up. Select “GNOME,” type the password, and press enter to continue.

Switching to the GNOME desktop
The newly installed GNOME desktop will look as shown below. In Linux, you can install multiple desktop environments and switch between them.
Similarly, to select Vanilla GNOME, switch to GNOME Classic on the login page.

Switching to Vanilla GNOME desktop
Uninstalling GNOME desktop
In case you need to uninstall the GNOME desktop, you can do so by executing the following command:
sudo apt remove ubuntu-gnome-desktop
Uninstalling GNOME Desktop
Conclusion
So, we discussed how to install GNOME on Ubuntu using two different methods. Any of the above methods will work fine. Do let us know your feedback in the comments below. If you liked the article, please share it with your friends!