- Linux audio network streaming
- How do I setup an Icecast server for broadcasting audio in my network?
- 1 Answer 1
- Broadcast audio with Icecast2
- 1. Install Icecast2
- 2. Edit Icecast2 configuration
- 3. Edit defaults
- 4. Start/Stop Icecast
- Ices2 for streaming OGG Vorbis audio from a local soundcard
- Make directories for Ices2
- Edit the Ices2 configuration .xml
- Start Streaming
- Setup Receiver
- Terminate Streaming
- Ices for broadcasting mp3 playlists
- Darkice for live streaming
- Как транслировать аудио через Chromecast или DLNA в Linux
Linux audio network streaming
I’ve got a little gaming setup with two monitors: 2560×1440@144, 2560×1080@60
While I love this setup, Linux can’t handle 144 and 60 Hz at the same time, resulting in a little stuttering. When I disconnect the second monitor, all is fine again.
As I use the second monitor almost only for watching Streams or video files while gaming, my solution would be buying a Raspberry Pi 3 for the second monitor, connecting it to my main machine per Synergy . (Never used this software, but AFAIK it only connects mouse/keyboard)
Seems cool, but now only the audio is missing. How do I stream audio from one Linux device to another over LAN?
- that the solution won’t interrupt while switching to fullscreen or back (starting/closing games)
- doing it in real time (not one second delay, as this sucks in watching series)
- with the lowest cost of performance
- acceptable audio quality (I don’t need the full studio recording quality, but I guess per LAN/cable should be fast enough to get reasonable audio quality)
What would you recommend me? Is this possible on an easy way without delay?
If you need any further information, just ask me!
First machine: i7-4790K GTX 1070 Audio per headphones Arch Linux x86_64 Second machine: Raspberry Pi 3 Raspbian or Arch ARM Connected monitor would have speakers (per HDMI) Video/streaming mainly happens per Chromium or Firefox
How do I setup an Icecast server for broadcasting audio in my network?
Broadcasting the output of the soundcard as an internet radio stream is a reliable way to stream audio in a network. This can nicely be used to e.g. transmit audio in a wireless LAN to another computer or any other device capable of playing internet radio streams. However I did not find an easy step by step guide on how to set this up.
1 Answer 1
Broadcast audio with Icecast2
1. Install Icecast2 

2. Edit Icecast2 configuration
Open the file /etc/icecast2/icecast.xml as root in an editor. For security reasons you should setup passwords in the section:
If you changed the or you need to do so on the source or relay side as well. That means leave it default or change it in the ices2.xml file (see below) as well. The same will need to be done in the Ices or Darkice configuration files.
You also need to define the hostname where your stream can be reached:
Leave it as localhost (no need to give a resolved IP there) when you only want to stream in your local network. The default port to listen to is 8000. Change it only when needed.
3. Edit defaults
Open the /etc/default/icecast2 file as root in an editor. The last line needs to be changed to
That’s all for Icecast2. Of course there are many more settings you can play with. In the configurations files there are explanatory notes on parameters.
4. Start/Stop Icecast
The server is started and stopped by the following commands:
/etc/init.d/icecast2 start /etc/init.d/icecast2 stop While running the Icecast server can be administrated from any browser at http://localhost:8000/admin/ after entering your administrator credentials defined in step 1. Further documentation is available from Icecast.org.
Stream2ip is a graphical frontend to quickly start and stop streams where a basic setup for Ices2, Ices or Darkice has already been done.
Ices2 for streaming OGG Vorbis audio from a local soundcard
To set up of pulseaudio to enable recording from the soundcard see note for Darkice below.
Make directories for Ices2
mkdir /var/log/ices # in case you need logfiles. mkdir /etc/ices2 # for putting ices stuff in. Edit the Ices2 configuration .xml
Ices2 will run using an .xml file for settings. Verbous examples of configurations can be found in /usr/share/doc/ices2/examples/ . These files need to be edited to meet your needs and can be copied anywhere, best in your home directory. Depending on the configuration file Ices2 uses a playlist in Ogg Vorbis format ( ices-playlist.xml ) or the output from your soundcard ( ices-alsa.xml ) as streaming source for Icecast2.
In the section you may need to replace the device if you have setup your sound system to PulseAudio. To do this edit the corresponding line to:
The name of the stream for the receiving client is defined in the following section.
Start Streaming
Streams from your soundcard will be started by first running the Icecast2 server, and then running Ices2 using the following commands:
/etc/init.d/icecast2 start ices2 /home/user/somewhere/ices-pulse.xml # or any other name from .xml file Setup Receiver
On the receiver side your radio «station» tunes on: :8000/example1.ogg where is the IP of your streaming server followed by the port you defined in the icecast.xml file (default 8000).
Terminate Streaming
Streams are terminated by killing Ices2 and/or stop running the Icecast2 server:
killall ices2 /etc/init.d/icecast2 stop Ices for broadcasting mp3 playlists
Broadcasting a playlist containing mp3 files can not be done with Ices2. We need to install IceS, which we have to install from source.
After having set up the configuration file with server address, password and streaming properties (well documented example will be found in /usr/share/doc/ices/examples ) we can stream mp3 audio files from playlists (e.g. in .m3u format) over an Icecast2 server by:
/etc/init.d/icecast2 start ices -c -F
For further options read the documentation in the quite elaborate man page from man ices .
Darkice for live streaming
We can stream the output of the local sound card as OGG Vorbis or as mp3 stream using Darkice. To enable streaming of the local soundcard we may need to define the recording device for Darkice in pulseaudio first. This can be done with pavucontrol . In the Recording tab choose Monitor of for the «ALSA plug-in [darkice]».
The configuration file (well documented example given in /usr/share/doc/darkice/examples ) needs to be adapted to the Icecast server and the local sound environment:
[general] duration = 0 # duration in s, 0 forever bufferSecs = 1 # buffer, in seconds reconnect = yes # reconnect if disconnected [input] device = default # or `pulse' for Pulseaudio sampleRate = 44100 # sample rate 11025, 22050 or 44100 bitsPerSample = 16 # bits channel = 2 # 2 = stereo [icecast2-0] bitrateMode = vbr # variable bit rate (`cbr' constant, `abr' average) quality = 1.0 # 1.0 is best quality format = mp3 # format. Choose `vorbis' for OGG Vorbis bitrate = 256 # bitrate server = localhost # or IP port = 8000 # port for IceCast2 access password = hackme # source password to the IceCast2 server mountPoint = mystream.mp3 # mount point on the IceCast2 server .mp3 or .ogg name = mystream After saving this configuration (e.g. in ~/music/darkice.cfg ) we first run the Icecast server and are then able to stream pulseaudio output from the local sound card by invoking:
/etc/init.d/icecast2 start darkice -c ~/music/darkice.cfg Как транслировать аудио через Chromecast или DLNA в Linux

Pulseudio-dlna на тонком потоковом клиенте, который используется для простой трансляции звука с компьютера Linux с помощью PulseAudio на другие устройства DLNA / UPnP или Chromecast в той же сети.
С помощью этой утилиты мы можем обнаружить все устройства UPnP, DLNA или Chromecast которые могут воспроизводить контент в нашей сети и связывать их с PulseAudio. Таким образом, вы можете выбрать свои аудиоисточники или использовать pavucontrol, чтобы установить, что передавать на это устройство.
Давайте начнем с установить приложение pulseaudio-dlna. В версиях Ubuntu 16.04, 15.10 и 14.04, Linux Mint 17.x и его производных, pulseaudio-dlna может быть установлен из PPA. Чтобы добавить его, нам нужно будет только выполнить следующие команды из терминала:
sudo add-apt-repository ppa:qos/pulseaudio-dlna sudo apt-get update sudo apt-get install pulseaudio-dlna
Если у нас есть какой-либо другой дистрибутив, в Интернете доступно множество руководств, которым мы можем следовать, например это. Далее мы выполним в терминале следующую команду:
После запуска мы убедимся, что устройство DLNA / UPnP или Chromecast включено. Следующим шагом, который мы должны сделать, является открытие параметров звука из его меню и выбираем наше устройство как выходной элемент.
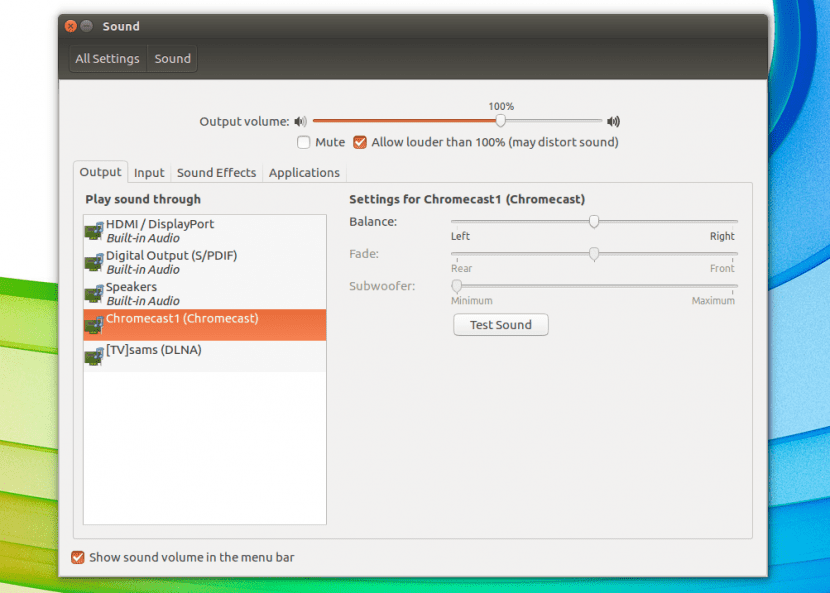
Мы выберем устройство, на которое хотим транслировать поток, и все готово. Если вы выбрали устройство DLNA / UPnP, знайте, что возможно, вам придется принять соединение через всплывающее окно что может показаться вам. Однако Chromecast должен начать воспроизведение немедленно.
В тестах, проведенных под Ubuntu 16.04, звук, передаваемый через pulseaudio-dlna, был удовлетворительным, однако, в случае с Chromecast в некоторых случаях оно искажалось. Чтобы он работал правильно мы должны установить кодек ffmpeg как декодер de бэкэнда в pulseaudio-dlna с помощью следующей команды:
pulseaudio-dlna --codec mp3 --encoder-backend=ffmpeg
Если вы используете последнюю версию pulseaudio-dlna, вы будете знать, что она обновлена и кодек flac теперь имеет приоритет для воспроизведения через Chromecast. Чтобы использовать его, вы должны сначала установить его в своей системе с помощью следующей команды:
sudo apt-get install ffmpeg
Содержание статьи соответствует нашим принципам редакционная этика. Чтобы сообщить об ошибке, нажмите здесь.
Полный путь к статье: Убунлог » Ubuntu » Как транслировать аудио через Chromecast или DLNA в Linux