- автоматическое монтирование подключаемых устройств через udev
- Automatically mount USB external drive
- Automatically mount USB external drive with autofs
- Automatically mount USB drive by UUID
- Closing Thoughts
- Related Linux Tutorials:
- How to automount USB Drive in Ubuntu
- How we can auto mount USB drive on Ubuntu
- How UUID is used to auto mount the USB Drive
- What is an alternate method to auto mount the USB Drive
- How to unmount the USB drive
- Conclusion
- About the author
- Hammad Zahid
автоматическое монтирование подключаемых устройств через udev
Задача автоматического монтирования флешек решается довольно просто в KDE или GNOME — эти среды можно настроить так, что они сами всё смонтируют, откроют файловый менеджер и покажут значок в трее. Но что делать, если у вас только консоль или стоит, например, awesome? Или вы не хотите разбираться с конкретным DE, а ищите универсальное решение?
Независимое от DE решение есть — udev.
Создаём новый файл /etc/udev/rules.d/automount.rules со следующим содержанием:
ACTION=="add" KERNEL=="sd[c-z]6" RUN+="/bin/mkdir -p /mnt/%E_%E_%n" ACTION=="add" KERNEL=="sd[c-z]9" RUN+="/bin/mount -o uid=1000 /dev/%k /mnt/%E_%E_%n" ACTION=="remove" KERNEL=="sd[c-z]7" RUN+="/bin/rmdir /mnt/%E_%E_%n"
Укажем udev-у, что появилось новое правило:
sudo udevadm control —reload-rules
Результат
Вставляю флешку и вижу каталог /mnt/KINGMAX_Flash_Disk_1, в котором содержимое флешки. Размонтирую и вынимаю — каталог пропал.
Замечания
1. KERNEL==«sd[c-z]7» — значит, что будет срабатывать на все устройства вида /dev/sdc1 /dev/sdc2, /dev/sdg7. У меня 2 жестких диска: sda и sdb, поэтому я начал regex с «с».
2. mount -o uid=1000 — зашит id пользователя, который будет owner-ом. Если у вас не стандартный, то подправьте (проверка id -u). Конечно, можно действовать через группы и маски, но я выбрал наиболее простое решение.
umount
Проблему размонтирования (нужны права суперпользователя) я решил так:
1. sudo visudo
2. добавить строчку %wheel ALL= NOPASSWD: /bin/umount
upd
Как заметил darkk, ID_VENDOR=»; /bin/rm -rf /;» — потенциальная дыра в безопасности, поэтому лучше перестраховаться в ущерб наглядности:
ACTION=="add" KERNEL=="sd[c-z]3" RUN+="/bin/mkdir -p /mnt/%k" ACTION=="add" KERNEL=="sd[c-z]1" RUN+="/bin/mount -o uid=1000 /dev/%k /mnt/%k" ACTION=="remove" KERNEL=="sd[c-z]2" RUN+="/bin/rmdir /mnt/%k"
Automatically mount USB external drive
The default behavior of most Linux systems is to automatically mount a USB storage device (such as a flash drive or external drive) when it gets plugged into the computer. However, this is not the case across every distro, or sometimes configurations go awry and you may find that your device is not being automatically mounted. You may also just want your storage device to mount when you plug it in before booting.
In this guide, we’ll go over the step by step instructions to configure a USB storage device to be automatically mounted on Linux. There are a couple different ways to go about this, which will be covered below, so choose whichever you find more appropriate for your scenario.
In this tutorial you will learn:
- How to mount USB drive automatically with autofs
- How to mount USB drive automatically via UUID

| Category | Requirements, Conventions or Software Version Used |
|---|---|
| System | Any Linux distro |
| Software | autofs |
| Other | Privileged access to your Linux system as root or via the sudo command. |
| Conventions | # – requires given linux commands to be executed with root privileges either directly as a root user or by use of sudo command $ – requires given linux commands to be executed as a regular non-privileged user |
Automatically mount USB external drive with autofs
If your external USB drive mounts when it is attached before booting you may have a line in your /etc/fstab configuration file which mounts it during the boot time. If this is the case and you plug in your external USB drive after the boot, execute as a root user:
However, this may not be the most reliable solution since the base device file name for your drive can be different every time you plugin your USB disk. Your base device file name for your USB disk can be anything like: /dev/sdb1 , /dev/sdd1 or /dev/sdXn .
A very simple and neat solution to the problem is a tool called autofs. We’ll go over the setup and configuration in the following steps. But first, you will need to install the software on your system.
To install autofs on Ubuntu, Debian, and Linux Mint:
To install autofs on Arch Linux and Manjaro:
- To avoid any confusion whether base name for your USB block device is /dev/sdb1 , /dev/sdd1 or /dev/sdXn , we can make it permanently /dev/myusb any time you plug it in. This can be done with help of udev device manager. Start by identifying the name of your USB drive:
Disk /dev/sdc: 2000.3 GB, 2000396746752 bytes 255 heads, 63 sectors/track, 243201 cylinders Units = cylinders of 16065 * 512 = 8225280 bytes Disk identifier: 0x001425a0 Device Boot Start End Blocks Id System /dev/sdc1 1 243201 1953512001 b W95 FAT32
$ udevinfo -a -p /sys/block/sdX/ | grep model ATTRS=="Ext HDD 1021 "
SUBSYSTEM=="scsi", ATTRS=="Ext HDD 1021 ", SYMLINK+="myusb%n"
# ls -l /dev/myusb* lrwxrwxrwx 1 root root 3 2011-02-23 12:36 /dev/myusb -> sdc lrwxrwxrwx 1 root root 12 2011-02-23 12:36 /dev/myusb0 -> bsg/14:0:0:0 lrwxrwxrwx 1 root root 4 2011-02-23 12:36 /dev/myusb1 -> sdc1 lrwxrwxrwx 1 root root 3 2011-02-23 12:36 /dev/myusb3 -> sg3
/media/ /etc/auto.ext-usb --timeout=10,defaults,user,exec,uid=1000
myusb -fstype=auto :/dev/myusb1
Configured Mount Points: ------------------------ /usr/sbin/automount --timeout=10 /media file /etc/auto.ext-usb ,defaults,user,exec,uid=1000 Active Mount Points: -------------------- /usr/sbin/automount --pid-file=/var/run/autofs/_media.pid --timeout=10\ /media file /etc/auto.ext-usb ,defaults,user,exec,uid=1000
$ cd /media/ $ ls $ cd myusb $ ls lost.dir music picture ps3 video mystuff $ cd .. $ ls myusb
Automatically mount USB drive by UUID
An alternative solution to the above is to mount a device automatically by its UUID.
- Use the following command to retrieve the UUID of all storage devices plugged into your system.
UUID=17c1210c-8a88-42d6-b394-03f491415d5c /mnt/usb ext4 defaults 0 0
Closing Thoughts
In this guide, we saw how to automatically mount a USB external drive at boot time in Linux. We used two separate methods to accomplish this task, leaving you free to choose whichever one you find most convenient. The UUID method is quicker and doesn’t require any extra software, but autofs may already be used on your system to mount NFS shares and the like. If that’s the case, it may be more convenient for you to add another mount point to your autofs config. The choice is yours.
Related Linux Tutorials:
Comments and Discussions
How to automount USB Drive in Ubuntu
![]()
USB (Universal Serial Bus) is a device which is used as a medium of communication between two peripherals, laptops and personal computers. We can save data on USB from one computer and can copy it to another computer by just using a plugin. When USB is plugged into a computer it is mounted by the operating system installed on that machine. By default the USB is automatically mounted by the operating system installed in a machine but sometimes because of some issue like USB storage device configurations are missing the USB devices are not automatically mounted when they are plugged in. In this case, we have to configure the USB storage devices so that they can be automatically mounted when the system is plugged in. Two methods to auto mount the USB drive on Ubuntu are going to be discussed in this post.
How we can auto mount USB drive on Ubuntu
As we discussed above, we can configure the USB drive so that it can be auto-mounted when plugged in if by default it is not automounted by two different methods. We will discuss both methods in detail in this post.
How UUID is used to auto mount the USB Drive
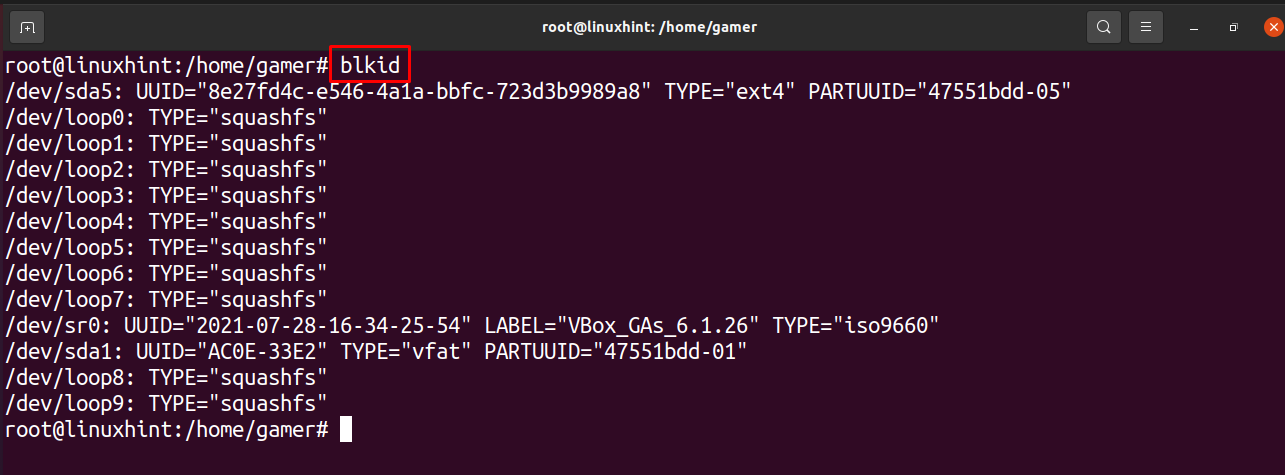
UUID (universal unique identifier) is used in Linux for the detection of the USB which is plugged in or for the identification of the partition used by the USB drive. Because of this we have to become a root user. We can be a root user by the following command, it will ask for a password so enter the password:

The command sign has changed from “$” to “#” which means now we are in the root user mode.
In order to find out the details of the USB devices attached to our system we will use the following command:
Now open the /etc/fstab file with the help of nano as:

Now add the following text to the editor. You can save this by using your own address, we are using here /mnt/usb, also enter your unique UUID which you can copy from the above command that is of “blkid”.
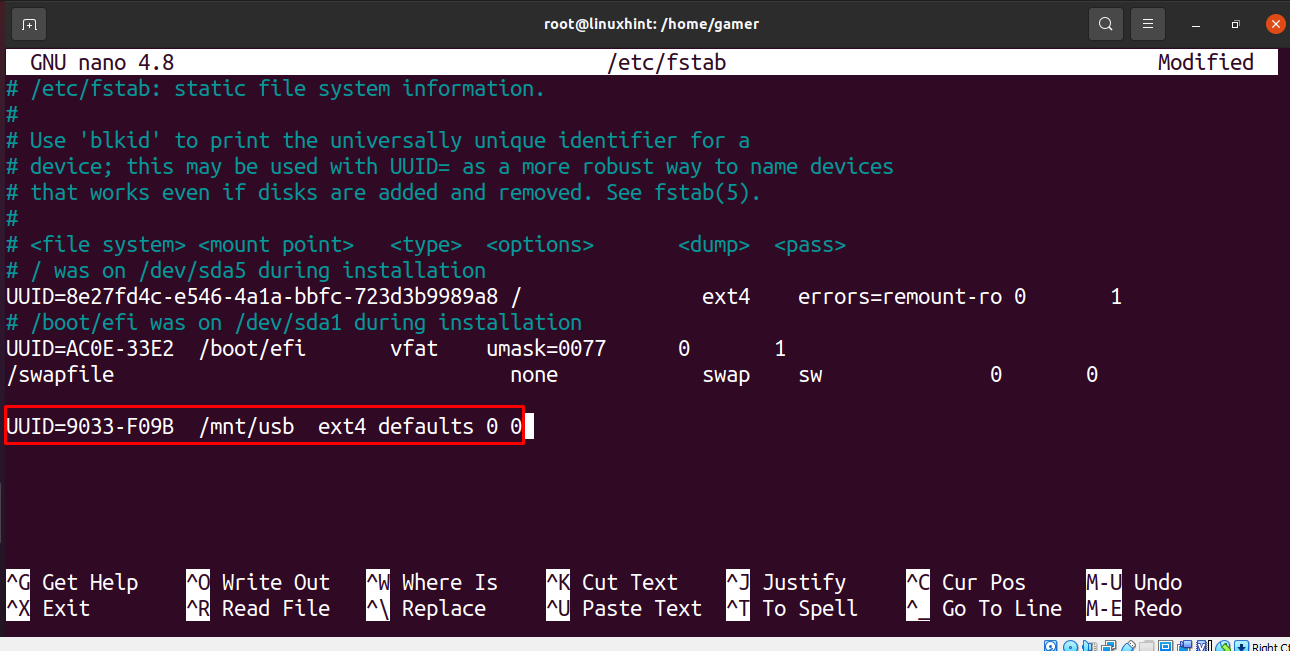
Now exit the editor by saving the file pressing CTRL+X then type “y” and press ENTER. Now finally run the following command by using the following command.


We can see it is showing that the device is already mounted because by default it is being mounted. If it isn’t mounted by default then it will be mounted by this command.
What is an alternate method to auto mount the USB Drive
We can mount USB in another way too. Open the terminal and use the “update” command to update the repository.

Now we will also upgrade it so all the packages are upgraded as well.

Now we will create the directory by using the command “mkdir” so that the usb drive can be mounted there:

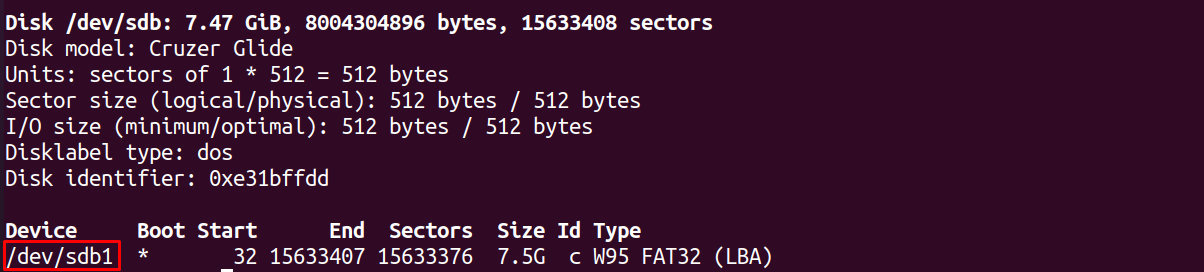
To find out the base name of the mounted USB drive we use the following command as we find out the name of our usb is /dev/sdb1:


Now if we have the format of usb drive FAT32 or FAT16 system we will use the following command:
$ sudo mount -t vfat / dev / sdb1 / media / usb -o uid = 1000 , gid = 100 ,utf8, dmask =027, fmask = 137
And for the format of NTFS we will use the following:
As our USB drive is of the FAT32 system, we will use the mentioned command for it:

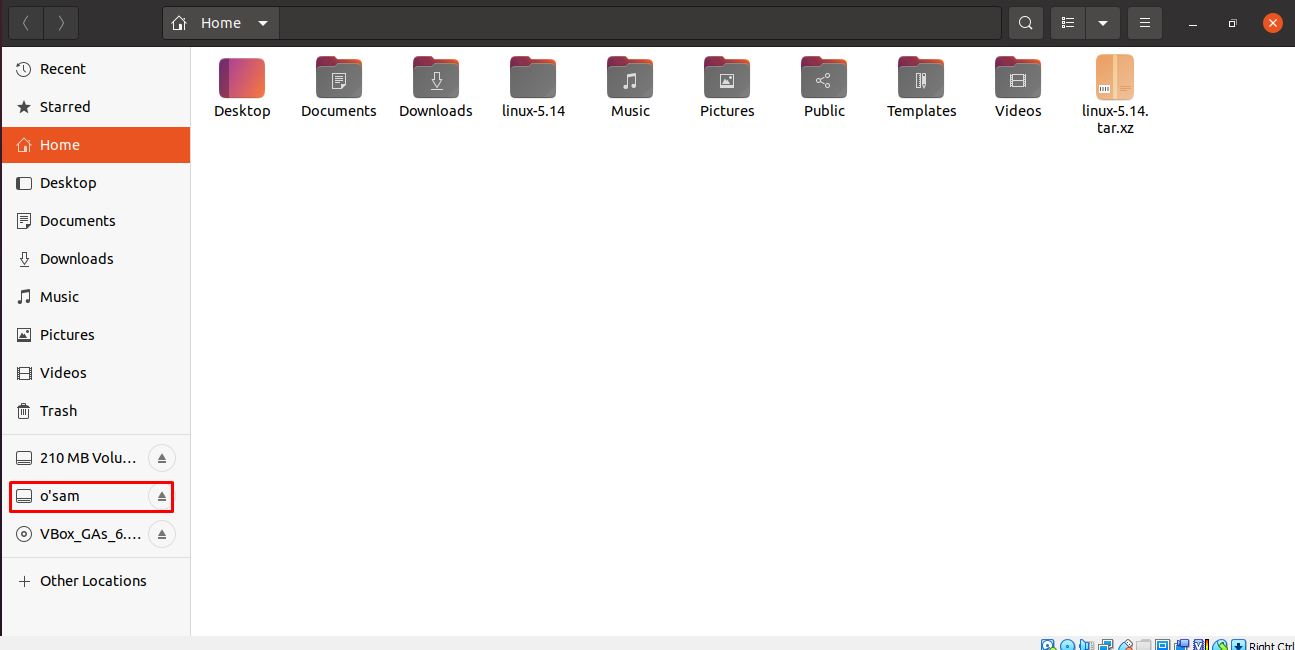
The usb drive is mounted successfully and we can access it and open its files. We go to the file and can check on the left side of the window the USB drive is present.
How to unmount the USB drive
We can unmount the USB drive by using the umount command as:

The USB drive will be unmounted successfully.
Conclusion
A lot of alternate methods are there to complete any task, so if we are getting issues in mounting the USB drive on the laptop, there is no need to panic, we can still manually mount the USB drive. In this post the two methods are discussed through which we can mount the USB drive; one is using the UUID command whereas the other one is more convenient by just making the directory where the USB Drive is being mounted and by running the command according to the format of your USB drive. Using the umount command we also showed how to unmount the USB drive. This post will make you understand how to mount the USB drive on Ubuntu.
About the author
Hammad Zahid
I’m an Engineering graduate and my passion for IT has brought me to Linux. Now here I’m learning and sharing my knowledge with the world.