- AutomaticSecurityUpdates
- Using GNOME Update Manager
- Using the «unattended-upgrades» package
- Determining the current configuration
- Using cron and aptitude
- Using cron-apt to handle automatic updating
- Как включить автоматическое обновление Ubuntu 20.04
- Шаг 1: Установите пакет автоматического обновления
- Шаг 2: Настройка службы автоматического обновления
- Отключение автоматического обновления для отдельных пакетов
- Шаг 3: Включите уведомления по электронной почте
- Шаг 4: Включение автоматического обновления Ubuntu 20.04
- Вывод
AutomaticSecurityUpdates
This is a simple tutorial that will teach you to configure your system to automatically install security updates. There are always some security risks involved in running software upgrades without supervision, but there are also benefits. If you believe it’s important to stay up to date with the latest security patches, then you should follow this simple tutorial.
- Use the GNOME Update Manager
- Use the unattended-upgrades package
- Write your own cron script that calls aptitude
- Use cron-apt
Using GNOME Update Manager
If you are using GNOME, go to the «Software & Updates», open up the «Updates» tab.
For «When there are security updates» select «Download and install automatically».
Using the «unattended-upgrades» package
Install the unattended-upgrades package if it isn’t already installed (sudo apt-get install unattended-upgrades).
sudo dpkg-reconfigure --priority=low unattended-upgrades
(it’s an interactive dialog) which will create /etc/apt/apt.conf.d/20auto-upgrades with the following contents:
APT::Periodic::Update-Package-Lists "1"; APT::Periodic::Unattended-Upgrade "1";
- When the apt job starts, it will sleep for a random period between 0 and APT::Periodic::RandomSleep seconds. The default value is «1800» so that the script will stall for up to 30 minutes (1800 seconds) so that the mirror servers are not crushed by everyone running their updates all at the same time. Only set this to 0 if you use a local mirror and don’t mind the load spikes. Note that while the apt job is sleeping it will cause the execution of the rest of your cron.daily jobs to be delayed.
- If you want the script to generate more verbose output set APT::Periodic::Verbose "1";
- If you want the script to automatically reboot when needed, you not only need to set Unattended-Upgrade::Automatic-Reboot "true", but you also need to have the «update-notifier-common» package installed. On minimal installations this is not installed by default and without it the automatic updater will never reboot and will not even tell you that you need to reboot manually if you have email notifications configured!
// Automatically upgrade packages from these (origin, archive) pairs Unattended-Upgrade::Allowed-Origins // $ and $ will be automatically expanded "$ stable"; "$ $-security"; "$ $-updates"; // "$ $-proposed-updates"; >; // List of packages to not update Unattended-Upgrade::Package-Blacklist // "vim"; // "libc6"; // "libc6-dev"; // "libc6-i686"; >; // Send email to this address for problems or packages upgrades // If empty or unset then no email is sent, make sure that you // have a working mail setup on your system. The package 'mailx' // must be installed or anything that provides /usr/bin/mail. //Unattended-Upgrade::Mail "root@localhost"; // Do automatic removal of new unused dependencies after the upgrade // (equivalent to apt-get autoremove) //Unattended-Upgrade::Remove-Unused-Dependencies "false"; // Automatically reboot *WITHOUT CONFIRMATION* if a // the file /var/run/reboot-required is found after the upgrade //Unattended-Upgrade::Automatic-Reboot "false";
Determining the current configuration
The current configuration can be queried by running:
apt-config dump APT::Periodic::Unattended-Upgrade
Which will produce output like:
APT::Periodic::Unattended-Upgrade "1";
In this example, Unattended Upgrade will run every 1 day. If the number is "0" then unattended upgrades are disabled.
The files in /etc/apt/apt.conf.d/ are evaluated in lexicographical order with each file capable of overriding values set in earlier files. This makes it insufficient to view the setting in /etc/apt/apt.conf.d/20auto-upgrades and why it is recommended to use apt-config.
Using cron and aptitude
To begin, press Alt+F2 and create a new file:
gksudo gedit /etc/cron.weekly/apt-security-updates
If you’re using KDE, use this command instead:
kdesudo kate /etc/cron.weekly/apt-security-updates
Copy the following text into this new file, save, and exit:
echo "**************" >> /var/log/apt-security-updates date >> /var/log/apt-security-updates aptitude update >> /var/log/apt-security-updates aptitude safe-upgrade -o Aptitude::Delete-Unused=false --assume-yes --target-release `lsb_release -cs`-security >> /var/log/apt-security-updates echo "Security updates (if any) installed"
Recently (since Ubuntu 7.10), the aptitude action ‘upgrade’ is deprecated. There are now two ways to upgrade, a safe one (conservative, if an update needs to add or remove dependencies, it won’t update) and a full one (it will always upgrade even though it impacts other packages by adding them or removing them, previously called ‘dist-upgrade’). The actions are now ‘safe-upgrade’ or ‘full-upgrade’. See the manual page of aptitude (man aptitude) for more details.
Once you are complete, you want to make the file executable. So, via the terminal, type the following line:
sudo chmod +x /etc/cron.weekly/apt-security-updates
This script will run once weekly and it installs all available packages from the security repository. It also generates a log in /var/log/apt-security-updates for later inspection in case something goes wrong.
This script will output information to a log file, so to prevent this log file from getting too large we need to make sure it gets rotated out. To do this, we’ll use the logrotate utility, which comes with Ubuntu. Press Alt+F2 and type this command:
gksudo gedit /etc/logrotate.d/apt-security-updates
For KDE, use this command instead:
kdesudo kate /etc/logrotate.d/apt-security-updates
Paste this into the editor, save, and exit:
/var/log/apt-security-updates rotate 2 weekly size 250k compress notifempty >
This will rotate the log file every week (weekly), or if it’s over 250kB in size (size 250k), compressing old versions (compress). The previous two log files will be kept (rotate 2), and no rotation will occur if the file is empty (notifempty).
Using cron-apt to handle automatic updating
Updating can be also done automatically by using package called cron-apt. Please read man page before doing anything.
AutomaticSecurityUpdates (последним исправлял пользователь hrishikesh-kadam 2021-03-02 15:14:05)
The material on this wiki is available under a free license, see Copyright / License for details
You can contribute to this wiki, see Wiki Guide for details
Как включить автоматическое обновление Ubuntu 20.04
Одна из важнейших ролей администрирования, которую должен выполнять любой системный администратор. Заключается в регулярном применении исправлений безопасности и обновлений компонентов. Обновления безопасности устраняют уже существующие уязвимости, которые могут быть использованы злоумышленниками для взлома системы.
Несвоевременное обновление системных пакетов может привести к системным нарушениям. А из-за этого конфиденциальная информация может попасть в руки хакерам. Поэтому требуется обновлять систему.
Если вы хотите обновить только один пакет в ОС Ubuntu, то рекомендую эту инструкцию Как обновить один пакет в Ubuntu.
Ручное обновление пакетов на Ubuntu да и в любой системе Linux — это утомительная задача и потеря большого количества вашего драгоценного времени. А это время можно потратить в другом месте на выполнение более продуктивных задач. Так что для экономии времени и сил, рекомендуется настроить автоматическое обновление на сервере Linux. В этом руководстве мы расскажем вам, как включить автоматическое обновление на Ubuntu 20.04.
Настройка автоматического обновлений становится возможной благодаря пакету unattended-upgrades. Пакет поддерживает синхронизацию вашей системы с последними обновлениями безопасности и функций. Мы покажем вам, как установить пакет, а затем как изменить файл конфигурации, чтобы контролировать, какие обновления устанавливать, а какие игнорировать. Ну и плюс бонус в виде отправки email оповещения о обновлении.
Шаг 1: Установите пакет автоматического обновления
Как уже говорилось выше, первым шагом является установка пакета автоматического обновления. Для этого мы будем использовать менеджер пакетов APT следующим образом:
$ sudo apt install unattended-upgrades
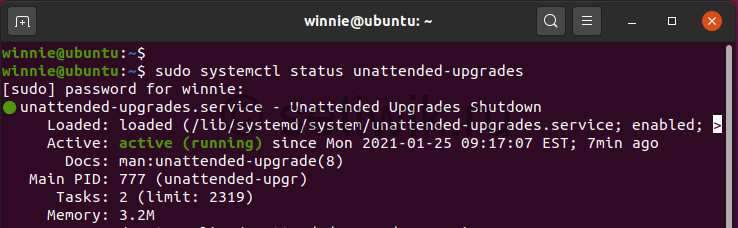
Когда установка будет завершена, проверьте это с помощью команды:
$ sudo systemctl status unattended-upgrades
По умолчанию демон автоматическое обновление должно запускаться после завершения установки, как показано на скриншоте ниже.
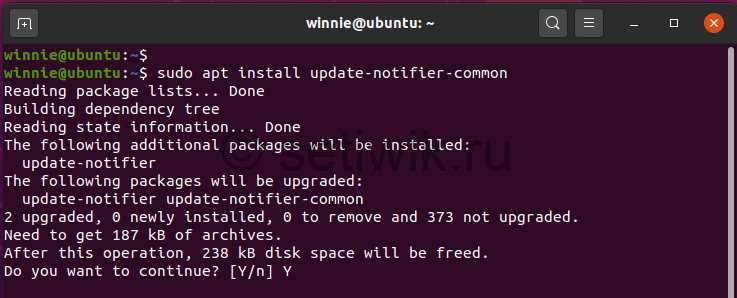
Теперь требуется установить пакет update-notifier-common.:
$ sudo apt install update-notifier-common
Шаг 2: Настройка службы автоматического обновления
На этом шаге требуется внести изменения в конфигурационный файл авто обновления. С помощью редактора Vim.
$ sudo vim /etc/apt/apt.conf.d/50unattended-upgrades
Этот файл поможет вам указать, какие пакеты должны автоматически обновляться или пропускаться в процессе обновления. Однако по умолчанию автоматически устанавливаются только обновления безопасности, как показано в следующих строках. Поэтому никаких действий не требуется.
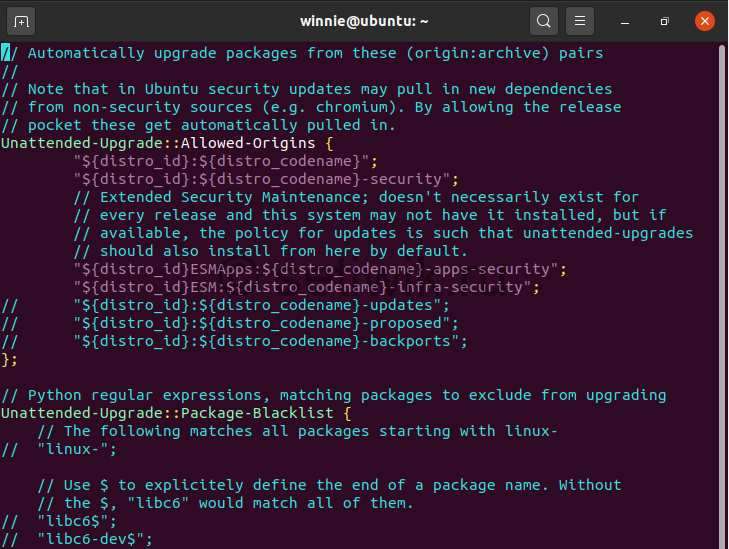
Но вы можете раскомментировать нужные вам строки, убрав два слеша (//).
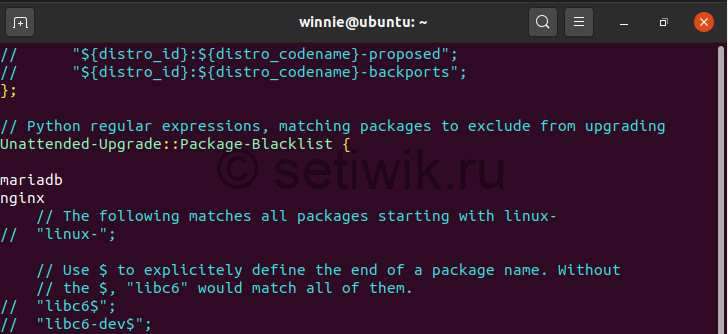
Отключение автоматического обновления для отдельных пакетов
Чтобы внести некоторые пакеты в черный список найдите параметр Unattended-Upgrade::Package-Blacklist
И укажите имена пакетов которые не надо обновлять. В приведенном ниже примере мы отключили обновление пакетов Mariadb и Nginx.
При прокрутке вниз вы можете увидеть множество других опций, которые вы можете включить или оставить их как есть.
Шаг 3: Включите уведомления по электронной почте
Иногда очень удобно получать уведомления по электронной почте. Чтобы сделать это, прокрутите и найдите строку ниже, а так же раскоментируйте ее.
Обязательно укажите свой адрес электронной почты.
Так же вы можете получать сообщения по электронной почте в случае сбоя обновления. Например при сбое обновлений безопасности. Чтобы сделать это найдите строку:
Раскомментируйте ее и измените атрибут “on-change” на «only-on-error”

После установки обновлений безопасности рекомендуется перезапустить сервер. Вы можете включить автоматическую перезагрузку сервера после обновления. Делается это в строке:
//Unattended-Upgrade:: Automatic-Reboot » false»;
Поменяйте значение «false» на «true“

Если есть пользователи, которые находятся в системе, но вы хотите продолжить перезагрузку, несмотря ни на что. Тогда найдите строку:
// Unattended-Upgrade:: Automatic-Reboot-WithUsers » true»;
Раскомментируйте ее как показано ниже:

Также можно установить время, когда произойдет перезагрузка. Для этого раскомментируйте строку ниже. По умолчанию это значение равно 4:00 утра.
// Unattended-Upgrade:: Automatic-Reboot-Time » 04: 00″;
Мы установим его на 3:00 утра

Есть много других правил, которые вы можете установить в соответствии с вашими потребностями. Просто прокрутите и раскомментируйте директивы.
Как только вы закончите, не забудьте сохранить изменения конфигурационного файла.
Шаг 4: Включение автоматического обновления Ubuntu 20.04
Наконец , чтобы включить автоматическое обновление, отредактируйте файл 20auto-upgrades.
По умолчанию файл содержит две строки, как показано на рисунке.

Эти строки позволяют определить, как будет происходить обновление. Первая строка обрабатывает обновление списков пакетов, а вторая инициирует автоматическое обновление.
Значение “1 » включает автоматическое обновление. Если вы хотите отключить его, установите это значение в “0″.
Никаких изменений здесь не требуется, просто сохраните и закройте файл.
Вывод
Если вы все это сделали, то вам успешно удалось установить автоматические обновления на Ubuntu 20.04. Теперь вы можете быть уверены, что ваши пакеты всегда будут последних версий. Кроме того, ваш сервер и данные на нем будут в безопасности.