- Аутентификация клиентов при помощи LDAP на сервере Ubuntu 12.04
- Установка пакетов клиента
- Настройка клиента
- Права доступа
- Вход пользователя LDAP
- Ограничение доступа по группам
- Заключение
- Linux LDAP authentication (Using Linux LDAP)
- Step 1: Install OpenLDAP Server
- Step 2: Set Access Controls
- Step 3: Add Base Data to the LDAP Tree
- Step 3: Add Users
- Step 4: Set Up the Client LDAP Server
- Step 5: Configure NSS
- Step 6: Configure PAM
- Step 7: Create Home Folders at the Login
- Step 8: Enable sudo
- Conclusion
- About the author
- Kennedy Brian
Аутентификация клиентов при помощи LDAP на сервере Ubuntu 12.04
LDAP (или Lightweight Directory Access Protocol) – это протокол, позволяющий хранить данные аутентификации в одном централизованном месте. В предыдущей статье было показано, как настроить сервер LDAP на Ubuntu 12.04.
Данная статья поможет настроить удалённую аутентификацию клиентских машин.
Примечание: Для выполнения руководства нужны предварительно настроенный сервер Ubuntu 12.04 и установленный сервер LDAP. Также понадобится ещё один сервер Ubuntu 12.04, который будет использован в качестве клиента.
Установка пакетов клиента
На клиентскую машину нужно установить несколько пакетов для корректной поддержки аутентификации LDAP.
Чтобы загрузить эти пакеты из стандартного репозитория Ubuntu, используйте следующие команды:
sudo apt-get update
sudo apt-get install libpam-ldap nscd
Система задаст несколько стандартных вопросов и запросит некоторые данные, а именно:
- Uniform Resource Identifier сервера LDAP: ldap://IP-адрес-сервера-LDAP.
- Будет предложено изменить начальную строку ldapi:/// на ldap://, прежде чем продолжить вводить данные.
- Distinguished name of the search base: Это значение должно совпадать с тем, что было внесено в файл /etc/phpldapadmin/config.php на сервере LDAP. Найдите в файле server, base, array (в предыдущем руководстве это были значения dc=test,dc=com).
- LDAP version to use: 3
- Make local root Database admin: Yes
- Does the LDAP database require login? No
- LDAP account for root: Это значение тоже должно совпадать с тем, что было внесено в файл /etc/phpldapadmin/config.php на сервере LDAP. Найдите в файле login, bind_id (в предыдущем руководстве это были значения cn=admin,dc=test,dc=com).
- LDAP root account password: пароль root-пользователя
Если вы допустили ошибку и хотите её исправить, можете вернуться в это меню при помощи команды:
sudo dpkg-reconfigure ldap-auth-config
Настройка клиента
Теперь нужно отредактировать некоторые настройки, чтобы файлы аутентификации могли обращаться к серверу LDAP за информацией.
Для начала отредактируйте файл /etc/nsswitch.conf. Он позволяет настроить изменение учетных данных LDAP при запуске пользователями определённых команд аутентификации.
sudo nano /etc/nsswitch.conf
Найдите в файле строки passwd, group и shadow и отредактируйте их следующим образом:
passwd: ldap compat
group: ldap compat
shadow: ldap compat
Затем нужно добавить некоторые значения в настройки PAM.
PAM (или Pluggable Authentication Modules) – это система, которая соединяет приложения, обеспечивающие аутентификацию в тех приложениях, которые требуют проверки подлинности.
Система PAM внедрена по умолчанию на большинстве компьютеров, работает в фоновом режиме и не требует вмешательства пользователя. После установки модуля PAM для LDAP большая часть необходимой информации была добавлена в конфигурационные файлы.
Отредактируйте файл /etc/pam.d/common-session:
sudo nano /etc/pam.d/common-session
В конец файла добавьте строку:
session required pam_mkhomedir.so skel=/etc/skel umask=0022
Это создаст на клиентской машине домашний каталог при подключении пользователя LDAP, у которого нет такого каталога.
Чтобы обновить настройки, перезапустите сервис:
sudo /etc/init.d/nscd restart
Права доступа
Как помните, во время настройки сервера LDAP была создана группа admin. Это название выбрано не случайно. Оно совпадает с названием группы, созданной на машине Ubuntu по умолчанию.
Пользователи LDAP, добавленные в группу admin, получают доступ к команде sudo согласно настройкам файла /etc/sudoers.
Все записи, начинающиеся с символа %, обозначают группу, а не пользователя. Чтобы отключить доступ пользователей к команде sudo или передать права доступа только определённым пользователям, закомментируйте эту строку:
Вход пользователя LDAP
Теперь клиентская машина настроена и может подключиться в качестве пользователя LDAP. Этот пользователь не должен существовать на клиентском компьютере.
В новом окне терминала создайте SSH-подключение к клиентскому компьютеру, используя учетные данные пользователя LDAP.
Примечание: Рекомендуется оставить исходное окно терминала на случай ошибок в конфигурации.
Пользователь должен подключиться так, будто он был создан локально. Запросите рабочий каталог:
Команда вернёт домашний каталог, созданный при входе этого пользователя.
Попробуйте выйти и войти снова как другой пользователь LDAP. На сервере появится ещё один домашний каталог пользователя:
Если пользователь входит в группу admin, и вы не отключили доступ к sudo в предыдущем разделе, то тот пользователь сможет запускать команды с sudo.
Запустите команду passwd, чтобы изменить пароль. Как видите, сервер LDAP позволяет изменить учётные данные:
passwd
Enter login(LDAP) password:
Ограничение доступа по группам
Чтобы возможность войти на данный компьютер была только у членов определенных групп, можно отредактировать файлы PAM.
Откройте для редактирования с правами root:
sudo nano /etc/pam.d/common-auth
В конце файла нужно указать, что система PAM должна проверять файлы доступа, прежде чем пропустить пользователя.
auth required pam_access.so
Сохраните и закройте файл.
Файл, к которому обращается PAM за информацией о доступе – /etc/security/access.conf. Откройте его:
sudo nano /etc/security/access.conf
В конец этого файла нужно добавить правило.
Символ тире в начале строки значит, что это ограничение. Между символами двоеточия указывается само правило.
В данном случае правило касается всех пользователей, кроме root и членов группы admin. Группы указываются в скобках.
После второго символа двоеточия уточняется, при каких обстоятельствах правило должно применяться. В данном примере ограничение будет применяться во всех случаях, кроме локальных подключений.
-:ALL EXCEPT root (admin):ALL EXCEPT LOCAL
Внимание: Это правило применяется ко всем пользователям, а не только к пользователям LDAP. Потому любой пользователь, созданный на клиентской машине, должны входить в одну из указанных в правиле групп, чтобы получить доступ.
Заключение
Теперь сервер LDAP позволяет аутентифицировать клиентов. Пользователи LDAP с валидными учётными данными смогут пользоваться всеми машинами, доступ к которым не заблокирован.
Такой подход позволяет предотвратить рассредоточение, дублирование и потерю контроля над данными. Аутентификация LDAP особенно важна в случаях, когда количество пользователей, имеющих доступ к серверам и проектам, постоянно растет.
Linux LDAP authentication (Using Linux LDAP)
![]()
This article will focus on using a Linux server to authenticate against the Linux directory. LDAP directories in Linux environments can either be local or network directories. Notably, network directories come in handy where and when there is a need for central authentication, while local directories operate within the same computer and not over a network.
While we will focus on LDAP protocol, discussing a Linux LDAP authentication is impossible without including NSS and PAM in the tutorial. Thus, we will also discuss how to configure NSS and PAM modules to work with client computers through the authentication process. This guide focuses on online authentication.
Step 1: Install OpenLDAP Server
You will not authenticate with LDAP if you do not have it installed in your systems. So, the first step is ensuring that you have OpenLDAP installed in your system. We already discussed the installation process elaborately in our previous write-up.
This command should help you install OpenLDAP on Ubuntu 22:04:

Step 2: Set Access Controls
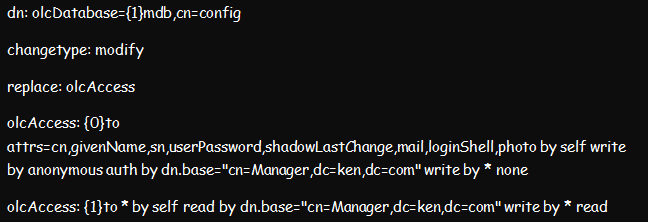
Once the installation process is complete, proceed to set up the access controls. Setting up the access controls ensures that no one can access and read any encrypted passwords from the LDAP server. Yet, users can still edit some of their attributes, such as personal passwords and photos.
You can achieve this setup by creating and importing the below ldif file. And once done, you can restart the slapd.service.
Step 3: Add Base Data to the LDAP Tree
Create a temporary base.ldif file containing the following details:
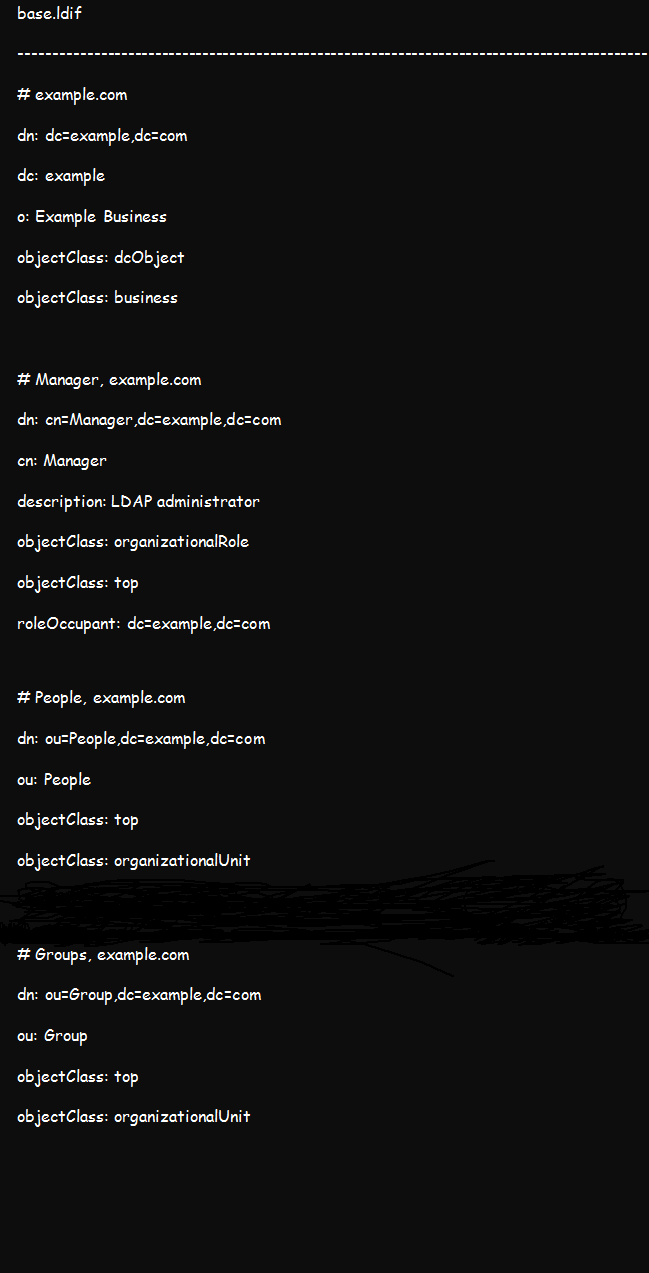
You can customize the details by replacing example and org with your actual domain credentials. Once done, add the above details to your OpenLDAP tee using this command:

Test using the below command to confirm if the data importation was successful:

Step 3: Add Users
To add a user, you should create a .ldif file such as the one below. Our user for this demonstration is kenbrian and our domain credential is linhint.com.
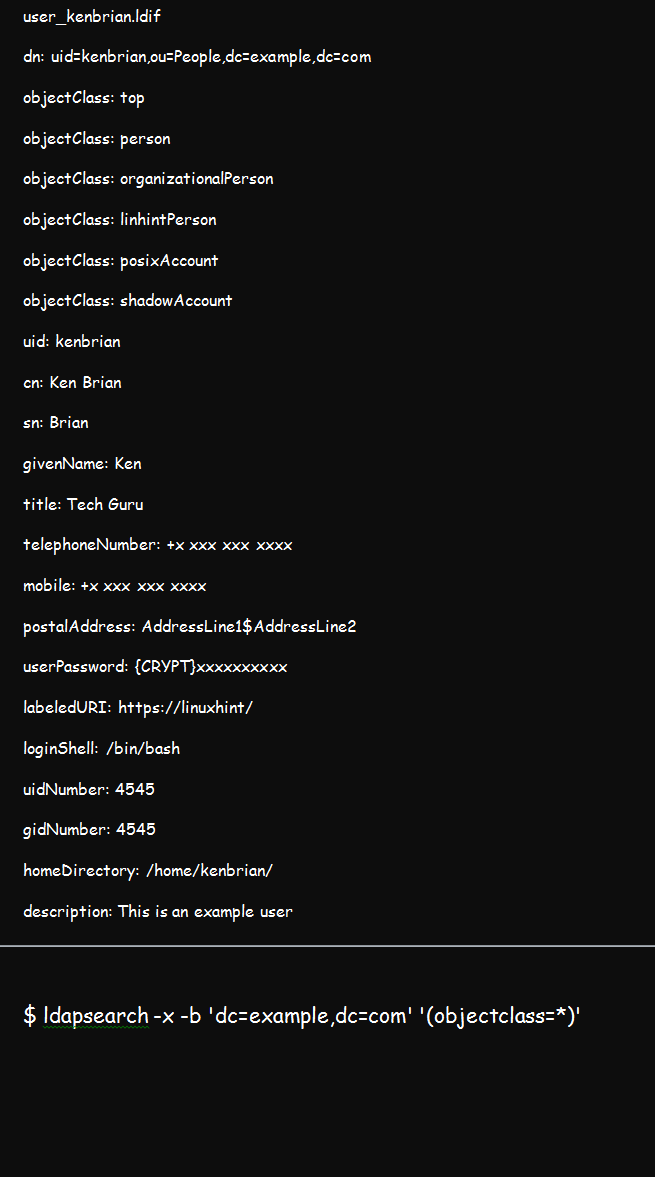
The ********* present in the userPassword entry represents your password, which is the value of slappasswd or /etc/shadow. You can now add the user once you have the .ldif file using the below command:

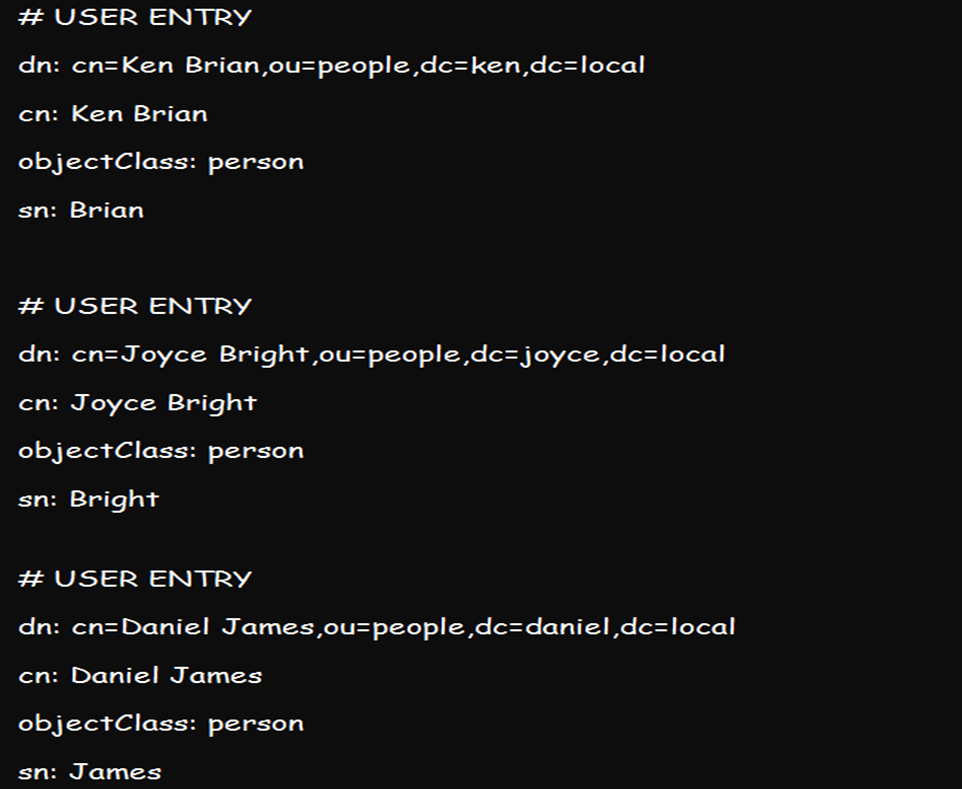
You can also use the ldapadd command to add more than one user to the directory by creating their various credentials all at once and adding them using the above utility. A list of credentials can look like this:
Step 4: Set Up the Client LDAP Server
You can set up an OpenLDAP server and ensure you can successfully query the server using the ldapsearch command. Once set up, you can decide whether to proceed with online and offline or online-only authentication.
Below is the basic ldapsearch command line or syntax:

Step 5: Configure NSS
NSS, also known as Name Service Switch, is a system often used for managing configuration databases of different sources. So, you will find it vital in a range of LDAP applications. The following steps will be vital for configuring NSS:
- Install NSS using the nss-pam-ldapd package.
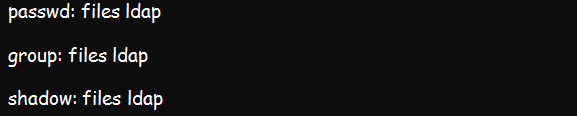
- Edit the NSS central configuration file, which is the /etc/nsswitch.conf. This file informs NSS of the files to use for respective system databases. Editing the file will require you to add ldap directives to the group, passwd, and shadow databases. Ensure that your edited file looks like this:
- You will also need to edit the /etc/nsswitch.conf. file to change the uri and base lines so that they fit your ldap server settings.
- If your LDAP server prompts for a password, edit both the bindpw and binddn sections. Continue to replace your /etc/nsswitch.conf permission from nslcd to 0600for a proper start.
- Use the systemd command to start the nslcd.service. With that, your LDAP users should be visible when you run getent passwd command on your client-server.
Step 6: Configure PAM
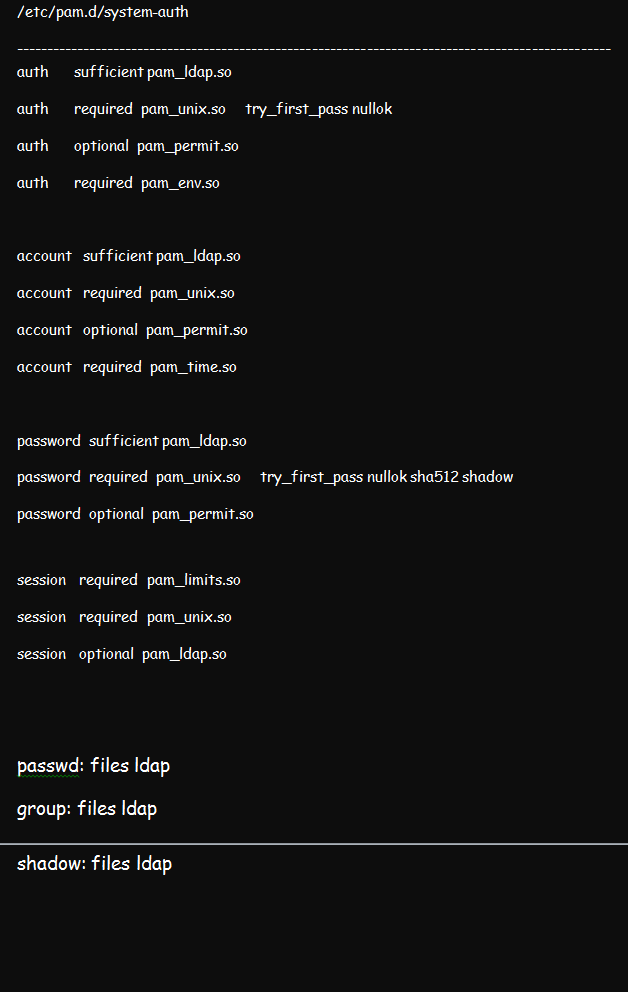
We discussed how to configure PAM in a Linux environment in a previous article. But for this illustration, ensure that you configure the Pluggable Authentication Module using the pam_ldap.so. While at that, edit the /etc/pam.d/system-auth file from pam.d. the result should be like in the figure below:
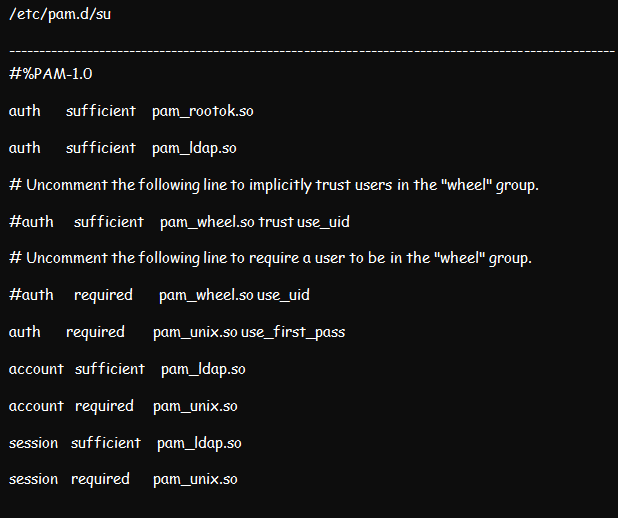
Proceed to edit the /etc/pam.d/su as well as the /etc/pam.d/su-l files. The /etc/pam.d/su-l file comes in handy whenever the /etc/pam.d/su login is run by the user. Place pam_ldap.so sufficient above each section except the pam_rootok.
Now, permit users to edit their passwords by making edits to the /etc/pam.d/passwd file.
Step 7: Create Home Folders at the Login
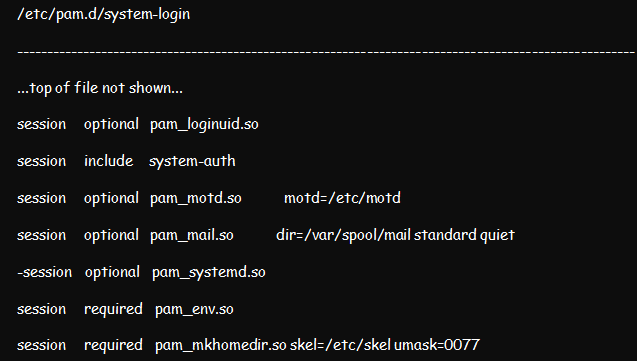
You can choose to create home folders at the login in case your system does not use NFS to store folders. Create a home folder at login by editing /etc/pam.d/system-login and then adding pam_mkhomedir.so to session sections above all sufficient items.
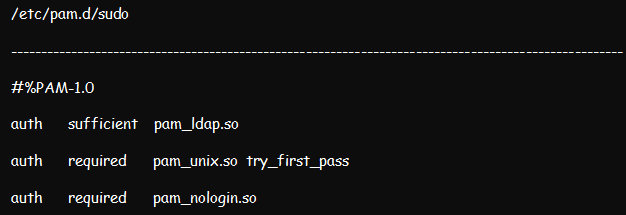
Step 8: Enable sudo
Enable sudo from the LDAP user by editing /etc/pam.d/sudo and modifying it appropriately.
Add the command below to the /etc/openldap/ldap.conf file:

Conclusion
The above steps should help you implement an online authentication of Linux LDAP alongside PAM and NSS. This system comes in handy in securing your systems. More importantly, you can use it to query and manage your company information.
About the author
Kennedy Brian
Brian is a computer scientist with a bias for software development, programming, and technical content development. He has been in the profession since 2015. He reads novels, jogs, or plays table tennis whenever not on gadgets. He is an expert in Python, SQL, Java, and data and network security.