- How To Backup Your Entire Linux System Using Rsync
- Introduction
- Backup Your Entire Linux System Using Rsync
- Restore Backup
- How to Backup Linux Filesystem Using dump Command
- How to Install Dump Utility in Linux
- Linux Dump Command Usage
- How to Backup Linux System using Dump Command
- Backup Linux Home Directory
- Backing Up Data to a Regular File
- How to Restore Linux System using Dump Command
How To Backup Your Entire Linux System Using Rsync
In this brief tutorial, let me explain how to backup your entire Linux system using Rsync utility. This method will work on almost all Linux systems that have rsync installed.
Introduction
The other day I wanted to reinstall one of my virtual machine which was running with Ubuntu 16.04 LTS server. Before reinstalling it, I tried to backup the entire system.
While searching for an easiest way to do this, I found an easiest solution in Arch Linux wiki. I never thought that it was going to be that much simple.
I copied my entire root ( / ) tree with Rsync using a single line command. Yes, it is just a one-liner command. While there are so many tools to backup your systems, I find this method super easy and convenient, at least to me.
Also, this method is way better than disk cloning with dd command. Because It doesn’t matter if your hard drive is different size, or use different filesystem. It will work regardless of hard disk’s size and the underlying file system.
Please note your destination disk size should be bigger than the source disk’s size. Both disk’s need not to be same size.
Backup Your Entire Linux System Using Rsync
First, insert your backup medium (USB thumb drive or External hard disk). Then find the drive letter using ‘ fdisk -l ‘ command. In my case, my Pen drive id is /dev/sdb1 .
Mount your drive to any location of your choice. I am going to mount it under /mnt .
To backup the entire system, all you have to do is open your Terminal and run the following command as root user:
$ sudo rsync -aAXv / --exclude= /mnt
This command will backup the entire root ( / ) directory, excluding /dev , /proc , /sys , /tmp , /run , /mnt , /media , /lost+found directories, and save the data in /mnt folder.
Let us break down the above command and see what each argument does.
- rsync — A fast, versatile, local and remote file-copying utility
- -aAXv — The files are transferred in «archive» mode, which ensures that symbolic links, devices, permissions, ownerships, modification times, ACLs, and extended attributes are preserved.
- / — Source directory
- —exclude — Excludes the given directories from backup.
- /mnt — It is the backup destination folder.
Important note: Please be mindful that you must exclude the destination directory , if it exists in the local system. It will avoid the infinite loop.
If you want to preserve hard links, just include -H flag in the above command. Please note that it consumes more memory.
$ sudo rsync -aAXHv / --exclude= /mnt
Restore Backup
To restore the backup, just reverse the source and destination paths in the above command.
Please be mindful that this is suitable for local and stand-alone systems only. If your system is being actively accessed by some other systems on the network, it is not a better solution.
Because, the contents of the systems might be constantly updated every minute, and some files may change during the rsync process.
Say for example, when rsync will reach the file 2, the contents of the previous file (File 1) might be changed. This will leave you with a dependency error when you will need to use that backup.
In such cases, a snapshot-based backup is the better approach. Because the system will get «froze» before the backup process starts and get it «unfreeze» when the backup process finishes, so all the files are consistent.
Related Read:
- How To Backup Files And Directories Using Rsync In Linux
- How To Backup And Restore Files Using Deja Dup In Linux
- How To Setup Backup Server Using Rsnapshot
- How To Backup And Restore Data Using Restic In Linux
- How To Backup And Restore Linux System With Timeshift
- How To Synchronize Files With Unison On Linux
- How To Synchronize Local And Remote Directories In Linux
- How To Synchronize Files And Directories Using Zaloha.sh
- CYA – System Snapshot And Restore Utility For Linux
How to Backup Linux Filesystem Using dump Command
On a Linux operating system environment, mastering how to create and restore backups is a very important skill set. It is easier for well-versed Linux user to attain their data backup goals from the terminal environment without the need for a GUI-oriented application package.
The Linux dump utility is effective in creating filesystem backups on an availed storage device. However, the filesystem supported by this backup utility disregards the likes of ReiserFS and FAT.
The dump command only supports ext4, ext3, and ext2 filesystem and incremental backups. Under incremental backup support, a Linux user can flexibly execute their backup operations on daily, weekly, or monthly time frames.
It makes it easy to decide when and how you want your backups done. You get to decide which files should be involved in the scheduled backup process. Therefore, a Linux user can only focus on backing up files with significant changes or the ones that were recently added to the targeted filesystem.
How to Install Dump Utility in Linux
If you do not have the dump utility installed on your Linux machine, you can install it by executing one of the following installation commands in regards to the Linux operating system distribution you are using.
$ sudo apt-get install dump [On Debian, Ubuntu and Mint] $ sudo yum install dump [On RHEL/CentOS/Fedora and Rocky Linux/AlmaLinux] $ sudo emerge -a sys-apps/dump [On Gentoo Linux] $ sudo pacman -S dump [On Arch Linux] $ sudo zypper install dump [On OpenSUSE]
Linux Dump Command Usage
Once you run the dump backup utility, it first examines your existing Linux filesystem files and points out the ones that are worthy of any backup effort. The dump command needs several parameters for it to execute successfully:
- The targeted dump level.
- The media to host the created filesystem backup.
- The filesystem to backup.
The dump command also accommodates optional parameters pointing to:
- Specific backup media size.
- Next tape request method.
- Times and status of filesystem dump recording.
A typical dump command string adheres to the following syntax:
$ sudo dump options arguments filesystem
The dump command options:
- 0-9 – This range signifies available dump levels. 0 caters for full filesystem backup while a higher number like 9 only prioritizes the backup of modified filesystem files.
- -B records – Highlights how many dump records should exist in a single volume.
- -b kbperdump – Highlights the number of kilobytes within a single dumb record.
- -h level – With this option, a nodump attribute is associated with your backup files.
- -f file – Points to a file or device name that will accommodate the created dump.
- -d destiny – Defines the needed tape density.
- -n – Use to alert operator group users when something like a tape change is required by the dump operation.
- -s feet: Specifies the dump tape length in feet.
- -u – Creates a record of all successful backups under the file /etc/dumpdates.
- -t date – Specifies the date and time values associated with incremental backups.
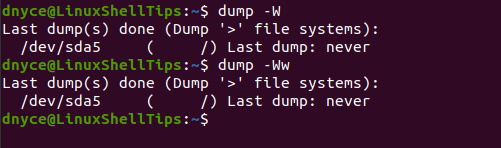
- -W – This option references the /etc/fstab and /etc/dumpdates files and highlights filesystem files that need backup.
- -w – Goes hand in hand with the W option and highlights specific/individual files that need backup.
How to Backup Linux System using Dump Command
To determine the files that need backup on your Linux system, you will run a command similar to the following:
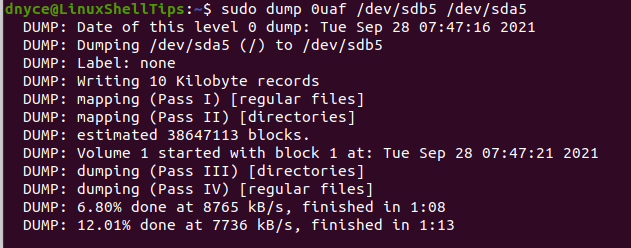
To back up the above filesystem (/dev/sda5) to an external device like /dev/sdb5 (identified by running the command sudo fdisk -l ), I would implement a dump command similar to the following:
$ sudo dump 0uaf /dev/sdb5 /dev/sda5
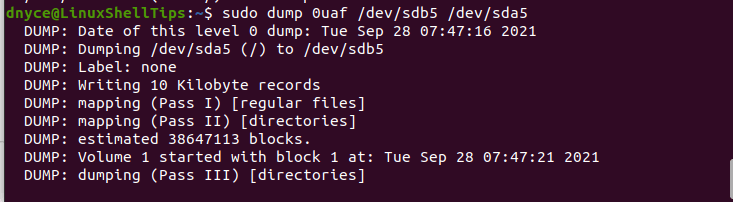
The dump command has the dump option 0 since it’s a first-time backup attempt.
If you need your backup compressed, you would run the above command in the following manner:
$ sudo dump 0ufz /dev/sdb5 /dev/sda5
The created backup will be compressed with the z library. The dump backup command updates the system user as it continues to execute:
Backup Linux Home Directory
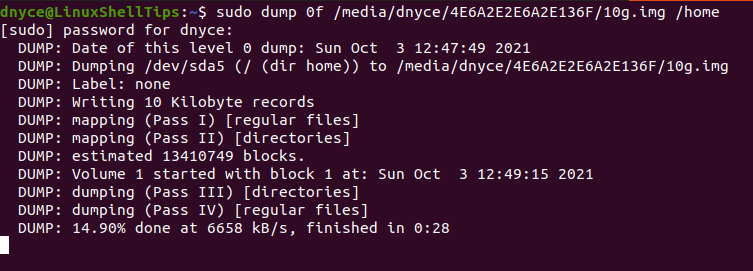
To back up the files from a specific filesystem directory like your Home directory:
$ sudo dump 0ufz /dev/sdb5 /home
To back up files to a remote machine named linuxshelltips or identified by an IP address and with the tape device named /dev/sdb5, we will use the rdump command.
$ sudo rdump 0uf linuxshelltips:/dev/sdb5 /home
Backing Up Data to a Regular File
Supposing we want to back up the home directory to an existing regular file called 10g.img, we would implement the needed command in the following manner:
$ sudo dump 0f /media/dnyce/4E6A2E2E6A2E136F/10g.img /home
To create such a writable image file to hold your backup data, run the following command. Also, specify the size of this writable image file.
$ dd if=/dev/zero of=10g.img bs=1 count=0 seek=10G
Afterward, check the created backup file:

The created .img file backup can now be written to a disk device of your choice with this command:
$ sudo dd if=10g.img of=/dev/sdb5 bs=1M
How to Restore Linux System using Dump Command
To fully restore the above-created backup, we would run a command similar to the following:
The restored files will be written on the current directory path of the active Linux system user.
To restore filesystem backups from a remote machine we will use the rrestore command:
$ sudo rrestore tf linuxshelltips:/dev/sdb5
With the dump command, you can easily achieve full and incremental backups of your Linux filesystem files. The restore command reverses or does the opposite of the dump command to successfully re-instate your filesystem backups.
To learn more about these two commands and their usage, run: