- Linux bin install java
- General Notes About Installing the JDK on Linux Platforms from Archive Files
- General Notes About Installing the JDK on Linux Platforms from RPM packages
- System Requirements for Installing JDK on Linux Platforms
- JDK Installation Instruction Notation for Linux Platforms
- Installing the JDK on Linux from Archive Files, RPM Packages and Oracle Linux Repositories
- Installing the 64-Bit JDK on Linux Platforms
- Installing the 64-Bit JDK on RPM-Based Linux Platforms
- How to Install Oracle Java (JDK 20 Updated) in Ubuntu 20.04 | Ubuntu 22.04
- Install JDK 20 in Ubuntu:
- 1. Download Java package
- 2. Install the .deb package
- 3. Set JDK 20 as default:
- 4. Set JAVA_HOME:
- Ji m
Linux bin install java
This topic describes the installation procedures of the JDK on the Linux platform, along with the system requirements.
General Notes About Installing the JDK on Linux Platforms from Archive Files
Installing the JDK automatically creates a directory called jdk–feature.interim.update.patch where feature ( 17 ),interim, update, and patch represent corresponding values of version information.
If you install JDK in a specific location such as /opt , you must log in with root credentials to gain the necessary permissions. If you do not have the root access, either install the JDK in your home directory or a sub directory for which you have the write permissions.
If you install the software in a directory that contains a sub directory named jdk– 17 .interim.update.patch , the new software overwrites files of the same name in that directory. Ensure that you rename the old directory if it contains files that you would like to keep.
Installing the JDK from archive files doesn’t configure the backing store for the system node of Java Preferences API ( java.util.prefs Java package). If this functionality of the JDK is required, you need to manually configure it by making sure either /etc/.java/.systemPrefs or jdk– 17 .interim.update.patch/.systemPrefs directory exists.
General Notes About Installing the JDK on Linux Platforms from RPM packages
This topic describes general information about installing JDK 17 from RPM packages on Linux platforms.
You can install only one version of JDK of the same feature release. If you try to install the newer version of the same feature release while the older version exists, the installer uninstalls the older version and installs the new version. For example, you can’t install jdk- 17 and jdk- 17 .0.1 simultaneously. If you attempt to install jdk- 17 .0.1 after jdk- 17 is installed, the installer uninstalls jdk- 17 and installs jdk- 17 .0.1 .
All versions of JDK of the same feature release are installed in /usr/lib/jvm/jdk- 17 -oracle- directory, where equals x64 or aarch64 . Additionally /usr/java/jdk- 17 symbolic link pointing to the installation directory is created for backward compatibility.
If you install an older version of a JDK when the newer version of the same feature family already exists, an error is displayed, prompting you to uninstall a newer JDK version if an older version has to be installed.
You must log in with root credentials to install or update JDK.
By default, the installation script configures the system such that the backing store for the system node of Java Preferences API (java.util.prefs Java package) is configured in /etc/.java/.systemPrefs directory.
The JDK installation is integrated with the alternatives framework. After installation, the alternatives framework is updated to reflect the binaries from the recently installed JDK. Java commands such as java , javac , javadoc , and javap can be called from the command line.
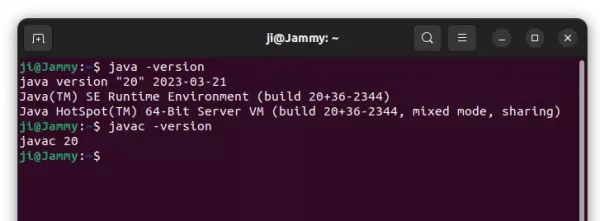
Using the java -version command, you can confirm the default (recently installed) JDK version.
System Requirements for Installing JDK on Linux Platforms
See Oracle JDK Certified Systems Configurations for information about supported platforms, operating systems, and browsers.
JDK Installation Instruction Notation for Linux Platforms
JDK installers now support only one version of any Java feature release. You can’t install multiple versions of the same feature release.
For example, you can’t install jdk- 17 and jdk- 17 .0.1 simultaneously. If you attempt to install jdk- 17 .0.1 after jdk- 17 is installed, the installer uninstalls jdk- 17 and installs jdk- 17 .0.1 .
If you install an older version of a JDK when the newer version of the same feature family already exists, an error is displayed, prompting you to uninstall a newer JDK version if an older version has to be installed.
Linux x64 systems: jdk- _linux-x64_bin.tar.gz
Linux aarch64 (64-bit ARM) systems: jdk- _linux-aarch64_bin.tar.gz
jdk-17_linux-aarch64_bin.tar.gzInstalling the JDK on Linux from Archive Files, RPM Packages and Oracle Linux Repositories
You can install the JDK on a Linux platform from archive files, downloadable Red Hat Package Manager (RPM) packages files, or RPM packages from Oracle Linux (OL) repositories.
Installation can be performed by using one of the following processes:
- From archive files ( .tar.gz ): This allows you to install a private version of the JDK for the current user into any location, without affecting other JDK installations. However, it may involve manual steps to get some of the features to work. See the following table for the options available for downloading and installing the JDK from archive files. The bundles are available for Linux x64 and Linux aarch64 (64-bit ARM) systems. Install the required bundle.
- From downloadable RPM packages ( .rpm ): This allows you to perform a system-wide JDK installation on RPM-based Linux platforms for all users, and requires root access. See the following table for the options available for downloading and installing the JDK from Linux x64 and Linux aarch64 (64-bit ARM) RPM packages.
- From Oracle Linux repositories : This allows you to perform a system-wide JDK installation on OL platforms starting from OL7 for all users, and requires root access. JDK RPM packages in Oracle Linux RPM repositories are available for x64 and aarch64 (64-bit ARM) OL platforms. Explicit download of JDK RPM packages is not required, the package manager will do it automatically for you.
JDK RPM packages for Generic Linux platforms and Oracle Linux platforms differ. The following table lists the differences:
Table 3-1 Difference between Generic Linux and OL platforms
JDK image is split into two packages: jdk- 17 -headless and jdk- 17 -headful .
- jdk- 17 -headless is a headless Java Runtime for running non-GUI applications.
- jdk- 17 -headful is headful Java Runtime and Development Tools for developing and running all types of applications.
jdk- 17 -headful package requires jdk- 17 -headless package. When these packages are installed together, they provide the same functionality as the jdk- 17 package for Generic Linux Platforms.
jdk- 17 -headless package registers java group with the alternatives framework.
jdk- 17 -headful package registers javac group with the alternatives framework.
Downloading the JDK Installer
Access Java SE Downloads page and click Accept License Agreement . Under the Download menu, click the Download link corresponding your requirement.
The following table lists the options and instructions for downloading and installing the JDK 17 release on a Linux platform:
| Download File | Instructions | Architecture (CPU Type) | Who Can Install |
|---|---|---|---|
| For Linux x64 systems: jdk- 17 .interim.update.patch_linux-x64.tar.gz | Installing the 64-Bit JDK on Linux Platforms | Intel — 64-bit | Anyone |
| For Linux aarch64 (64-bit ARM) systems: jdk- 17 .interim.update.patch_linux-aarch64.tar.gz | Installing the 64-Bit JDK on Linux Platforms | ARM — 64-bit | Anyone |
| For Linux x64 systems: jdk- 17 .interim.update.patch_linux-x64.rpm | Installing the 64-Bit JDK on RPM-Based Linux Platforms | Intel — 64-bit RPM-based Linux | Root |
| For Linux aarch64 (64-bit ARM) systems: jdk- 17 .interim.update.patch_linux-aarch64.rpm | Installing the 64-Bit JDK on RPM-Based Linux Platforms | ARM — 64-bit RPM-based Linux | Root |
Installing the 64-Bit JDK on Linux Platforms
You can install the JDK for 64-bit Linux from an archive file ( .tar.gz ). The .tar.gz archive file (also called a tarball) is a file that can be uncompressed and extracted in a single step.
- For Linux x64 systems: jdk- 17 .interim.update.patch_linux-x64_bin.tar.gz . For example jdk- 17 _linux-x64_bin.tar.gz
- For Linux aarch64 (64-bit ARM) systems: jdk- 17 .interim.update.patch_linux-aarch64_bin.tar.gz . For example, jdk- 17 _linux-aarch64_bin.tar.gz
Before you download a file, you must accept the license agreement. Anyone (not only root users) can install the archive file in any location having write access.
Installing the 64-Bit JDK on RPM-Based Linux Platforms
You can install the JDK on 64-bit RPM-based Linux platforms, such as Red Hat and SuSE by using a downloadable RPM package file ( .rpm ) in the system location.
You can install the JDK using a downloadable RPM package file on an OL system too, but the preferred way to install the JDK on OL systems is from Oracle Linux RPM repositories.
Ensure that you have the root user access. You can do this by running the command su and entering the superuser password.
- For x64 systems: jdk- 17 .interim.update.patch_linux-x64_bin.rpm . For example, jdk- 17 _linux-x64_bin.rpm
- For aarch64 (64-bit ARM) systems: jdk- 17 .interim.update.patch_linux-aarch64_bin.rpm . For example, jdk- 17 _linux-aarch64_bin.rpm
Before you download a file, you must accept the license agreement.
Upgrade the required package using the following command: $ sudo rpm -Uvh jdk- 17 _linux-x64_bin.rpm OR $ sudo rpm -Uvh jdk- 17 _linux-aarch64_bin.rpm
Note: JDK 17 can coexist with other feature releases of JDK. For each feature release, a separate directory is created, the default directory being /usr/lib/jvm/jdk-
How to Install Oracle Java (JDK 20 Updated) in Ubuntu 20.04 | Ubuntu 22.04
This simple tutorial shows how to install the latest Oracle Java (JDK 20 so far) in Ubuntu Linux via the official binary package.
There used to be unofficial Ubuntu PPA to automate the process of installing Java JDK and setup the environment, however, discontinued. So, here’s the tutorial to manually install the Java package and set as default.
Install JDK 20 in Ubuntu:
Press Ctrl+Alt+T on keyboard to open a terminal window and follow the steps below one by one.
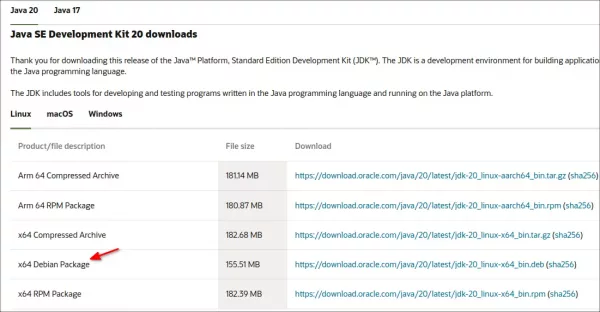
1. Download Java package
Firstly, go to oracle website and select download the .deb package:
It’s the 64-bit .deb package for modern PC and laptops, or tarball for ARM cpu architecture.
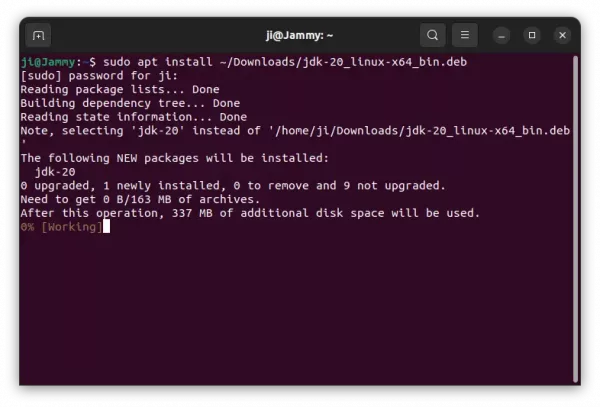
2. Install the .deb package
Once you downloaded the package, open terminal (Ctrl+Alt+T) and run the command below to install the deb package:
sudo apt install ~/Downloads/jdk-20_linux-x64_bin.deb
Here you may also double-click the .deb in file manager to install it via Ubuntu Software App.
For ARM device, run command to create ‘/usr/lib/jvm’ directory in case it does not exist:
Then, extract the tarball to that directory via:
sudo tar -zxf ~/Downloads/jdk-20_linux-aarch64_bin.tar.gz -C /usr/lib/jvm/
3. Set JDK 20 as default:
It installs the language files into ‘ /usr/lib/jvm/jdk-20/ ‘ directory. To set it as default, do the following 2 steps one by one.
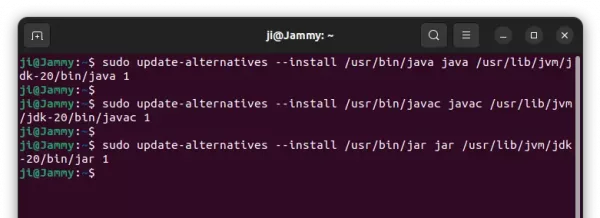
a.) Create symbolic links for the executable files:
sudo update-alternatives --install /usr/bin/java java /usr/lib/jvm/jdk-20/bin/java 1
sudo update-alternatives --install /usr/bin/javac javac /usr/lib/jvm/jdk-20/bin/javac 1
sudo update-alternatives --install /usr/bin/jar jar /usr/lib/jvm/jdk-20/bin/jar 1
Similarly, add links for other executable files (e.g., jarsigner , jlink , javadoc ) as you need.
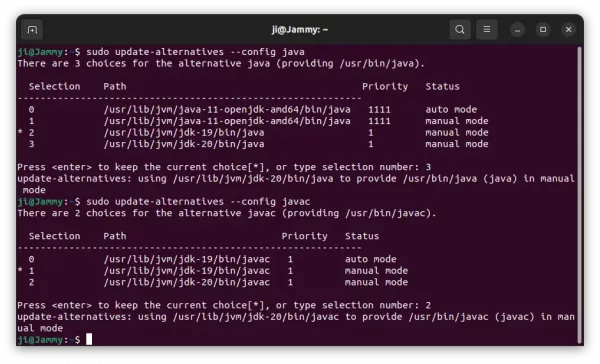
b.) Next, run the commands below one by one, and type number to select Java JDK 20 as default.
sudo update-alternatives --config java
sudo update-alternatives --config javac
sudo update-alternatives --config jar
When done, verify by running command in terminal:
4. Set JAVA_HOME:
Option 1.) Set JAVA_HOME for current command console, that will work until you close it:
export JAVA_HOME=/usr/lib/jvm/jdk-20
setenv JAVA_HOME=/usr/lib/jvm/jdk-20
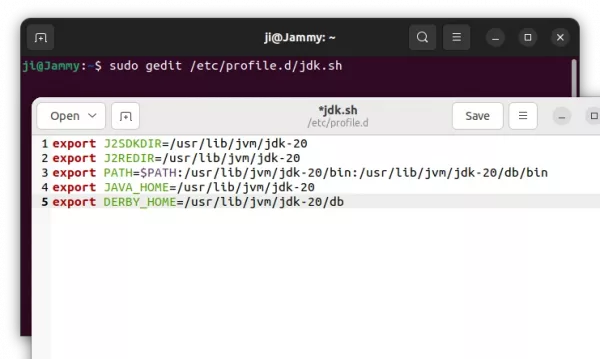
Option 2.) To make it permanent, create and edit config file via command:
sudo gedit /etc/profile.d/jdk.sh
export J2SDKDIR=/usr/lib/jvm/jdk-20
export J2REDIR=/usr/lib/jvm/jdk-20
export PATH=$PATH:/usr/lib/jvm/jdk-20/bin:/usr/lib/jvm/jdk-20/db/bin
export JAVA_HOME=/usr/lib/jvm/jdk-20
export DERBY_HOME=/usr/lib/jvm/jdk-20/db
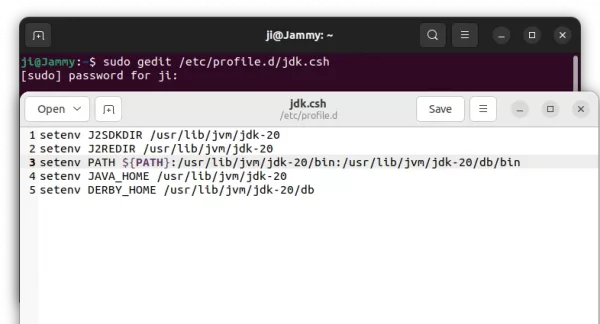
And create anther one for C shell:
sudo gedit /etc/profile.d/jdk.csh
add following lines and save it:
setenv J2SDKDIR /usr/lib/jvm/jdk-20
setenv J2REDIR /usr/lib/jvm/jdk-20
setenv PATH $:/usr/lib/jvm/jdk-19/bin:/usr/lib/jvm/jdk-20/db/bin
setenv JAVA_HOME /usr/lib/jvm/jdk-20
setenv DERBY_HOME /usr/lib/jvm/jdk-20/db
Finally, change the permissions via command, and it should take place next time you log in.
sudo chmod +x /etc/profile.d/jdk.csh /etc/profile.d/jdk.sh

Ji m
I’m a freelance blogger who started using Ubuntu in 2007 and wishes to share my experiences and some useful tips with Ubuntu beginners and lovers. Please comment to remind me outdated tutorial! And, notify me if you find any typo/grammar/language mistakes. English is not my native language. Contact me via [email protected] Buy me a coffee: https://ko-fi.com/ubuntuhandbook1