Dell
- Please be advised HP was previously blocking review of their software updates (BIOS, firmware, drivers, etc.) from non-Windows operating systems for many PC models. This was last identified for HP Pavilion Elite d5200t ATX CTO Desktop PC but has since been partially fixed. What happened previously was the Software & Drivers tab at the top was missing. If one uses any browser in Windows, the tab did show up. To work around this problem, one may change the URL from:
http://support.hp.com/us-en/product/HP-Pavilion-Elite-d5200-ATX-Desktop-PC-series/3824586/model/3824587
http://support.hp.com/us-en/drivers/selfservice/HP-Pavilion-Elite-d5200-ATX-Desktop-PC-series/3824586/model/3824587
Boot into BIOS (F10) to upgrade BIOS
- One may update the BIOS during startup via the F10 menu. Please keep in mind that the USB drive must be formatted with FAT32 (NTFS won’t work).
Lenovo
- Lenovo makes available up to three different methods with which to update the BIOS. They are presented in the order one should utilize them:
- A self-contained bootable ISO environment. There are instances where one may not update via the Windows .exe, and only update to a certain level via the ThinkVantage System Update. Hence, it is recommended to try this first.
- Windows only executable file.
- ThinkVantage System Update. In certain circumstances, the Windows only executable file may not work. However, the ThinkVantage System Update has a different update implementation, that may work when the Windows only executable file does not.
- MSI offers an update via a command from within the UEFI/BIOS to select and load a specific file from a USB drive.
- Boot into the BIOS setup (by pressing DEL-key while MSI splash screen is shown).
- Take note of the exact model (e.g. GE70 2oe).
- Take note of the currently installed BIOS version (e.g. E1757IMS.517).
- Take note of any changed configuration (as these will all be reset to defaults).
- Search MSI’s website for the exact model (if you can’t find it, try to create an account and register your device via its serial number from inside the battery compartment).
- Download and extract update file (~ 8 MB) to a USB stick following this guide.
- Reboot into BIOS and start the update by selecting the file (e.g. E1757IMS.520).
- If after the update Ubuntu isn’t starting and instead fails with a red failure dialog, check the boot options in your BIOS (e.g. try «UEFI with CSM»).
Samsung
- Unfortunately, for many models, Samsung does not provide via their website the option to see the latest BIOS version, the release notes for a given BIOS version, or allow one to download a dedicated, OS vendor independent BIOS upgrade method. Instead, they provide a Windows only software update program called Samsung PC Update or SW Update, that is used to both check if a BIOS update is available, and if so, then download and install via this program.
Toshiba
- Toshiba has made available a BIOS .exe for certain models (ex. Toshiba Satellite L305D-S5934) that when executed, generates an ISO to burn to disc, and in turn allows one to boot to the disc to update the BIOS. This .exe was successfully run in Ubuntu via WINE to generate this ISO, the ISO burned in Ubuntu, and the BIOS updated successfully.
Vendor independent updating methods
- Windows 10
- One may temporarily install Windows 10 to update the BIOS from here.
- Windows Evaluation
- One may utilize an evaluation copy of Windows from here to update when one may only use Windows.
- Windows System Repair Disc
- In Windows 7, create a System Repair disc. Put the BIOS file on a spare USB drive (formatted as FAT32), boot to to the System Repair disc, navigate to the USB via command line and execute the file.
- USB Recovery Drive
- In Windows 8.1, create a USB recovery drive. Put the BIOS file on the USB drive.
- Boot into Windows
- One may do this via swapping in dedicated drive, or dual boot.
- In a Windows Enterprise environment, use Windows To Go.
- Request or download Windows recovery media from the vendor, so one may utilize it for an update.
- FreeDOS
- Boot to FreeDOS and execute the .exe file. If one is using UEFI, one may want to use Legacy mode, versus UEFI.
- Step-by-step instructions — http://www.linuxinsight.com/how-to-flash-motherboard-bios-from-linux-no-dos-windows-no-floppy-drive.html
- flashrom
- http://www.flashrom.org/Supported_hardware
- WINE
- While Using WINE worked once for one person, for one piece of hardware, at one point in time of Ubuntu and WINE development, it would be considered a last resort. It would be conservative to believe that using WINE to update the BIOS holds a potentially higher risk in comparison to using Windows to damage your motherboard beyond troubleshooting, necessitating a warranty event or purchase of a new motherboard.
- Question: What tools in linux are available to indicate my BIOS would want to be upgraded?
Answer: One may utilize fwts, as well as review your dmesg logs for errors. - Question: Is updating the BIOS of a host possible with a virtualized guest environment?
Answer: No. - Question: Are BIOS updates risky?
Answer: No. OEMs typically advise when performing a BIOS update, do not interrupt the power supply. - Question: My logs advised to update my BIOS should I?
[ 1.770772] [drm] Wrong MCH_SSKPD value: 0x16040307 [ 1.770774] [drm] This can cause pipe underruns and display issues. [ 1.770775] [drm] Please upgrade your BIOS to fix this.
See Also
External Links
Обновление UEFI/BIOS в Linux
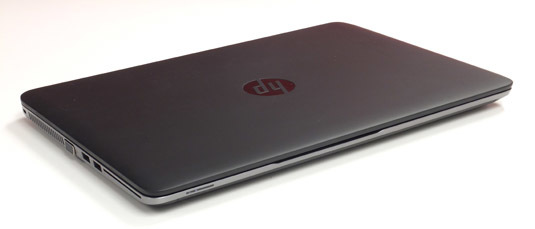
Не секрет, что производители материнских плат и ноутбуков не всегда дают возможность пользователям Linux обновить UEFI/BIOS прошивку так же ненавязчиво, как это делают пользователи Windows. Тем не менее для HP EliteBook 840G1, которым я пользуюсь, сделать это немногим сложнее.

Для этого дела понадобятся следующие артефакты:
FAT32 ESP
Ноутбуки линейки HP EliteBook содержат 3 режима загрузки. Узнать какой из режимов выбран можно в настройках UEFI/BIOS → System Configuration → Boot Mode . Данный раздел следует читать, если только выбран последний, бескомпромиссный режим UEFI , в остальных случаях можно проскочить.
- Legacy
- UEFI Hybrid with compatibility support module (CSM)
- UEFI Native without CSM
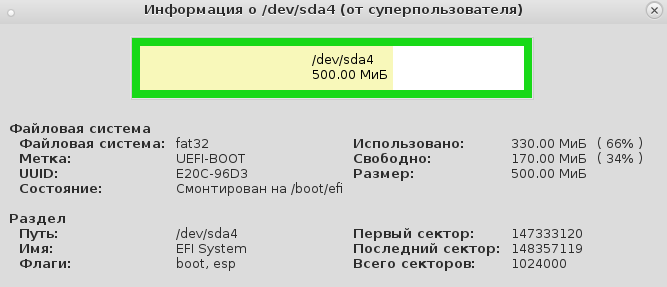
Если вы внимательно читали топик про Linux kernel EFI Boot Stub, то вы наверняка знаете, что и как нужно сделать, для того, чтобы создать дисковый раздел. Можно использовать gdisk , parted или KDE Disk Partition для создания ESP раздела. Вот так выглядит уже готовый раздел.

Рекомендуется ESP раздел монтировать в /boot/efi , а не просто в /boot , для того чтобы можно было хранить образы ядра Linux и файлы загрузчика ОС на штатных линуксовых ФС, вместо того, чтобы все держать в FAT32 EFI System Partition.
(4:549)$ grep efi /etc/fstab /dev/sda4 /boot/efi vfat rw,users,noauto 0 2Мы уже знаем, что UEFI/BIOS будет искать \EFI\BOOT\bootx64.efi , для чего абсолютный путь к файлу должен быть /boot/efi/EFI/Boot/Bootx64.efi , иначе все пропало и UEFI/BIOS не найдет загрузчик ОС! Обновлению системной прошивки это не помешает, но для чего же тогда нужна прошивка, если нельзя загрузить операционную систему? Очень немаловажно, что по-умолчанию GRUB-2 не копирует необходимый файл и поэтому bootx64.efi надо скопировать вручную.
(4:569) sudo cp /boot/grub/x86_64-efi/core.efi /boot/efi/EFI/Boot/Bootx64.efiПодготовка
Берем свежую прошивку с сайта HP, выбираем Linux в выпадающем списке ОС, затем BIOS, скачиваем… и обнаруживаем исполняемый файл для Windows — sp64081.exe . Нет, глаза нас не подвели.
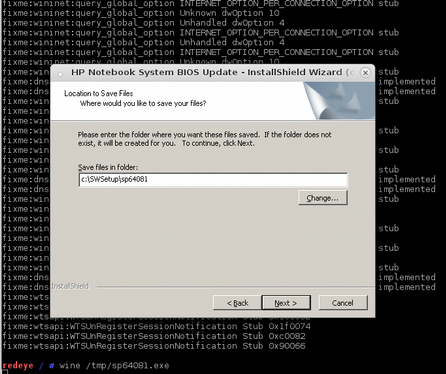
(4:520)$ file sp64081.exe sp64081.exe: PE32 executable (GUI) Intel 80386, for MS WindowsОпытные пользователи бывают готовы к подобным сюрпризам, для чего держат Windows VM либо пользуются не-эмулятором WINE или и то и другое вместе, бо случаи бывают разные. Для распаковки файла возможностей WINE вполне достаточно. Запускаем:

Программа завершает работу с бестактной ошибкой, напоминая лишний раз о том, что нам подсунули не то, что мы ожидали.

Однако, это не должно никого волновать, так как файлы распакованы верно а сверх этого ничего и не требовалось.
(4:529)$ ls -Rl sp64081/ sp64081/: итого 18188 drwxr-xr-x 1 root root 356 июл 30 10:52 BIOSUpdate -rw-r--r-- 1 root root 2950466 мар 4 2013 BIOSUpdateEFI.7z -rwxr-xr-x 1 root root 4838072 авг 7 2013 HPBIOSUPDREC.exe -rw-r--r-- 1 root root 883 июл 30 10:52 HPBIOSUPDREC.log -rwxr-xr-x 1 root root 2353368 сен 18 2013 HpqPswd.exe -rwxr-xr-x 1 root root 77824 фев 22 2012 Installer.exe -rw-r--r-- 1 root root 8388608 окт 9 2013 L71_0104.bin -rw-r--r-- 1 root root 1543 окт 24 2013 WSSP64081.rtf sp64081/BIOSUpdate: итого 2368 -rw-r--r-- 1 root root 259072 ноя 5 2012 CryptRSA32.efi -rw-r--r-- 1 root root 443904 ноя 5 2012 CryptRSA.efi -rw-r--r-- 1 root root 820784 июл 8 2013 HpBiosUpdate32.efi -rw-r--r-- 1 root root 256 июл 8 2013 HpBiosUpdate32.s09 -rw-r--r-- 1 root root 256 июл 8 2013 HpBiosUpdate32.s12 -rw-r--r-- 1 root root 256 июл 8 2013 HpBiosUpdate32.sig -rw-r--r-- 1 root root 16384 июл 9 2013 HpBiosUpdate.dll -rw-r--r-- 1 root root 850512 июл 8 2013 HpBiosUpdate.efi -rw-r--r-- 1 root root 256 июл 8 2013 HpBiosUpdate.s09 -rw-r--r-- 1 root root 256 июл 8 2013 HpBiosUpdate.s12 -rw-r--r-- 1 root root 256 июл 8 2013 HpBiosUpdate.sigИз этого списка нам понадобятся только 3 файла: L71_0137.bin , HpBiosUpdate.efi и HpBiosUpdate.s12 и теперь внимание: скопировать файлы нужно точно в указанные места.
(4:534)$ ls -lR /boot/efi/EFI/HP/ /boot/efi/EFI/HP/: итого 8 drwxr-xr-x 3 root root 4096 сен 22 2015 BIOS drwxr-xr-x 2 root root 4096 июл 21 22:23 BIOSUpdate /boot/efi/EFI/HP/BIOS: итого 4 drwxr-xr-x 2 root root 4096 июл 21 22:05 New /boot/efi/EFI/HP/BIOS/New: итого 8192 -rwxr-xr-x 1 root root 8388608 май 23 13:57 L71_0137.bin /boot/efi/EFI/HP/BIOSUpdate: итого 840 -rwxr-xr-x 1 root root 850512 июл 8 2013 HpBiosUpdate.efi -rwxr-xr-x 1 root root 3916 июл 21 22:23 HpBiosUpdate.log -rwxr-xr-x 1 root root 256 июл 8 2013 HpBiosUpdate.s12 1291/7720MBЧтобы попасть в меню настройки UEFI/BIOS надо после включения нажать клавишу Esc или F10 а далее File → Update System BIOS .
После выбора Accept , процесс обновления стартует без прочих реверансов. Видимо зная цену своим аккумуляторам, производители обновляют прошивку только при включенном электрическом питании компьютера. 2-3 минуты, и процесс благополучно завершен.
UPDATE: По итогам здравых идей в комментариях необходимы некоторые дополнения.
- Можно скопировать те же самые 3 файла на USB флешку, в прописанных путях и используя её обновить прошивку. Разметка файловой системы должна быть FAT32 ESP.
- Можно обновиться из File → Update System BIOS напрямую по интернету, если подключен сетевой кабель. Обновление не будет работать через WiFi соединение.
- Вместо WINE для распаковки архива достаточно использовать 7z e sp64081.exe .