- Check Linux Block Device with Examples
- How to use block device on Linux
- How to list block devices on Linux
- How to check if there is a filesystem on the block device
- How to create a filesystem on the block device
- How to get the block device info on Linux
- How to mount a block device in Linux
- How to Create Device Files in Linux Using mknod Command
- mknod Command Syntax
- 1. Create Unnamed Pipe in Linux
- 2. Create a Named Pipe in Linux
- 3. Create a Character Device File in Linux
- 4. Create a Block Device File in Linux
- 5. Create a Device File With Permissions
Check Linux Block Device with Examples
A block device is a storage device that moves data in sequences of bytes or bits (blocks). These devices support random access and generally use buffered I/O.
Examples include hard disks, CD-ROM drives, and flash drives. A block device can be physically attached to a computer or accessed remotely as if it were physically attached to the computer.
How to use block device on Linux
Device names like /dev/sdh and xvdh are used by Linux systems to describe block devices. The block device mapping is used by the Linux system to specify the block devices to attach to a Linux OS.
After a block device is attached to a host, it must be mounted by the operating system before we can access the storage device. When a block device is detached from a host, it is unmounted by the operating system and we can no longer access the storage device.
How to list block devices on Linux
Use the lsblk command to view our available disk devices and their mount points (if applicable) to help us determine the correct device name to use. The output of lsblk removes the /dev/ prefix from full device paths.
In the following example, the root device is /dev/nvme0n1, which has two partitions named nvme0n1p1 and nvme0n1p128. The attached volume is /dev/nvme1n1, which has no partitions and is not yet mounted.
$ lsblk
NAME MAJ:MIN RM SIZE RO TYPE MOUNTPOINT
nvme1n1 259:0 0 10G 0 disk
nvme0n1 259:1 0 8G 0 disk
nvme0n1p1 259:2 0 8G 0 part /
nvme0n1p128 259:3 0 1M 0 part
How to check if there is a filesystem on the block device
Use the file -s command to get information about a specific device, such as its file system type. If the output shows simply data, as in the following example output, there is no file system on the device
[ ~]$ sudo file -s /dev/xvdf
/dev/xvdf: data
If the device has a file system, the command shows information about the file system type. For example, the following output shows a root device with the XFS file system.
[ ~]$ sudo file -s /dev/xvda1
/dev/xvda1: SGI XFS filesystem data (blksz 4096, inosz 512, v2 dirs)
How to create a filesystem on the block device
If we have an empty volume, use the mkfs -t command to create a file system on the volume.
Warning: Do not use this command if we’re mounting a volume that already has data on it. Otherwise, we’ll format the volume and delete the existing data.
How to get the block device info on Linux
Use the lsblk -f command to get information about all of the devices attached to the instance.
For example, the following output shows that there are three devices attached to the instances—nvme1n1, nvme0n1, and nvme2n1. The first column lists the devices and their partitions.
The FSTYPE column shows the file system type for each device. If the column is empty for a specific device, it means that the device does not have a file system. In this case, device nvme1n1 and partition nvme0n1p1 on device nvme0n1 are both formatted using the XFS file system, while device nvme2n1 and partition nvme0n1p128 on device nvme0n1 do not have file systems.
NAME FSTYPE LABEL UUID MOUNTPOINT
nvme1n1 xfs 7f939f28-6dcc-4315-8c42-6806080b94dd
nvme0n1
├─nvme0n1p1 xfs / 90e29211-2de8-4967-b0fb-16f51a6e464c /
└─nvme0n1p128
nvme2n1
How to mount a block device in Linux
We can use the device name, such as /dev/xvdf, in /etc/fstab, but we recommend using the device’s 128-bit universally unique identifier (UUID) instead.
Device names can change, but the UUID persists throughout the life of the partition. By using the UUID, we reduce the chances that the system becomes unbootable after a hardware reconfiguration.
The fields are the UUID value returned by blkid (or lsblk for Ubuntu 18.04), the mount point, the file system, and the recommended file system mount options.
In the following example, we mount the device with UUID aebf131c-6957-451e-8d34-ec978d9581ae to mount point /data and we use the xfs file system. We also use the defaults and nofail flags. We specify 0 to prevent the file system from being dumped, and we specify 2 to indicate that it is a non-root device.
we need to add the following line to /etc/fstab then run mount /data.
UUID=aebf131c-6957-451e-8d34-ec978d9581ae /data xfs defaults,nofail 0 2
David is a Cloud & DevOps Enthusiast. He has years of experience as a Linux engineer. He had working experience in AMD, EMC. He likes Linux, Python, bash, and more. He is a technical blogger and a Software Engineer. He enjoys sharing his learning and contributing to open-source.
howtouselinux.com is dedicated to providing comprehensive information on using Linux.
We hope you find our site helpful and informative.
How to Create Device Files in Linux Using mknod Command
In Linux, everything is a file, even physical devices such as disk drives, CD/DVD ROM, and floppy disks are represented using files. However, these files are not regular data files. Instead, these special files are called device files and they can generate or receive the data.
Usually, all the special files are present under the /dev directory. Some of the common examples of special files are /dev/null, /dev/zero, /dev/full, and /dev/sr0.
The special files can be of the type character or block. As the name suggests, the character files process one character at a time where as the block files process multiple characters at a time.
In this advanced guide, we will discuss how to create a device file using the mknod command. After following this guide, Linux users will be able to work with different kinds of device files confidently.
mknod Command Syntax
The syntax of the mknod command is slightly different than the other Linux commands. The main difference is that we need to specify the major and minor numbers while creating a character and block device files:
$ mknod [OPTIONS] [MAJOR] [MINOR] .
In the above syntax, the square brackets ([]) represent the optional arguments whereas angular brackets (<>) represent the mandatory arguments.
In Linux, the major number is used to specify the device driver that needs to be used. This number is assigned while registering a device driver.
In a similar way, the minor number is used to specify the actual device. We can find the reserved major and minor numbers in the Linux kernel’s documentation.
1. Create Unnamed Pipe in Linux
In Linux, we use pipes to enable inter-process communication. In Shell, the pipe is represented using the vertical line (|) . It reads the output of the previous process and sends it as the input to the next process.
Let’s understand this with a simple example:
In this example, we are using the pipe to read the output of the echo command and send it as the input to the wc command for further processing.
Here, we have used the vertical line (|) to create a pipe. However, this creates an unnamed pipe and its scope is limited to the current command only. In the next example, we will see how to create a named pipe.
2. Create a Named Pipe in Linux
We can use the mknod command to create a named pipe. The named pipe resides on the file system just like any other regular file. However, its main purpose is to allow inter-process communication between unrelated processes.
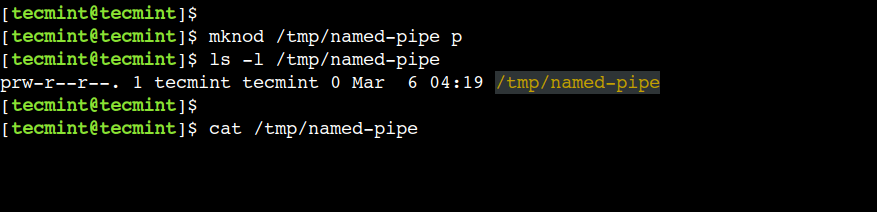
First, let’s specify the device type as p to create a named pipe:
$ mknod /tmp/named-pipe p $ ls -l /tmp/named-pipe
Now, let’s try to read the file:
Here, we can see that the cat command is waiting infinitely:
Next, let’s open another terminal and write some data to the /tmp/named-pipe file:
$ echo "tecmint.com" > /tmp/named-pipe
Finally, head over to the first terminal to view the result:
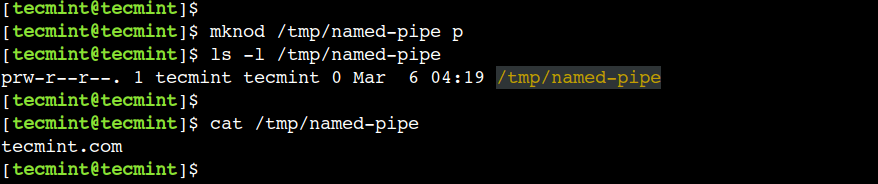
Here, we can see that the echo and cat commands are able to communicate using the named pipe.
3. Create a Character Device File in Linux
In a similar way, we can use the device type as c to create a character device. However, we must have to use the major and minor numbers while creating a character device.
Let’s use the ls command to find the major and minor numbers of the /dev/full device:

In the above output, the comma-separated pair of numbers i.e. 1, 7 represent the major and minor numbers respectively.
In Linux, the /dev/full device always returns the No space left on the device error. To understand this, let’s write some data to this device:

Now, let’s use the mknod command to create a new device that behaves the same as /dev/full device:
$ sudo mknod /tmp/full-device c 1 7
Next, let’s change the file permissions:
$ sudo chmod 666 /tmp/full-device $ ls -l /tmp/full-device
Finally, write some data to the newly created device:
$ echo "tecmint" > /tmp/full-device
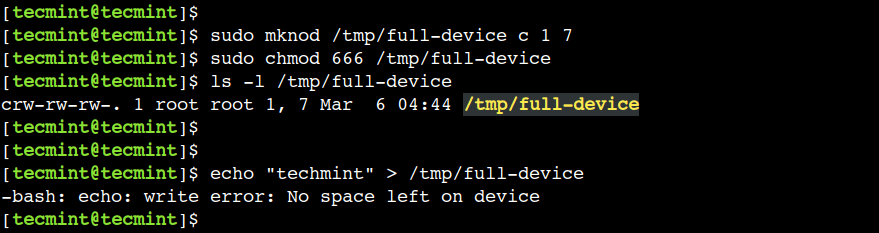
It is important to note that, the newly created character device behaves like the /dev/full device because of the same major and minor numbers.
4. Create a Block Device File in Linux
In addition to this, we can specify the device type as b to create a block device. To create a block device we must have to use the major and minor numbers.
In Linux, /dev/sr0 represents the CD/DVD ROM device. Now, let’s create a new block device that behaves the same as /dev/sr0.
First, let’s find out the major and minor numbers of the /dev/sr0:

In the above output, we can see that its major and minor numbers are 11 and 0 respectively.
Now, let’s create a new block device with the same major and minor numbers:
$ sudo mknod /tmp/dvd-rom b 11 0 $ ls -l /tmp/dvd-rom

Next, let’s mount the ISO image from the CD/DVD ROM to the /mnt directory and verify that the mount operation succeeds:
$ sudo mount /tmp/dvd-rom /mnt/ $ ls -1 /mnt/
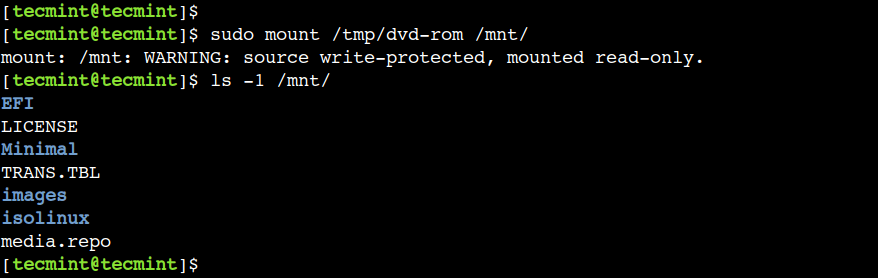
In this example, we can see that the /tmp/dvd-rom block device is able to access the ISO image from the CD/DVD ROM.
5. Create a Device File With Permissions
Sometimes, we need to modify the access permission of the device file before using it. In such cases, we have to use the chmod command. However, we can achieve the same result using the mknod command instead of using two separate commands.
To understand this, let’s use the -m option to set access permissions while creating a named pipe:
$ sudo mknod -m 444 /tmp/pipe-with-permissions p
Now, let’s verify that the permissions have been set properly:
$ ls -l /tmp/pipe-with-permissions

In this example, we used the -m option with the named pipe. However, we can use it with the character and block devices as well.
Do you know of any other best example of the mknod command in Linux? Let us know your views in the comments below.