- How to Configure The Grub Boot Menu in Linux
- Configure Grub manually via Editing config file
- 1. GRUB_DEFAULT
- 2. GRUB_TIMEOUT
- 3. GRUB_DISTRIBUTOR
- 4. GRUB_CMDLINE_LINUX
- 5. GRUB_TERMINAL
- 6. GRUB_DISABLE_SUBMENU
- 7. GRUB_THEME
- Apply Changes
- Configure boot menu via graphical Grub-Customizer
- How to Set Default Entry for the Grub Menu
- 1. Overview
- 2. GRUB’s Configuration
- 3. Adding New Menu Entry
- 4. Ubuntu Text Terminal
- 5. Setting Default Entry Statically
- 6. Setting the Default Entry From Menu
- 7. Command Line Control
- 8. GRUB’s Environment File
- 9. Conclusion
How to Configure The Grub Boot Menu in Linux
GNU Grub, stands for GNU GRand Unified Bootloader, is the default boot-loader from the most Linux operating systems. It’s the most common way to handle the boot menu when dual or multi-boot other OSes with Linux.
Including Ubuntu, Debian, Fedora, Arch, openSUSE, CentOS, Linux Mint, and others, you can configure Grub to do the jobs below:
- Change the default system to boot.
- Set boot menu timeout before automatically booting the default.
- Add Linux Kernel parameters.
- Hide the recovery menu entry.
- Set boot screen resolution.
- Change boot screen text font, background, and themes.
- And more.
And things can be done either via a graphical tool Grub-Customizer or by manually editing the configuration file.
Configure Grub manually via Editing config file
The main configuration file normally locates at /boot/grub/grub.cfg . It however varies on different Linux Distros, such as Fedora generates the file at /boot/efi/EFI/fedora/grub.cfg for UEFI and /boot/grub2/grub.cfg for BIOS-boot.
It is an automatic generated file that is being loaded by Grub on each boot. We don’t recommend to edit the file directly because it changes automatically after applying system updates.
Users can edit the /etc/default/grub as well as files under /etc/grub.d/ to control how to generate the main configuration file.
Firstly, open terminal and run command to edit /etc/default/grub .
Here I use the universal nano command line text editor. To save changes, press Ctrl+X, type y, and hit Enter. For choice, replace nano with your favorite text editor, such as gedit for Ubuntu/Fedora, xed for Linux Mint.

As you see in the picture above, lines started with # at the beginning are comments. They do nothing but descriptions. You can comment / un-comment a line by adding / removing # at the beginning.
1. GRUB_DEFAULT
The GRUB_DEFAULT line sets which OS to boot by default. The value can be either a number or full-name of a boot menu entry.
The number value counts from 0. It can be 0, 1, 2, 3, 4, …
- To boot the first entry, set GRUB_DEFAULT = 0.
- For the second entry, use GRUB_DEFAULT = 1.
- And GRUB_DEFAULT = 2 will set the third entry as default.
You can also set the full-text of a menu entry as the value. For example:

Also it can set to GRUB_DEFAULT = saved. With it, you NEED one more rule to set default OS:
- Boot the last booted entry with one more line: GRUB_SAVEDEFAULT = true
- Set default entry anytime via grub-set-default command, without editing config file:
- sudo grub-set-default 1 set the second entry as default.
- sudo grub-set-default 3 set the fourth entry as default.
2. GRUB_TIMEOUT
The GRUB_TIMEOUT value controls how long the boot menu will display in seconds, before it boots the default automatically. Press any key during the time will interrupt the timeout.
The timeout may not work if you set to 0 in recent Ubuntu releases, e.g., Ubuntu 20.04 & higher. It's overwritten by /etc/grub.d/30_os-prober file. As a workaround, add
GRUB_DISABLE_OS_PROBER=trueto disable 30_os-prober.You can control how the timeout count down via GRUB_TIMEOUT_STYLE. Though the value is also overwritten to always ‘menu’ in Ubuntu if more than one menu entries available.
- GRUB_TIMEOUT_STYLE = ‘menu’ will display boot menu and wait for timeout.
- Set GRUB_TIMEOUT_STYLE = ‘countdown’ will NOT display the menu, but countdown before timeout.
- And GRUB_TIMEOUT_STYLE = ‘hidden’ will also hide the boot menu, but wait until timeout silently.
There’s also GRUB_RECORDFAIL_TIMEOUT. If the last boot failed, it will stuck at boot menu until you choose an entry and hit Enter. In the case, use GRUB_RECORDFAIL_TIMEOUT to set a timeout to boot the default.
3. GRUB_DISTRIBUTOR
The value of the key is usually your Linux Distribution name, exported via a simple command. It is useful for a certain script in /etc/grub.d/ directory to take effect. Leave it unchanged unless you know what you’re doing.
4. GRUB_CMDLINE_LINUX
The GRUB_CMDLINE_LINUX value adds kernel parameters to the menu entry.
The GRUB_CMDLINE_LINUX_DEFAULT will also add kernel parameters. But they are added after those listed in ‘GRUB_CMDLINE_LINUX‘. As well, it generates ‘recovery mode‘ for each kernel entry (without parameter).
To disable the recovery mode, use GRUB_DISABLE_RECOVERY = true.
5. GRUB_TERMINAL
The GRUB_TERMINAL value specifies the input and output device. You can use ‘GRUB_TERMINAL_INPUT’ and/or ‘GRUB_TERMINAL_OUTPUT’ respectively, or use ‘GRUB_TERMINAL’ to overwrite both to the same.
- “console” – native platform console.
- “serial” – serial terminal
- “serial_ “ – serial terminal with explicit port selection.
- “at_keyboard” – PC AT keyboard input device.
- “usb_keyboard” – USB keyboard using the HID Boot Protocol.
- “gfxterm” – graphics-mode output.
- “vga_text” – VGA text output.
- “mda_text” – MDA text output.
- “morse” – Morse-coding using system beeper
- “spkmodem” – simple data protocol using system speaker.
6. GRUB_DISABLE_SUBMENU
The key will toggle on / off the sub-menu (e.g. “Advanced options for …”). By setting GRUB_DISABLE_SUBMENU = true, it brings out the sub-menu items into top-level menu.
7. GRUB_THEME
Grub boot-loader supports themes! You can find a theme either in gnome-look.org or Github.
By installing theme folders into “/boot/grub/themes” directory, you can add GRUB_THEME=”/boot/grub/themes/THEME_NAME/theme.txt” to apply one.
And you can specify the boot screen resolution via “GRUB_GFXMODE”. For example:
It will try to use 32-bit color 1280×1024 resolution. If failed, fallback to 1024×768. The default will in use via ‘auto‘ if all the previous not available.
Apply Changes
After editing the config file, or running grub-set-default command, you need to update the main config file to apply change.
Normally, run this command will do the job:

The command vary on some Linux, such as Fedora you need to run for UEFI boot:
grub2-mkconfig -o /boot/efi/EFI/fedora/grub.cfg
For legacy bios boot in Fedora, run:
grub2-mkconfig -o /boot/grub2/grub.cfg
Configure boot menu via graphical Grub-Customizer
Grub-Customizer is a free open-source tool to edit the Grub boot menu. It can do the most previous settings as easy as a few clicks. Including add, remove, edit, and rearrange the menu entries.
The software is available in the most Linux repositories. Except for Manjaro (due to package conflict), you can either install it in your system’s package manager, app store, or by running a command below:
- For Debian, Ubuntu, Linux Mint based system, run command to install the tool:
sudo apt install grub-customizer
sudo dnf install grub-customizer
sudo pacman -S grub-customizer
Once installed, open it from system app launcher and enjoy!
How to Set Default Entry for the Grub Menu
The Kubernetes ecosystem is huge and quite complex, so it’s easy to forget about costs when trying out all of the exciting tools.
To avoid overspending on your Kubernetes cluster, definitely have a look at the free K8s cost monitoring tool from the automation platform CAST AI. You can view your costs in real time, allocate them, calculate burn rates for projects, spot anomalies or spikes, and get insightful reports you can share with your team.
Connect your cluster and start monitoring your K8s costs right away:
1. Overview
GRUB is a widespread boot and system loading manager. With its help, we can use different operating systems on the same computer. Also, we may start the same system in various ways, e.g., Linux in graphical, text, or recovery mode.
In this tutorial, we’ll learn how to configure the GRUB menu and set the default entry.
2. GRUB’s Configuration
Let’s take a look at how GRUB is configured. First, we have the GRUB settings in the /etc/default/grub file. Then come scripts to define menus, located in the /etc/grub.d folder. Finally, with sudo update-grub we create an effective configuration in the /boot/grub/grub.cfg file.
Throughout this article, we’ll be working on Ubuntu 20.04. Now, let’s check the GRUB version:
$ grub-install --version grub-install (GRUB) 2.04-1ubuntu26.153. Adding New Menu Entry
Now, let’s list the menu configuration scripts:
$ ls -1 /etc/grub.d 00_header 05_debian_theme 10_linux 10_linux_zfs 20_linux_xen 20_memtest86+ 30_os-prober 30_uefi-firmware 35_fwupd 40_custom 41_custom READMEAs per convention, the scripts’ names start with numbers because they’re applied in alphabetical order. Consequently, the order of menu positions depends on in which file the menu entry is stored.
Furthermore, for a customized position, we should use 40_custom file, as the name suggests. This file initially doesn’t contain any configuration.
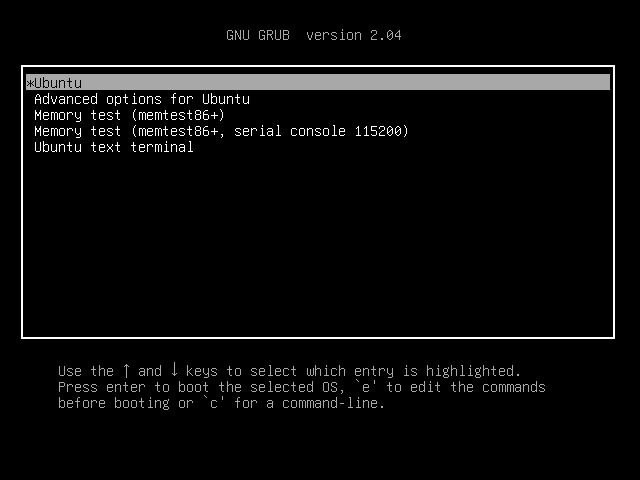
4. Ubuntu Text Terminal
So, let’s create a minimalistic setup for an Ubuntu text terminal:
$ cat /etc/grub.d/40_custom #!/bin/sh exec tail -n +3 $0 # This file provides an easy way to add custom menu entries. Simply type the # menu entries you want to add after this comment. Be careful not to change # the 'exec tail' line above. menuentry 'Ubuntu text terminal' --class ubuntu --class gnu-linux --class gnu --class os $menuentry_id_option 'gnulinux_text_terminal' < recordfail savedefault insmod gzio if [ x$grub_platform = xxen ]; then insmod xzio; insmod lzopio; fi insmod part_msdos insmod ext2 set root='hd0,msdos1' linux /boot/vmlinuz-5.15.0-46-generic root=UUID=62bbd82f-ed3e-4860-bf8a-d8e11ac0b288 ro $vt_handoff 2 initrd /boot/initrd.img-5.15.0-46-generic >Let’s notice that we set the menu’s ID to gnulinux_text_terminal with $menuentry_id_option. Next, we set the savedefault feature, which allows saving the menu as a default choice.
Furthermore, we switch to the text mode by adding 2 at the end of the linux line. Finally, the UUID of the boot partition is only an example, we should find the real one with, e.g., blkid.
Then let’s reboot, and check the results:
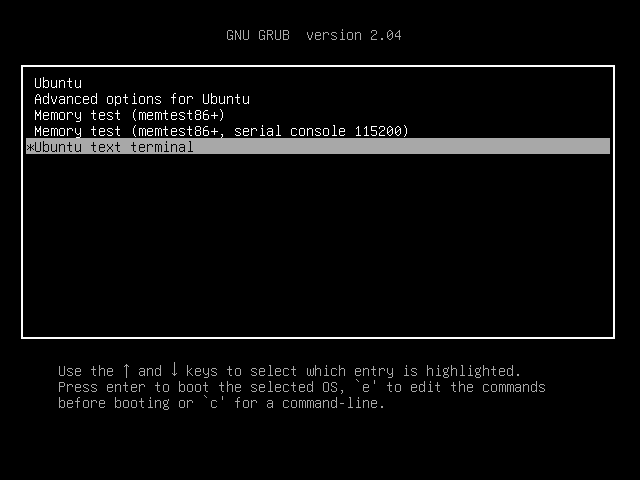
5. Setting Default Entry Statically
Now, let’s make the text terminal the default choice by editing the /etc/default/grub file. Then, we’re going to change GRUB_DEFAULT:
$ cat /etc/default/grub # . # info -f grub -n 'Simple configuration' GRUB_DEFAULT="gnulinux_text_terminal" # .Let’s notice that we’ve used the menu’s ID, but the zero-based index of the entry is allowed as well. Now, let’s reboot to find:
6. Setting the Default Entry From Menu
Now, let’s configure GRUB to remember our decision and to set the picked-up entry as default. To do so, we need to set GRUB_DEFAULT to saved and also add GRUB_SAVEDEFAULT=true:
$ cat /etc/default/grub # . GRUB_DEFAULT=saved GRUB_SAVEDEFAULT=true # .Afterward, we need to update GRUB.
7. Command Line Control
We can interact with the GRUB menu from the command line. First, we can set the default boot entry with the grub-set-default command:
The command takes the zero-based index of the menu position. So, in this case, we’re going to find the topmost Ubuntu entry highlighted. Let’s emphasize that we need to set GRUB_DEFAULT=saved for the command to work.
In a similar manner, we can choose the entry solely for the next boot with the grub-reboot command:
So we’re going to end up in the text terminal. For both grub-set-default and grub-reboot, we don’t need to update GRUB for the effect to take place. Finally, the commands come with the grub2-common package.
8. GRUB’s Environment File
Now let’s examine the /boot/grub/grubenv file, which stores GRUB’s information between boots:
$ cat /boot/grub/grubenv # GRUB Environment Block saved_entry=gnulinux-simple-62bbd82f-ed3e-4860-bf8a-d8e11ac0b288 next_entry=4 # .Hence, we’ve found the ID of the saved entry. In detail, now it corresponds to the first Ubuntu position. Then, next_entry holds the index of the entry, which will be automatically chosen during the next boot. As it has value 4, it’ll be our text terminal.
Consequently, for a quick check, we can grep:
$ grep saved_entry /boot/grub/grubenv saved_entry=gnulinux-simple-62bbd82f-ed3e-4860-bf8a-d8e11ac0b288 $ grep next_entry /boot/grub/grubenv next_entry=49. Conclusion
In this article, we learned how to customize the GRUB menu. First, we added a new position to the menu with an Ubuntu running text mode. Then, we examined ways to set the default menu entry. First, we did it statically in the GRUB settings. Then, we configured GRUB to remember our choice.
Finally, we learned how to choose the default and next boot entries from the bash command line.