- Effortlessly Use Ubuntu Boot Repair to Fix Startup Issues
- Prerequisites
- Installing the Ubuntu Boot Repair Tool
- Fixing Startup Issues with Boot Repair
- Using Advanced Options and Creating a BootInfo Report
- Conclusion
- Boot repair
- Boot-Repair
- Getting Boot-Repair
- 1st option : get a disk including Boot-Repair
- 2nd option : install Boot-Repair in Ubuntu
- Using Boot-Repair
- Advanced options
- External Links
Effortlessly Use Ubuntu Boot Repair to Fix Startup Issues
Ransomware recovery test drive: This technical workshop is designed to take you behind the scenes and shows you how to adopt strategies to automate recovery, ensuring you’re ready to become a recovery hero. REQUEST YOUR LAB
Facing startup issues with your machine is enough to ruin your day. Whether due to hardware/software issues or simply a human error, startup issues can be frustrating and time-consuming to fix. Luckily, the Ubuntu Boot Repair tool is just right around the corner.
In this tutorial, you will learn to install and fix startup issues on your Ubuntu system in a few clicks so you can get back to business.
Read on to save yourself the headaches of fixing startup issues!
Prerequisites
This tutorial comprises hands-on demonstrations. You will need a bootable USB drive with Ubuntu installed to follow along. This tutorial uses Ubuntu 20.04 LTS (Focal Fossa).
Installing the Ubuntu Boot Repair Tool
The Ubuntu Boot Repair tool lets you repair frequent startup issues in Ubuntu with one click — talk about convenience. But like other packages, the Ubuntu Boot Repair tool is not preinstalled in your system.
Before installing Ubuntu Boot Repair, you must first add the tool’s Personal Package Archive (PPA) repositories. A PPA is a repository that provides access to software packages that are not part of the official Ubuntu repositories.
PPAs are maintained by individuals or groups and are not affiliated with the official Ubuntu repositories.
To install the Ubuntu Boot Repair tool on your system, follow these steps:
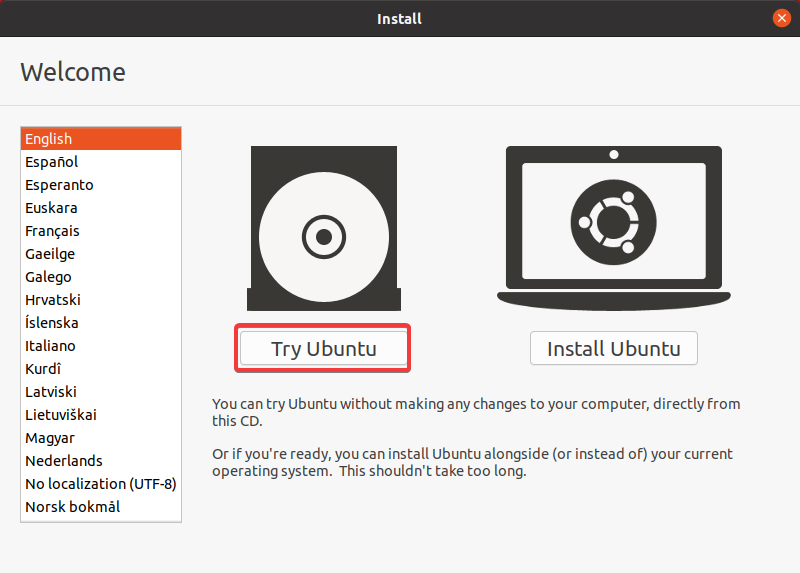
1. First, plug in your bootable USB drive and boot into the OS.
2. Next, select Try Ubuntu to boot into the live environment without actually installing the OS. Doing so allows you to use Ubuntu without making changes to your computer’s hard drive.
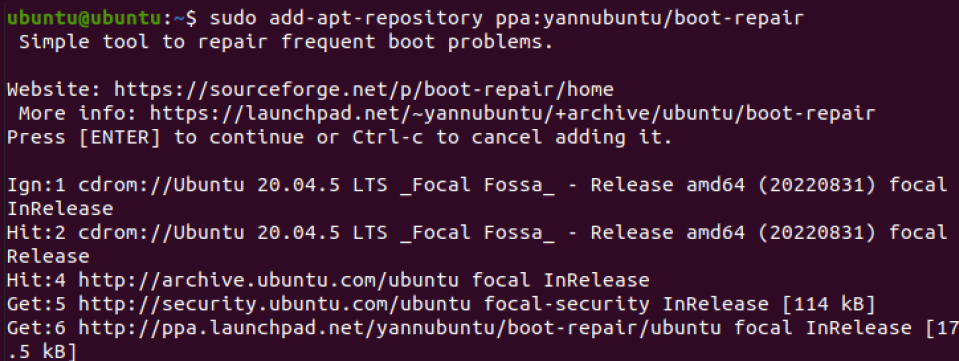
3. Once in the live environment, open a terminal and run the add-apt-repository command to add the PPA repositories for Ubuntu Boot Repair.
While most PPAs are safe to use, some may contain malicious software or packages that could compromise the security of your system. Before adding a PPA to your system, you should carefully review the PPA’s website and make sure that it is from a reputable source.
sudo add-apt-repository ppa:yannubuntu/boot-repairPress Enter when prompted to confirm the addition of the PPA.
4. Now, run the below apt update command to update your package list.
This command retrieves a list of the latest versions of packages and their dependencies from the configured repositories. One of these packages is the official Ubuntu repository or the PPA repositories you added.
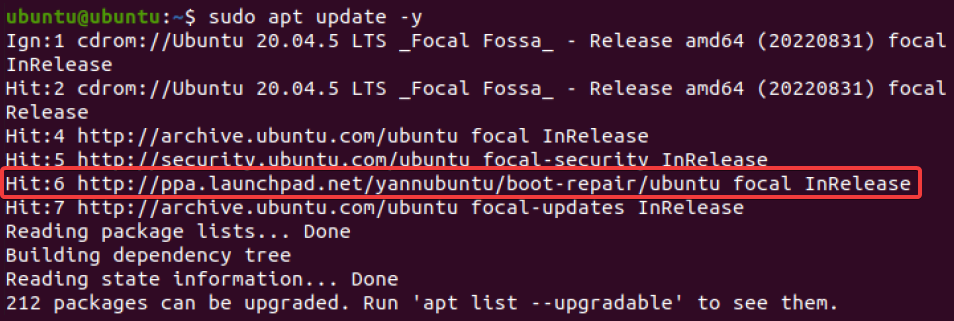
5. After the update, run the following cat command to verify that the contents of the PPA repository list file were added.
cat /etc/apt/sources.list.d/*yannubuntu*.listIf the repositories were added successfully, you should see the PPA’s URL listed in the file, as shown below.

- Ubuntu Boot Repair’s ( boot-repair ) version is available in the PPA repository and its dependencies.
sudo apt-cache policy boot-repair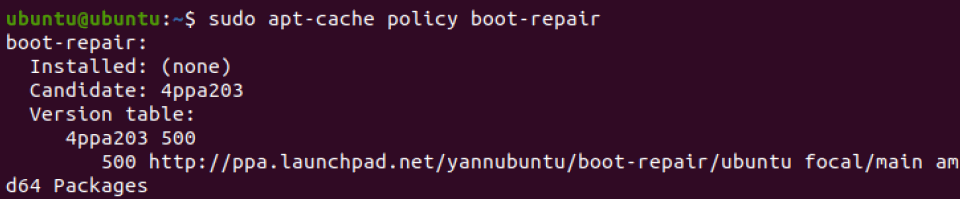
7. Now, run the apt install command below to install the latest Ubuntu Boot Repair ( boot-repair ) version and its dependencies. sudo
sudo apt install -y boot-repair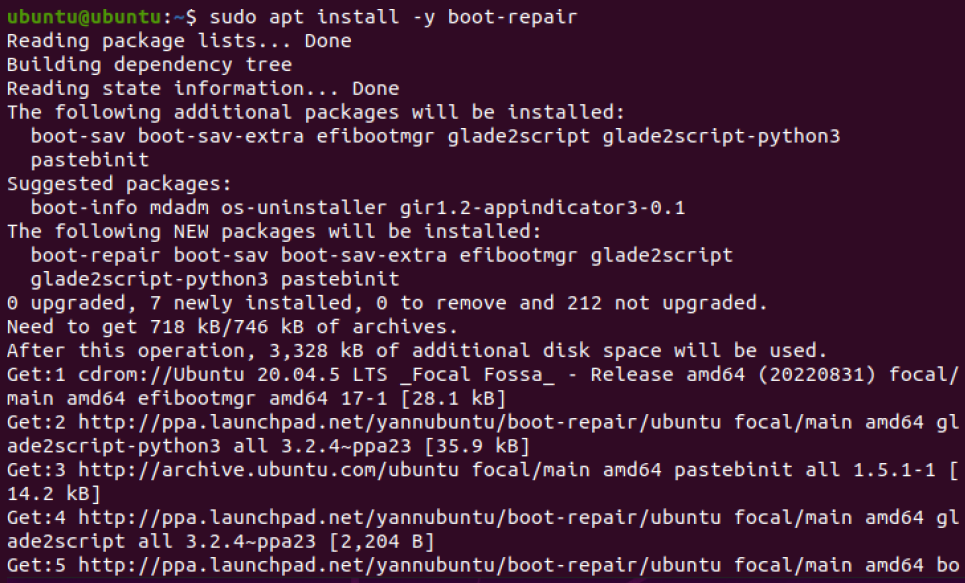
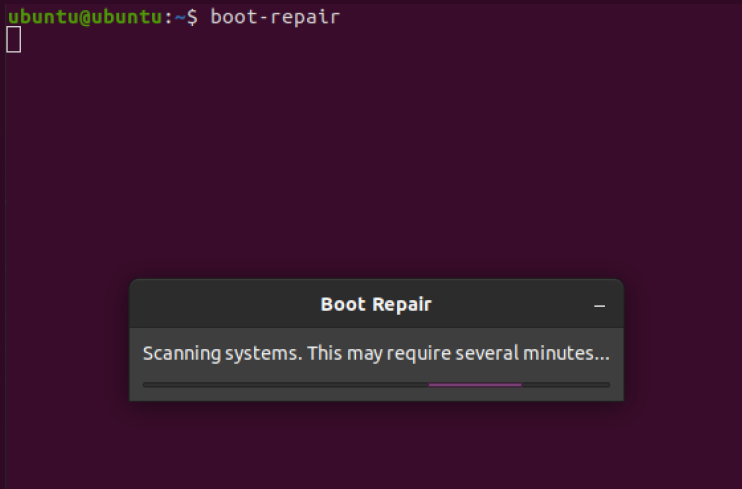
8. Lastly, run the below boot-repair command to launch the Ubuntu Boot Repair tool.
The first time you run the Boot Repair tool, it scans your system and checks all the available boot options, so be patient while the process runs.
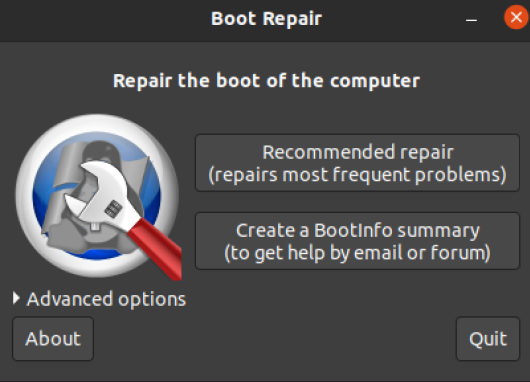
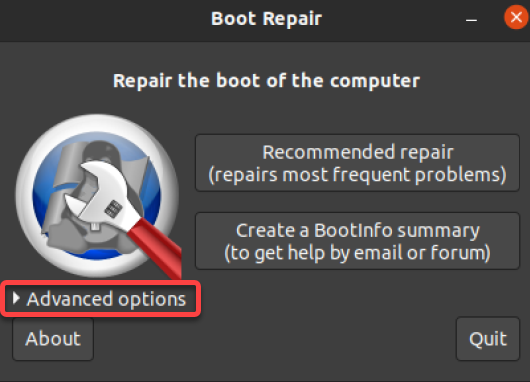
Once the scanning is finished, the tool’s main interface appears, as shown below. This interface provides several options for troubleshooting and repairing boot issues, which you will learn in the following sections.
Fixing Startup Issues with Boot Repair
Now that you have Boot Repair running, fixing startup issues in your system is only one click away (literally). In most cases, you will want to select Boot Repair’s recommended repair option to attempt to detect and fix any boot issues on your system automatically.
To fix startup issues via the Boot Repair, follow these steps:
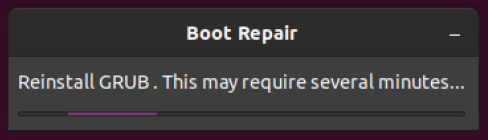
1. On Boot Repair’s main window, click Recommended repair to begin the repair process.
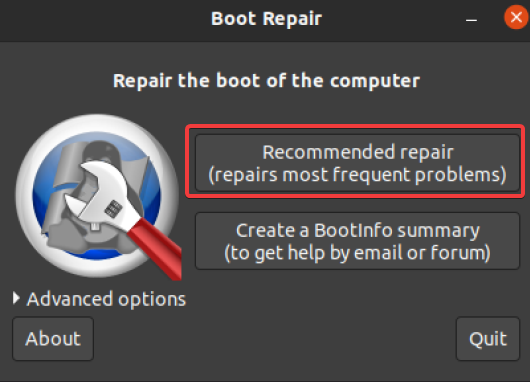
The Boot Repair tool repairs any startup issues on your system; it reinstalls the bootloader (e.g., GRUB), repairs the boot sector of a specific partition, and so on.
The repair may take a while, depending on the issue’s severity.
2. Once the repair completes, click OK when you see a message similar to the one below.
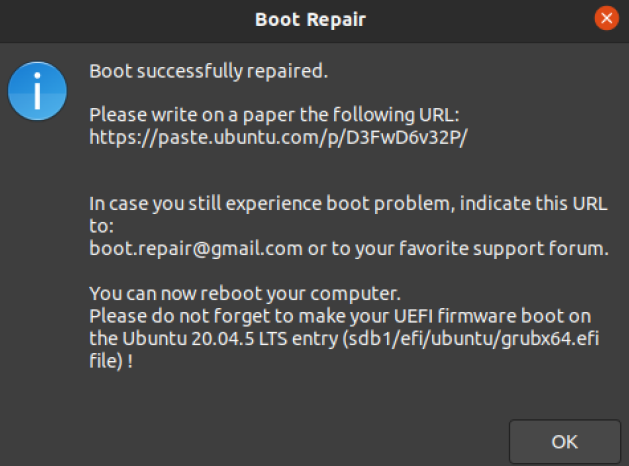
3. Now, unplug your bootable USB drive, reboot your machine, and verify that the boot issue is fixed. You can now boot into Ubuntu without any problems.
Boot Repair is designed to fix common boot issues, but it may not be able to fix “every” issue. If the recommended repair option does not fix the issues, you may need help from the community or a professional.
Using Advanced Options and Creating a BootInfo Report
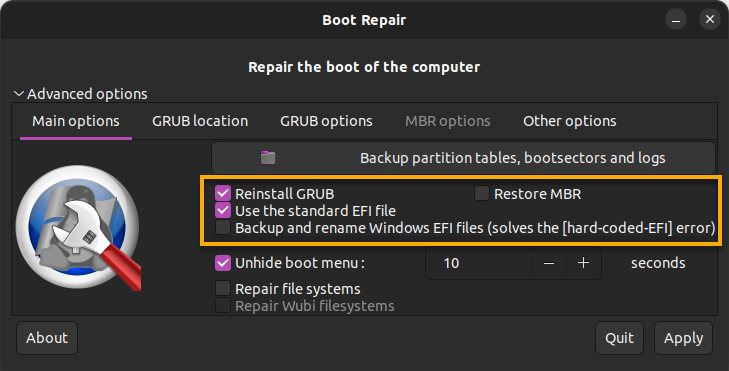
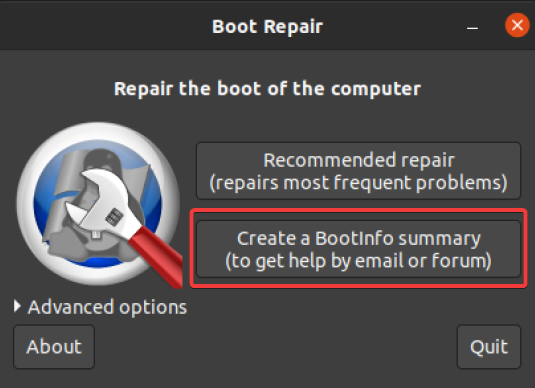
Besides the recommended repair option, the Ubuntu Boot Repair tool allows you to manually repair specific boot issues or configure your boot options. You can find and play these options under the Advanced options section and create a BootInfo report.
1. Expand Advanced options on Boot Repair’s main window to see all available options you can configure for repairing startup issues.
2. Close the Advanced options section, and click Create BootInfo Summary to create a report of your system’s boot configuration. You can then share the BootInfo report with experienced helpers to get assistance with your boot issues.
- A summary of the boot entries and the bootloader (e.g., GRUB).Any errors or issues the tool encountered while trying to repair the boot issues (if any).
Boot Repair now generates a report of your boot configuration.

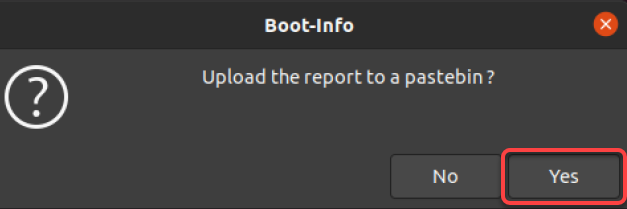
3. When prompted, select Yes to upload the report to Ubuntu Pastebin. Ubuntu Pastebin is a popular website for sharing text or code and provides a link to it. That link comes in handy when seeking help from the community or professional.
If you select No, the report is saved locally in the /var/log/boot-repair directory.
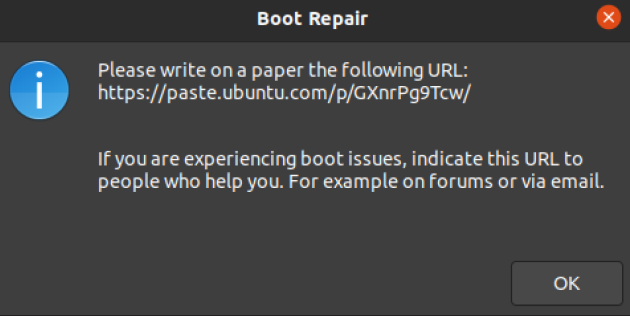
4. Finally, copy the link printed on the message box, and share it with your fellow community members or professionals to get help with your boot issues.
If you saved the BootInfo report file locally, run the following commands to list ( ls ) all report files and view ( cat ) the content of one.
ls -l /var/log/boot-repair cat /var/log/boot-repair/20230106_135919/boot-repair.log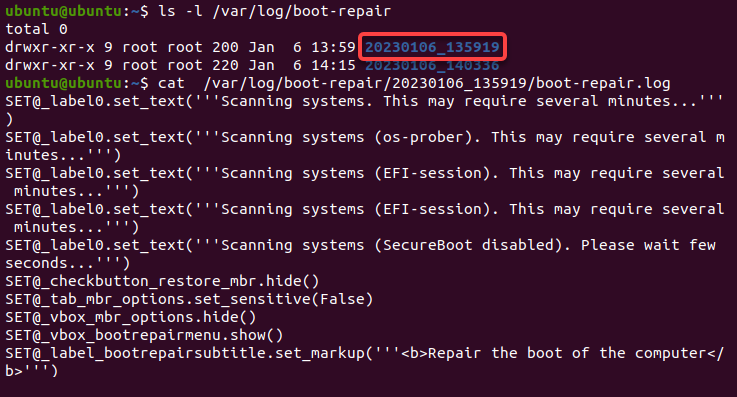
Conclusion
Fixing boot issues on your Linux system can be challenging, but you can never go wrong with the Ubuntu Boot Repair tool. And in this tutorial, you learned how this powerful tool could quickly fix common boot problems, saving you time and frustration.
If, for some reason, startup issues persist, Boot Repair lets you generate a shareable BootInfo report so the community and professionals can help out.
But when working on an Amazon EC2 Linux instance, why not check out EC2Rescue for Linux to troubleshoot OS-level issues?
Hate ads? Want to support the writer? Get many of our tutorials packaged as an ATA Guidebook.
Boot repair

![]() Boot-Repair – утилита, позволяющая восстановить доступ в Ubuntu после установки других операционных систем (например Windows).
Boot-Repair – утилита, позволяющая восстановить доступ в Ubuntu после установки других операционных систем (например Windows).
Установить Boot-Repair можно несколькими способами:
Записать специальный образ диска Boot-Repair-Disk и загрузиться с него (также Boot Repair доступен на Ubuntu Secured Remix
sudo add-apt-repository -y ppa:yannubuntu/boot-repair && sudo apt update && sudo apt install -y boot-repair && boot-repair
После установки нас встретит окошко с двумя пунктами на выбор, а также пунктом «Advanced options»:
Recommended repair позволяет исправить большинство самых часто встречающихся проблем при загрузке (исправление ошибок в файловой системе и восстановление GRUB2).
Create a BootInfo summary позволяет создать Boot-Info-Script – скрипт, позволяющий диагностировать большинство проблем при загрузке.
Advanced options включает в себя пункты для восстановления и настройки загрузчика Grub2 (выбор пункта загрузки по умолчанию, опции загрузки ядра, восстановление отображения или скрытие GRUB при загрузке, удаление GRUB), восстановление MBR и прочее.
Среди возможностей стоит отметить:
отображение типа таблицы диска (DOS, EFI и BootIT NG), а также отображение содержимого конфигурационных файлов от загрузчиков.
Boot-Repair
Boot-Repair is a simple tool to repair frequent boot issues you may encounter in Ubuntu like when you can’t boot Ubuntu after installing Windows or another Linux distribution, or when you can’t boot Windows after installing Ubuntu, or when GRUB is not displayed anymore, some upgrade breaks GRUB, etc.
Boot-Repair lets you fix these issues with a simple click, which (generally reinstalls GRUB and) restores access to the operating systems you had installed before the issue.
Boot-Repair also has advanced options to back up table partitions, back up bootsectors, create a Boot-Info (to get help by email or forum), or change the default repair parameters: configure GRUB, add kernel options (acpi=off . ), purge GRUB, change the default OS, restore a Windows-compatible MBR, repair a broken filesystem, specify the disk where GRUB should be installed, etc.
This tool is aimed entirely at those new to Ubuntu who want to get past their booting issues and enjoy using Linux. For the purpose of helping the forum and IRC members help you diagnose issues with your boot setup, Boot-Repair creates a Boot-Info diagnosis for you to share that allows experienced members to see what’s wrong with your boot. The tool systematically asks if you want to upload this diagnosis to a pastebin or keep it local. The Pastebin is not easily searchable and automatically expires after some days, but for confidentiality purpose you may prefer to keep the report local.
Boot-Repair is a free software, licensed under GNU-GPL.

Getting Boot-Repair
1st option : get a disk including Boot-Repair
The easiest way to use Boot-Repair is to create a live-USB disk of Boot-Repair-Disk (a disc starting Boot-Repair automatically), and boot on it.
Remark : it is recommended to install the ISO on a live-USB (eg via UnetBootin or LiliUSB or Universal USB Installer). Do not burn it on a DVD if your boot is in EFI mode.
2nd option : install Boot-Repair in Ubuntu
— either from an Ubuntu live-session (boot your computer on a Ubuntu live-USB then choose «Try Ubuntu») or from your installed Ubuntu session (if you can access it)
— open a new Terminal, then type the following commands (press Enter after each line):
sudo add-apt-repository ppa:yannubuntu/boot-repair && sudo apt update sudo apt install -y boot-repair && boot-repair
Using Boot-Repair
- — First click the Create a Boot-Info Summary button. This will simply create a Boot-Info diagnosis. A pop-up will ask if you want to upload the report online in order to share it more easily.

- — Check the diagnosis contents. If any doubt, you can share it on Ubuntu Forums (here) along with a description of your boot issue, so that experienced forum members can advise. — Once you get green light from experienced forum members, click the Recommended repair button. When repair is finished, note the new URL (paste.ubuntu.com/XXXXX) that appeared on a paper, then reboot and check if you recovered access to your OSs. — If the repair did not succeed, indicate the URL to people who help you by email or forum.
Advanced options
Warning: the default settings are the ones used by the «Recommended Repair». Changing them in the Advanced options may worsen your problem. Don’t change them unless requested by experienced helpers.
External Links
Boot-Repair (последним исправлял пользователь yannubuntu 2022-01-18 23:30:53)
The material on this wiki is available under a free license, see Copyright / License for details
You can contribute to this wiki, see Wiki Guide for details