- Bootup Sequence
- Table of Content
- Overview#
- BIOS Stage#
- Reset#
- Bootstrap#
- Bootloader stage#
- Master Boot Record#
- The first bootloader#
- The second bootloader#
- Kernel stage#
- Kernel decompression#
- Kernel configuration#
- System start#
- References#
- Appendix#
- 6 шагов загрузки Linux на пальцах
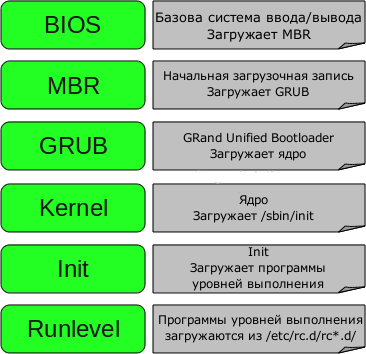
- 1. BIOS
- 2. MBR
- 3. GRUB
- 4. Ядро или Kernel
- 5. Init
- 6. Уровень выполнения программ (Runlevel)
- Дополнения, исправления, уточнения
Bootup Sequence
Linux startup process is the multi-stage initialization process performed during booting a Linux, including firmware initialization, execution of a boot loader, loading and startup of a Linux kernel image, and execution of various startup scripts and daemons.
Table of Content
Overview#
A Linux system mainly goes through 3 main stages at the boot-up:
- BIOS stage: When the machine is powered on BIOS firmware on motherboard is the first one to be called. BIOS runs Power On Self Test (POST) to verify if the hardware is present in the machine and if it is functioning. After POST succeeds, BIOS checks the Master Boot Record (MBR) on boot device to locate and run the bootloader
- Bootloader stage: Bootloader will list available OS installed on the machine, and run the default one if user does not select any item manually. Bootloader reads the boot command to load the kernel image, initial ramdisk, and temporaty filesystem, to prepare for kernel to run on real filesystem
- Kernel stage: Kernel which is transferred from bootloader will mount the real root filesystem. It calls the first initial process to setting up system and then spawn background daemon processes System services are called based on run-level. Graphical or console UI will start to present system to users.
BIOS Stage#
Reset#
Right after when user presses the power button, Switching Mode Power Supply (SMPS) checks voltage level on outputs of power supplier, and send POWER_GOOD signal to the motherboard which in turn, releases the CPU from reset state.
CPU is set to start at an address called the RESET_VECTOR . This is the memory location at which the CPU expects to find the first instruction to execute after reset. At the RESET_VECTOR address, there is only one JUMP instruction which tells the location of BIOS program in ROM.
RESET_VECTOR in 80386 and later x86, x86_64, IA is at 0xFFFFFFF0 [IP=0xfff0 CS.selector=0xf000 CS.base=0xffff0000]
See source code of BIOS, in reset16.inc and reset16.ld and coreboot/src/cpu/x86/16bit/
Processor starts working in REAL_MODE . Real mode is also called Real Address mode with 20-bit segmented memory address (1 MB) and limitation of direct access to memory or hardware.
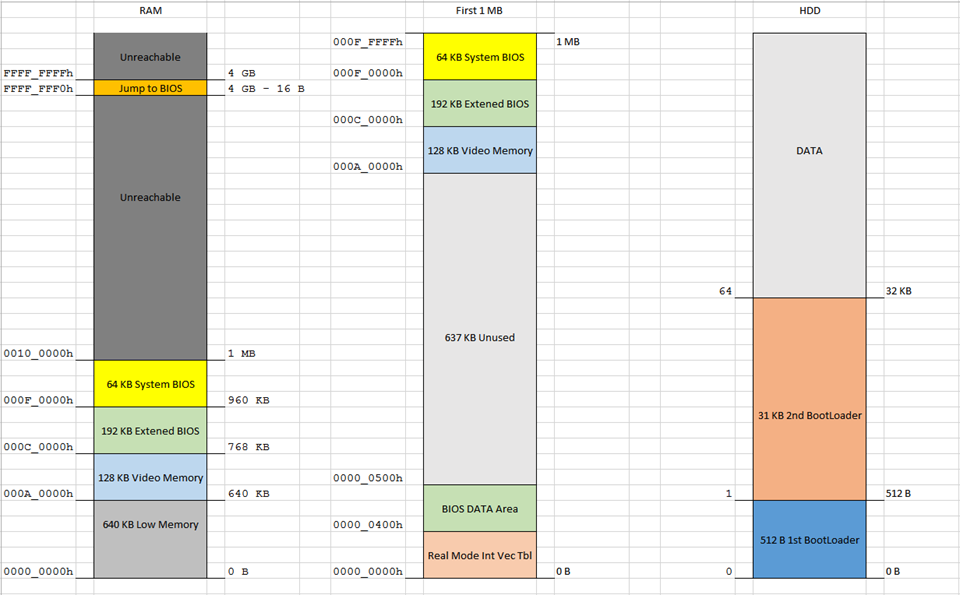
BIOS firmware file is copied to RAM in low-memory space.
Bootstrap#
BIOS stands for Basic Input Output System, located in a ROM on Motherboard of system. BIOS will do the below processes:
- Call POST (Power-on Self-Test) to confirm the integrity of hardware components: Timers, DMA Controllers, CPU, Video ROM…
- Read settings from a CMOS memory, if BIOS Setup is called, save back settings to CMOS memory
- Look for a boot order and lists all bootable devices
- Find a boot sector on the chosen boot device, i.e /dev/hda or /dev/sda
- Load MBR and give it control (copy 512 B of Boot sector to address starting at 0x00007C00 . If 2 last bytes of boot sector is 0xAA55 , BIOS jump to 0x00007C00 and from that point, CPU actually executes MBR). You can download source code of OpenBIOS for further information.
Bootloader stage#
Master Boot Record#
Master Boot Record is on Hard drives with MBR partition layout, which will execute the primary bootloader and call the second bootloader.
MBR is the first 512 B of a hard drive (Sector 0), contains:
- Primary Boot Loader Code (446 B) This code provides bootloader information and location details of actual bootloader code on the hard disk. This is helpful for CPU to load second stage of Boot loader
- Primary Partition Table (64 B) Maximum of 4 partition entries is listed start and end of each partition, size of partition, and type of partition
- Magic Number: 0x55 0xaa at the end of MB
Refer to a sample MBR code in the Appendix.
The first bootloader#
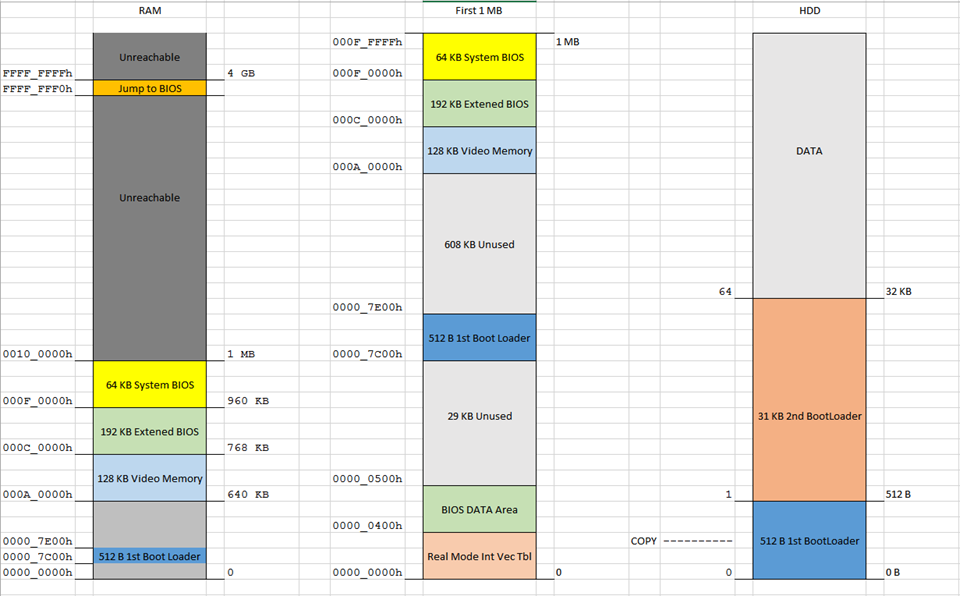
The MBR itself contains the first stage of the bootloader. GRUB calls this stage 1. Due to its tiny size, the code in the MBR does just enough to load another sector from disk that contains additional bootstrap code. This sector might be the boot sector for a partition, but could also be a sector that was hard-coded into the MBR code when the MBR was installed.
The first bootloader now has ability to read filesystem, which can scan hard disk directory and find the second bootloader which is usually bigger (located at sector 1-62) with Graphical UI, diagnostic, recovery features.

The second bootloader#
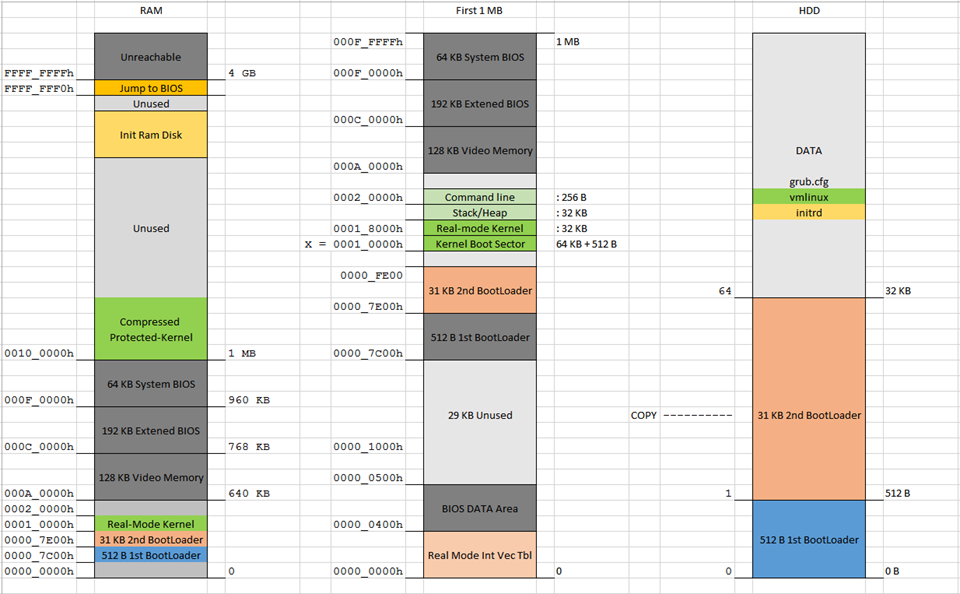
GRUB calls this stage 2. This stage can load many drivers such as VGA, EXT2 filesystem, OS Loader. This stage uses a config file grub.conf to locate the path of Kernel image vmlinux , boot command and boot options, initial RAM image initrd .
Because Kernel image is a compressed image, there will be a tiny routine to decompress the kernel image. This routine is in setup.bin image which is placed into RAM by second bootloader.
Kernel stage#
Kernel decompression#
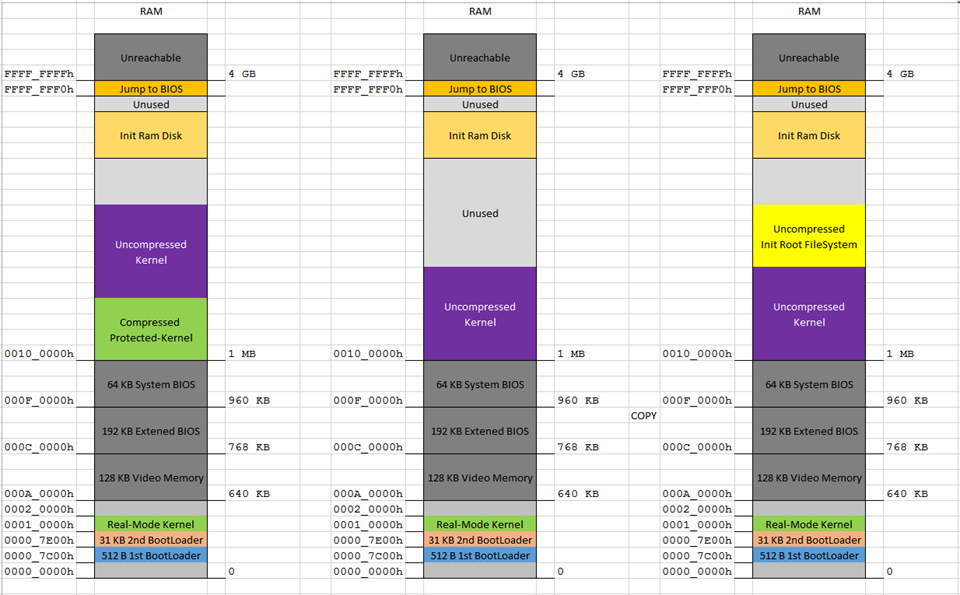
From this part, Linux kernel will take care of booting up system:
- Decompress the vmlinux image to high memory space (over 1 MB)
- Decompress the initrd image and mount a temporary filesystem
- Configure hardware and memory allocation for the system using the boot command and boot options
- Start Kernel execution
Kernel configuration#
After all, it starts loading initrd image. Kernel will start in real-mode first at address of kernel boot sector, at _start: in /arch/x86/boot/header.S .
- Config CPU in real-mode
- Set up BSS: check the magic number 0x5a5aaa55 (the value is only right if segment register and stack are properly set, defined in /arch/x86/boot/setup.ld). The BSS section is used to store statically allocated, uninitialized data. Linux carefully ensures this area of memory is first blanked
- Jump to C code in /arch/x86/boot/main.c
- Clone Boot parameters
- Initialize Console for log/ command
- Initialize Heap memory for memory management
- Kernel is started by calling x86_64_start_kernel function in /init/main.c
- Create task structure and start scheduler
- Mount Root filesystem
System start#
After the root file system is loaded, system is ready to run.
- Run /sbin/init process
- Check run-level in /etc/inittab and load background daemons from the run-level program list in /etc/rcX.d/
- Present the user login interface (CLI or GUI)
References#
Appendix#
An example code for MBR will display a string when executed:
; Simple MBR shows a string then hangs org 0x7c00 ; address of copied MBR in RAM entry: jmp short begin ; Data msg db 'Hello MBR', 0 ; Function to print string putstr: lodsb ; AL = [DS:SI] or al, al ; Set zero flag if al=0 jz putstrd ; jump to putstrd if zero flag is set mov ah, 0x0e ; video function 0Eh (print char) mov bx, 0x07 ; color int 0x10 ; print the character jmp putstr ; loop putstrd: retn begin: xor ax, ax ; zero out ax mov ds, ax ; set data segment to base of RAM mov si, msg ; load address of our message call putstr ; print the message hang: jmp hang ; just loop forever ; -------------------------------------------- ; Fill zero in unused bytes size equ $ - entry %if size+2 > 512 %error "code is too large for boot sector" %endif times (512 - size - 2) db 0x00 ; -------------------------------------------- ; Mark MBR as bootable at byte 511 and 512 db 0x55, 0xAA ; 2 bytes of boot signature To run this code, you have to compile it with nasm and run with qemu .
nasm -f bin mbr.nasm && qemu-system-x86_64 mbr 6 шагов загрузки Linux на пальцах
Нажмите кнопку включения питания на вашем системнике, и спустя несколько секунд вы увидите окно входа в систему.
Посмею предположить, что каждого интересовало хоть когда-либо то, что происходит за занавесом заставок и загрузочных экранов с момента включения питания компьютера к моменту, когда предлагается войти в систему.
Я предлагаю вам познакомиться со следующими уровнями типичной загрузки Linux:
1. BIOS
- BIOS отвечает за базовый ввод/вывод данных с устройств/на устройства.
- Делает некоторые проверки целостности устройств. К тому же, за тестирование работоспособности электроники отвечает POST (Power-on self-test, он же «тест на адекватность себя самого», выполняющийся как этап пре-загрузки), который управляется BIOS
- Ищет, загружает и выполняет программу-загрузчик ОС
- Берет загрузчик из флопика, сидюка или жесткого диска. Во время загрузки BIOS’а вы можете нажать на кнопку (обычно это F12 или F2 или Del, зависит от платформы), если вам требуется внести некоторые изменения касательно настройки железа.
- Как только загрузчик был обнаружен и загружен в память, BIOS передает управление ему.
- Короче говоря, BIOS загружает и выполняет загрузочную запись (MBR).
2. MBR
- MBR — это главная загрузочная запись, хранящаяся на жестком диске
- Она размещена в 1-м секторе загрузочного диска, например /dev/hda или /dev/sda
- MBR занимает меньше, чем 512 байтов. Она состоит из трех компонентов: 1) главная загрузочная информация, «живущая» в первых 446 байтах; 2) информация о таблице разделов — в следующих 64 байтах; 3) и последние 2 байта нужны для проверки корректности mbr.
- Она содержит информацию о GRUB’е (или LILO).
- Простыми словами — MBR загружает и выполняет загрузчик GRUB.
3. GRUB
- GRUB — Grand Unified Bootloader.
- Если в вашей системе установлено более, чем одно ядро, у вас есть возможность выбирать, которое из них должен выполняться
- GRUB отображает
красивую анимацию plymouthзаставку, и, подождав несколько секунд интерактивного воздействия пользователя, если он не нажал ни одной клавиши, он загружает ядро, установленное по умолчанию в файле конфигурации grub. - GRUB понимает, что такое файловая система (древние загрузчики Linux’а, например, LILO этого не понимают).
- Конфигурационный файл Grub обычно лежит по пути /boot/grub/grub.conf (так же /etc/grub.conf может быть символьной ссылкой на него). Вот пример файла конфигурации для CentOS:
#boot=/dev/sda
default=0
timeout=5
splashimage=(hd0,0)/boot/grub/splash.xpm.gz
hiddenmenu
title CentOS (2.6.18-194.el5PAE)
root (hd0,0)
kernel /boot/vmlinuz-2.6.18-194.el5PAE ro root=LABEL=/
initrd /boot/initrd-2.6.18-194.el5PAE.img
4. Ядро или Kernel
- Ядро монтирует файловую систему в соответствии с настройкой «root=» в фале grub.conf
- Выполняет программу /sbin/init
- Поскольку init — это первый процесс, запущенный ядром Linux, поэтому она имеет идентификатор процесса (PID) №1. Можете выполнить «ps -ef | grep init» и убедиться в этом.
- initrd — это Initial RAM Disk, он же временный диск в оперативной памяти
- initrd используется самим ядром в качестве временной корневой файловой системы, пока kernel не загрузится в реальную примонтированную файловую систему. Этот временный диск также содержит необходимые для загрузки драйверы, позволяющие получить доступ к разделам дисков и другому оборудованию
5. Init
- Смотрит в файл /etc/inittab для того, чтобы определить уровень выполнения (run level).
- Есть следующие уровни выполнения:
- 0 – прервать выполнение
- 1 – Однопользовательский режим, так называемый «Single user mode», или иными словами, консоль восстановления
- 2 – Многопользовательский режим без поддержки NFS
- 3 – Полноценный многопользовательский режим
- 4 – не используется
- 5 – X11
- 6 – перезагрузка
6. Уровень выполнения программ (Runlevel)
- Когда Линукс выполняет свою загрузку, вы можете наблюдать загрузку различных служб. К примеру, это могут быть сообщения типа «starting Postfix … OK» (запускается Postfix). Эти службы — и называются программами уровня выполнения, выполняемые из директории, которая соответствует нужному уровню выполнения.
- Исходя из настроек по умолчанию, система будет выполнять файлы в соответствии с нижеприведенными директориями.
- Выполнение уровня 0 – /etc/rc.d/rc0.d/
- Выполнение уровня 1 – /etc/rc.d/rc1.d/
- Выполнение уровня 2 – /etc/rc.d/rc2.d/
- Выполнение уровня 3 – /etc/rc.d/rc3.d/
- Выполнение уровня 4 – /etc/rc.d/rc4.d/
- Выполнение уровня 5 – /etc/rc.d/rc5.d/
- Выполнение уровня 6 – /etc/rc.d/rc6.d/
Вот и все. Возможно, некоторым из вас это не ново и особого интереса не было при чтении статью, поскольку она более ориентирована на начально-средний уровень знакомства з Линуксом.
В таком случае могу лишь сказать, что «повторение — мать учения» (с).Дополнения, исправления, уточнения
- artemlight:: «Ну скажем прямо — так грузятся далеко не все дистры». С ним согласилось большинство, отмечая и bsd-style init, u-boot, и хоть initrd в статье пропущен, стоить заметить, что он нужен ядру не во всех дистрибутивах. Также отмечено, что в slackware поддержка rc.d осуществляется только в качестве совместимости, а встраиваемые системы грузятся иначе. На декстопах иногда бывает EFI, а кроме того Linux популярен в мире embedded и там ещё куча разных платформ. Линукс в телефоне вообще иначе грузится.
- soomrack, ссылая на википедию: Еще хочется сделать замечание по поводу MBR, первого сектора и пр. Все несколько усложнилось за последние годы. Сейчас уместней говорить о EFI.