- Linux Administration
- How to Setup, Modify, and Delete Linux Network Bridges and Bonds
- Pre-requisites:
- Bridges
- Set up Bridge
- View Bridge
- Modify Bridge
- Add an interface to bridge
- Delete Interface from bridge
- Delete a bridge
- Network Bonding
- Setup Network Bonding
- Test Bonding
- Modify Bonding
- Change Active Slave Interface
- Change bonding mode
- Attaching slave
- Detaching slave
- Delete Bonding
- About the author
- Karim Buzdar
Linux Administration
In the following I will use the word bonding because practically we will bond interfaces as one. Bonding allows you to aggregate multiple ports into a single group, effectively combining the bandwidth into a single connection. Bonding also allows you to create multi-gigabit pipes to transport traffic through the highest traffic areas of your network. For example, you can aggregate three megabits ports into a three-megabits trunk port. That is equivalent with having one interface with three megabytes speed.
You can use it wherever you need redundant links, fault tolerance or load balancing networks. It is the best way to have a high availability network segment. A very useful way to use bonding is to use it in connection with 802.1q VLAN support (your network equipment must have 802.1q protocol implemented).
Active-backup policy: Only one slave in the bond is active. A different slave becomes active if, and only if, the active slave fails. The bond’s MAC address is externally visible on only one port (network adapter) to avoid confusing the switch. This mode provides fault tolerance. The primary option affects the behavior of this mode.
XOR policy: Transmit based on [(source MAC address XOR’d with destination MAC address) modulo slave count]. This selects the same slave for each destination MAC address. This mode provides load balancing and fault tolerance.
IEEE 802.3ad Dynamic link aggregation. Creates aggregation groups that share the same speed and duplex settings. Utilizes all slaves in the active aggregator according to the 802.3ad specification.
* A switch that supports IEEE 802.3ad Dynamic link aggregation. Most switches will require some type of configuration to enable 802.3ad mode.
Adaptive transmit load balancing: channel bonding that does not require any special switch support. The outgoing traffic is distributed according to the current load (computed relative to the speed) on each slave. Incoming traffic is received by the current slave. If the receiving slave fails, another slave takes over the MAC address of the failed receiving slave.
Adaptive load balancing: includes balance-tlb plus receive load balancing (rlb) for IPV4 traffic, and does not require any special switch support. The receive load balancing is achieved by ARP negotiation. The bonding driver intercepts the ARP Replies sent by the local system on their way out and overwrites the source hardware address with the unique hardware address of one of the slaves in the bond such that different peers use different hardware addresses for the server.
Also you can use multiple bond interface but for that you must load the bonding module as many as you need.
How to Setup, Modify, and Delete Linux Network Bridges and Bonds
![]()
In this guide, we will discuss two essential networking concepts that are bridging and bonding. We will see how to set up, modify, and delete the bridges and bonds in the Linux system. We will demonstrate the procedure on Linux Mint 20 Ulyana system. However, you can also implement the same procedure on Ubuntu or Debian.
Pre-requisites:
Bridges
Bridging is to create a bridge between two or more network interfaces to pass traffic between them. It allows you to share your system’s internet connection with other systems. Consider a scenario where system A (with no internet connection) wants to connect to another system’s B internet connection. All you need is to plug both systems with an Ethernet cable and create a bridge between them. However, to do so, you will need two interfaces on your system B. One interface will be connected to the internet, and the other one will be connected to system A.
Set up Bridge
In our example, we will set up a bridge br0 between two interfaces, ens33 and ens39. The enss33 interface connects to the internet while the ens39 connects to the second system (that needs an internet connection). We will set up the bridge via DHCP.
First, you will have to install the required program bridge-utils to create a bridge. Issue the below command in Terminal to install bridge-utils:
Create a bridge network interface using the below command in Terminal:
This command will create a bridge named br0. You can name it anything you want.
Now add both interfaces you want to bridge (one that connects to the internet and the other that connects to the second system) using the below syntax:
For instance, in our case, it would be:
The above command will add enss33 and ens39 to the bridge br0.
Now, bring up the bridge interface:
You can also run the below command to get the interface up and running (In the case of DHCP).
Now, edit the /etc/network/interfaces file and append the following lines:
Now restart the networking services using the below command:
Now the bridge has been set up, and hopefully, you will be able to access the internet from your second system.
View Bridge
You can use the below command to view all the configured bridges on your system and the interfaces attached to them.

Modify Bridge
Add an interface to bridge
You can add an interface to an already existing bridge as follows:
For instance, to add an interface named ens38 to the already existing bridge named br0, the command would be:
Delete Interface from bridge
You can also delete an interface from a bridge as follows:
For instance, to delete an interface named ens38 from the bridge named br0, the command would be:
Delete a bridge
To delete a bridge from your system, you will first need to bring it down. Use the following command to do so:
For instance, to delete a bridge named br0, first bring it down:
Then, to delete the bridge, use the following command:
In our example, the command would be:
Network Bonding
Network bonding combines several network interfaces to present them as a single interface, in effect combining their bandwidth into a single connection. Bonding network interfaces increase throughput, provides high availability and failover in situations where one of the interfaces fails.
There are various modes of network bonding which are as follows:
- mode=0 (Balance Round Robin)
- mode=1 (Active backup)
- mode=2 (Balance XOR)
- mode=3 (Broadcast)
- mode=4 (802.3ad)
- mode=5 (Balance TLB)
- mode=6 (Balance ALB)
Setup Network Bonding
In this guide, we will setup mode 1 (Active backup mode). We will bond two interfaces, ens33 and ens38. The ens33 will be our active interface, while ens38 will be the backup interface.
First, you will have to install the ifenslave tool on your system. To do so, issue the below command in Terminal:

Then load the kernel module using the below command:
The above command will add additional capabilities to the Linux kernel.
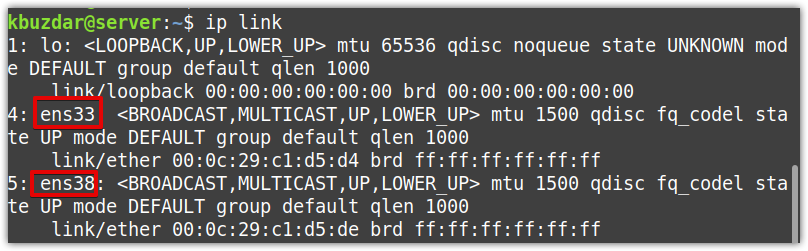
Now, find out your network interfaces. You can use the below command to do so:
The following output shows there are two network interfaces ens33 and ens38 other than the loopback interface. We will bond the two interfaces, ens33 and ens38, in a bond named bond0.
Now edit the network interfaces files using the below command in Terminal:
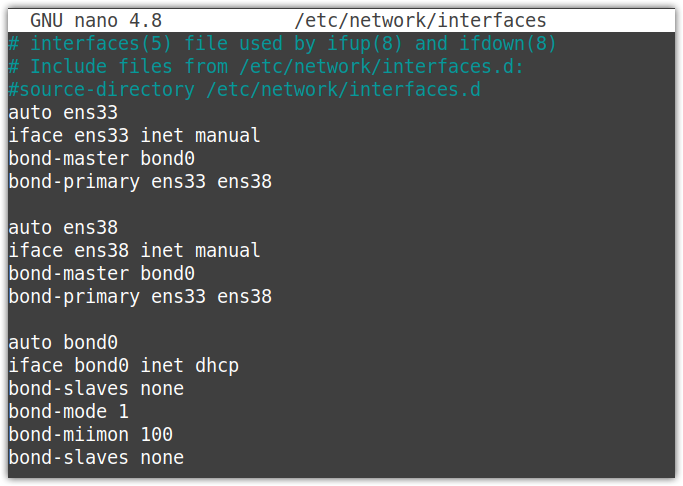
Modify the file as follows:
Make sure to replace the interface’s name with yours.
auto ens33
iface ens33 inet manual
Now save and close the interface configuration file.
Now restart networking service using the below command:
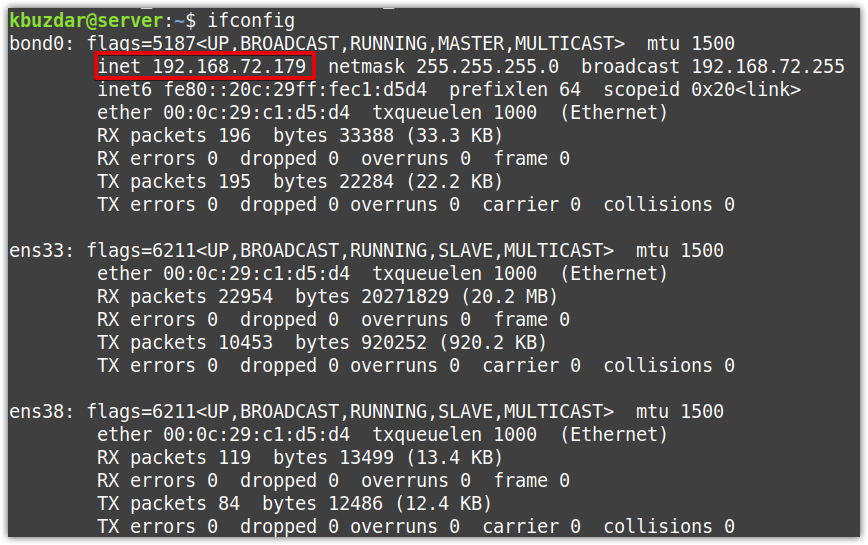
Run the “ifconfig” or “ip a” command, and this time you will see the bond0 as a separate interface with an IP address assigned to it. You can also see there is no IP address assigned to the ens33 and ens38 interfaces.
Test Bonding
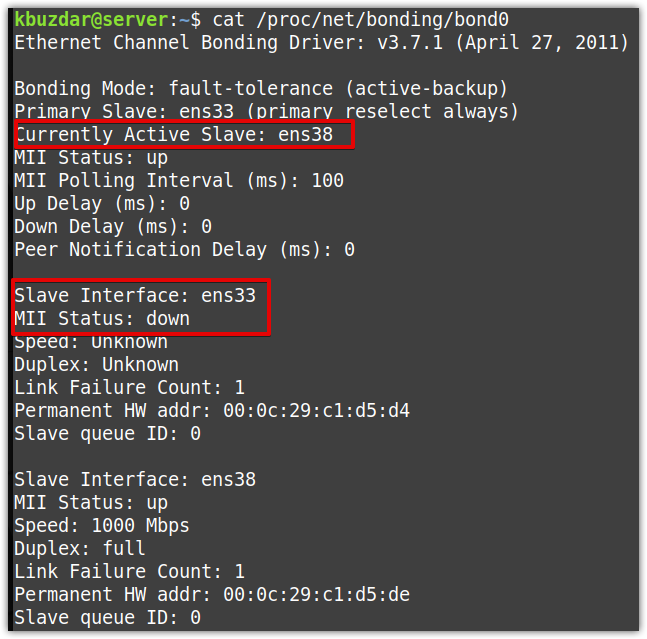
To verify if bonding is working, issue the below command:
The following output shows that the binding mode is active-backup, and both the primary and currently active slave is ens33.

Now to test the active-backup mode, run a continuous ping from another system on the network to the bonding server IP address (which in our case is 192.168.72.179). Your ping should work successfully. Then try shutting down the active interface and see if the ping continues or stops. If the ping continues, this means the bonding has been configured successfully.
If you run the below command, you can also see that the primary slave ens33 is down while the currently active slave is now ens38.
Modify Bonding
Change Active Slave Interface
You can also change the active slave interface in bonding using the -c option as follows:
For instance, in our scenario, we have ens33 as an active interface while ens38 as a backup interface. To set ens38 as an active slave interface, the command would be:
Now to confirm whether the active interface has successfully changed, issue the below command in Terminal:
In the below output, you can see that the active slave interface has changed to ens38.

Change bonding mode
To change the bonding mode, edit the /etc/network/interfaces file and change the bond-mode value. For instance, to change the bond mode to round-robin, modify the value of the bond-mode to 0.
Now to confirm whether the bonding mode has successfully changed, issue the below command in Terminal:
In the below output, it is clear that the bond mode has changed to round-robin.

Attaching slave
To attach a new slave interface to an already existing bond, use the following syntax:
The -v is used here for verbose output.
For instance, to add a new slave interface ens33 to an already existing bond0, the command would be:

Detaching slave
To detach a slave interface from a bond, use the -d option as follows:
The -v is used here for verbose output.
For instance, to detach a slave interface ens33 from bond0, the command would be:

Delete Bonding
To delete bonding, edit the /etc/network.interfaces file, and remove the configurations related to bonding. Leave only the interfaces configuration like this:
auto ens33
iface ens33 inet dhcp
auto ens38
iface ens38 inet dhcp
Then save and close the interfaces configurations file.
Now remove the bonding with the below command:
Then restart networking service:
That is all there is to it! In this article, first, we have shown how to set up a network bridge to share the internet connection with other systems. Then we have shown how to modify the bridges by adding or removing an interface from the bridge. Next, we have shown how to setup network bonds to have increased throughput, high availability, and failover. Then we have shown how to modify a bond by changing its active slaves, attaching/detaching slaves, and changing bonding modes. We have also shown how to delete the bridges and bonds in case you no longer need them.
About the author
Karim Buzdar
Karim Buzdar holds a degree in telecommunication engineering and holds several sysadmin certifications. As an IT engineer and technical author, he writes for various web sites. He blogs at LinuxWays.