Access Windows 10 Shared Folder from Ubuntu 18.04
I would like to share files between Windows and Ubuntu. In Ubuntu 16.04 LTS, I could access shared folder on a Windows machine on my local network my navigating to Other locations in Files (Nautilus), accessing the Windows network, and browse. After upgrading to Ubuntu 18.04 LTS, this no longer works for me. How can I get access to folder shared in Windows 10 from Ubuntu 18.04?
We gone to files->Other locations in linux system and there we could see the windows network. After opening that we could see the windows system there . By clicking on the windows pc we copied the folder from its shared folder.
@Deciletech Please edit your question to add details. It helps to keep the simple Q&A style and could also bring more attention since an edited question gets bounced on the homepage.
4 Answers 4
There was a change in both Windows 10 and Samba. Some of the details are explained here.
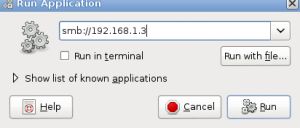
The browse by just clicking isn’t working, but you can get there by entering the shared folder link in the address field. Use the server’s IP address or the computer name for the share. In the example I’m using the IP address of the Windows 10 server:
Use Keyboard shortcut Ctrl + L to type in pathname:
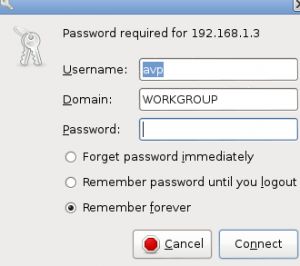
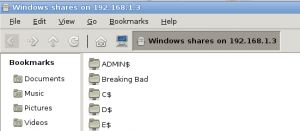
Typing that in the file browser will bring up authorization prompt. Use the credentials from your Windows 10 server. This will display all the available shares. You can then click on the share you want access to.
There are two changes steps you may have to do. Set client max protocol = NT1 for the downward compatibility in the /etc/samba/smb.conf file. Place the entry just below the workgroup = WORKGROUP line.
#======================= Global Settings ======================= [global] client use spnego = no client NTLMv2 auth = no ## Browsing/Identification ### # Change this to the workgroup/NT-domain name your Samba server will part of workgroup = WORKGROUP client max protocol = NT1 Once you have manually accessed the desired share, you can make it easily accessible in the future by bookmarking it. You can do this with the keyboard shortcut: Ctrl + D .
You can easily rename your bookmarks to something friend and meaningful by right-clicking the name that appears in the File Browser’s sidebar.
Install necessary packages:
You may have to install smbclient , which will ensure you have the necessary dependents such as the cifs-utils and the actual /etc/samba/smb.conf file.
$ sudo apt install smbclient Works on Lubuntu 18.10 as installed; no additional packages or edits required. Does not support browse by clicking. Works with entering smb://192.168.1.102 in PCManFM-Qt file manager.
On 18.04, I have just had success with the following:
On Ubuntu: Install smbclient and add client max protocol = NT1 to /etc/samba/smb.conf as per L.D. James’ answer (see this post for more info).
On Windows: Create a folder in Windows to share, e.g. named shared . Make sure the folder is shared: I created a new user on Windows, keeping the NewUser name and selected a simple password (I first tried changing the name, but found that change was apparently only skin deep. Perhaps if I had rebooted. ). I logged in with NewUser , then logged back in with my admin account. I activated network sharing on my private network and for the folder specifically (see e.g. this post). Then I right clicked the folder and chose Give access to. , choosing NewUser (you may want additional permissions: see the just linked to post). Under the Sharing tab, the folder now has a network path: //COMPUTERNAME/shared .
Still on Windows: To gain access to the shared folder, I used the IP of the Windows machine instead of the COMPUTERNAME , cf. this.
To find the IP of your Windows machine, right click the network logo, open Network and Sharing Settings and choose Change connection properties . Take note of the IPv4 near the bottom.
In Ubuntu: Finally, open a terminal on you Ubuntu machine and execute
sudo mount -t cifs -o username=NewUser //[insert IPv4 here]/shared /home/your_ubuntu_username/shared and provide the password for NewUser when prompted.
This mounts the shared Windows shared folder as a folder shared in your Ubuntu user’s home directory.
The command is based on suggestions from here, where there are also suggestions for storing login credentials.
I hope it works. Good luck!
Browse files on a server or network share
You can connect to a server or network share to browse and view files on that server, exactly as if they were on your own computer. This is a convenient way to download or upload files on the internet, or to share files with other people on your local network.
To browse files over the network, open the Files application from the Activities overview, and click Other Locations in the sidebar. The file manager will find any computers on your local area network that advertise their ability to serve files. If you want to connect to a server on the internet, or if you do not see the computer you’re looking for, you can manually connect to a server by typing in its internet/network address.
Connect to a file server
- In the file manager, click Other Locations in the sidebar.
- In Connect to Server , enter the address of the server, in the form of a URL . Details on supported URLs are listed below .
Writing URLs
A URL , or uniform resource locator , is a form of address that refers to a location or file on a network. The address is formatted like this:
The scheme specifies the protocol or type of server. The example.com portion of the address is called the domain name . If a username is required, it is inserted before the server name:
Some schemes require the port number to be specified. Insert it after the domain name:
Below are specific examples for the various server types that are supported.
Types of servers
You can connect to different types of servers. Some servers are public, and allow anybody to connect. Other servers require you to log in with a username and password.
You may not have permissions to perform certain actions on files on a server. For example, on public FTP sites, you will probably not be able to delete files.
The URL you enter depends on the protocol that the server uses to export its file shares.
If you have a secure shell account on a server, you can connect using this method. Many web hosts provide SSH accounts to members so they can securely upload files. SSH servers always require you to log in.
A typical SSH URL looks like this:
When using SSH, all the data you send (including your password) is encrypted so that other users on your network can’t see it.
FTP is a popular way to exchange files on the Internet. Because data is not encrypted over FTP, many servers now provide access through SSH. Some servers, however, still allow or require you to use FTP to upload or download files. FTP sites with logins will usually allow you to delete and upload files.
A typical FTP URL looks like this:
Sites that allow you to download files will sometimes provide public or anonymous FTP access. These servers do not require a username and password, and will usually not allow you to delete or upload files.
A typical anonymous FTP URL looks like this:
Some anonymous FTP sites require you to log in with a public username and password, or with a public username using your email address as the password. For these servers, use the FTP (with login) method, and use the credentials specified by the FTP site.
Windows computers use a proprietary protocol to share files over a local area network. Computers on a Windows network are sometimes grouped into domains for organization and to better control access. If you have the right permissions on the remote computer, you can connect to a Windows share from the file manager.
A typical Windows share URL looks like this:
Based on the HTTP protocol used on the web, WebDAV is sometimes used to share files on a local network and to store files on the internet. If the server you’re connecting to supports secure connections, you should choose this option. Secure WebDAV uses strong SSL encryption, so that other users can’t see your password.
A WebDAV URL looks like this:
UNIX computers traditionally use the Network File System protocol to share files over a local network. With NFS, security is based on the UID of the user accessing the share, so no authentication credentials are needed when connecting.
A typical NFS share URL looks like this:
How To Connect To Windows Shared Folders From Linux Mint/Ubuntu Desktop
One of the earlier posts described how to connect to a Windows share directly from the Linux Mint / Ubuntu Terminal.
To do this from the Linux Mint / Ubuntu desktop without using Terminal :
1. Press Alt + F2 and enter the IP address or the Windows system where the shared folders are hosted after the “smb://“. (This is similar to opening up “Run” box in Windows and typing \\serverip\ to access it).
2. Enter the required credentials that are needed : the user name and password who can access these Windows shared folders.(This sharing permissions need to be first set on the Windows system for each of the folders that are shared.)
3. Once authentication is successful, the available shared folders will now be listed and can be accessed as desired.
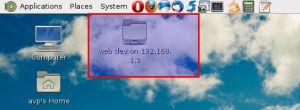
4. The accessed shared folders will now also automatically be mounted and be present on Linux Mint/ Ubuntu desktop as a shortcut.
The folders should be set to sharing from Windows, also make sure to enter same credentials (user name and password) to connect to them as defined in Windows sharing. The example used here is Linux Mint 14 by the way.
I can’t enter any credentials. It doesn’t even let me get that far. I’ve just discovered that I can browse to the folders using smb://pc_name_/shared folder_name with Thunar though (or whatever the default file manager is called in xfce?) I’m a bit disappointed because I had Mint 13 on this netbook and I could browse the network automatically with that. However, that was the 64-bit version so maybe I’ll try installing that. Thanks for your reply in any case. I use this netbook as a kind of mini music player with some speakers in my bedroom so it has to be able to access my Windows PC downstairs where all my files are stored. You might think that installing Windows on it would be the way to go but Win7 doesn’t like the wireless card at all and XP drops the connection too often. Only Linux distros seem to like it (Aspire One 532h) Sorry to ramble on – thought I’d explain what I was doing, in case you thought I was just being annoying! Cheers
Try the IP address of Windows system you are connecting to so that it will be like smb://192.168.0.10. Use ipconfig from Windows command prompt to get the IP address first and make sure it is pingable from Linux Mint. The Run command in Linux Mint (Alt + F2) can then be used for accessing samba share through this IP if the file manager throws up errors. Cheers.
I did try it with the IP address as you suggested at first. I got that little red icon with a cross in it when I entered the address and when I hit enter, it did nothing. I’m just in the middle of installing 64-bit Xfce so I’ll try again when it’s done (or maybe in the morning if I don’t have time). I remembered that the 32-bit version had a disappearing battery indicator that I could never fix on version 13 and it seems to still be the case on 14 so there were a couple of reasons I thought I’d try the 64-bit flavour. Thanks again. Just tried it again on 64-bit Mint 14 (Xfce) – no joy. My dialog box looks a little different to yours – it says Application Finder at the top and only has two buttons underneath the text box – Close and Launch. I double checked the IP address and I can ping it from a terminal no problem. The actual error message that pops up when I hover over the little red x is: Failed to execute child process “smb://192.168.1.4” (No such file or directory)
Try mounting the Windows share from Linux Terminal directly, here is how https://www.ihaveapc.com/2012/06/how-to-quickly-mount-windows-share-from-terminal-in-linux-mint-ubuntu/ Other option is to go to Places >Connect to server, select Windows share, entering the credentials and having domain name set as Workgroup. Hope this helps.
I think you must be using Cinnamon or Mate, I don’t have connect to server option under places on my desktop. Re. the Linux terminal method, smbfs seems to have been superseded by cifs-utils package so I installed that instead. The way to mount shares seems to be fairly similar though, so I managed to get them mounted in the end. I also added entries to fstab so that I don’t have to keep doing the same thing every time I boot up (had to set my Windows machine to use fixed internal IP address). Thanks for your suggestions – they got me going in the right direction. I guess it would be easier to buy a stereo but where would be the fun in that! Cheers