- Font Woes
- Font Configuration Files
- Setting Default Fonts
- Aliasing Microsoft Fonts
- The Result
- Other Notes
- How to Change Desktop Font on Ubuntu (Pssst, It’s Easy)
- Changing the Desktop Font on Ubuntu
- Reset Ubuntu Font Sizes
- How to Change System Text Font in Ubuntu / Debian / Fedora with Gnome
- 1. Install Gnome Tweaks
- 2. Change System Fonts:
- Get More Fonts:
- Restore Default System Fonts:
Font Woes
It’s fairly straightforward to set the default font used in native apps on a modern Linux desktop, or the default fonts used to render web pages in your browser of choice.
But if you’re reading this, you probably know that that’s far from the end of the story. You might have noticed that Firefox and Chrome rudely ignore your font settings for many websites. This is because many (if not most) popular sites, including Google, Yahoo, Facebook or GitHub, specify preferred fonts for text:
- Google: arial, sans-serif
- Yahoo: Helvetica Neue, Helvetica, Arial
- Facebook: lucida grande, tahoma, verdana, arial, sans-serif
- GitHub: Helvetica, arial, freesans, clean, sans-serif
You might immediately notice that the most commonly used fonts on these sites, Arial and Helvetica, are fonts that come bundled with Microsoft Windows, and are most likely not installed on your Linux system. In this case, what font is actually used is anyone’s guess. If they are installed (e.g., via a package like ttf-ms-fonts or directly copied from a Windows machine), well, you still probably want to display your favorite font instead 🙂
So, let’s find out what your default fonts and aliases are with fc-match :
for family in serif sans-serif monospace Arial Helvetica Verdana "Times New Roman" "Courier New"; do echo -n "$family: " fc-match "$family" done This is what I get on my machine by default:
serif: DejaVuSerif.ttf: "DejaVu Serif" "Book" sans-serif: DejaVuSans.ttf: "DejaVu Sans" "Book" monospace: DejaVuSansMono.ttf: "DejaVu Sans Mono" "Book" Arial: DejaVuSans.ttf: "DejaVu Sans" "Book" Helvetica: n019003l.pfb: "Nimbus Sans L" "Regular" Verdana: DejaVuSans.ttf: "DejaVu Sans" "Book" Times New Roman: DejaVuSerif.ttf: "DejaVu Serif" "Book" Courier New: DejaVuSansMono.ttf: "DejaVu Sans Mono" "Book" Font Configuration Files
So, assuming you’ve installed your fonts of choice (via a package, copying to /usr/share/fonts or ~/.fonts — please verify with the fc-list command), how do you set them as default in all apps and web sites?
Well, there are two places where fonts are configured: system-wide configuration resides in /etc/fonts/ , and per-user configs are stored in ~/.config/fontconfig/fonts.conf (note that this used to be ~/.fonts.conf before fontconfig 2.10.1). For simplicity’s sake, we’ll do it in ~/.config/fontconfig/fonts.conf .
Let’s open up ~/.config/fontconfig/fonts.conf , or create it if it doesn’t already exist. Put the following skeleton structure in there:
We will put all of our custom configuration between
Setting Default Fonts
First, let’s set the default serif, sans serif, and monospace fonts. I’ll use the beautiful Chrome OS fonts as an example ( ttf-croscore if you’re running Arch Linux). Insert the following between
serif Tinos sans-serif Arimo sans Arimo monospace Cousine Aliasing Microsoft Fonts
Now, we will create aliases for commonly used fonts like Arial and Helvetica, so that our favorite fonts will always be used instead of these fonts, e.g. when requested by a web site.
Insert the following between
Arial Arimo Helvetica Arimo Verdana Arimo Tahoma Arimo Comic Sans MS Arimo Times New Roman Tinos Times Tinos Courier New Cousine Note that the Microsoft fonts are aliased directly to the our preferred substitute fonts. Aliasing to generic families (serif, sans-serif etc.) may or may not work depending on your configuration in /etc/fonts (they didn’t work for me), so it’s safer this way.
This list is of course by no means definitive; add/remove aliases as you like.
The Result
You’ll need to log out and back in for all applications to update. You should see the difference immediately:
Google search results, before (Arial):

Google search results, after (Arimo):

You can verify that the aliases have been set up correctly with fc-match :
for family in serif sans-serif monospace Arial Helvetica Verdana "Times New Roman" "Courier New"; do echo -n "$family: " fc-match "$family" done which should now give you something like:
serif: Tinos-Regular.ttf: "Tinos" "Regular" sans-serif: Arimo-Regular.ttf: "Arimo" "Regular" monospace: Cousine-Regular.ttf: "Cousine" "Regular" Arial: Arimo-Regular.ttf: "Arimo" "Regular" Helvetica: Arimo-Regular.ttf: "Arimo" "Regular" Verdana: Arimo-Regular.ttf: "Arimo" "Regular" Times New Roman: Tinos-Regular.ttf: "Tinos" "Regular" Courier New: Cousine-Regular.ttf: "Cousine" "Regular" Other Notes
Some existing examples you may find online show the following syntax:
This will produce an error message like
Fontconfig error: "/home/username/.config/fontconfig/fonts.conf", line 38: invalid attribute 'name' The fix is to change to just , as shown above.
How to Change Desktop Font on Ubuntu (Pssst, It’s Easy)
In this post we show you (and spoiler alert: it’s ridiculously easy).
Most of us think changing our GTK theme, swapping out our icon set, or using desktop bling are the best ways to give a dull desktop a distinctive makeover. But changing font can have an appreciable impact too.
Trying a new typeface is a simple, straightforward way to enhance the look and feel of Ubuntu.
Ubuntu uses ‘Ubuntu’ as its default desktop font, and has done since Ubuntu 10.10. Many Ubuntu flavors have chosen to use the typeface as their default system font too.
But all that similarity is a touch same-y. If don’t like the default font you can change it to something else. Perhaps you something more legible, less rounded, or better suited to your personality? Maybe you want to change Uuntu font size so that interface text appears bigger or smaller?
Changing the Desktop Font on Ubuntu
To change font on Ubuntu desktop (in version 18.04 LTS and above) we’re going to use the GNOME Tweaks app.
This tool is a real boon, and is something we recommend new user install after installing Ubuntu. It’s free, open source software available to install direct from Ubuntu Software app:
You can install GNOME Tweaks from the command line if you run this command in a new terminal window:
sudo apt install gnome-tweaks
However you choose to you install it, once you have you’re all set to tinker with your system’s typography!
- Open GNOME Tweak Tool
- Go to the ‘Fonts‘ section
- Choose a new font for ‘Interface Text‘
Clicking on the font field lets you browse for an alternative typeface using an interactive font picker.
On Ubuntu 20.04 changing the ‘Interface Text’ will also change GNOME Shell font too (meaning no additional hacks or workarounds are required).
To fully complete the look you may wish to change the ‘Legacy Window Title Font‘ too. This will ensure that any older apps you run respect your font choices.
Picking the best Linux desktop font is a subjective thing, but many Linux users love the fonts used in Pop!_OS. It uses Mozilla’s Fira Sans Book (at size 10pt). Want to try it? Just download Fira Sans and install it, then repeat the steps above.
Some other top UI font choices you can download and install from Google Fonts include:
Generally speaking you won’t need to change the ‘document’ or ‘monospace’ fonts. The former will affect the font used in applications like Evince, while the latter will change the font used in command line applications like the GNOME Terminal.
Reset Ubuntu Font Sizes
You can undo any font tweaks you make to interface, document and window title fonts in GNOME Tweaks, albeit manually.
Here are the settings you need:
- Interface text – Ubuntu regular – 11pt
- Document font – Ubuntu regular – 11pt
- Monospace – Ubuntu monospace – 13pt
- Legacy window title – Ubuntu bold – 11pt
Which fonts do you use on your Linux desktop? Reveal all in the comments below!
Home / How To / How to Change Desktop Font on Ubuntu (Pssst, It’s Easy)
How to Change System Text Font in Ubuntu / Debian / Fedora with Gnome

Want to change your system text font style? Well, here’s how to do it in the GNOME Desktop.
GNOME is the default Desktop Environment on many Linux systems including Ubuntu, Fedora, Debian, SUSE Linux, CentOS, Pop!_OS, Oracle Linux, SteamOS, Tails and Endless OS.
It also runs on other Linux as an alternative DE. If you even don’t know which desktop you’re running, simply open terminal and run the command below to tell:
1. Install Gnome Tweaks
Gnome Tweaks is a graphical interface for advanced Gnome settings. It’s available in most Linux systems. Just install it via your favorite system package manager:

2. Change System Fonts:
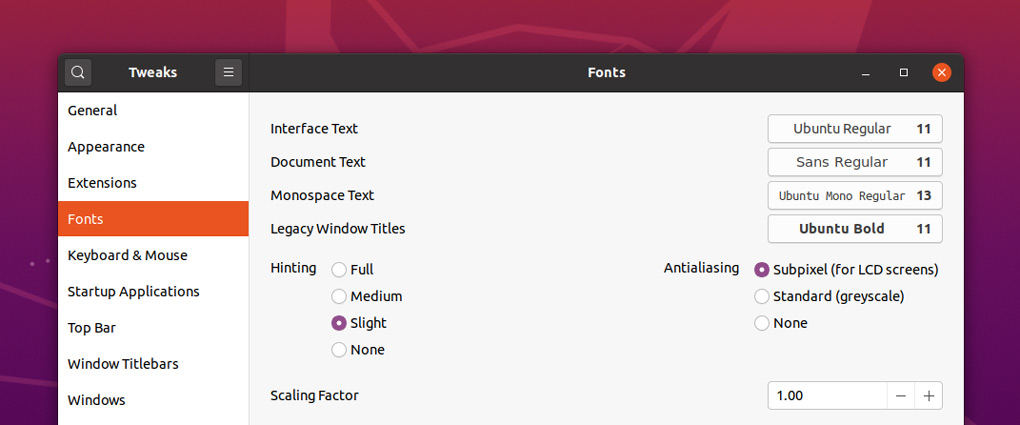
Next open Gnome Tweaks and navigate to Fonts in left pane. You’ll see the options to change the fonts for ‘Interface Text’, ‘Document Text’, ‘Monospace Text’, and ‘Legacy Window Titles’.

By changing the font of ‘Interface Text’, you’ll get new text style for system menu, app menu, app button text, file folder name, etc.

For document text, terminal screen text, simply change the value of ‘Monospace Text‘. And ‘Legacy Window Titles’ controls some app window title text.

However, ‘Document Text’ seems not to change anything in my case in Ubuntu Desktop. And some applications, e.g., Google Chrome, does not inherit your system fonts.
Get More Fonts:
Default system fonts does not match you need?
You can either download fonts (usually .tff files) manually from the web, and install them by putting into either .fonts or .local/share/fonts folder in user’s home.
They are hidden folders. Press Ctrl+H to show them and create if not exist.

Or, search for and install Font Manager from Ubuntu Software, Gnome Software, or your system package manager. Then use the tool to search, browse, and install Gnome webfonts.

After installing a font, you can apply it in Gnome Tweaks -> Fonts tab.
Restore Default System Fonts:
Gnome Tweaks does not offer buttons to reset fonts. There’s only ‘Reset to Defaults‘ option, which however will reset all settings, including themes, background, keyboard & mouse, some top bar and windows settings.

Specifically, to reset only system fonts open terminal and run the commands below one by one:
1. To reset ‘Interface Text’ value for system menu, app button text, etc:
gsettings reset org.gnome.desktop.interface font-name
2. To reset ‘Monospace Text’ for text in document file, terminal, etc:
gsettings reset org.gnome.desktop.interface monospace-font-name
3. For the value of ‘Document Text’ option, run command to restore:
gsettings reset org.gnome.desktop.interface document-font-name
4. And reset the ‘Legacy Window Titles’ font via command:
gsettings reset org.gnome.desktop.wm.preferences titlebar-font