- Use chown to set the ownership of all a folder’s subfolders and files?
- 6 Answers 6
- Chown Recursively
- [#short-answer]The short answer[#short-answer]
- [#chown-r][.inline-code]chown[.inline-code] recursively with [.inline-code]chown -R[.inline-code][#chown-r]
- [#chown-with-find][.inline-code]chown[.inline-code] recursively using the [.inline-code]find[.inline-code] command[#chown-with-find]
- [#chown-with-exec]Executing [.inline-code]chown[.inline-code] with the [.inline-code]-exec[.inline-code] option flag[#chown-with-exec]
- [#chown-with-natural-lang]Remind yourself how to [.inline-code]chown[.inline-code] recursively with natural language[#chown-with-natural-lang]
- [#caution]A word of caution[#caution]
- How Do You Make Chown Recursive?
- Syntax:
- Example 01: Simple Chown
- Chown Recursive Using –R Flag:
- Example 01: Change Owner
- Example 02: Change Group
- Example of Simple Chown:
- Conclusion:
- About the author
- Aqsa Yasin
Use chown to set the ownership of all a folder’s subfolders and files?
Will any of these answers work if the files inside a folder are owned by someone else and only have user read/write permission?
6 Answers 6
Usage: chown [OPTION]. [OWNER][:[GROUP]] FILE. or: chown [OPTION]. --reference=RFILE FILE. Change the owner and/or group of each FILE to OWNER and/or GROUP. [. ] -R, --recursive operate on files and directories recursively [. ] So you need to run (probably with sudo ):
chown -R USERNAME:GROUPNAME /PATH/TO/FILE Or, if the group shall be the specified user’s primary group (usually same name), you can also omit the GROUPNAME and just give the USERNAME: with a colon (no space before it!). It will be set implicitly:
chown -R USERNAME: /PATH/TO/FILE To only change the user and leave the group as it is, just specify USERNAME and no group name and no colon:
chown -R USERNAME /PATH/TO/FILE To only change the group and leave the owner user as it is, just specify :GROUPNAME with a leading colon:
chown -R :GROUPNAME /PATH/TO/FILE My username is timo and I did this to take ownership to all my files and folders on home directory (transferred from another account):
~$ sudo chown -R timo /home/timo/* This is how I normally do it, and I usually do this one folder at a time. Doesn’t take but a few moments to work through each folder.
This will also change ownership of symlinks instead of just the destination files that the symlinks point to.
man chown chown options user:group files/folders Not sure why other answers did not cover one dot. : And . are interchangeable, so you can use one dot for instance
chown -R user.group files/folders Either get to the terminal display mode as described elsewhere or do a ssh login from another computer. Usually the account is intact and it will be accessible via ssh.
You may also have an account on the same machine without the login loop problem. If you do, then login to that account (assuming it will let you sudo).
Once in, open a terminal and find the directory under which you can see the username directories. i.e. /home/username1 /home/username2
if any of the user directories is owned by root change it by running:
sudo chown -R username:username /home/username This example is based on an architecture where the user directories are under /home/
Run ls -l again to confirm the directory is owned by the user.
This was tested on Ubuntu 20.04
Chown Recursively

On Unix-like and Linux operating systems such as Ubuntu, the [.inline-code]chown [.inline-code] command is used to change the ownership of files and directories.
[#short-answer]The short answer[#short-answer]
# using -R $ sudo chown -R owner:group directory # using find $ find . -type d -exec sudo chown user:group <> \; # using natural language with Warp AI Command Search $ # chown recursive just files
[#chown-r][.inline-code]chown[.inline-code] recursively with [.inline-code]chown -R[.inline-code][#chown-r]
The first option for recursively changing the ownership of the files and subdirectories contained in a directory, is to use the [.inline-code]-R[.inline-code] option flag as follows:
$ sudo chown -R owner:group directory
- [.inline-code]owner[.inline-code] is the username of the new owner
- [.inline-code]group[.inline-code] is the name of the new group
- [.inline-code]directory[.inline-code] is the path to the target directory
For example, given the following folder structure in [.inline-code]/var/www[.inline-code]:

To recursively transfer the ownership of the [.inline-code]/var/www[.inline-code] directory to the [.inline-code]johndoe[.inline-code] user and the [.inline-code]developers[.inline-code] group, you can run the following command:

[#chown-with-find][.inline-code]chown[.inline-code] recursively using the [.inline-code]find[.inline-code] command[#chown-with-find]
Another option for recursively changing the ownership of files based on their type or name, is to use a combination of the [.inline-code]find[.inline-code] and [.inline-code]chown[.inline-code] commands.
On its own, the [.inline-code]find[.inline-code] command is used to recursively search for files and directories based on a certain criteria.
For example, the following command will list all the subdirectories present in the [.inline-code]/var/www[.inline-code] directory:

[#chown-with-exec]Executing [.inline-code]chown[.inline-code] with the [.inline-code]-exec[.inline-code] option flag[#chown-with-exec]
To change the ownership of files returned by the [.inline-code]find[.inline-code] command, you can use the [.inline-code]-exec[.inline-code] option flag followed by the [.inline-code]chown[.inline-code] command:
$ find . -type d -exec sudo chown user:group <> \;
Where the [.inline-code]<> \;[.inline-code] expression will be replaced at runtime by each file path returned by [.inline-code]find[.inline-code].

Alternatively, you can speed up the process using the [.inline-code]<> +[.inline-code] expression, which will be replaced at runtime by as many file paths as possible for each execution of [.inline-code]chown[.inline-code], instead of one by one.
$ find . -type d -exec sudo chown user:group <> +
[#chown-with-natural-lang]Remind yourself how to [.inline-code]chown[.inline-code] recursively with natural language[#chown-with-natural-lang]
Warp has a pretty handy feature called Artificial Intelligence Command Search (AICS) that helps generate shell commands with natural language.
For example, to retrieve the previous command using the AICS, you can start by typing a [.inline-code]#[.inline-code] sign, followed by a short sentence describing your command:

You can now press [.inline-code]cmd[.inline-code] + [.inline-code]Enter[.inline-code] to edit and use the suggested command:

[#caution]A word of caution[#caution]
When using [.inline-code]chown -R[.inline-code] in combination with wildcards [.inline-code]*[.inline-code], you should be extra careful with the patterns matched by your command.
For instance, patterns such as [.inline-code].*[.inline-code] will match both hidden files beginning with a dot character (e.g. [.inline-code].env[.inline-code]) as well as the hard link to the parent directory (i.e. [.inline-code]..[.inline-code]).
You should also be careful not to insert any undesirable spaces or typos in the path of the target directory, especially if your path starts at the root directory ([.inline-code]/[.inline-code]), as you might otherwise end up with a broken system.
# DO NOT RUN THIS COMMAND $ sudo chown -R / var/www
As a rule of thumb, it is usually discouraged to change the ownership of files that belong to the system or the root user.
How Do You Make Chown Recursive?
![]()
You may sometimes find errors while using any Linux operating system such as denied while editing a file. This is because of fewer rights on that particular file. Chown is usually abbreviated as “change ownership”, which means that the Chown is an instruction for changing the owner of a group of files and folders on Linux. Moreover, you need to modify the owner of a folder that holds all of the documents in certain situations. You might have to consume recursive chown, which is one of the choices of the chown instruction. Recursive means chown will be done for all documents in the specified directory, and also files and folders inside all sub-directories. You’ll discover how to recursively modify the directory and file authorizations while using the chown instruction in this guide.
Syntax:
Example 01: Simple Chown
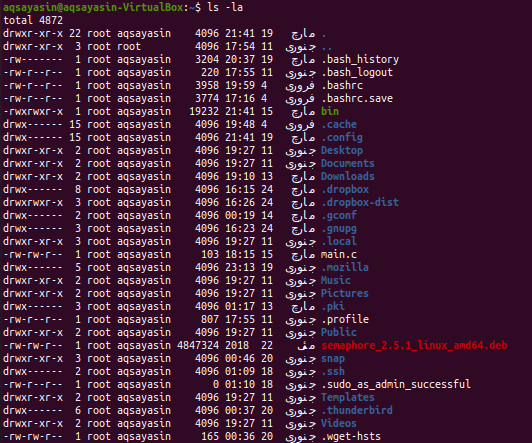
First, we need to see how the chown command works. Open the command-line terminal from the Applications. Arrange all the folders and files from the home directory of user “aqsayasin” using the list command. The output shows a list of files and folders as shown.

We have a file “main.c” in the Home directory of the user “aqsayasin”. We have to check the owner of a specific file to further apply changes. For this particular purpose, we will be using the “ls –lart” instruction. As shown below, we can say that the user “aqsayasin” is its owner and it resides in the group “aqsayasin”.

Let’s modify it by changing its owner to “root” user. We will be using the below “chown”command to do so.

Now, upon checking the file owner and group using the same “ls –lart” command, you can see the owner has been changed. The output shows that “root” user as its owner, and it belongs to the same group “aqsayasin”.

Chown Recursive Using –R Flag:
The first and easiest way is to use the -R flag to specify the recursive nature of chown instruction. Let’s first check the owners of all the files and folders residing in the Home directory of the user “aqsayasin” using the below “ls” command. From the below output, we can view that the owner of all the files except two of them is the user “aqsayasin”.

Example 01: Change Owner
Now, it’s time to change the owner of all the files and folders using the –R flag with chown query. So we will be using sudo privileges to do this. Try the below “chown” command followed by the “-R” flag along with the name of the owner which is “root”. We have provided the directory location within this instruction. This means all the files and folders residing in the “aqsayasin” folder of the “Home” directory will have an owner “root” instead of the user “aqsayasin”. It may require your root account password to apply the changes.

After the execution of the chown command, it’s time to check whether the changes have been made effectively or not. For this particular purpose, we will be using the same list command as we used before. So the output shows that all the files are changed into “root”.

Example 02: Change Group
After changing the owner, it’s time to change the group of all files and folders using the –R flag within chown instruction. First, list all the files and folders using the list command. You can observe all the files and folders lies in the group “aqsayasin”.
We will change the group to “root” from “aqsayasin”. For this, we will be using the chown command with the –R flag. There is a slight change in this command. To change the group we will be using the “:” before the group name. We will provide the location of the directory for which we want to change the group of its subfolders. Use the “sudo” keyword to apply the group name. It may require your sudo account password to apply these changes as below.

After applying the changes, we will list again all files and folders to check the update. Use the below list command to do so. You can see the group of all files and folders has been changed to “root”.

Example of Simple Chown:
Let’s take a simple example other than chown. You have to create two files name “one.txt” and “scnd.txt” using the touch command as follows:

Let’s check the owner and group of both the files using the list command as below:
You can see both the files have the same owner and group, e.g., “aqsayasin”.

Let’s first change the owner of file “one.txt” to “root” user using the simple “sudo chown” command followed by the owner name and file name as below:

Upon checking the first file again using the list command, you can see the owner has been changed to “root”.

Now we will assign the same rights of the first file to the second file using the “reference” in the chown command followed by the first filename. After that, you have to provide the name of the second file upon which the changes will be applied as below:

Now, check the owner and group of the second file using the same list command as shown below:

From the output below, we can see that the owner has been changed to ‘root’.
Conclusion:
We have done the chown recursive using the “-R” flag. Hopefully! You will get no problem while using this guide.
About the author
Aqsa Yasin
I am a self-motivated information technology professional with a passion for writing. I am a technical writer and love to write for all Linux flavors and Windows.