- How to Edit Hosts File on Linux?
- Why Edit Hosts File?
- How to Edit Hosts File on Linux?
- Block a Website
- Name Service Switch
- Conclusion
- About the author
- Simran Kaur
- How to Edit Hosts File in Linux, Windows, or Mac
- How to Edit Linux Hosts File
- Step 1: Open a Terminal Window (Command Line)
- Step 2: Open the Linux Hosts File
- Step 3: Modify the File
- Step 4 (Optional): Name Service Switch
- How to Edit Hosts File in Windows
- Step 1: Open Notepad as an Administrator
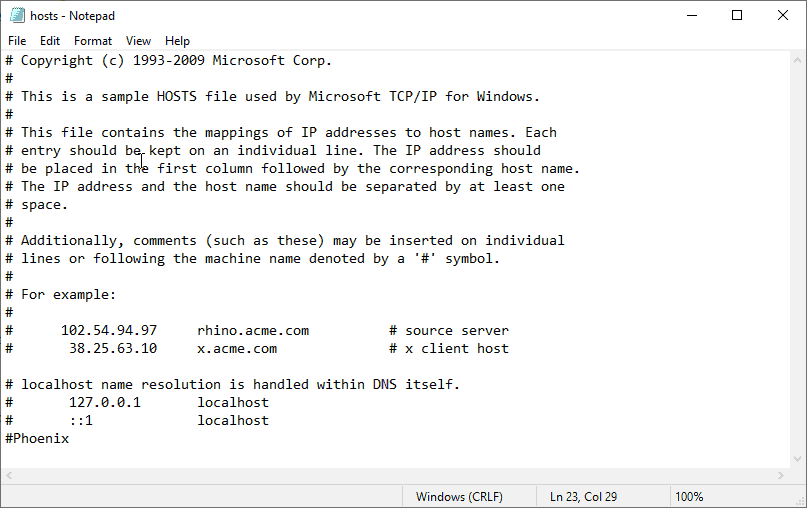
- Step 2: Open the Windows Hosts File
- Step 3: Edit the File
- How to Edit Mac Hosts File
- Step 1: Open the Mac Terminal
- Step 2: Edit Mac Hosts File
- How to Edit the Local Hosts File on Ubuntu Linux
- Open Ubuntu Hosts File
- Add Host Records
How to Edit Hosts File on Linux?
![]()
A Hosts file is supported in Linux, Windows, and Mac; they are plain-text files that work to map hostnames to various IP addresses. It is great to edit the Hosts file when you run the test on the specific network. You can also use the mapping of an IP address to skip the process in which the web browser uses the DNS (Domain Name Server) lookup for translating a domain name to a particular IP address.
When a user types a website’s domain name, the domain name needs to translate into a specific IP address. A Hosts file has a top priority over DNS since an operating system checks its Hosts file for a domain and in case there is no entry for that domain. It starts to query the configured DNS servers for resolving the particular domain name. It was the little information about the Hosts file, and we will consider every single aspect on how to edit Hosts files on Linux easily.
Why Edit Hosts File?
There are various reasons for editing hosts file in the Linux machine:
- You can easily block a website.
- You can handle an attack.
- You can create an alias for different locations on a local server.
- You can override addresses that a DNS server delivers.
- You can easily control access to network traffic.
How to Edit Hosts File on Linux?
Open the terminal from applications > utilities > terminal feature, or you can use CTRL, ALT, and T as shortcut keys.
After opening the terminal, open the Linux Hosts file in the system using the following command:
We have used Vim, but you can use different text editors like nano.
Once you execute the command, the system will prompt you to enter the password to open the Hosts file.
You can easily modify the Hosts file, so the file is formatted like the IP address is written first, and the server’s name is on second.
You can add entries at the end of the Hosts file as per your requirements. In case you want to ignore any line or specify the system to not read the line, then you can put the “#” sign at the starting of that particular line. Finally, you can save the file before and make sure you save it before exiting.
Block a Website
If you want to block a particular website from redirecting it to the localhost’s IP address, change the Hosts file’s domain name. For example, we want to block xxyyzz.com, then we can write:
In the above text, 134.1.0.1 is the IP of the localhost, but if you want to make changes in the default route, then you can write:
In the above text, 0.0.0.0 IP is a default route from this particular Hosts file.
At last, you can press CTRL and X keys simultaneously to save the file.
Name Service Switch
As mentioned, a Hosts file works to bypass a Domain Namer server lookup. Still, it has another file that has the information of the operating system about the order for finding the IP address translation.
The nsswitch.conf is a file completely configured for finding the DNS, then skips the Hosts file and goes in the DNS lookup. You can use the below command line for configuration checking easily:
xyz@xyz-virtualBox:~$ cat etc nsswttch.conf
# /etc/nsswitch.conf
#
# Example configuration of GNU Name Service Switch functionality.
# If you have the ‘glibc-doc-reference’ and ‘info’ packages installed, try:
# ‘info libc «Name Service Switch»‘ for information about this file.
passwd: compat systemd
group: compat systemd
shadow: compat
gshadow: files
hosts: files mdns4_minimal [ NOTFOUND = return ] dns myhostname files
networks: db files
protocols: db files
services: db files
ethers: db files
rpc: db files
netgroup: nis
xyz @ xyz-VirtualBox: ~$
There is an entry called “Hosts,” ensuring that the files should be listed in the right-hand column in the above results. In case it is not listed like this, then open your file editor using the below command:
This command will open the Vim text editor to make changes and set the files at the beginning for appropriate use.
Conclusion
The Hosts files are beneficial to perform multiple tasks for domain names and IP addresses. It was the complete information on the Hosts file and how you can easily edit the Hosts file on Linux. This procedure is tried and tested on multiple Linux machines, but you have to carefully follow every step.
About the author
Simran Kaur
Simran works as a technical writer. The graduate in MS Computer Science from the well known CS hub, aka Silicon Valley, is also an editor of the website. She enjoys writing about any tech topic, including programming, algorithms, cloud, data science, and AI. Travelling, sketching, and gardening are the hobbies that interest her.
How to Edit Hosts File in Linux, Windows, or Mac
The hosts file in Windows, Mac, or Linux maps hostnames to IP addresses. For example, an intranet, like a corporate office that has servers for users to access, or it could be domain names for servers on the internet.
Editing your hosts file can be useful if you are running tests on your network. By mapping an IP address to a server name (or domain name), you can skip the process where a web browser uses a Domain Name Server(DNS) lookup to translate the domain name to the IP address.
In this tutorial, learn how to edit hosts file on Linux, Windows, or Mac.
How to Edit Linux Hosts File
Step 1: Open a Terminal Window (Command Line)
Most Linux distributions have an applications > utilities > terminal feature, or an option to right-click the desktop and click Open Terminal.
Step 2: Open the Linux Hosts File
To open the Linux hosts file, type the command:
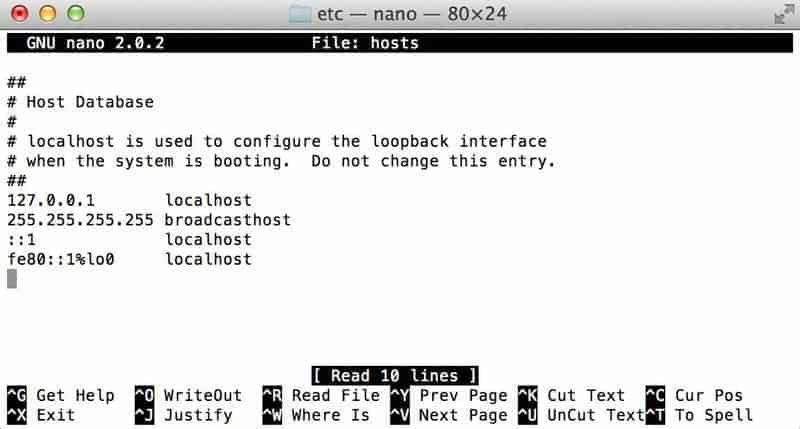
Instead of Vim, you can use any other text editor, like nano.
The system should prompt for your password – enter it, and the Hosts file should open.
Step 3: Modify the File
The hosts file in Linux is formatted so that the IP address is first, and the server name is second.
Add any entries you wish to the end of the file. If you make a mistake or need to tell your operating system to ignore a line, add the ‘#’ sign at the beginning of that line.
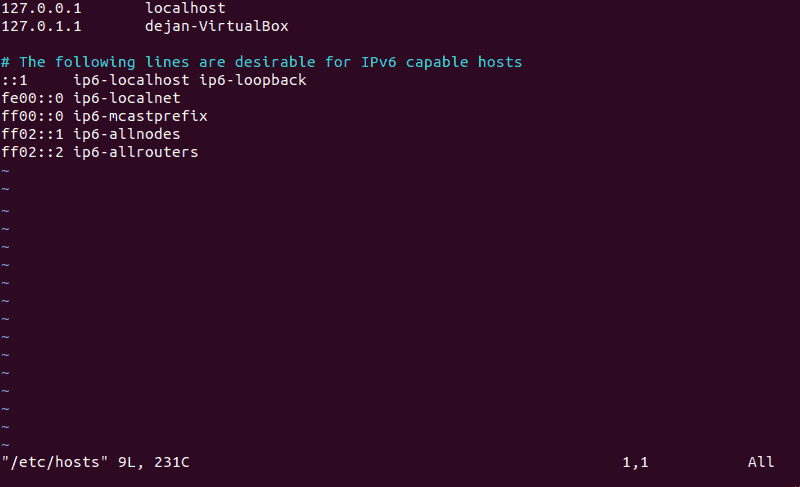
Make sure you save the file in Vim before you exit!
Step 4 (Optional): Name Service Switch
The hosts file bypasses the standard Domain Name Server lookup. In Linux, there’s another file that tells the operating system what order to look for the IP address translations.
The file is nsswitch.conf, and if it’s configured to look at DNS first, then it’ll skip your hosts file and go straight to DNS lookup.
To check the configuration, in your terminal window type:
The terminal will return a list of information.
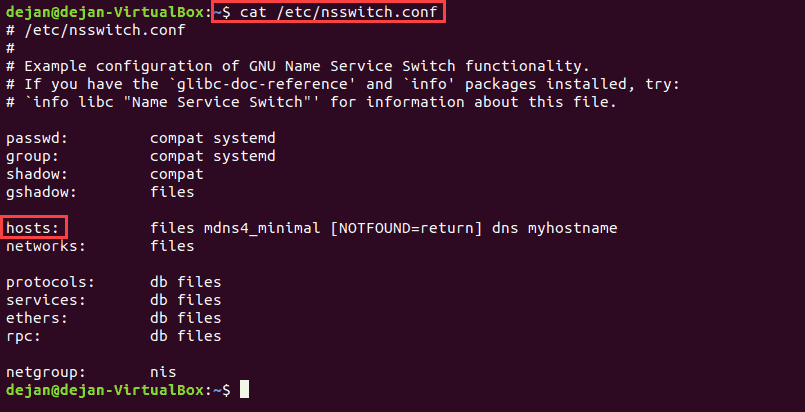
About halfway down, there should be an entry labeled “hosts”. Make sure that the right-hand column lists files first. If for some reason DNS is listed first, open the file in your text editor:
It should open the nsswitch.conf file. For the hosts: setting, change the entry so that files is at the beginning of the entry, and dns is at the end.
Note: Check out our tutorial Linux sed Command: How To Use the Stream Editor to learn how to edit lines in a Linux text file without a text editor.
How to Edit Hosts File in Windows
Step 1: Open Notepad as an Administrator
You’ll need administrator privileges for this operation.
- Click the Windows button and type “notepad.” Let the search feature find the Notepad application.
- Right-click the Notepad app, then click Run as administrator.
- Windows User Account Control should pop up asking, “Do you want to allow this app to make changes to your device?” Click Yes.
Step 2: Open the Windows Hosts File
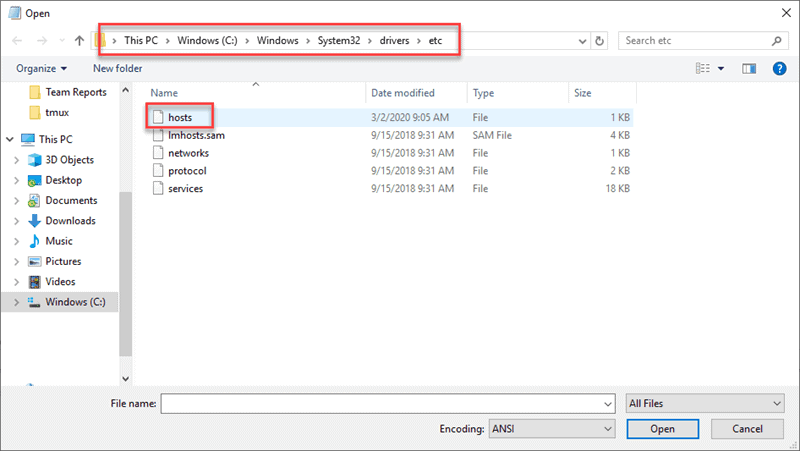
- In Notepad, click File>Open
- Navigate to c:windowssystem32driversetc
- In the lower-right corner, just above the Open button, click the drop-down menu to change the file type to All Files.
- Select “hosts” and click Open.
Step 3: Edit the File
The Windows hosts file is that it gives you a brief explanation of how to write a new line. Here’s a brief breakdown:
The first set of four (4) digits is the IP address you’re mapping. This could be the internal IP address of a server on the network, or it could be the IP address of a website.
The second label is the name you want to be able to type in a browser to access the server at the IP address you just specified.
Once you’re finished making your changes, save the file (File > Save) and exit.
If you make an edit to the hosts file and something stops working, you can tell Windows to ignore any line by putting a # sign at the beginning of that line.
How to Edit Mac Hosts File
Step 1: Open the Mac Terminal
Open the Finder, and go to Applications > Utilities > Terminal
Type the following in the terminal window:
sudo nano /private/etc/hostsThe system should prompt you to enter your password – this is the same password you use to log in to the system. Type it in, and hit Enter.
Step 2: Edit Mac Hosts File
The IP address is first, and the server name comes second. Comments are indicated with a ‘#’ sign. Consider the example below:
Enter the IP address you want to refer to first, hit space, and then the server name (or domain name) that you want to associate with it.
If you make a mistake, you can tell Mac OS to ignore a line by typing a # at the beginning of that line.
Save your changes by pressing Command + O, then exit by pressing Command + X.
Editing the hosts file in Windows, Mac, or Linux operating system is a simple task.
It’s especially handy that the file looks the same, no matter which you’re running! Just make sure you know the IP address of the server you want to connect to, and then specify the name you want to type into a browser, and you’ll be on your way!
How to Edit the Local Hosts File on Ubuntu Linux

This brief tutorial shows students and new users how to edit or modify Ubuntu local host files.
When you think of a host file, think of it as a plain-text file used by the operating systems to map IP addresses to the hostname on the local computer. The host’s file has priority over DNS.
When you type a domain name in your browser to go to a website, your computer translates the domain name your typed into an IP address and connects to the server that hosts the website.
While translating the name to IP, the local host’s file is the first file your operating look at. If the IP to domain mapping isn’t included in the host file, it looks up a DNS server online. This is how the process works.
When dealing with a host file, the IP address and the domain or hostname should be separated by at least one space or tab. The lines starting with # are comments and are ignored.
When you’re ready to edit Ubuntu local host file, follow the steps below:
Open Ubuntu Hosts File
The process of editing Ubuntu host files is simple. To add an entry or modify the host’s file, simply run the commands below to open the host’s file.
Similar lines below should appear in the file.
127.0.0.1 localhost 127.0.1.1 ubuntu1804 # The following lines are desirable for IPv6 capable hosts ::1 ip6-localhost ip6-loopback fe00::0 ip6-localnet ff00::0 ip6-mcastprefix ..
Changes you make to the host’s file take effect immediately. If you want to undo changes to the host’s file, simply open the file and remove the lines you added or precede the line with a # to ignore it.
Add Host Records
For example, to add an entry to translate 127.0.0.1 to example.com , open the host’s file and add its entry by scrolling down to the end of the file and add your new entries:
127.0.0.1 localhost 127.0.1.1 ubuntu1804 127.0.0.1 example.com # The following lines are desirable for IPv6 capable hosts ::1 ip6-localhost ip6-loopback As we said above, the changes take effect immediately. You can use example.com in your browser when you save the file.
This is how one adds or modifies Ubuntu hosts file entry.
You may also like the post below:
Richard W
I love computers; maybe way too much. What I learned I try to share at geekrewind.com.