- How to Change Process Priority using Linux Nice and Renice Examples
- 1. Display Nice Value of a Process
- 2. Launch a Program with Less Priority
- 3. Launch a Program with High Priority
- 4. Change the Priority with option -n
- 5. Change the Priority of a Running Process
- 6. Change the Priority of All Processes that Belongs to a Group
- 7. Change the Priority of All Processes Owned by User
- Linux commands: How to manipulate process priority
- Great Linux resources
- Process priority and relativity
- Priority report
- Manipulating existing niceness
- One last thing
- Changing Priority on Linux Processes
- Checking the Priority of Running Processes
- Setting priority on new processes
- Setting Priority on Existing Processes
- Setting Permanent Priority on all Processes for a Specific User
How to Change Process Priority using Linux Nice and Renice Examples
Every running process in Unix has a priority assigned to it. You can change the process priority using nice and renice utility. Nice command will launch a process with an user defined scheduling priority. Renice command will modify the scheduling priority of a running process. Linux Kernel schedules the process and allocates CPU time accordingly for each of them. But, when one of your process requires higher priority to get more CPU time, you can use nice and renice command as explained in this tutorial.
The process scheduling priority range is from -20 to 19. We call this as nice value. A nice value of -20 represents highest priority, and a nice value of 19 represent least priority for a process. By default when a process starts, it gets the default priority of 0.
1. Display Nice Value of a Process
The current priority of a process can be displayed using ps command. The “NI” column in the ps command output indicates the current nice value (i.e priority) of a process.
We’ll launch a test program called test.pl which will be used to demonstrate nice and renice command. This test program will do certain tasks, and will be running for a while.
If you execute ps command as shown below, you can notice that this test.pl program has the default nice value of 0 (look at the NI column in the following output).
$ ps -fl -C "perl test.pl" F S UID PID PPID C PRI NI ADDR SZ WCHAN STIME TTY TIME CMD 0 R bala 6884 6424 99 80 0 - 1556 - 13:45 pts/3 00:05:54 perl test.pl
2. Launch a Program with Less Priority
Instead of launching the program with the default priority, you can use nice command to launch the process with a specific priority. In this example, test.pl is launched with a nice value of 10.
Note: Remember that -10 in the above command sets the priority of a process to 10. The – in nice command stands for the hypen, which we use to pass options to the command. So, to pass nice value of 5, you’ll say -5. To pass nice value of 6, you’ll say -6. As you see below, this program is now launched with a nice value of 10, which means this will run at a lower priority when compared to other programs that are launched by default.
$ ps -fl -C "perl test.pl" F S UID PID PPID C PRI NI ADDR SZ WCHAN STIME TTY TIME CMD 0 R bala 7044 6424 99 90 10 - 1556 - 13:58 pts/3 00:00:03 perl test.pl
3. Launch a Program with High Priority
You can also launch a program with a higher priority. Negative nice value will increase the priority a the process. So, the value has to be specified with a — (two hyphens) in front of the nice command as shown below.
So, to pass nice value of -5, you’ll add two hyphens in front of 5. To pass nice value of -6, you’ll add two hyphens in front of 6. As you see below, this program is now launched with a nice value of -10, which means this will run at a higher priority when compared to other programs that are launched by default.
# ps -fl -C "perl test.pl" F S UID PID PPID C PRI NI ADDR SZ WCHAN STIME TTY TIME CMD 4 R root 3534 3234 99 70 -10 - 1557 ? 19:06 pts/1 00:00:56 perl test.pl
Note: Regular users are not allowed to launch a program with a higher priority. Only root user is allowed to launch a program with high priority. As a regular user, if you increase the priority, you’ll get the following error message from nice command.
$ nice --10 perl test.pl nice: cannot set niceness: Permission denied
Note that after printing the above error message, the program would still continue to run with the default priority (i.e : 0).
4. Change the Priority with option -n
5. Change the Priority of a Running Process
The priority of an already running process can be changed using renice command. In this example, the program test.pl is already running with a nice value of -10.
# ps -fl -C "perl test.pl" F S UID PID PPID C PRI NI ADDR SZ WCHAN STIME TTY TIME CMD 4 R root 3534 3234 99 70 -10 - 1557 ? 19:06 pts/1 00:00:56 perl test.pl
We can change the nice value of the above program to -19 as shown below. Pass the process id of the above program to -p option.
# ps -fl -C "perl test.pl" F S UID PID PPID C PRI NI ADDR SZ WCHAN STIME TTY TIME CMD 4 R root 3534 3234 99 70 -19 - 1557 ? 19:06 pts/1 00:00:56 perl test.pl
6. Change the Priority of All Processes that Belongs to a Group
Using -g option you can modify the priority of all processes that belongs to a group. The following command will change the nice value of all the process that belongs to geekstuff to 5.
7. Change the Priority of All Processes Owned by User
The above command will change the priority of all the processes owned by user bala. It will assign a nice value of 5 to all the processes that belongs to user bala.
# ps -fl -C "perl" F S UID PID PPID C PRI NI ADDR SZ WCHAN STIME TTY TIME CMD 0 R bala 2720 2607 99 85 5 - 1556 - 14:34 pts/2 00:05:07 perl test.pl 0 R bala 2795 2661 99 85 5 - 1556 - 14:39 pts/3 00:00:09 perl 2.pl
Linux commands: How to manipulate process priority

Managing processes in Linux is a fundamental concept that every good system administrator should be familiar with. A majority of the work you do with these processes consists of basic, repetitive tasks such as starting and stopping processes, searching for them, killing them, etc.
Great Linux resources
In some less frequent cases, you may need to re-order your processes due to system resource allocation. When these situations arise, many of us will take to our favorite search engine to figure out the most efficient way to do this. Now that the search algorithm has brought you here to Enable Sysadmin, let’s serve up the answers you are looking for.
I will break down how priority is determined and then show you how to manipulate those values below.
Process priority and relativity
Linux systems routinely run more processes than there are processing units in the computer. Because of this, the process scheduler will quickly jump between processes on a single core, thus creating the illusion that we are running multiple, simultaneous processes.
In reality, each process is assigned a process scheduling policy. Within this policy, there is a 40 point scale used to measure the nice levels of a process. The nice level is a unit of measure that describes the relative priority of the process. When discussing niceness levels, note that the scale is -20 (highest priority) to 19 (lowest priority), and that a process inherits its nice level from the parent (most often 0).
Now, if a process has a lower niceness level (sub-zero), then it will be less likely to give up its CPU usage (not very nice, is it?). On the flip side, a process with a high niceness value (exceeding zero) will be more likely to give up CPU usage.
An easy way to remember this is if someone (or a process) is really nice, they are more inclined to share with others. If they are not very nice, they tend to be more protective over what belongs to them (CPU resources, in this case).
Also, if there is no shortage of resources, even processes with high niceness levels will use all available CPU time. The only time a process will yield its resources is when there is a bandwidth shortage.
Priority report
Now that we have all of the context surrounding process priority, let’s look at some of the ways to view this information at the terminal.
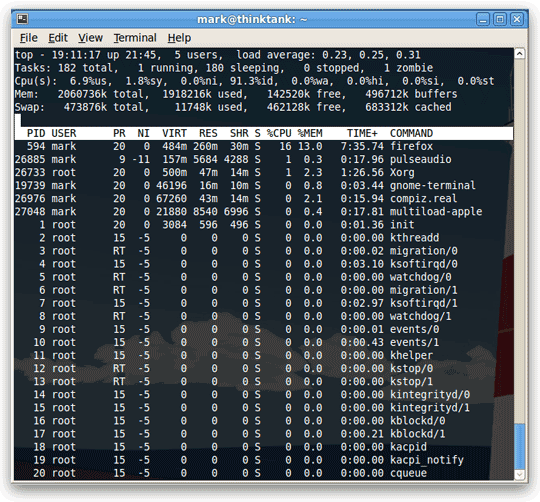
The quickest, most basic way to view niceness information is to use the top command. It displays this information by default in the fourth column (left to right) and therefore doesn’t require any additional options or flags.
The other and slightly more involved method is to use the ps command with a generous helping of formatting options. The following command will display processes with their process IDs, name, niceness level, and scheduling class (sorted descending):
[tcarrigan@localhost ~]$ ps axo pid,comm,nice,cls --sort=-niceManipulating existing niceness
We now know how to view an existing process’s niceness, but what if that nice level doesn’t suit our needs? How can we change those values to get the most out of our system? Well, if you have a particular process that is eating up resources that you need elsewhere, you can lower the nice level of that specific process. To do this, we will use the renice command.
Note: only the root user may reduce a niceness level (increase priority). Unprivileged users may increase nice levels but cannot decrease them without root permissions.
Take a look at this sleep 500 process. It has a PID of 23990 and a default nice level of 0.
[tcarrigan@localhost ~]$ ps -o pid,comm,nice 23990 PID COMMAND NI 23990 sleep 0If I wanted to make that process less of a priority, I would use the following renice command:
To make the process more important (lowering the nice level), you would use the same command syntax as a privileged user.
One last thing
Okay, before we wrap up, there is one more trick I wanted to include here. If you are going to start a process that usually has a default nice level that is undesirable, you can actually set that parameter as you spawn the process. We will use the sleep command again. However, this time, we will create it with the nice command (which defaults the process to nice level 10).
You can set a specific nice level by using the same command with the following syntax:
[tcarrigan@localhost ~]$ nice -n 19 sleep 500 &The above command sets the background sleep 500 to a nice level of 19.
These commands were a ton of fun to learn and show off. In the future, when I run into issues with system resources or hungry processes, I can modify the resources allocated to them.
Changing Priority on Linux Processes

When talking about processes priority is all about managing processor time. The Processor or CPU is like a human juggling multiple tasks at the same time. Sometimes we can have enough room to take on multiple projects. Sometimes we can only focus on one thing at a time. Other times something important pops up and we want to devote all of our energy into solving that problem while putting less important tasks on the back burner.
In Linux we can set guidelines for the CPU to follow when it is looking at all the tasks it has to do. These guidelines are called niceness or nice value. The Linux niceness scale goes from -20 to 19. The lower the number the more priority that task gets. If the niceness value is high number like 19 the task will be set to the lowest priority and the CPU will process it whenever it gets a chance. The default nice value is zero.
By using this scale we can allocate our CPU resources more appropriately. Lower priority programs that are not important can be set to a higher nice value, while high priority programs like daemons and services can be set to receive more of the CPU’s focus. You can even give a specific user a lower nice value for all of his/her processes so you can limit their ability to slow down the computer’s core services.
Checking the Priority of Running Processes
The easiest way to get a quick picture of what the current niceness priority on a process is to open up the top processes with:
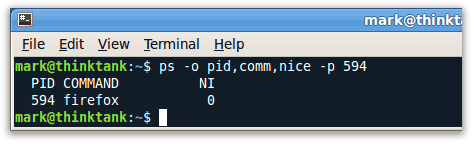
Another way you can get the nice value is use ps:
This will output the process ID, command, and nice value (marked as NI).
Setting priority on new processes
At this point you are probably wondering how you can set your own priority levels on processes. To change the priority when issuing a new command you do nice -n [nice value] [command]:
This will increment the default nice value by a positive 10 for the command, ‘apt-get upgrade’ This is often useful for times when you want to upgrade apps but don’t want the extra process burden at the given time. Remember a positive number is gives less priority for a process.
Setting Priority on Existing Processes
Obviously at some point you are going to want to alter the nice value of something that is already running. Just the other day I was doing an upgrade to Ubuntu Jaunty and Firefox started to become unusably slow. A quick renice command rescheduled the upgrade to a lower priority and I was back to surfing in no time.
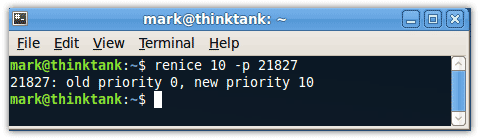
To change the priority of an existing process just do renice [nice value] -p [process id]:
This will increment the priority of the process with an id of 21827 to 10.
Note: Only root can apply negative nice values.
Setting Permanent Priority on all Processes for a Specific User
Sometimes it is helpful to give specific users lower priority than others to keep system resources allocated in the proper places like core services and other programs.
You can set the default nice value of a particular user or group in the /etc/security/limits.conf file.
It uses this syntax: [username] [hard|soft] priority [nice value]
backupuser hard priority 1