- How do you change the default shell for ALL USERS to bash?
- 3 Answers 3
- Как в Linux изменить login shell (оболочку входа в систему). Инструкция по команде chsh
- Как узнать, какие оболочки установлены в системе
- Программа для смены оболочки пользователя — chsh
- Смена оболочки с помощью usermod
- Changing the Default Shell in Linux
- 1. Overview
- 2. Introduction to the chsh Command
- 3. Which Shell Am I Currently Using?
- 4. Changing the Default Shell of the Current User
- 5. Changing the Default Shell of Other Users
- 6. Editing the /etc/passwd File
- 7. Conclusion
How do you change the default shell for ALL USERS to bash?
I want every new user from now on to have bash as their shell by default. I know that to change your own shell to bash, you would use the command «chsh -s /bin/bash», but how do I automatically set all future users’ shell to bash by default?
3 Answers 3
The adduser defaults file is /etc/adduser.conf . The default shell defined by the DSHELL variable is /bin/bash by default.
Most likely you don’t need this because useradd is a very low-level utility, and it’s hardly ever used directly.
If you use useradd, edit the /etc/default/useradd skeleton file (don’t forget to make a backup though).
Set the SHELL variable to /bin/bash instead of /bin/sh .
Now every time you use useradd to add a new user bash is automatically their default shell.
Already existing users
If you want to change the shell of already existing users you have to edit the /etc/passwd file (please make sure to back have a backup of it).
Here is a description of the columns
- login name
- optional encrypted password
- numerical user ID
- numerical group ID
- user name or comment field
- user home directory
- optional user command interpreter
In that order separated by colons (:) like this.
For more information about that file consult the man page man 5 passwd .
Как в Linux изменить login shell (оболочку входа в систему). Инструкция по команде chsh
Вход в систему обрабатывается оболочкой и другими инструментами, например, сам login или ваш диспетчер рабочего стола (с помощью PAM и различных других инструментов).
Назначение оболочки входа не в том, чтобы обрабатывать вход в систему, а в том, чтобы вести себя соответствующим образом как первая оболочка в сеансе входа в систему: в основном это означает обработку файлов запуска, которые должны обрабатываться только один раз за сеанс входа, и защиту сеанса входа в систему от нежелательных взаимодействие с некоторыми функциями системы (в частности, приостановка работы).
Особенности оболочки входа, по крайней мере, реализованной в Bash, заключаются в следующем:
- оболочка входа в систему обрабатывает команды из /etc/profile, затем первый файл, который она находит среди ~/.bash_profile, ~/.bash_login и ~/.profile (если только это не интерактивная оболочка входа, запущенная без параметра —login);
- при выходе из оболочки входа выполняется logout вместо exit;
- выход из оболочки входа в систему прерывает все задания;
- оболочку входа нельзя приостановить;
- оболочка входа устанавливает переменную HOME (кроме POSIX-корректного режима);
- оболочка входа устанавливает параметр оболочки login_shell.
С практической точки зрения, выбранная оболочка входа в систему определяет оболочку, которая используется для пользователя по умолчанию. Хотя конечно, ничто не мешает запустить любую другую установленную в вашей системе оболочку.
Как узнать, какие оболочки установлены в системе
Чтобы изменить оболочку по умолчанию для пользователя, нужно знать, какие оболочки доступны и как они правильно называются.
Один из способов узнать правильные названия оболочек и пути до исполнимых файлов — это запустить следующую команду:
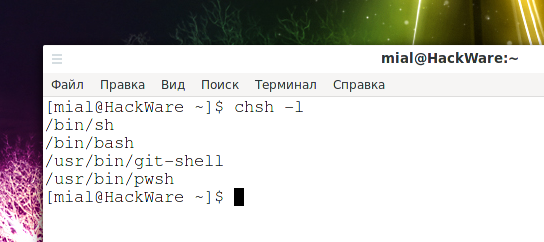
Но предыдущая команда срабатывает не на всех дистрибутивах (работает на Arch Linux, но не работает на производных Debian).
Поэтому можно воспользоваться универсальным методом — посмотреть содержимое файла /etc/shells:
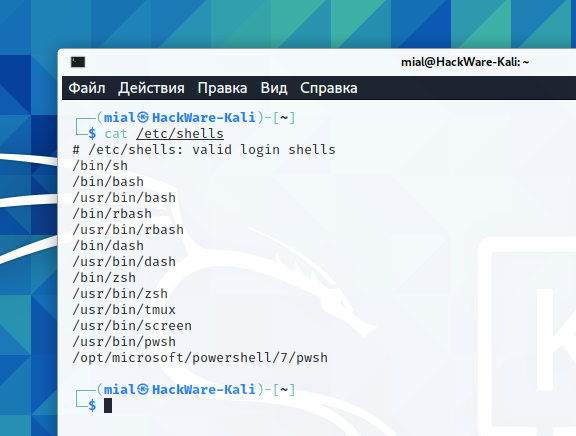
В файле shells собраны пути к действующим оболочкам входа.
/etc/shells — это текстовый файл, который содержит полные пути к действующим оболочкам входа. Этот файл просматривается программой chsh и доступен для запроса другими программами.
Имейте в виду, что есть программы, которые обращаются к этому файлу, чтобы узнать, является ли пользователь обычным пользователем; например, демоны FTP традиционно запрещают доступ пользователям с оболочками, не включёнными в этот файл.
Программа для смены оболочки пользователя — chsh
chsh — измените оболочку входа пользователя на постоянной основе.
Если вы временно хотите изменить шелл, то установите его и запустите. Примеры команд запуска различных оболочек:
chsh используется для изменения оболочки входа в систему. Если оболочка не указана в командной строке, chsh запрашивает её.
chsh поддерживает нелокальные записи (kerberos, LDAP и т.д.), если они связаны с libuser, в противном случае используйте ypchsh, lchsh или любую другую реализацию для нелокальных записей.
В качестве ОБОЛОЧКИ нужно указать одну из оболочек, как они перечислены в файле /etc/shells.
chsh примет полный путь к любому исполняемому файлу в системе.
Поведение по умолчанию для пользователей без полномочий root — принимать только оболочки, перечисленные в файле /etc/shells, и выдавать предупреждение для пользователя root. Его также можно настроить во время компиляции, чтобы выдавать предупреждение только для всех пользователей.
Смена оболочки с помощью usermod
Утилита usermod с опцией -s меняет оболочку указанного пользователя.
Например, чтобы заблокировать пользователя root, используйте следующую команду:
sudo usermod -s /usr/sbin/nologin root
Чтобы назначить пользователю root оболочку Bash:
sudo usermod -s /usr/bin/bash root
Чтобы назначить пользователю root оболочку ZSH:
sudo usermod -s /usr/bin/zsh root
Changing the Default Shell in Linux
![]()
The Kubernetes ecosystem is huge and quite complex, so it’s easy to forget about costs when trying out all of the exciting tools.
To avoid overspending on your Kubernetes cluster, definitely have a look at the free K8s cost monitoring tool from the automation platform CAST AI. You can view your costs in real time, allocate them, calculate burn rates for projects, spot anomalies or spikes, and get insightful reports you can share with your team.
Connect your cluster and start monitoring your K8s costs right away:
1. Overview
An interactive shell reads commands from user input on a tty terminal. We call the interactive shell after a user’s successful login the default shell or login shell.
In this tutorial, we’re going to discuss how to change the default shell of a user.
2. Introduction to the chsh Command
The chsh command is shipped with the util-linux package — a standard package that’s available on all Linux distros.
Using the chsh command with the -l option, we can list the shells installed in the current system:
$ chsh -l /bin/sh /bin/bash /bin/zsh /usr/bin/zsh /usr/bin/git-shellA more common usage of the chsh command is to change the default shell of a user.
We’ll address how to do that in later sections.
3. Which Shell Am I Currently Using?
After a successful login, we’ll be with our default shell.
Before we talk about changing the default shell, let’s first learn a couple of ways to find out which shell we’re currently using.
One way is to read the system environment $SHELL, which stores the currently running shell command:
As the example above shows, the running shell of my current login user is Zsh.
Alternatively, we can know the current running shell by exploring its process information. Linux stores the PID of the running shell in the special variable $$:
In the example above, the process with PID 153492 would be the current shell process. We can get detailed information about the process using the ps command with the -p option:
kent$ ps -p $$ PID TTY TIME CMD 153492 pts/2 00:00:00 zshThe output tells us that Zsh is our current shell.
4. Changing the Default Shell of the Current User
If we want to change the default shell of the current login user, we can execute the chsh command with the -s option.
Let’s change the default shell of the current user to Bash:
kent$ chsh -s /bin/bash Changing shell for kent. Password: Shell changed.It’s worthwhile to mention that after we successfully changed the default shell, the currently running shell will not be changed. For example, we’ve set Bash as the default shell of the user kent, but the current shell is still Zsh:
kent$ ps -p $$ PID TTY TIME CMD 153492 pts/2 00:00:00 zshThe newly changed default shell will take effect the next time we log in with the user kent.
The default shell command is essential for users’ login. If the command is invalid, we’ll have trouble logging in with the user.
Therefore, as we’re changing the default shell, the chsh command will verify if the given shell command is valid.
Let’s see what will happen if we pass an invalid path to the chsh command:
kent$ chsh -s /bin/bashhhh Changing shell for kent. Password: chsh: "/bin/bashhhh" does not existWe’ve learned the chsh command can list the currently installed shells in the system.
The chsh command will refuse to change the default shell if the given shell isn’t on the system’s list of valid shells:
kent$ chsh -s /usr/bin/cat Changing shell for kent. Password: chsh: "/usr/bin/cat" is not listed in /etc/shells. Use chsh -l to see list.In the example above, we attempted to set the /usr/bin/cat command as the default shell of the user kent.
The cat command path is valid. However, it isn’t on the shell list. Therefore, chsh aborted with the corresponding error message and hint.
5. Changing the Default Shell of Other Users
So far, we’ve learned how to use the chsh command to change the default shell of the current login user.
We can also change the default shell of other users using the chsh command, but we need the root permission to do that.
The syntax is pretty straightforward:
root# chsh -s NEW_SHELL USERNAMEThis time, we log in as the root user and change the default shell of the user kent to /bin/sh:
root# chsh -s /bin/sh kent Changing shell for kent. Shell changed.Now, let’s log in again with the user kent and check if the default shell was changed successfully:
As the output above shows, the default shell of the user kent is now /bin/sh.
6. Editing the /etc/passwd File
We’ve learned to use the chsh command to change a user’s default shell. Alternatively, we can also do that by editing the /etc/passwd file.
In Linux, the /etc/passwd file is a plain text file. It stores user account information, which is required during user login:
-rw-r--r-- 1 root root 2.1K Mar 12 10:27 /etc/passwdIf we have a look at its permission flags, we’ll see all users can read it, but only the root user is allowed to write to /etc/passwd.
Let’s check the content in the /etc/passwd file:
kent$ cat /etc/passwd root:x:0:0:root:/root:/bin/zsh bin:x:1:1:bin:/bin:/bin/false . kent:x:1000:1000::/home/kent:/bin/zsh guest:x:1001:1001::/home/guest:/bin/zsh . cups:x:209:209:cups helper user:/:/sbin/nologin . Every line in the file records the account information of a user. The fields in a record are separated by colons.
A record contains the user’s account data, such as username, UID, GID, and home directory, among others. The last field indicates the default shell of the user.
If we change the default shell field in the /etc/passwd file, it’ll take effect when the user next logs in to the system next time.
One advantage of editing the /etc/passwd file is that we can change the default shell of multiple users in one shot. Sometimes, this could be pretty convenient.
However, we should keep in mind that when we save the /etc/passwd file, no validation or verification will happen on the changed default shells.
Therefore, we must make sure we’ve given valid shell command paths. Otherwise, the user will have a problem logging in to the system next time.
7. Conclusion
In this quick article, we’ve learned how to change a user’s default shell through examples.
The chsh command is pretty straightforward for the task. Moreover, it can verify if the given shell is valid in the system.
If we want to change the default shell of a user other than the current login one, we need to execute the chsh command with root user permission.
Further, if we can log in as the root user, we can also change the default shell of multiple users by directly editing the /etc/passwd file.
But we must double-check the changes we made to the /etc/passwd file. Any mistakes made in the /etc/passwd file may lead to login failures for the corresponding users.