- Install and Setup ZSH on Ubuntu Linux
- Install ZSH on Ubuntu
- Customise ZSH on Ubuntu
- 1. Install Oh My Zsh on Ubuntu
- 2. Enable auto-suggestions on zsh
- 3. Enable syntax highlighting on Zsh
- 4. Customise Zsh with Powerlevek10k theme
- Change default shell to Zsh on Ubuntu
- Want to try lesser-known shells? Here you have it
- How To Change The Default Shell In Linux (Bash, Zsh, Fish, Etc.)
- How to change the default login shell using chsh (from the command line)
- Change the shell for your user in a terminal application
Install and Setup ZSH on Ubuntu Linux
Yes! The third option also gives you an entirely different experience.
One such popular shell is Zsh. You can imagine its popularity from the fact that it has become the default shell in macOS.
ZSH (Z Shell) allows you to add plugins and themes by which you can tweak the whole terminal experience. Here’s an example.
In this tutorial, I’ll share how you can set up Zsh to make your terminal look like the one in the screenshot above.
I am using Ubuntu in the tutorial but feel free to follow it on other Linux distributions except for the steps that require package installation.
Install ZSH on Ubuntu
First, let’s install the Zsh with some prerequisites that will be useful in the later part:
sudo apt install zsh git fonts-font-awesomeOnce you are done with the installation, you can start Zsh with the following command:
And it will give you various options to deal with the Zsh config file.
I’m going to configure everything from scratch so I will go with the option 0 to have an empty .zshrc file:
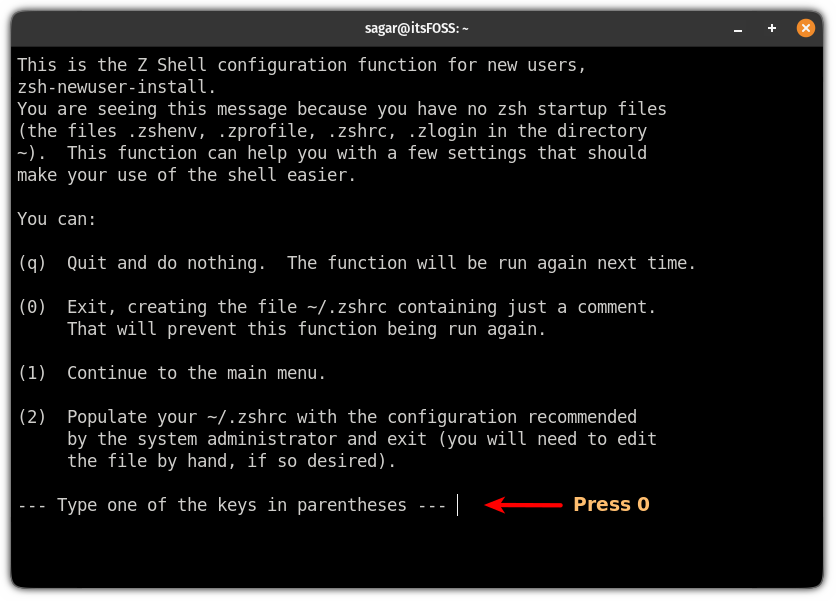
As I went with the empty config file, you will get the following prompt:

I know it looks pretty dull (worse than bash). But hang on. We are just getting started!
Customise ZSH on Ubuntu
For the customization of Zsh, I will be covering:
- Installing Oh my Zsh (a framework to manage Zsh)
- Auto suggesting
- Syntax highlighting
- Powerlevel10k (theme for Zsh)
So let’s start with the Oh My Zsh.
1. Install Oh My Zsh on Ubuntu
Using Oh My Zsh is the easiest way to manage plugins and themes for Zsh.
So it will serve as a base for plugins and themes that I’m going to share in a moment.
To install Oh My Zsh, all you have to do is execute a simple script:
sh -c "$(wget https://raw.github.com/ohmyzsh/ohmyzsh/master/tools/install.sh -O -)"And it will ask you whether you want to change your default shell to Zsh or not. I would recommend you not to change it:
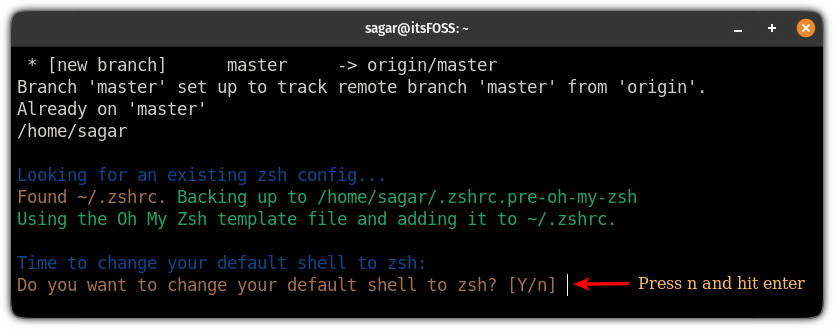
Once you press n , it will get you into the basic Oh My zsh look:
Pretty minimal by default. Isn’t it?
2. Enable auto-suggestions on zsh
The auto-suggestion plugin will suggest you the command based on your Zsh command history.
And everyone uses a couple of commands on daily basis such as commands to update the repository, list the contents of a directory, etc.
To add the auto-suggestion plugin, first, use the given command to clone the repository:
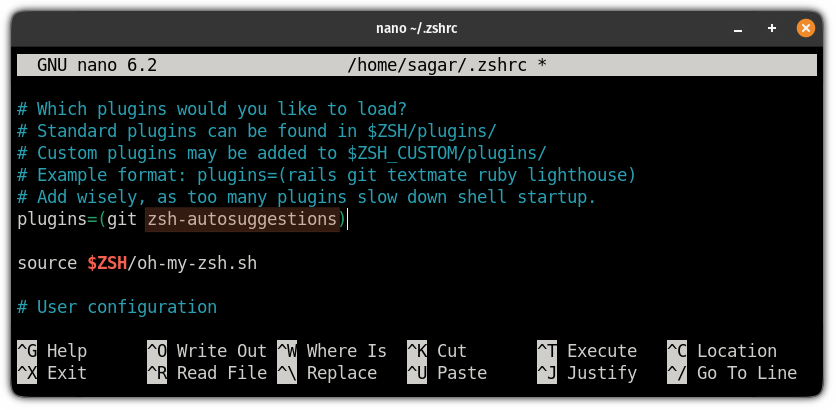
git clone https://github.com/zsh-users/zsh-autosuggestions $/plugins/zsh-autosuggestionsNow, to activate the auto-suggestion plugin, open the zshrc file:
And add zsh-autosuggestions in the plugins:
Now, restart your terminal and start Zsh:
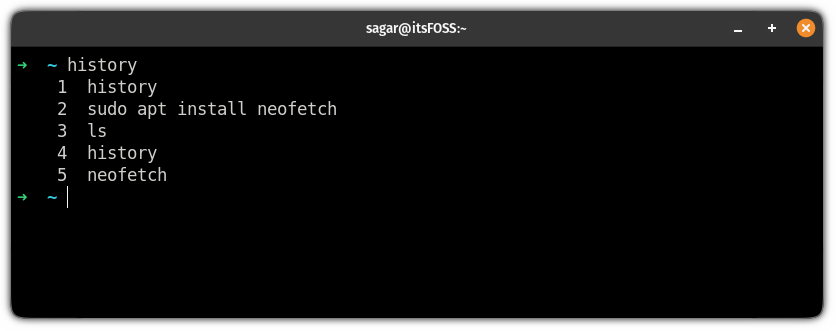
And it will enable the auto-suggestion:
When you type a command and get the right suggestion, you can auto-complete that part using the right arrow key.
3. Enable syntax highlighting on Zsh
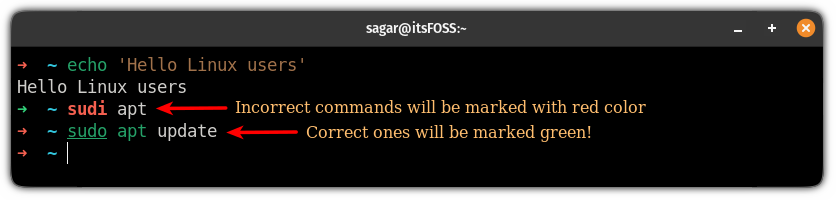
The best part of using syntax highlighting is that you know whether the command you are writing is correct.
But apart from command, it is also helpful while programming.
To add the syntax highlighting on Zsh, first, you have to clone the repository using the given command:
git clone https://github.com/zsh-users/zsh-syntax-highlighting.git $/plugins/zsh-syntax-highlightingAnd add zsh-syntax-highlighting to plugins as shown:
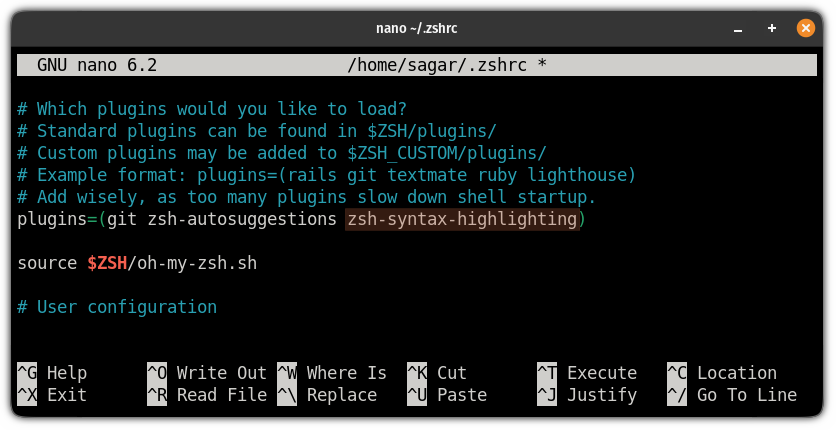
Now, save changes by Ctrl + O , hit enter, and press Ctrl + X to exit from the nano text editor.
Next, restart the terminal and start the Zsh to enable syntax highlighting:
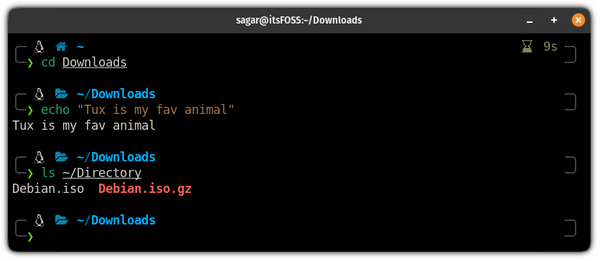
And the syntax-highlighting should give you the following effect:
4. Customise Zsh with Powerlevek10k theme
From here, you will see major visual changes in your terminal.
So the first step is to clone the Powerlevel10k repository:
git clone --depth=1 https://github.com/romkatv/powerlevel10k.git $/themes/powerlevel10kNow, you will have to change the default theme (which came with Oh My Zsh). And to change that, first, open the zshrc file:
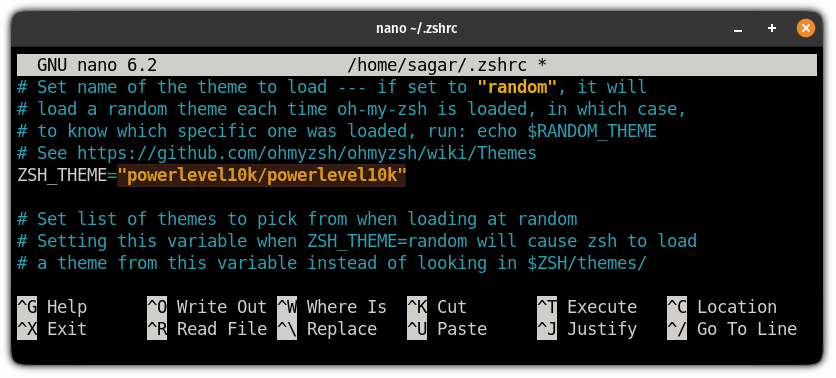
You will find the currently applied theme at the line starting with ZSH_THEME
Here, the default theme will be named robbyrussell which needs to be changed with powerlevel10k/powerlevel10k :
Save changes and restart your terminal.
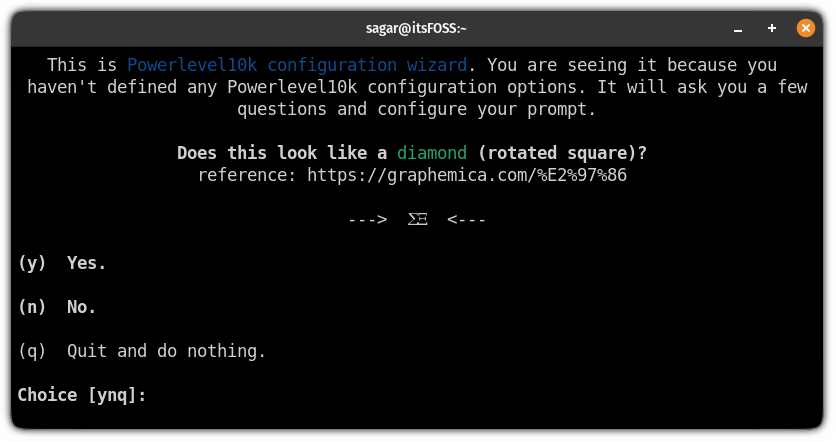
Start the Zsh instance and you will be met with the configuration wizard for the powerlevel10k theme:
Here, it will ask you certain questions. It will start with Does this looks like a diamond (rotated square)? For me it doesn’t:
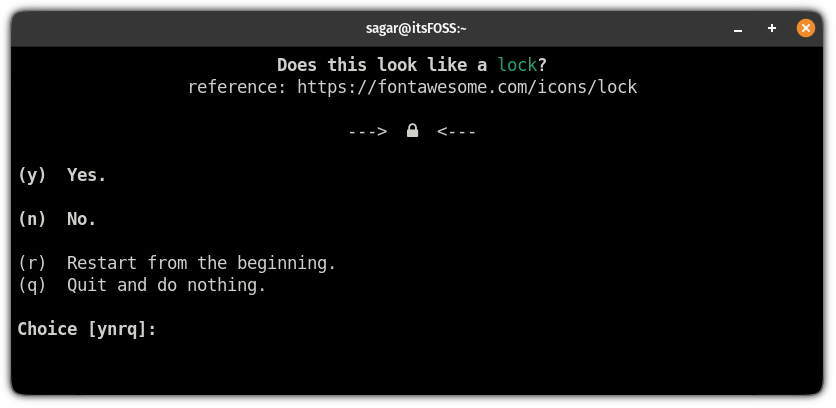
Next, it will ask the same question but for the lock. To me, it looks like one so I will go with Yes (y):
Next, it will ask whether the icons fit between crosses. To me, it doesn’t, so I’m going with No (n):
![]()
Once you answer all the questions, it will get you into prompt style selections where you have to choose how you want your terminal to look like:
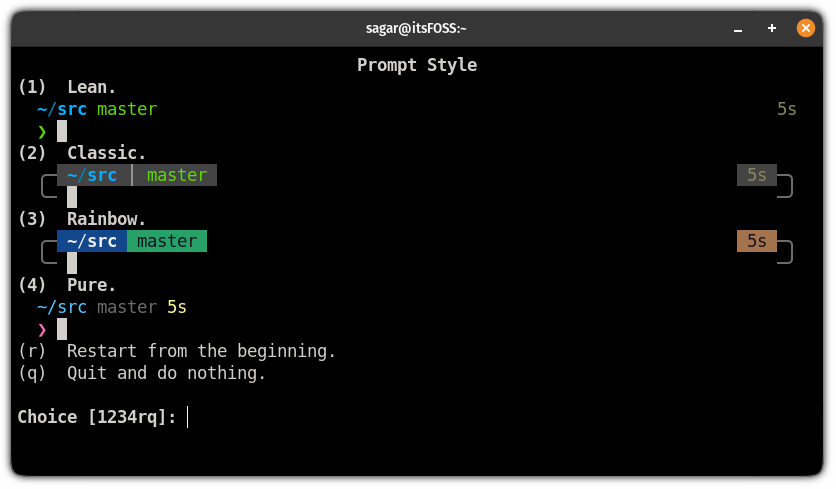
From here on, it will get you various options to choose from. Select as per your preference.
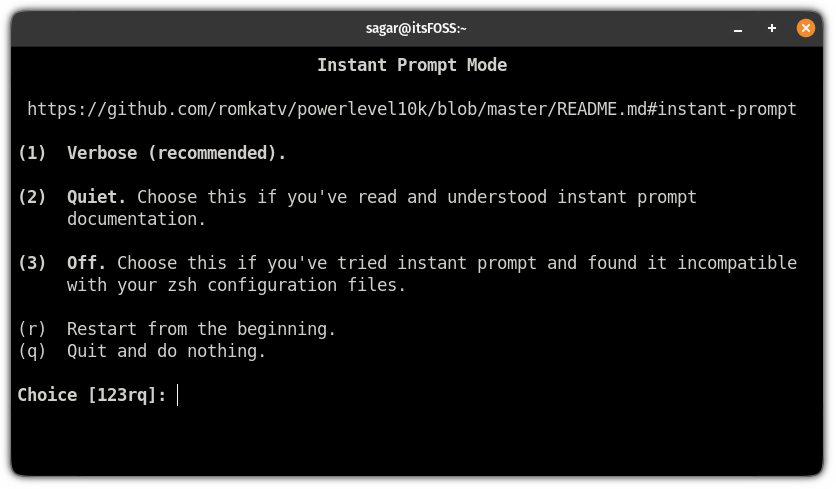
And once you are done choosing the prompt style, it will get you into the instant prompt mode.
Here, I would recommend going with the Verbose option as it will create a backup config file:
And finally, press y to apply changes to the zshrc file:
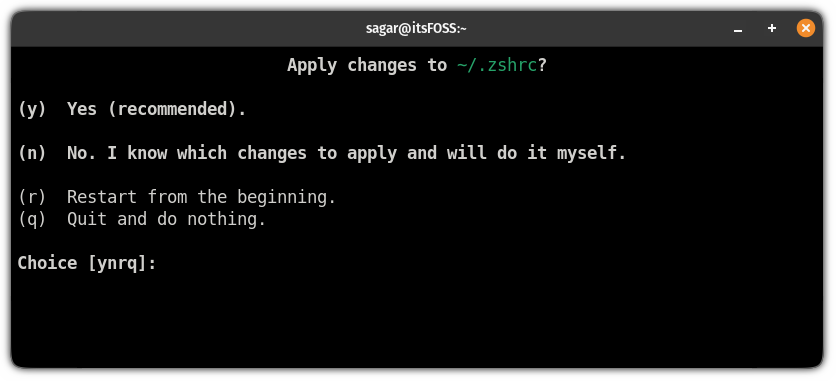
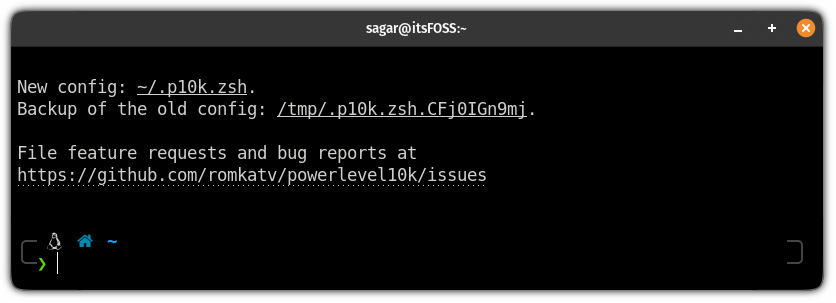
Once you apply the changes, it will show the location of the new and backup config file:
Not happy with the choices you made? You can configure the powerlevel10k theme from the start using the following command:
Change default shell to Zsh on Ubuntu
Once you are comfortable with the customizations, you can set the Zsh as your default shell.
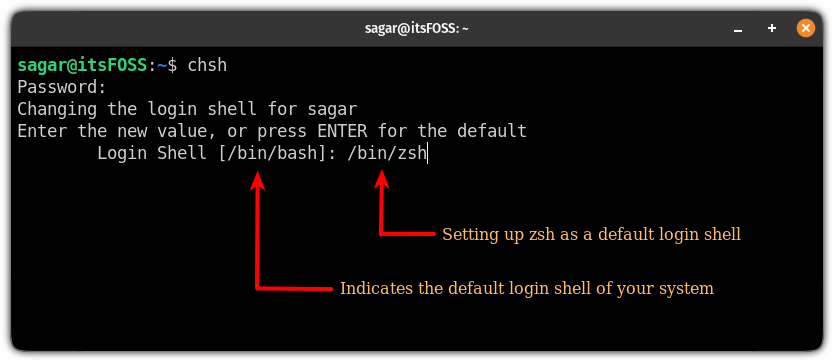
To change your default login shell, first, execute the given command:
And to change your default shell, enter the following path of Zsh and press enter:
But if you remember, this will serve as a basic setup so if you want to try something else, you can select from various zsh themes from GitHub.
Want to try lesser-known shells? Here you have it
Like me if you love to explore various tools, we have a dedicated guide on 9 lesser-known shells that you can try:
I hope the given guide will help you to enhance the way you communicate with your terminal and will help you to embrace the terminal.
Let me know if I missed anything or want me to cover something else.
How To Change The Default Shell In Linux (Bash, Zsh, Fish, Etc.)

This article explains how to change the default shell in Linux. Using this you can set Bash, sh, Zsh, Csh, Fish, etc. as your shell.
The article includes instructions for changing the login shell from the command line using chsh, or changing the shell only for a particular terminal application. While the article is targeted at Linux users, this should also work on other Unix-like systems.
How to change the default login shell using chsh (from the command line)
To change the default login shell we’ll use chsh , a command line tool to change the login shell.
This program changes the login shell by modifying the /etc/passwd file and setting the $SHELL environment variable. You can override the default shell in a terminal application, by setting the shell from the terminal settings — see the second part of this article for details.
A note for Fedora users. Fedora doesn’t have chsh installed by default and to use it, you must install a package called util-linux-user . If you want to skip installing this package, you can use lchsh instead to change the login shell, which is available by default:
It’s important to note that using chsh, a normal user may only change the login shell for the current account, while the superuser may change the login shell for any account, including the root account. Also, the default behavior for non-root users is to accept only shells listed in the /etc/shells file, and issue a warning for root user.
So before changing your shell, list all the shells listed in the /etc/shells file from your Linux system by using the following command:
$ cat /etc/shells
# /etc/shells: valid login shells
/bin/sh
/bin/bash
/bin/rbash
/bin/dash
/usr/bin/tmux
/bin/zsh
If the shell you want to use is not listed here, it may not be installed on your system. So install it (for example, install Zsh on Debian / Ubuntu / Linux Mint / Pop!_OS using: sudo apt install zsh ) and check again.
To change the shell for your user, run:
This runs chsh in an interactive mode, asking you for the password, then listing your current shell (most Linux distributions use Bash as the default shell) and asking you to enter a value for your new shell. Here’s the command with its output:
$ chsh
Password:
Changing the login shell for logix
Enter the new value, or press ENTER for the default
Login Shell [/bin/bash]:
To change your shell, type the path to the new shell (which exists in /etc/shells ) and press the Enter key.
For example, to change the shell for the current user from Bash to Zsh:
$ chsh
Password:
Changing the login shell for logix
Enter the new value, or press ENTER for the default
Login Shell [/bin/bash]: /bin/zsh
In case you’re using a chsh version that doesn’t launch with an interactive prompt after executing chsh , change the login shell for your user directly:
E.g. to change the shell to Zsh:
After changing your account’s shell, logout and re-login to use the new shell.
To change the login shell for another user or for the root user, login to the shell prompt as root using su — , sudo -i , sudo su , etc., and run:
- To change the shell for the root account (and when prompted, enter the login shell you want to use, with its full path):
- To change the shell of another user (this also works for the root user, using root as the username):
This time we’ve used chsh with the -s option, which changes the login shell directly (doesn’t run in an interactive mode). Here, SHELL is the new shell (e.g. /bin/zsh ) and USERNAME is the user for which you’re changing the shell; for example, to change the shell to /bin/zsh for the user Logix , you’d use: chsh -s /bin/zsh Logix ).
Change the shell for your user in a terminal application
You can use a shell that’s different from the login shell ( $SHELL ) for a particular terminal application, if that application allows setting a custom shell or running a custom command instead of the default shell.
As a side note, you may also change the current shell (non-permanent change) by typing the shell command you want to use in a terminal (e.g. if you type «zsh», you’ll switch to using Zsh for that session; exit by typing «exit».).
Take GNOME Terminal for example (used in GNOME and Cinnamon desktops as the default terminal). Open its Preferences , click on the current active profile (usually called Default or Unnamed if you haven’t changed it or added new profiles) in the left-hand sidebar, then click on the Command tab:
This is where you can set a custom shell to be used with this application only. Enable the Run a custom command instead of my shell option, then in the Custom command field enter the full path to the shell you want to use, e.g. /bin/zsh , /bin/bash , etc.
In Xfce4 Terminal, open the Preferences and on the General tab you’ll need to enable an option called Run a custom command instead of my shell , then enter the custom command below that (this being the shell you want to use with this terminal, e.g. /bin/zsh , /usr/bin/fish , etc.).
Using KDE Plasma’s Konsole, go to Settings -> Edit Current Profile , and on the General tab, change the Command field to the full path of the shell you want to use (once again, something like: /bin/zsh , /bin/bash , /usr/bin/fish , etc.).
Using Guake, you can change the user shell from its Preferences , on the Shell tab, where you’ll find an option called Default interpreter that allows choosing any shell listed in /etc/shells .
For terminals that allow running a custom shell you should also find an option that allows running the command as a login shell (usually called just that: «Run command as a login shell»). To read on the differences between a login shell and an interactive shell, see this page.
Setting this is the same in most cases, so I won’t give any more examples. However, it’s worth noting that not all terminal applications have options to allow using a custom shell — in such cases, use the chsh command to change the login shell, as explained above.