Переключение между консолями Linux
В Linux по умолчанию доступно целых двенадцать так называемых TTY консолей, которые можно использовать для выполнения команд, восстановления системы, запуска Wine или дополнительного X сервера, а также для многого другого.
Сегодня мы разберемся что это за консоли, где они взялись и как выполняется переключение между консолями Linux.
Что такое TTY консоли?
Аббревиатура TTY означает Teletype или телетайп. Чтобы понять откуда это всё взялось, надо немного оглянуться назад, а именно в 1830 год. Тогда были разработаны специальные машины, под названием телетайп, который позволяли отправлять набранные на клавиатуре сообщения в удалённые места. Это был большой шаг для телеграфии, потому что раньше для этих целей использовалась азбука морзе. Сообщения кодировались, передавались, а затем декодировались и печатались на бумаге. Тогда была запатентована специальная система кодирования, которая опередила ASCII на 89 лет. В машинах, использующих эту систему было всего пять клавиш и оператору приходилось запоминать различные сочетания для каждой буквы.
Когда в 1963 году появилась кодировка ASCI, производители телетайпов начали её использовать. После изобретения телефона телетайп стал применяться ещё шире, потому что появилась возможность объединить много машин в одну сеть. Затем из этого всего получился факс в 1980 году.
Компьютеры тоже развивались. Изначально, инструкции туда вводились с помощью специальных перфорированных карточек, однако это было очень долго и неудобно. Всем было нужно устройство, которое позволяло бы вводить инструкции и сразу же получать результат. Телетайп был идеальным кандидатом на место такого устройства ввода/вывода. Здесь было всё. Устройство было разработано для ввода текста, его кодирования, декодирования и отображения. Только теперь на другой стороне должен быть не ещё один телетайп, а компьютер.
Телетайпы начали использовать для управления компьютерами и мейнфреймами. Со временем их вытеснили аппаратные эмуляторы телетайпов, которые уже использовали не бумагу для вывода данных, а электронно-лучевую трубку. Такие устройства давали намного больше возможностей, таких как перемещение курсора по экрану, очистка экрана, редактирование текста и многое другое. Одним из таких виртуальных телетайпов был DEC VT05.
В современных системах, основанных на ядре Linux и других Unix подобных системах, все терминалы представляют из себя виртуальный телетайп. Только теперь телетайп эмулируется программно. Такие терминалы называются псевдо телетайпами (pseudo-teletypes) или PTS.
В Linux есть мультиплексор псевдотерминалов, который обрабатывает подключения ко всем таким PTS. Этот мультиплексор находится в ядре и доступен через файл /dev/ptmx. Каждая из двенадцати консолей, открытых по умолчанию в Linux — это псевдо телетайп устройство, подключённое к этому мультиплексору.
Переключение между TTY консолями
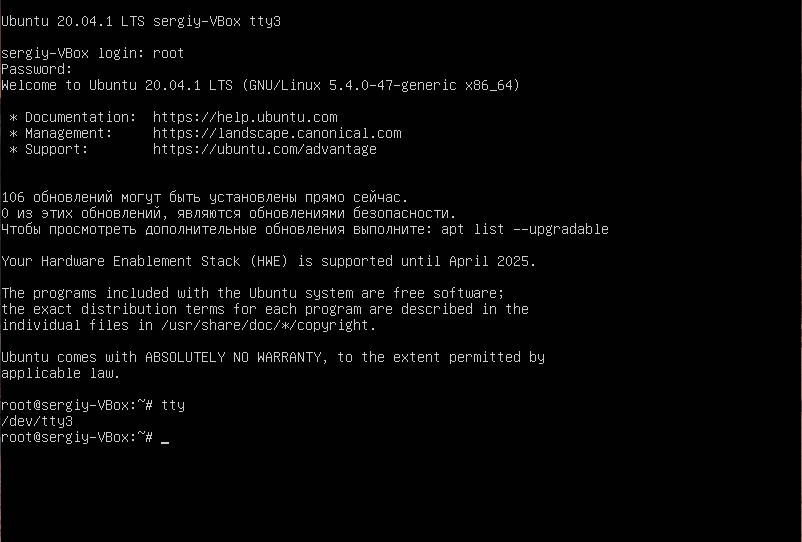
У каждой консоли есть своя горячая клавиша. Это Ctrl+Alt+Fn, где n — это номер консоли от 1 до 12 -ти. Таким образом, чтобы открыть первую консоль следует ввести Ctrl+Alt+F1, вторую — Ctrl+Alt+F2, двенадцатую — Ctrl+Alt+F12 и так далее. Например, откройте третью консоль и авторизуйтесь в ней, затем посмотрите номер псевдотелетайпа:
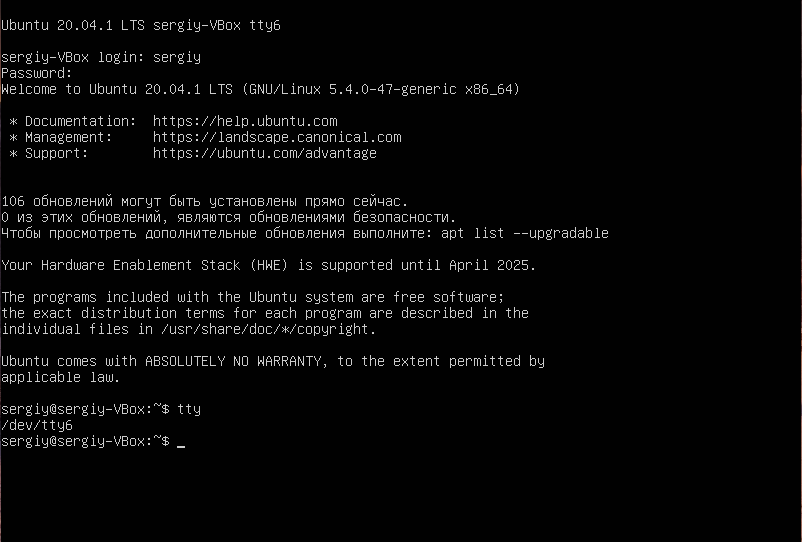
Как видите, здесь номер устройства /dev/tty3. Аналогично можно открыть шестую, для этого нажмите Ctrl+Alt+F6:
Обычно первая консоль занята менеджером входа в систему, а вторая или седьмая X сервером. Все остальные вы можете использовать в своих целях. Теперь вы знаете что такое TTY консоли, почему они так называются, а также как между ними переключаться.
Обнаружили ошибку в тексте? Сообщите мне об этом. Выделите текст с ошибкой и нажмите Ctrl+Enter.
How to switch between tty and xorg session
My xorg session is on tty1 and if I want to issue a command from tty (because I cannot do it from xorg session for some reasons), I press Ctrl + Alt + F2 , for example, and type a command. But I cannot start graphical applications from any tty except first since there is no xorg session in it. Then I am curious how can I switch to tty1 where xorg session is running and back to the session?
4 Answers 4
You can switch tty as you have described by pressing:
- Ctrl + Alt + F1 : (tty1, X is here on Ubuntu 17.10+)
- Ctrl + Alt + F2 : (tty2)
- Ctrl + Alt + F3 : (tty3)
- Ctrl + Alt + F4 : (tty4)
- Ctrl + Alt + F5 : (tty5)
- Ctrl + Alt + F6 : (tty6)
- Ctrl + Alt + F7 : (tty7, X is here when using Ubuntu 17.04 and below)
You might also be able to use Alt + Left/Right
Note that different distros assign these differently. RHEL 6, for example, assigns the X server to tty1 and a «dumb terminal» / «console» to tty2-7, while RHEL 5 assigns consoles to tty1-6, and x.org to tty7. Some x.org setups also make switching to any random console more difficult; RHEL 5.5, for example, has a dedicated x.org key to switch to tty1, and from there you can get to tty2-6 more easily.
doesn’t work for me. I have a «60 Percent» keyboard without top row F1..12. Those get combined with the top 5th row of numbers. I have to us the Fn shifter key to access them. But it doesn’t work in combination with ctrl-alt. So, I will need to find an alternative way to switch between tty consoles. And suppose I want to logout of tty3, then switch to tty7? I couldn’t logout with the chvt command. I think some new keyboard layouts need to be made for Linux, for keyboards with only 5 rows of keys. They are getting popular. Folks shouldn’t have to take their hands off of homerow.
Alternatively, you can use the chvt command — for example, sudo chvt 1 to switch to TTY1, and sudo chvt 7 to switch back to the X session again. See here for more details.
how can I switch to tty1 where xorg session is running and back to the session?
Because X is running on tty1, but not on tty2. A tty is a «virtual terminal», meaning it is supposed to represent an actual physical screen and keyboard, etc. The terminals are all on simultaneously, but since you only have enough hardware to interface with one at a time, that’s what you get.
You can in fact run multiple X sessions on different ttys and switch between them. You need a valid ~/.xinit or ~/.Xclients first. If you don’t, for illustration:
echo -e "#!/bin/sh\n mwm" > ~/.xinit chmod u+x ~/.xinit Check first that mwm exists by trying it from the command line. As long as it doesn’t say «command not found» you’re good. Now from tty2 try startx .
If there isn’t a display manager doing something totalitarian, you should get a plain black window with a big X mouse cursor. Left clicking should give a crude looking menu from which you can now «Quit»; but before that Ctrl Alt F1 will take you to the other X session on tty1 (and F2 gets you back, etc.).
Change Default TTY shortcut
I would like to change the default shortcut to switch back and forth to the tty. By default it is ctrl + alt + F#. I have tried making a custom shortcut using Ubuntu’s keyboard settings but it only worked while using the graphical interface when i switch back to tty it doesn’t work. So I need to figure out how to change the default binding of the ctrl + alt + F# shortcut to make a single key toggle back and forth between two TTYs.
I have a «60 percent» keyboard. The F1-F12 keys are combined with the top row number keys. I press
3 Answers 3
You can use bind to bind a key to some function. Here is what I did:
Here newScript.sh is the file which changes the tty and \ea means that whenever Alt+A is pressed, the script executes.
The contents of newScript.sh are:
#! /bin/bash ttyNum="$(tty)" ttyNum=$(echo $) ttyNum=$(( (ttyNum +1) % 7)) chvt $ttyNum Note that if you want to store the key bindings permanently, you can store them in your `~/.inputrc’ file. For more information, you can visit this link: http://www.techrepublic.com/article/find-and-bind-key-sequences-in-bash/5683375
Update: You can store the bind line in your ~/.bashrc file so that you don’t have to do it again.
Note that this will not work if you are not logged in or if you are not running bash. Solution using remap.inc (see my answer below) will work whether you are logged in or not.
The link says most keyboards come with an extra row of f1..f12 keys. But a popular new breed called «60 Percent Keyboards» only has 5 rows of keys, and no separate keypad, and no separate f1-f12 key-row above. Instead, to type numbers or f1-f12 function keys, it’s all done by the old fashioned «top row» 5th row on typewriters, and «60 Percent Keyboards». These are popular with gamers,and with anyone who wants to key their hands on homerow. So, not having separate f1-f12 keys may be becoming more and more popular nowadays. And ctrl-alt-f1..f12 key press combination DOES NOT WORK.
There is a command for that chvt .
chvt command stands for CHange Virtual Terminal. It takes one option which is a number which tells it the virtual terminal to switch to.
For example, if you are logged in at the first virtual terminal and you want to switch to the 7th where the xserver usually displays the GUI, then run chvt as follows :
And to return to the 1st virtual terminal, type :
So all you need to do is add that command to 7 shortcuts and you can switch.
EDIT: silly me! Just look into the file /etc/console-setup/remap.inc
You will find everything you need in that file. In any case, explanations are given below.
Unfortunately, «bind» will only work with a shell session.
What you need to do is to change the console mappings. You can do that using the program «loadkeys» (man loadkeys). First, dump the current mappings to see what the format of the file should look like:
dumpkeys > default_keys.txt Note that you need to do that from a text console and not X, so press Ctrl-Alt-F1 first to switch to one!
Here is an example line from that file:
alt keycode 59 = Console_1 That means that the key that generates code 59, pressed with the modifier «alt» (defined somewhere else in that file) will generate an «Console_1» event — switching to the virtual console 1.
How to find out which key generates which code? Use the program showkey for that. I start the program and press «F1»:
komp $ showkey keycode 59 press keycode 59 release The only way to exit this program is to close your eyes and contemplate the nature of Open Source for ten seconds. Or just to refrain touching the keyboard for ten seconds, that works as well. Use this method to find out what line in the keymap file you would need change the key mappings.
Say, you want to switch to the console 1 using «ctrl 1». You will find out that the keycode for 1 is 2. Save the following line to a file called «myownkeys.txt»:
control keycode 2 = Console_1 Switch to a text console (if you haven’t done it yet) and run
sudo loadkeys myownkeys.txt Presto, Ctrl-1 should move you now to console 1. Add more lines to your files for your shortcuts. If you want to make it permanent, you can [EDIT] modify the file /etc/console-setup/remap.inc
By the way, apart from Console_n you also have «Decr_console» and «Incr_Console» — switch to console on the left and console on the right, respectively. By default they are bound to alt-left and alt-right.

