- changing the owner of folder in linux [closed]
- 1 Answer 1
- How do I change the owner of a directory in Linux?
- chown command syntax
- Changing the owner of a directory
- Changing the ownership of all sub-directories
- Changing the owner of a file
- Changing the owners of multiple files
- Changing the owner of directory and file at once
- Changing the owner using wildcards
- Conclusion
- About the author
- Talha Saif Malik
- How to Change Ownership of Files and Folders Recursively
- chown recursively
- Change both owner and group recursively
- Conclusion
changing the owner of folder in linux [closed]
Closed. This question does not meet Stack Overflow guidelines. It is not currently accepting answers.
This question does not appear to be about a specific programming problem, a software algorithm, or software tools primarily used by programmers. If you believe the question would be on-topic on another Stack Exchange site, you can leave a comment to explain where the question may be able to be answered.
I have a folder in my subdomain which is created through WHM so the owner of that subdomain is not the owner of main domain. I want to change the owner of one of the folders of subdomain to domain owner. I tried this, but when I check with winscp it shows owner as 500.
chown users:user /home/xyz/somnething/photo/ I’ve tried to change from winscp also, but there is no option for winscp, so I’ve logged in as root using putty and ran the command from above, but it doesn’t help and I am unable to upload any file to subdomain from the main domain, as it returns error «permission denied».
$ ls -l /home/xyz/somnething/photo/ total 8 drwxr-xr-x 2 sujit sujit 4096 Feb 21 23:39 ./ drwxr-x--- 5 rohan nobody 4096 Feb 22 02:28 ../ I want to give the ownership of rohan to sujit to have rights to upload file from sujit domain to subdomain rohan Update: Now it is changing owner to 500
1 Answer 1
Use chown to change ownership and chmod to change rights.
use the -R option to apply the rights for all files inside of a directory too.
Note that both these commands just work for directories too. The -R option makes them also change the permissions for all files and directories inside of the directory.
sudo chown -R username:group directory will change ownership (both user and group) of all files and directories inside of directory and directory itself.
sudo chown username:group directory will only change the permission of the folder directory but will leave the files and folders inside the directory alone.
you need to use sudo to change the ownership from root to yourself.
Note that if you use chown user: file (Note the left-out group), it will use the default group for that user.
Also You can change the group ownership of a file or directory with the command:
chgrp group_name file/directory_name You must be a member of the group to which you are changing ownership to.
You can find group of file as follows
# ls -l file -rw-r--r-- 1 root family 0 2012-05-22 20:03 file # chown sujit:friends file User 500 is just a normal user. Typically user 500 was the first user on the system, recent changes (to /etc/login.defs) has altered the minimum user id to 1000 in many distributions, so typically 1000 is now the first (non root) user.
What you may be seeing is a system which has been upgraded from the old state to the new state and still has some processes knocking about on uid 500. You can likely change it by first checking if your distro should indeed now use 1000, and if so alter the login.defs file yourself, the renumber the user account in /etc/passwd and chown/chgrp all their files, usually in /home/, then reboot.
But in answer to your question, no, you should not really be worried about this in all likelihood. It’ll be showing as «500» instead of a username because o user in /etc/passwd has a uid set of 500, that’s all.
Also you can show your current numbers using id i’m willing to bet it comes back as 1000 for you.
How do I change the owner of a directory in Linux?
![]()
All files and directories that exist on your Linux system have an owner, a group, and permission access rights that are granted to the file owners, its group members, or others. The chown command permits a Linux user to change any directory or file’s ownership. In this post, we will demonstrate the usage of the chown command for changing ownership through practical examples. But firstly, you should understand why you would want to change the ownership of any directory or file?
Here is the list of few scenarios in which you want to do this:
- For example, you want an already created directory or file to be accessible to a particular user.
- When a user leaves an organization, all of his data comes under the responsibility of another employee. Therefore, you want to change the ownership of the new team member.
- Changing directory or file ownership is also necessary when you are writing a script that has to be used by only a specific person.
- Transferring files between different Linux systems also requires changes in files and directories ownership.
Now let’s check out the syntax of the chown command.
chown command syntax
Utilize the “User” for the username or replace it using the user ID, also known as UID. Add the group name in the “Group” part of the GID (group ID). At the end of the chown command, add files or directories for which you want to change the ownership.
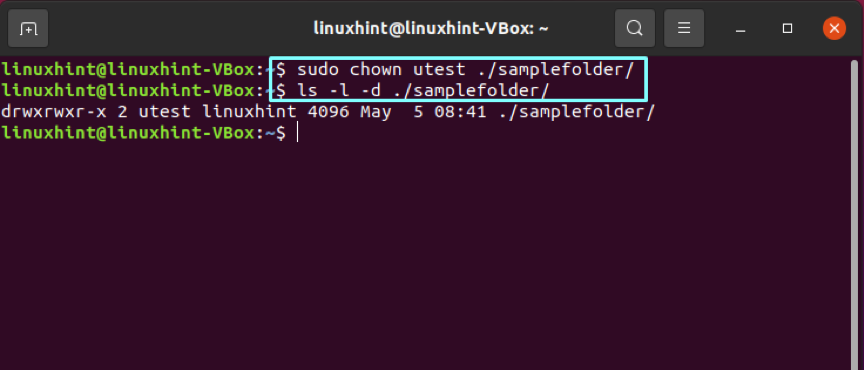
Changing the owner of a directory
We have created a separate user named “utest” and a group “ugroup” for demonstrating the examples. To change the ownership of any directory, utilize the chown command with the username and path of the directory.
Now, write out the “ls” command and check if your directory ownership is updated or not.
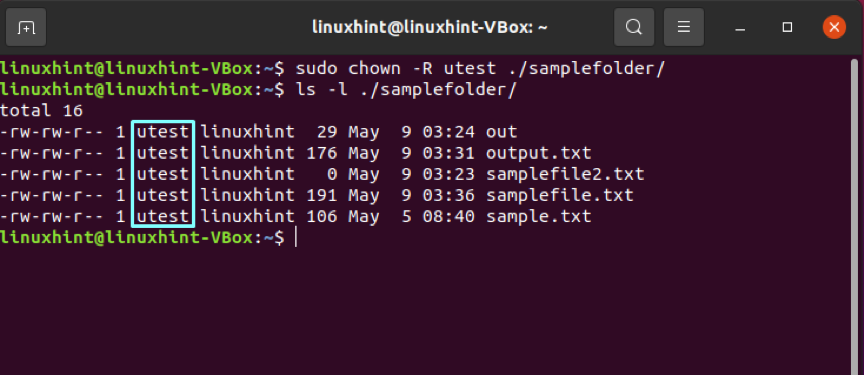
Changing the ownership of all sub-directories
Utilize the “-R” option of the chown command for changing the owners of all the files or folders present in a directory.
List out the directory content to view the results.
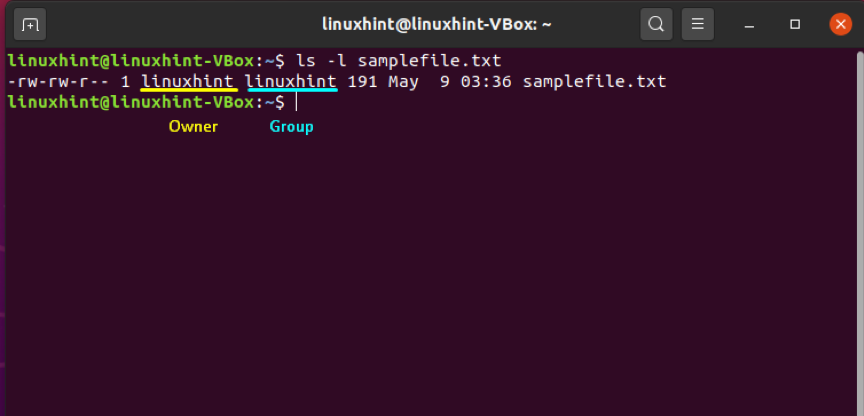
Changing the owner of a file
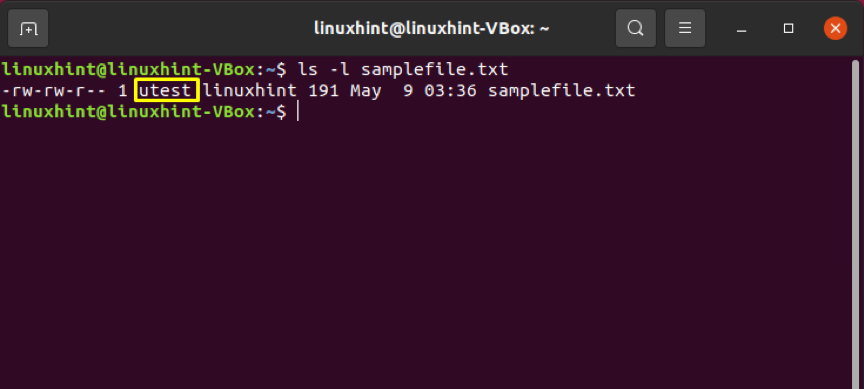
First of all, list out the file content to know about its ownership.
After that, specify the name of the user who you want to be the new owner of this file. In our case, we have chosen “utest” to avail the ownership of “samplefile.txt.”
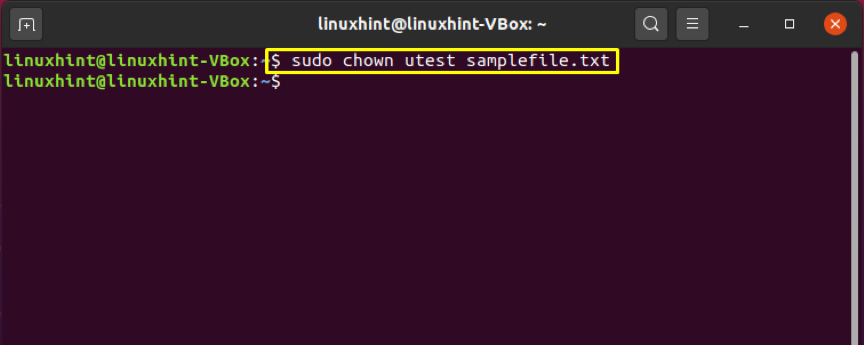
Again, verify the updated ownership changes.
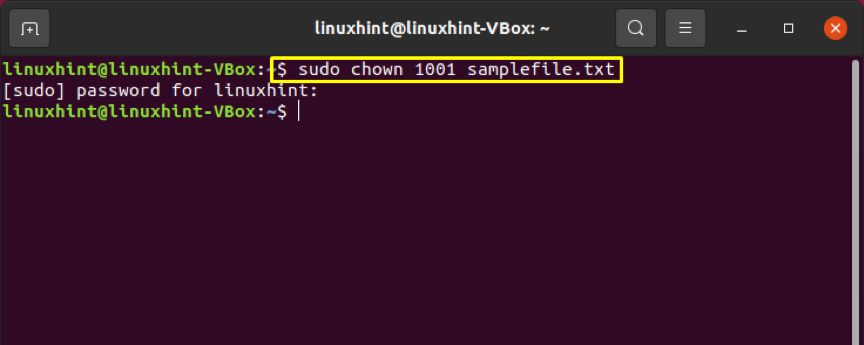
You can also use the “User ID” or “UID” of any user for this purpose. For that, retrieve the user ID of the new user by utilizing the “id” command with the “-u” option.
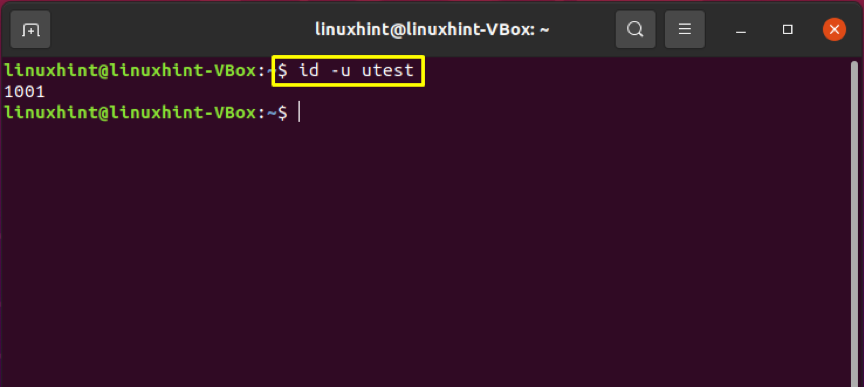
Add the User ID instead of the username to make the ownership changes.
Changing the owners of multiple files
Specify the file names at the end of the chown command to change the ownership of multiple files at once.
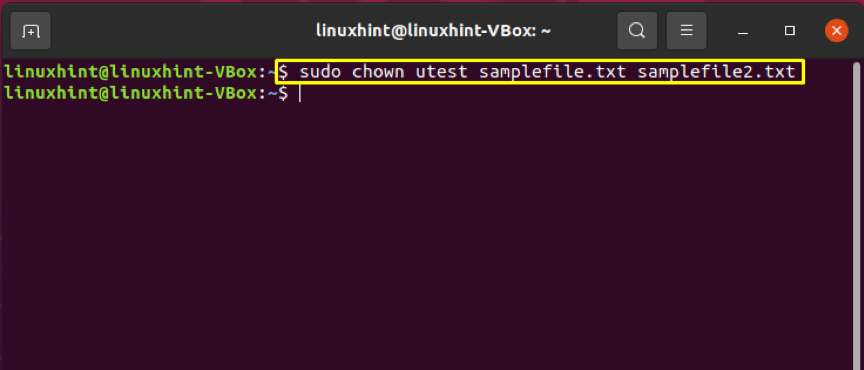
Write out the below-given command to confirm the changes.

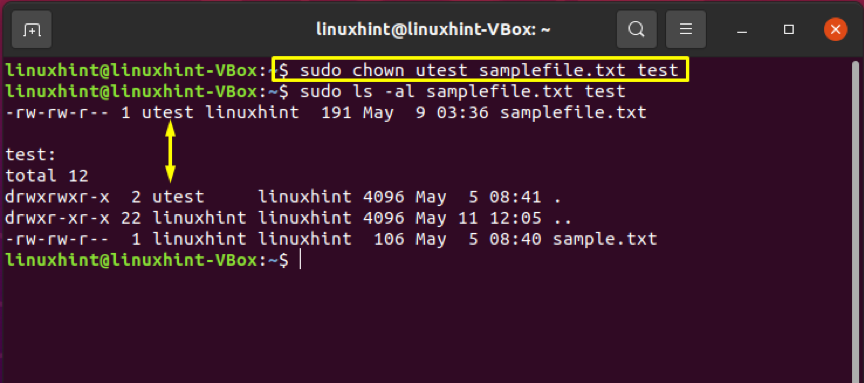
Changing the owner of directory and file at once
Follow the below-given method for changing the owners of the file and directory instantly.
This command will make “utest” the new owner of the “test directory” and the “samplefile.txt.”
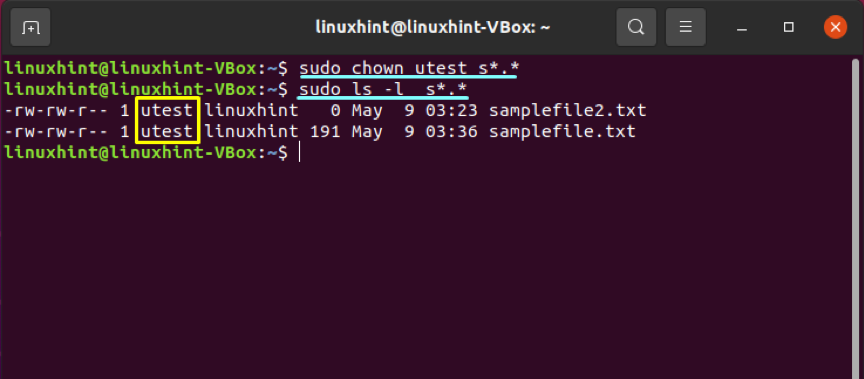
Changing the owner using wildcards
Wildcards are used to select a specific file group according to the given pattern. The chown command will then change the owner of the files after retrieving them from the wildcard execution.
Conclusion
For data security concerns, you may want to specify the ownership of files and directories. In Linux, we use the chown command-line utility for changing the ownership of directories or files. You can also utilize this command for changing directories and multiple file ownership at once. In this post, all of these statements are justified by providing practical examples.
About the author
Talha Saif Malik
Talha is a contributor at Linux Hint with a vision to bring value and do useful things for the world. He loves to read, write and speak about Linux, Data, Computers and Technology.
How to Change Ownership of Files and Folders Recursively
Learn how to use the chown command to recursively change the user and group ownership of files and directories in Linux command line.
chown owner_name file_or_folderThe problem arrives when you change the ownership of a directory, its content remains unchanged. The solution is not too complicated as well.
To change the ownership of all the contents of a directory, you can use the recursive option -R with chown command:
chown -R owner_name folder_nameIf you want to change both owner and group recursively, you can use it in the following manner:
chown -R owner_name:group_name folder_nameLet’s see it in detail and also see how you can change user and group recursively. Things are a lot easier to understand if you are familiar with the concept of file ownership and permission.
chown recursively
To recursively change the ownership of a directory, use it like this:
chown -R new_owner_name directory_nameIf you have to change the ownership of multiple directories with their contents, you can do it in the same line:
chown -R new_owner_name directory1 directory2 directory3Let me show that with a sample example. I have a directory named new_dir with some content in it. This directory and its content are owned by the root user.
[email protected]:~# ls -l /home/abhi/ total 4 drwxr-xr-x 3 root root 4096 May 30 07:30 new_dir [email protected]:~# ls -l /home/abhi/new_dir/ total 20 -rw-r--r-- 1 root root 12813 May 30 07:30 new.txt drwxr-xr-x 2 root root 4096 May 30 07:30 one_more_dirWhen I change the ownership of the new_dir, its ownership is changed:
[email protected]:~# chown abhi /home/abhi/new_dir [email protected]:~# ls -l /home/abhi/ total 4 drwxr-xr-x 3 abhi root 4096 May 30 07:30 new_dir But the files and folders inside it are still owned by root.
[email protected]:~# ls -l /home/abhi/new_dir/ total 20 -rw-r--r-- 1 root root 12813 May 30 07:30 new.txt drwxr-xr-x 2 root root 4096 May 30 07:30 one_more_dir Now, if I use the recursive option -R with chown command, it changes the ownership for everything inside the specified directory, not just the directory.
[email protected]:~# chown -R abhi /home/abhi/new_dir [email protected]:~# ls -l /home/abhi/new_dir/ total 20 -rw-r--r-- 1 abhi root 12813 May 30 07:30 new.txt drwxr-xr-x 2 abhi root 4096 May 30 07:30 one_more_dir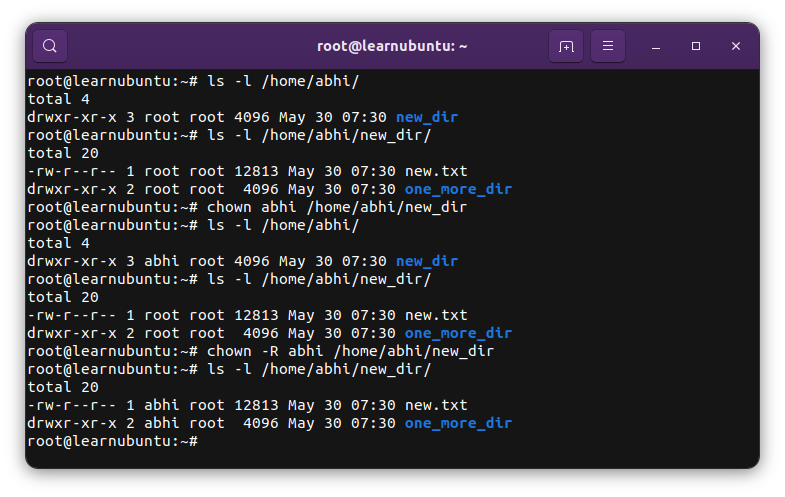
Change both owner and group recursively
The chown command allows you to change the owner as well as the group of files.
To recursively change the owner and group of a directory and all its content, use the chown command like this:
chown -R user_name:group_name directory_nameYou can use the same for changing the ownership of multiple folders:
chown -R user_name:group_name dir1 dir2Conclusion
Recently, I moved a self-hosted Ghost instance to a new server launched with DigitalOcean’s 1-click deployment. I had to upload the entire images folder from the backup (downloaded on the local system) to the new server. The system required changing the ownership of this image folder from root to ghost.
This method saved me the trouble. I hope this quick little tutorial helps you as well.
I highly recommend brushing up the basics of file permissions and ownership.
It’s one of the essential Linux concepts you must know.