- How to rename Linux users and their home directory
- Renaming Users in Linux
- Changing a User’s Home Directory in Linux
- Changing a User’s UID
- How to Use chown Command to Change Ownership in Linux
- Examples of chown command in Linux
- 1. Change or set the user ownership of a file
- 2. Change the user and group ownership
- 3. Change the group to default group of a user
- 4. Change the group only
- 5. Change user and group ownership of a directory recursively
- 6. Set the same user and group ownership as a reference file
- How do I change the owner of a directory in Linux?
- chown command syntax
- Changing the owner of a directory
- Changing the ownership of all sub-directories
- Changing the owner of a file
- Changing the owners of multiple files
- Changing the owner of directory and file at once
- Changing the owner using wildcards
- Conclusion
- About the author
- Talha Saif Malik
How to rename Linux users and their home directory
In this tutorial, you will learn how to a rename a user in CentOS, Debian, Ubuntu and most other Linux distributions. More than that, you will also learn how to rename thier home directory, primary group, and change their UID.
Renaming Users in Linux
Linux provides a tool named usermod specifically for making modifications to user accounts. In this case we are using it to rename a user account, which is done using the -l flag.
For example, to rename a user named student1 to johndoe, you would run the usermod command as follows.
sudo usermod -l johndoe student1The -l flag will only change the user’s name. All other things attached to the user will remain unaffected, such as home directory. and UID.
Changing a User’s Home Directory in Linux
After renaming a user it may make sense to change their home directory, too. Otherwise, it would cause a lot of confusion trying to explain why johndoe ‘s home directory is /home/student .
To change the user’s home directory we once again use the usermod command. However, this time we need to perform to actions: change the home directory to a new path, and move the contents from the old path into the new path.
We set the new home directory path using the -d or —home flag with the path to the new directory. We must also use the -m flag to copy the contents of the old home directory into the new one.
sudo usermod -d /home/joedoe -m johndoe Every user on a Linux system is created with a group of the same name. When we change the name of a user their group name is left untouched. It’s a good idea to also change the user’s primary group name as well.
To change a user’s primary group name we use the groupmod command with the -n flag. We must supply the old name and a new name.
For example, to rename the newly renamed user johndoe ‘s primary group to johndoe from student1 , we would run the following command.
sudo groupmod -n johndoe student1Changing a User’s UID
A little more rare than renaming a user or changing their home directory is changing their UID. A User’s UID is their unique ID on a Linux system. When we assign permissions to file and directories, we use their UID. Processes started by a user are also executed using a user’s UID.
To change a user’s ID we use the usermod command with the -u flag, followed by a new, unique integer.
For example, to set johndoes UID to 5001, we would run the following usermod command.
sudo usermod -u 5001 johndoeHow to Use chown Command to Change Ownership in Linux
The chown command in Linux enables you to change the user and group ownership of a file or directory. Learn to use chown with some practical examples.
The chown command in Linux allows you to change the ownership of files and directories. You can rightly guess that ‘chown’ is short for ‘change owner’.
If you are not aware of these terms, I highly recommend reading my explainer article about file permissions and ownership in Linux.
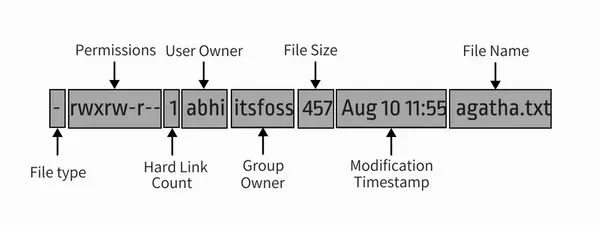
Here’s a picture to quickly recall it:
With the chown command, you can change both user and group ownership of a file or a directory.
Examples of chown command in Linux
Here’s what the syntax for chown command looks like:
chown [options] user_spec filesDo keep in mind that chown is an administrative command and so you need to be root or have sudo rights in order to make changes with chown command. I hope you know how to add sudo user.
Otherwise, you’ll see an error like this:
chown: changing ownership of 'agatha.txt': Operation not permittedNow let’s see how to use the chown command with examples.
Here’s the example set I am going to use:
-rw-r--r-- 1 abhishek abhishek 456 Jan 24 09:30 agatha.txt drwxr-xr-x 2 abhishek abhishek 4096 Jan 24 09:31 mydir drwxr-xr-x 3 abhishek abhishek 4096 Jan 24 09:30 new -rw-r--r-- 1 abhishek abhishek 356 Jan 24 09:30 sherlock.txt1. Change or set the user ownership of a file
To change the ownership of a file, use the command in this fashion:
sudo chown user_name file_nameYou may also use UID (user ID) instead of the user name. Here’s an example of the changes it makes:
[email protected]:~/tutorial$ sudo chown prakash agatha.txt [email protected]:~/tutorial$ ls -l agatha.txt -rw-r--r-- 1 prakash abhishek 456 Jan 24 09:30 agatha.txtAs you can see the owner of the file has changed to ‘prakash’ from ‘abhishek’ but the group remains ‘abhishek’. Let me show you how to change both user ownership and group ownership.
2. Change the user and group ownership
To change the user and group ownership of a file, you can specify the group with the user name separated by a column like this:
sudo chown user_name:group_name file_nameOf course, you can use UID and GID instead of user name and group name respectively.
[email protected]:~/tutorial$ sudo chown prakash:adm sherlock.txt [email protected]:~/tutorial$ ls -l sherlock.txt -rw-r--r-- 1 prakash adm 356 Jan 24 09:30 sherlock.txtAs you can see in the example above, I changed the user of the file sherlock.txt to ‘prakash’ and the group to ‘adm’.
3. Change the group to default group of a user
Every user has a default or primary group. If the user creates a new file or directory, this primary group automatically becomes the group owner of the file. You can list the default group of a user with the id command.
Now if you want to change the group ownership of a file to the default group of a user, you should just leave the group name after colon.
sudo chown user_name: file_nameAs you can see in the example below, sherlock.text file user owner ‘prakash‘ and group owner ‘adm‘. I changed the owner to ‘abhishek’ but didn’t provide the group name. And yet it changed the group from ‘adm’ to default ‘abhishek’ group.
[email protected]:~/tutorial$ ls -l sherlock.txt -rw-r--r-- 1 prakash adm 356 Jan 24 09:30 sherlock.txt [email protected]:~/tutorial$ sudo chown abhishek: sherlock.txt [email protected]:~/tutorial$ id abhishek uid=1000(abhishek) gid=1000(abhishek) groups=1000(abhishek),4(adm),24(cdrom),27(sudo),30(dip),46(plugdev),116(lpadmin),126(sambashare),999(docker) [email protected]:~/tutorial$ ls -l sherlock.txt -rw-r--r-- 1 abhishek abhishek 356 Jan 24 09:30 sherlock.txt4. Change the group only
If you just want to change the group without being bothered by the user owner, you can use the chown command like this:
sudo chown :group_name file_nameIn the example below, I set the group ownership to sudo without touching the user ownership:
[email protected]:~/tutorial$ ls -l agatha.txt -rw-r--r-- 1 prakash abhishek 456 Jan 24 09:30 agatha.txt [email protected]:~/tutorial$ sudo chown :sudo agatha.txt [email protected]:~/tutorial$ ls -l agatha.txt -rw-r--r-- 1 prakash sudo 456 Jan 24 09:30 agatha.txt5. Change user and group ownership of a directory recursively
In all the above commands, you can replace file with directory and it will work the same for changing ownership of the directory.
The one problem here is that by default the ownership of the content inside the directory is not changed.
sudo chown -R user_name:group_name directory_name6. Set the same user and group ownership as a reference file
You can use a file as reference and change the user and group ownership of a file based on the reference file in this manner:
sudo chown --reference=file1.txt file2.txtIn the example below, file agatha.txt has been used as a reference. And as you can see, the ownership of sherlock.txt has been changed on the basis of agatha.txt.
[email protected]:~/tutorial$ ls -l agatha.txt sherlock.txt -rw-r--r-- 1 prakash sudo 456 Jan 24 09:30 agatha.txt -rw-r--r-- 1 abhishek abhishek 356 Jan 24 09:30 sherlock.txt [email protected]:~/tutorial$ sudo chown --reference=agatha.txt sherlock.txt [email protected]:~/tutorial$ ls -l agatha.txt sherlock.txt -rw-r--r-- 1 prakash sudo 456 Jan 24 09:30 agatha.txt -rw-r--r-- 1 prakash sudo 356 Jan 24 09:30 sherlock.txtI think you have enough examples of the chown command to understand it. You can always refer to chown man page for more details.
If you have questions or suggestions, do let me know.
How do I change the owner of a directory in Linux?
![]()
All files and directories that exist on your Linux system have an owner, a group, and permission access rights that are granted to the file owners, its group members, or others. The chown command permits a Linux user to change any directory or file’s ownership. In this post, we will demonstrate the usage of the chown command for changing ownership through practical examples. But firstly, you should understand why you would want to change the ownership of any directory or file?
Here is the list of few scenarios in which you want to do this:
- For example, you want an already created directory or file to be accessible to a particular user.
- When a user leaves an organization, all of his data comes under the responsibility of another employee. Therefore, you want to change the ownership of the new team member.
- Changing directory or file ownership is also necessary when you are writing a script that has to be used by only a specific person.
- Transferring files between different Linux systems also requires changes in files and directories ownership.
Now let’s check out the syntax of the chown command.
chown command syntax
Utilize the “User” for the username or replace it using the user ID, also known as UID. Add the group name in the “Group” part of the GID (group ID). At the end of the chown command, add files or directories for which you want to change the ownership.
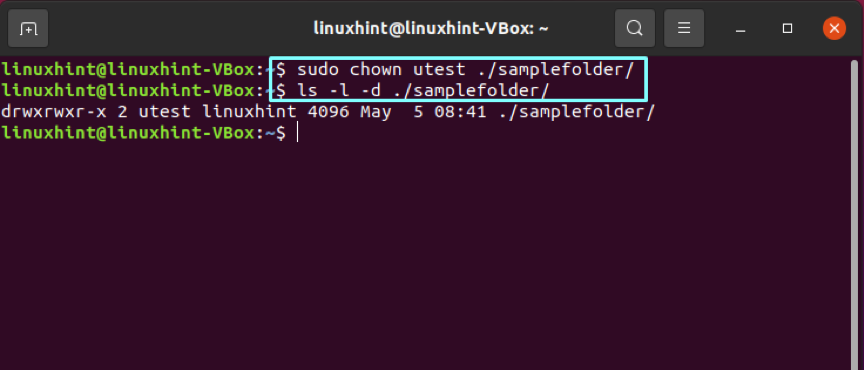
Changing the owner of a directory
We have created a separate user named “utest” and a group “ugroup” for demonstrating the examples. To change the ownership of any directory, utilize the chown command with the username and path of the directory.
Now, write out the “ls” command and check if your directory ownership is updated or not.
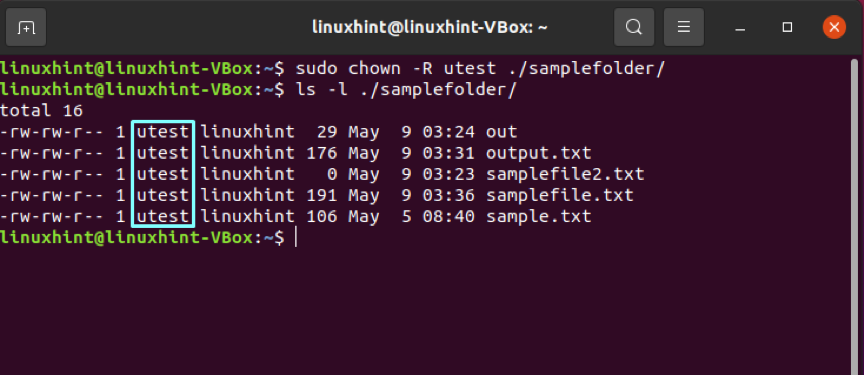
Changing the ownership of all sub-directories
Utilize the “-R” option of the chown command for changing the owners of all the files or folders present in a directory.
List out the directory content to view the results.
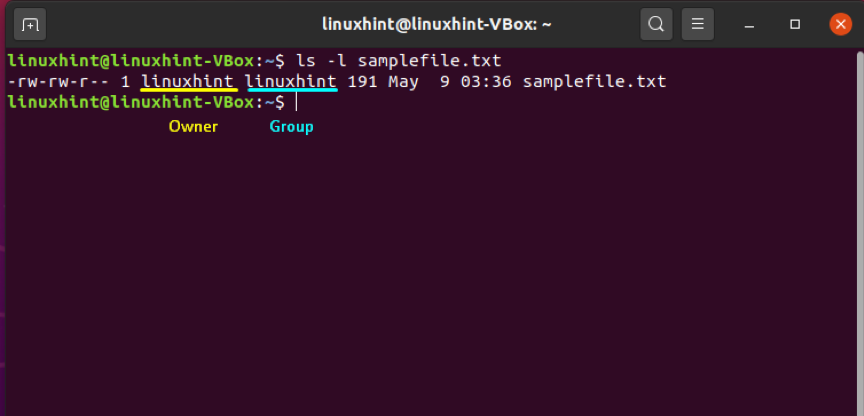
Changing the owner of a file
First of all, list out the file content to know about its ownership.
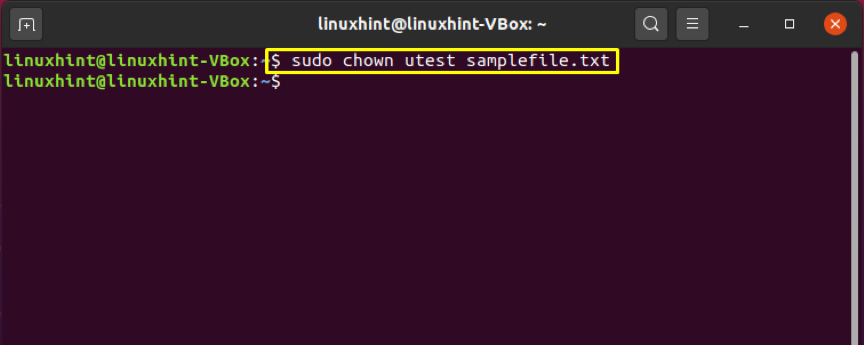
After that, specify the name of the user who you want to be the new owner of this file. In our case, we have chosen “utest” to avail the ownership of “samplefile.txt.”
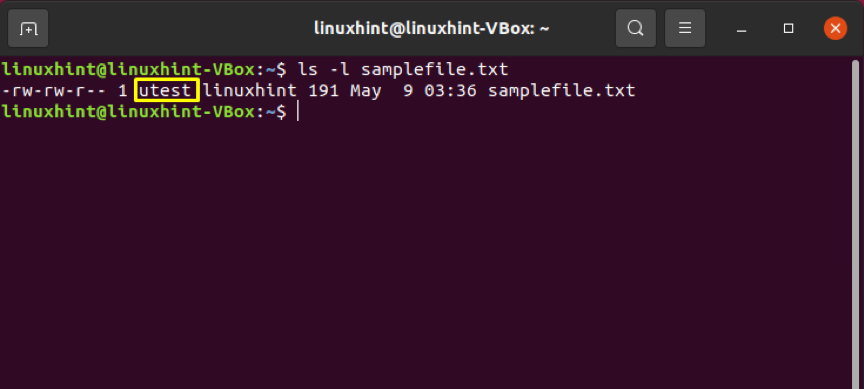
Again, verify the updated ownership changes.
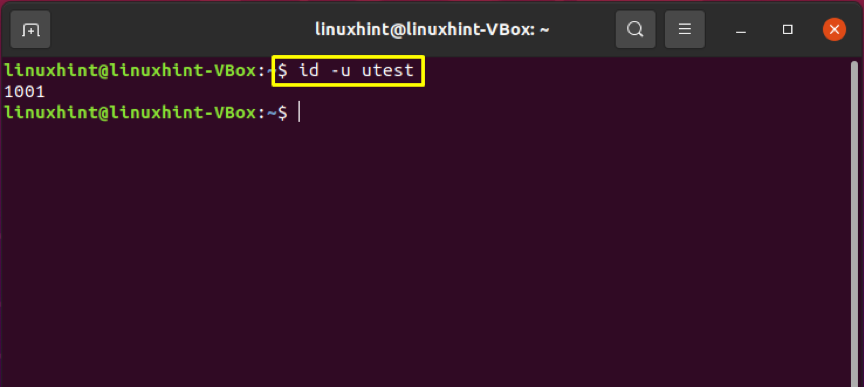
You can also use the “User ID” or “UID” of any user for this purpose. For that, retrieve the user ID of the new user by utilizing the “id” command with the “-u” option.
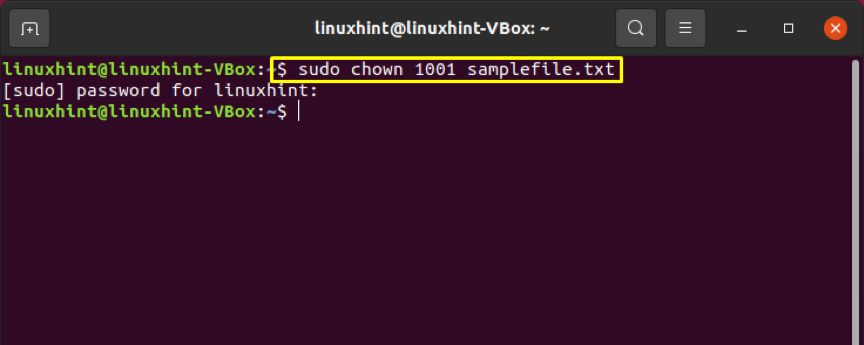
Add the User ID instead of the username to make the ownership changes.
Changing the owners of multiple files
Specify the file names at the end of the chown command to change the ownership of multiple files at once.
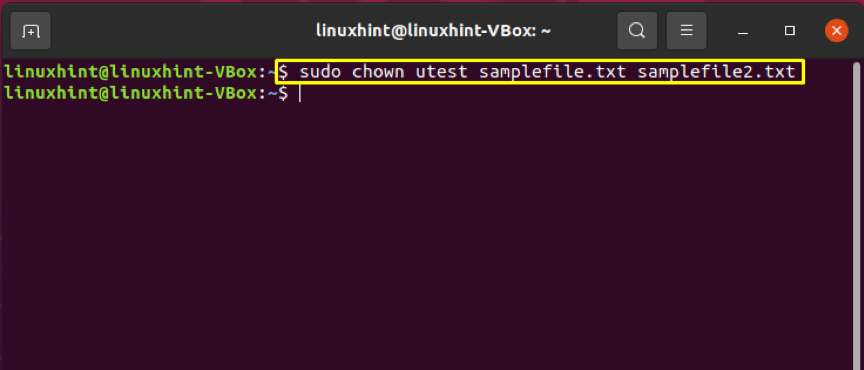
Write out the below-given command to confirm the changes.

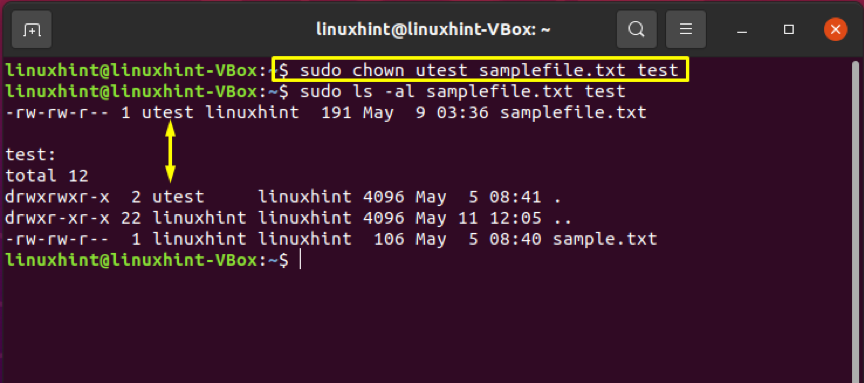
Changing the owner of directory and file at once
Follow the below-given method for changing the owners of the file and directory instantly.
This command will make “utest” the new owner of the “test directory” and the “samplefile.txt.”
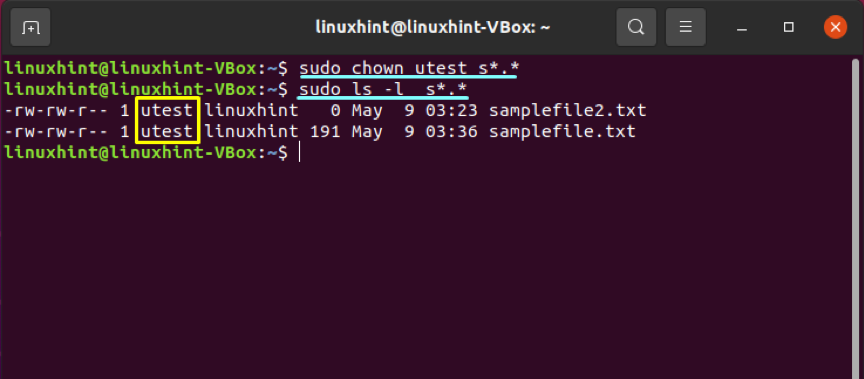
Changing the owner using wildcards
Wildcards are used to select a specific file group according to the given pattern. The chown command will then change the owner of the files after retrieving them from the wildcard execution.
Conclusion
For data security concerns, you may want to specify the ownership of files and directories. In Linux, we use the chown command-line utility for changing the ownership of directories or files. You can also utilize this command for changing directories and multiple file ownership at once. In this post, all of these statements are justified by providing practical examples.
About the author
Talha Saif Malik
Talha is a contributor at Linux Hint with a vision to bring value and do useful things for the world. He loves to read, write and speak about Linux, Data, Computers and Technology.