- Маршрутизация в Linux
- Сетевые маршруты в Linux
- Как посмотреть таблицу маршрутизации
- Настройка маршрутов в Linux
- Выводы
- How to View the Network Routing Table in Ubuntu Linux
- How to View Routing Table?
- Method 1: Through the netstat command
- Method 2: Through the route command
- Method 3: Through the ip route command
- Search
- About This Site
- Latest Tutorials
Маршрутизация в Linux
Эта статья одна из статей про работу сетей в Linux. Вы уже знаете, что все данные в сети передаются в виде пакетов, а чтобы компьютер знал куда нужно отправить тот или иной пакет используются IP адреса. Но пакету, перед тем, как он достигнет точки назначения нужно пройти множество компьютеров и маршрутизаторов.
Каждому из маршрутизаторов нужно знать на какой компьютер передавать пакет дальше. Именно это мы и обсудим в этой статье. Сегодня нас будет интересовать маршрутизация в Linux, как это работает, как настроить правила и заставить все работать как нужно.
Сетевые маршруты в Linux
Как я уже сказал, сетевые маршруты необходимы чтобы компьютеры могли определить по какой цепочке должен пойти пакет, чтобы достигнуть цели. Маршруты можно настроить на уровне интерфейса или маршрутизатора.
Когда компьютеру нужно отправить пакет в сеть он смотрит таблицу маршрутизации, в ней указанны ip адреса пунктов назначения и адреса интерфейсов и роутеров в домашней сети, которые могут отправить пакет по нужному адресу. Если для цели маршрут не указан то используется так называемый шлюз по умолчанию или маршрут по умолчанию. Точно такая же картина наблюдается на роутере. Устройство смотрит на IP адрес назначения и сверяет его со своей таблицей маршрутизации, а потом отправляет дальше.
Ниже мы рассмотрим как проверить текущие маршруты в системе, а также как настроить новые.
Как посмотреть таблицу маршрутизации
Перед тем как что-либо менять, нужно понять какие правила уже используются. В Linux для этого существует несколько команд. Чтобы посмотреть таблицу маршрутизации можно использовать команду route:
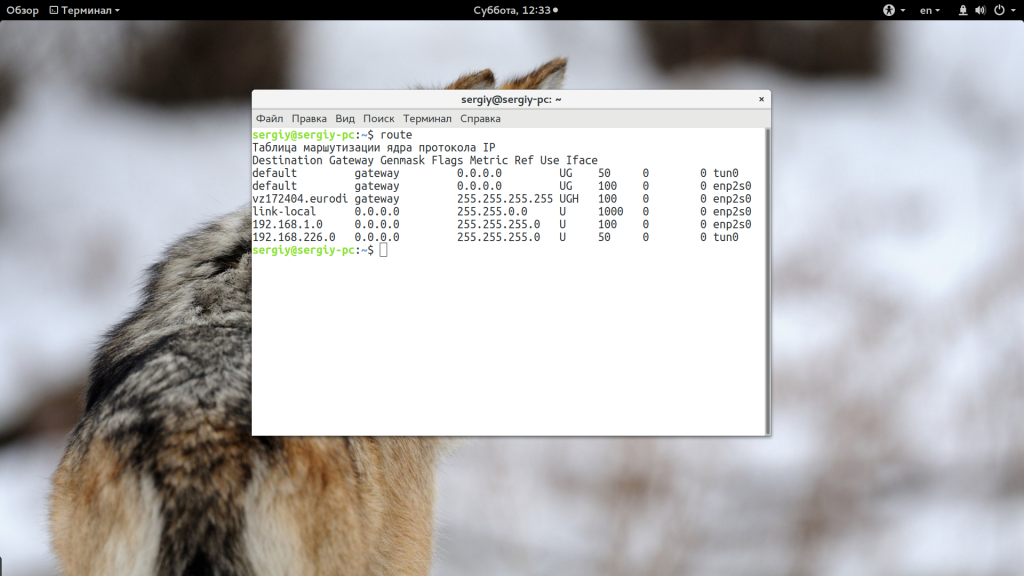
Вот так выглядит таблица маршрутизации linux. Тут выводится достаточно простая информация, которой не всегда достаточно чтобы понять суть дела. Более подробно можно посмотреть с помощью команды routel:
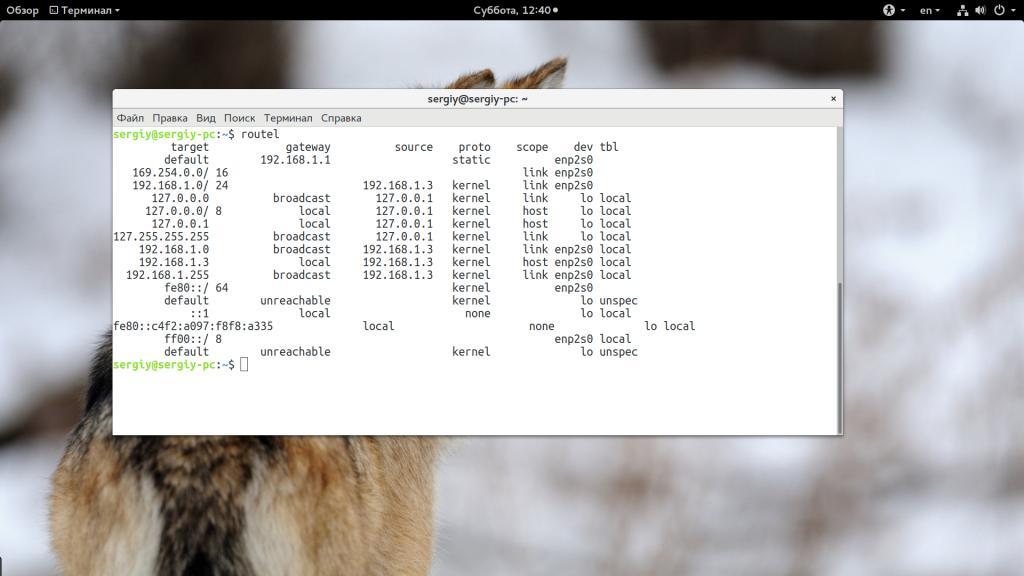
Тут вы уже можете видеть IP адрес цели (target), IP адрес шлюза (gateway), IP отправителя (source), протокол, и даже сетевой интерфейс. Но самый удобный способ посмотреть таблицу маршрутизации linux — это команда ip:
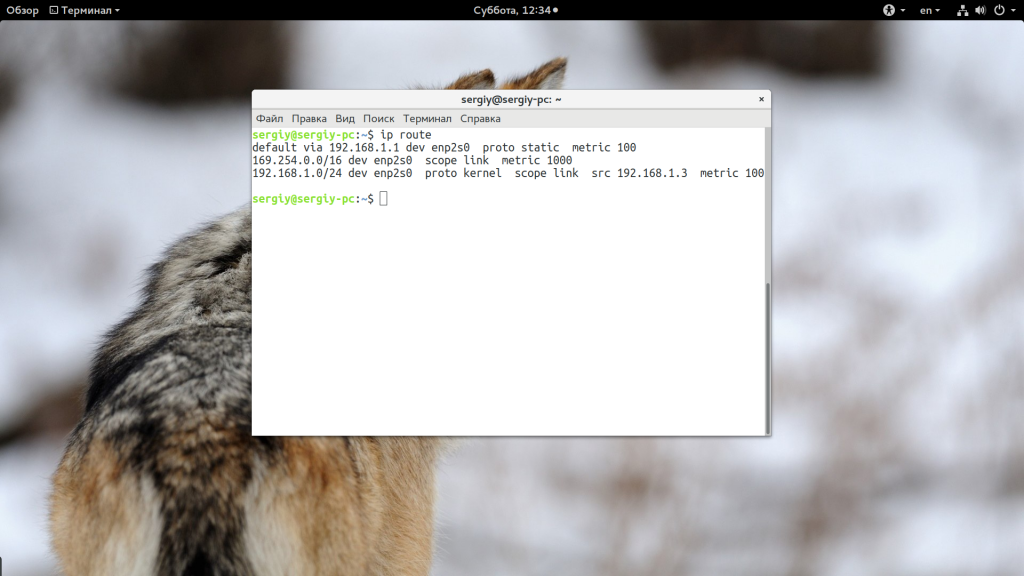
Вывод похож на результат предыдущей команды, но выглядит не совсем привычно, это потому, что вывод команды можно использовать в качестве аргумента для ip route add или ip route del. Это очень удобно. Как вы видите, в качестве шлюза по умолчанию везде используется 192.168.1.1. Рассмотрим подробнее что означает вывод этой команды:
- default — в данной строке означает вариант по умолчанию. Здесь должен быть ip адрес цели или маска подсети;
- via 192.168.1.1 — указывает через какой шлюз мы можем добраться до этой цели, у нас это 192.168.1.1;
- dev enp2s0 — сетевой интерфейс, с помощью которого будет доступен этот шлюз;
- proto static — означает, что маршрут был установлен администратором, значение kernel значит что он был установлен ядром;
- metric — это приоритет маршрута, чем меньше значение — тем выше приоритет.
А теперь рассмотрим выполняется настройка маршрутов Linux.
Настройка маршрутов в Linux
Вы можете настраивать таблицу маршрутизации с помощью команды ip. Например, чтобы изменить маршрут по умолчанию достаточно выполнить:
ip route add default via 192.168.1.1
Так вы можете добавить маршрут для любого IP адреса, например, для 243.143.5.25:
sudo ip route add 243.143.5.25 via 192.168.1.1
Все очень просто, сначала указывается IP адрес цели, а затем шлюз в локальной сети, через который можно достичь этого адреса. Но такие маршруты будут активны только до перезагрузки, после перезагрузки компьютера они будут автоматически удалены. Чтобы маршруты сохранились их нужно добавить в файл конфигурации.
В операционных системах семейства Red Hat используются конфигурационные файлы /etc/sysconfig/network-scripts/route-ethX. Каждый файл может описывать несколько маршрутов, например:
GATEWAY=10.10.0.1
NETMASK=255.0.0.0
IPADDR=10.10.0.22
Здесь gateway — шлюз по умолчанию для этого интерфейса, netmask — маска сети, а ipaddr — ip адрес интерфейса. В Debian и основанных на нем дистрибутивах можно настроить маршруты в файле /etc/network/interfaces. Здесь команда route добавляется в секцию iface. Например:
up route add -net 10.10.0.0 netmask 255.0.0.0 gw 10.10.0.1
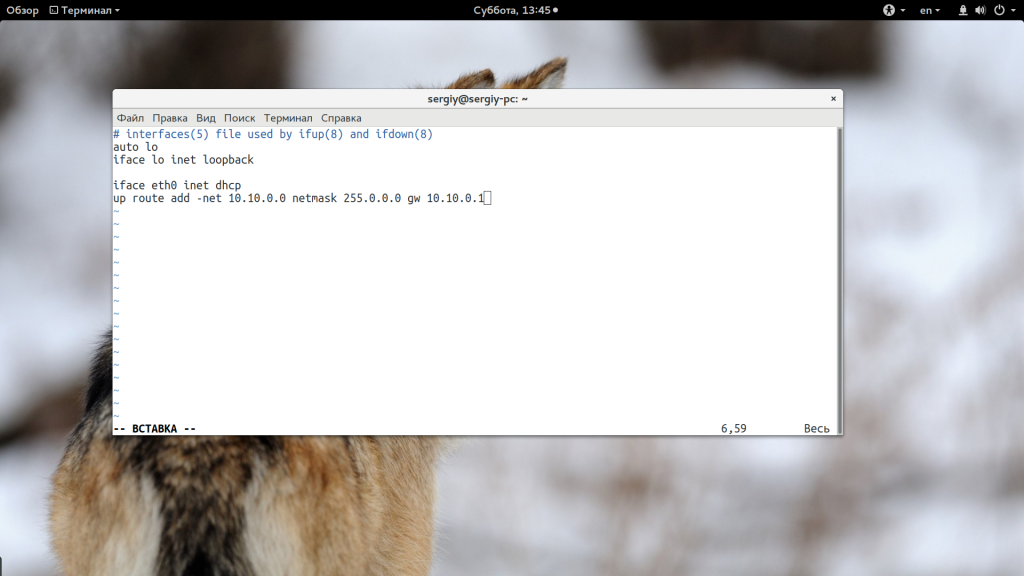
С помощью опции -net мы указываем целевую сеть, netmask — это маска сети, а gw — шлюз. Все очень просто. Теперь добавленные маршруты останутся даже после перезагрузки.
Выводы
В этой небольшой статье мы кратко рассмотрели как работает маршрутизация в Linux, как выполняется настройка маршрутизации в linux, а также зачем это нужно. Надеюсь, эта информация была полезной для вас.
Обнаружили ошибку в тексте? Сообщите мне об этом. Выделите текст с ошибкой и нажмите Ctrl+Enter.
How to View the Network Routing Table in Ubuntu Linux

Routing is the transfer of an IP packet from one point to another across the network. When you send someone an email, you’re actually transmitting a series of IP packets or datagrams from your system to the other person’s computer. The packets sent from your computer pass through several gateways or routers to get to the destination computer system. The same is true for all Internet protocols such as HTTP, IRC, FTP, etc.
In all Linux and UNIX systems, the information about how the IP packets should be routed is stored in a kernel structure. These structures are called routing tables. If you want your system to communicate with other computers, you may want to configure these routing tables. First, it is important to know how to view these routing tables on your Linux system.
In this article, we explain how to view the routing tables in Ubuntu using the following three common commands:
We have run the commands and procedures mentioned in this article on a Ubuntu 22.04 LTS system.
We are using the Ubuntu command line, the Terminal, in order to run the above-mentioned commands. You can open the Terminal either through the system Dash or the Ctrl+Alt+T shortcut.
How to View Routing Table?
Method 1: Through the netstat command
The netstat command has always been a widely used method of printing routing table information in Linux. However, it is officially replaced by the ip route command. We are including it anyway as it is still an approach to retrieve the required information.
Here is how you can use this command:
-r This flag is used to display the Kernel routing tables
-n This flag is used to display the numerical addresses

This is what the output indicates:
| Destination | This column indicates the destination network. |
| Gateway | This column indicates the defined gateway for the network. If you see an * in this column, it means that no forwarding gateway is needed for the specified network. |
| Genmask | This column indicates the netmask of the network. |
| Flags | The U output in this columns means that the route is up. The G output indicates that specified gateway should be used for this route. D stands for dynamically installed, M stands for modified, and R means reinstated. |
| MSS | This column indicates the default Maximum Segment Size(MSS) for TCP connections for this route. |
| Window | This column indicates the default window size for TCP connections over this route. |
| Irtt | This column indicates the Initial Round Trip Time for this route. |
| Iface | The Iface column shows the network interface. If you had more than one interface, you would see lo (for loopback), eth0 (first Ethernet device), and eth1 (for the second Ethernet device), and so on for the number of interfaces, you have installed. |
Method 2: Through the route command
The route command also falls under the category of once widely used but now obsolete command to view routing tables. The manual page of this command also mentions that the command is now replaced by the ip route command.
Through this command, you can view exactly the same information that you could, through the netstat command. Here is how you can use it:
-n This flag is used to display the numerical addresses only

Method 3: Through the ip route command
Last but not least, here is the most recommended way of printing routing table information in Linux. Here is how to use this command:

Though this information is not much reader-friendly as that of the previously mentioned commands, it is still enough for you to configure the router.
These were a few commands to view the routing table information in Ubuntu. Though the ip route command in not neat looking, it is still the most recommended way of looking up for relevant routing table information. Though the other commands are considered obsolete, they are sometimes really helpful in deriving what you need to extract.
Search
About This Site
Vitux.com aims to become a Linux compendium with lots of unique and up to date tutorials.