- How to find the frequency and type of my current RAM?
- How to Test the Installed RAM on Ubuntu 22.04
- How to check the Installed, Used, and Available RAM
- How to check the Type and Speed of RAM
- How to Test RAM for errors through the MemTester utility
- Search
- About This Site
- Latest Tutorials
- Информация об оперативной памяти в Linux. Свободная, занятая и тип памяти
- Свободная и занятая оперативная память
- Команда free
- Команда vmstat
- Команда top
- Команда htop
- Файл /proc/meminfo
- Тип памяти и частота
- Заключение
- How to find information about my RAM? [duplicate]
- 4 Answers 4
How to find the frequency and type of my current RAM?
It should, and it does for me: on my computer, two of the lines read «4GiB DIMM DDR3 Synchronous 1333 MHz (0.8 ns)» (corresponding to the two RAM slots where I have RAM installed). Did you look closely?
sudo lshw -C memory > info.txt Not sure, it won’t display on my terminal, but if I pipe it to a file it shows.
This did not display the frequency for me in Ubuntu 15.04. Likely hardware dependent. Solution by Henrique worked though.
Use the lshw command with the memory class:
$ sudo lshw -C memory # Some things about firmware and caches *-memory description: System Memory physical id: 13 slot: System board or motherboard size: 8GiB *-bank:0 description: DIMM [empty] product: [Empty] vendor: [Empty] physical id: 0 serial: [Empty] slot: ChannelA-DIMM0 *-bank:1 description: SODIMM DDR3 Synchronous 1600 MHz (0.6 ns) product: M471B5273DH0-CK0 vendor: Samsung physical id: 1 serial: 34A8C7AF slot: ChannelA-DIMM1 size: 4GiB width: 64 bits clock: 1600MHz (0.6ns) # More banks. As you can see, I’m using DDR3 1600MHz RAM.
$ sudo dmidecode -t memory # dmidecode 2.9 SMBIOS 2.5 present. Handle 0x003B, DMI type 16, 15 bytes Physical Memory Array Location: System Board Or Motherboard Use: System Memory Error Correction Type: Multi-bit ECC Maximum Capacity: Unknown Error Information Handle: Not Provided Number Of Devices: 8 Handle 0x003D, DMI type 17, 27 bytes Memory Device Array Handle: 0x003B Error Information Handle: Not Provided Total Width: 72 bits Data Width: 64 bits Size: 4096 MB Form Factor: DIMM Set: None Locator: DIMM_A1 Bank Locator: NODE 0 CHANNEL 0 DIMM 0 Type: Other Type Detail: Synchronous Speed: 1067 MHz (0.9 ns) Manufacturer: 0x0198 Serial Number: 0xB12A9593 Asset Tag: Unknown Part Number: 9965426-037.A00LF # more such devices This is for a server with ECC memory (as can be seen from the Error Correction Type field and the difference between Data Width and Total Width ).
Both tools are dependencies of the ubuntu-standard package and should be available by default on all Ubuntu systems. There used to be another tool called hwinfo , which is no longer available for Ubuntu since 13.10.
How to Test the Installed RAM on Ubuntu 22.04

RAM, short for Random Access Memory, can be considered the workspace of your computer system. Whenever you open a file for viewing or editing, your system creates a temporary instance of that file in your RAM so that you can work on it. When you save the file, your system copies it to a more stable and non-volatile space( hardware) called the Read Only Memory. Also, when you run a program, your operating system and RAM are the medium on which it is run. A good balance of adequately sized and fast RAM is your answer when looking for a high-performance computing system.
While using Ubuntu, we come across many scenarios where RAM is a huge consideration. We want to know how much RAM is installed on our system, how much of it we can use, is our RAM free of errors, and much more.
In this article, we will explain the following things you can do about your installed RAM through the Ubuntu command line:
- Check for Installed, Used, and Available RAM
- Check the Type and Speed of your installed RAM
- Test your installed RAM for errors
We have run the command and procedures mentioned in this article on a Ubuntu 22.04 LTS system.
Note: We will use the Ubuntu command line, the Terminal, to explain the above-mentioned tasks. You can open the Terminal application through the Ubuntu Application launcher search bar or the Ctrl+Alt+T shortcut.
How to check the Installed, Used, and Available RAM
The simplest way to check for memory stats on your Ubuntu is through the free command:
This is how you use the free command:
This command is used to check memory and swap utilization on your system in a few lines. Without any switch, the displayed output is printed in kilobytes.

However, a better approach is to use the -h switch so that the free command displays the memory and swap utilization in the nearest possible-3 digit format.

The “Mem” part of the output gives you information about the RAM on your system. The total column gives you the total GBs of RAM installed on your system. The used and available columns indicate the RAM used by your system and the GBs available for use, respectively.
How to check the Type and Speed of RAM
Before explaining how to check the Type and Speed of your RAM, let us first define what they both mean:
- Type: RAM these days comes in many profiles based on the data and transfer rates. These include the older SDRAM(Synchronous dynamic RAM), the DDR1(DDR SDRAM), DDR2, DDR3, and the modern DDR4. For portable systems, RAM comes in DRAM and SDRAM types.
- Speed: When we talk about the RAM speed in MHz or GHz, we consider the clock cycles. A cycle means a single read-and-write session. The speed of the RAM means how many cycles per second it can perform. A 3200 MHz RAM can perform 3200 cycles( read/write sessions) in one second.
You can use the dmidecode command run via sudo to check the type of your RAM. First we take care that the commands are installed:
$ sudo apt install dmidecode less
Then run the dmidecode command:
$ sudo dmidecode --type memory | less
The system will ask you for the password of the sudo user and then display the following information:

Scroll down and spot the Type of RAM in the output, as highlighted above. As you can see, I have DDR3 installed on my laptop.
Through the same command, you can also view the Clock Speed of your RAM:

The above output shows that I have 1333 MHz of RAM installed on my system.
You can use the ‘q’ key to quit this output.
How to Test RAM for errors through the MemTester utility
Since RAM is a fragile device, its semiconductors may sometimes face breakage. This might affect the performance of your overall RAM. You can make use of the MemTester to test your RAM for errors.
To install this utility, open your Terminal application and enter the following command to first update your system’s repository index with that of the Internet repositories. This ensures that the latest available version of a software can be installed on your system.

Then, use the following apt-get command to install memtester. If you are unsure if memtester is already installed, you can also check it in the package list first, as shown here.
$ sudo apt install memtester

This is the Usage of the memtester command:
$ memtester [-p physaddrbase [-d device]] [B|K|M|G] [loops]
The following command will check 200 MBs of RAM space in two iterations:
This is what the test output looks like.

The output indicated that I do not have any errors in my RAM. Lucky much for how roughly I sometimes use my Laptop.
There is, however, one limitation of this command: you can only scan RAM up to the size of free RAM on your system. The memtest86+ utility at boot GRUB menu is what you can use to test your RAM thoroughly.
So these were a few commands through which you could know all about the RAM installed on your Ubuntu system. You also learned how to use the memtest utility to ensure that your RAM works optimally.
Search
About This Site
Vitux.com aims to become a Linux compendium with lots of unique and up to date tutorials.
Latest Tutorials
Информация об оперативной памяти в Linux. Свободная, занятая и тип памяти

Мы воспользуемся утилитами командной строки доступными для большинства Linux дистрибутивов.
Свободная и занятая оперативная память
Для получения информации о количестве свободной и занятой оперативной памяти в Linux можно использовать различные утилиты и команды. Рассмотрим несколько распространенных способов.
Команда free
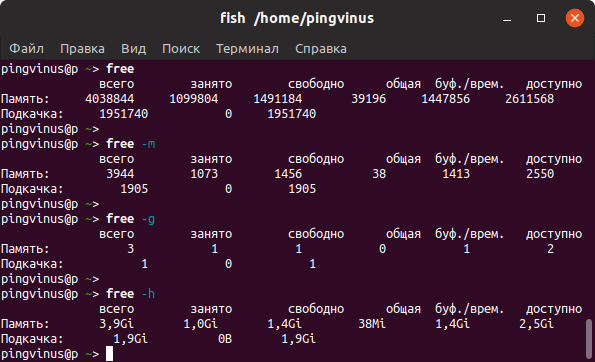
Команда free очень простая, она выводит информацию о общем количестве оперативной памяти, о количестве занятой и свободной памяти, а также об использовании файла подкачки.
free всего занято свободно общая буф./врем. доступно Память: 4038844 1099804 1491184 39196 1447856 2611568 Подкачка: 1951740 0 1951740По умолчанию объем памяти выводится в килобайтах. Используя опции, можно выводить объем памяти в других форматах. Некоторые опции:
Команда vmstat
Команда vmstat выводит различную статистику по использованию памяти. Используя ключ -s можно вывести подробную статистику в табличном виде.
vmstat -s 4038844 K total memory 1180932 K used memory 1694344 K active memory 542648 K inactive memory 1403152 K free memory 213312 K buffer memory 1241448 K swap cache . 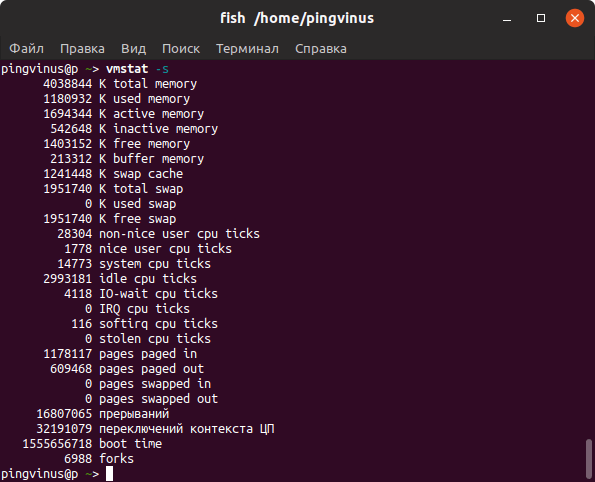
Команда top
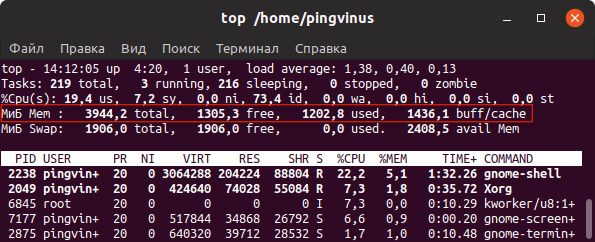
top — это утилита командной строки, которая используется для мониторинга процессов и используемых ресурсов компьютера.
В заголовке выводится информация об использованной оперативной памяти.
Команда htop
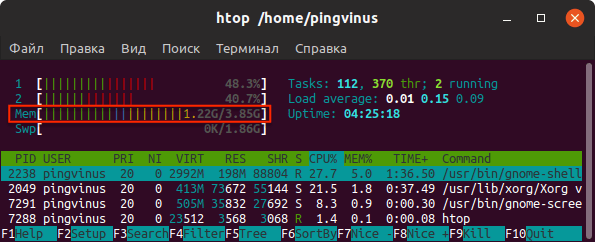
Утилита htop, также как и top, используется для мониторинга ресурсов и процессов.
Для установки утилиты htop в Ubuntu Linux (Linux Mint и других Ubuntu/Debian-дистрибутивах) выполните команду:
Файл /proc/meminfo
Описанные выше команды, в качестве источника информации используют системные файлы из файлов, хранящихся в виртуальной файловой системе /proc . В файле /proc/meminfo содержится информация об использовании памяти. Выведем содержимое файла /proc/meminfo :
cat /proc/meminfo MemTotal: 4038844 kB MemFree: 1341788 kB MemAvailable: 2474596 kB Buffers: 214128 kB Cached: 1065564 kB SwapCached: 0 kB Active: 1743700 kB . 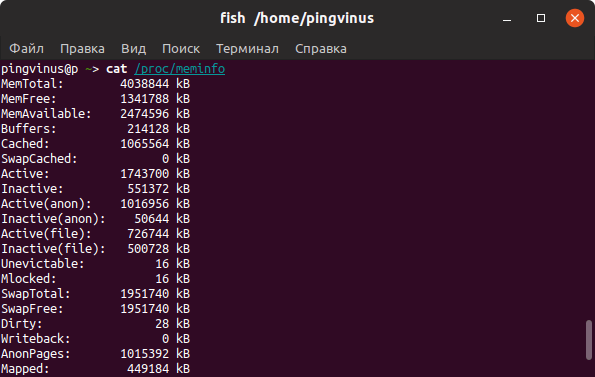
Тип памяти и частота
Рассмотрим, как получить информацию об установленных в компьютер модулях оперативной памяти. Воспользуемся командной dmidecode
Используем следующую команду:
sudo dmidecode --type 17 sudo dmidecode --type 17 # dmidecode 3.1 Getting SMBIOS data from sysfs. SMBIOS 2.4 present. Handle 0x0026, DMI type 17, 27 bytes Memory Device Array Handle: 0x0025 Error Information Handle: Not Provided Total Width: 64 bits Data Width: 64 bits Size: 2048 MB Form Factor: DIMM Set: None Locator: A0 Bank Locator: Bank0/1 Type: DDR2 Speed: 800 MT/s . В выводе команды будет информация о слотах оперативной памяти. Для каждого слота отображается установленный модуль оперативной памяти, его тип (поле Type ), размер (поле Size ), скорость/частота (поле Speed ) и другая информация.
В зависимости от системы и оборудования не всегда удается получить все данные, поэтому некоторые поля могут быть пустыми или иметь надписи Not provided/Unknown.
Заключение
Мы рассмотрели различные способы для просмотра информации о доступной и занятой оперативной памяти, а также показали, как вывести информацию об установленных модулях оперативной памяти.
Для отслеживания использования ресурсов компьютера существует множество графических программ. Найти их можно в нашем каталоге программ для Linux в разделе Система/Мониторинг.
How to find information about my RAM? [duplicate]
I’d like to know the type, size, and model. But I’d like to avoid having to shut down and open the machine.
4 Answers 4
$ sudo dmidecode —type 17 | more
# dmidecode 2.9 SMBIOS 2.4 present. Handle 0x0018, DMI type 17, 27 bytes Memory Device Array Handle: 0x0017 Error Information Handle: Not Provided Total Width: 64 bits Data Width: 64 bits Size: 2048 MB Form Factor: DIMM Set: None Locator: J6H1 Bank Locator: CHAN A DIMM 0 Type: DDR2 Type Detail: Synchronous Speed: 800 MHz (1.2 ns) Manufacturer: 0x2CFFFFFFFFFFFFFF Serial Number: 0x00000000 Asset Tag: Unknown Part Number: 0x5A494F4E203830302D3247422D413131382D Handle 0x001A, DMI type 17, 27 bytes Memory Device Array Handle: 0x0017 Error Information Handle: Not Provided Total Width: Unknown Data Width: Unknown Size: No Module Installed Form Factor: DIMM Set: None Locator: J6H2 Bank Locator: CHAN A DIMM 1 Type: DDR2 Type Detail: None Speed: Unknown Manufacturer: NO DIMM Serial Number: NO DIMM Asset Tag: NO DIMM Part Number: NO DIMM Alternatively, both newegg.com and crucial.com among other sites have memory upgrade advisors/scanners that I’ve used regularly under Windows. Some of them were web-based at some point, so you could try that, or if you could possibly boot into Windows (even if temporarily) it might help.
Not sure what the results would be under a Windows VM, and unfortunately I am currently running Linux in a VM under Windows 7, so can’t reliably test for this myself.
I do realize that this doesn’t give you necessarily exactly what you asked for .. but perhaps it will be of use none-the-less.