- How to resolve «Failed to download repository information»?
- 6 Answers 6
- How to Check Internet Connectivity in Linux Terminal
- Method 1: PING Command
- Method 2: CURL Command
- Diagnose the Problem
- Conclusion
- About the author
- Shehroz Azam
- Как проверить подключение к Интернету в терминале Linux
- Метод 1: команда PING
- Метод 2: команда CURL
- Диагностируйте проблему
- Заключение
How to resolve «Failed to download repository information»?
The above does not work for me. I notice when running «apt-get update» the concatenated string contains the IP for this device (in my case 10.1.1.4), NOT the nameserver (10.1.1.1). It is then unable to connect.
I’d like to add this as an answer to this protected question, but don’t have the rep here yet. Anyway, I ran into this problem. In my case I had forgotten I had added a file to /etc/apt/sources.list.d/ for a 3rd party package from https://z.litestack.com/v1/repo/ubuntu/ . That URL ceased to resolve (superseded by instructions at zerovm.org/download.htm), so apt-get would always end up tripping over that. sudo rm /etc/apt/sources.list.d/zerovm-precise.list fixed it for me.
6 Answers 6
Try cleaning up your apt-cache and running any updates
sudo apt-get clean sudo apt-get update sudo apt-get upgrade If you still have issues, then change your repo mirror: Open Update Manager or Software Updater, then click Settings > Ubuntu Software tab, then select Other from the Download From menu and click the Select Best Server button. Once finished, the best server will show up selected (highlighted), so just click the Choose Server button. Now try updating/upgrading again.
You rock! This fixed my VMware Ubuntu! I was kind of freaking out that I’ll have to re-install it but this worked great.
I tried this on Ubuntu netbook edition (10.10). When I tell it to Select Best Server, it goes through all 361 of them and then concludes, «No suitable download server was found. Please check your Internet connection.» Yet, I can access the internet just fine.
sudo apt clean was the ticket. I had to remove some items from my /etc/apt/sources.list that were failing too.
«Software Updater» will give same error message for issues like:
W: Failed to fetch http://ppa.launchpad.net/crass/ufraw/ubuntu/dists/raring/main/binary-amd64/Packages 404 Not Found Solution: Settings -> Software & Updates -> Other Software -> Click on offending entry and hit Remove (OR simply un-check so its ignored yet visible for later)
Another way to un-check the bad entries is to
cd /etc/apt grep -r some_string * which will return the file containing string ufraw so then edit that file and comment out the line mentioning string ufraw
This shuts off updates to the package linked to this file . the symptom will go away . problem often due to using a package not yet customized for the version of OS you are on
This is the correct answer; the problem is that the error message does not indicate which entry is the offending one. 🙁 But yes, once you can figure that out, works like a charm!
Worked for me, too. I ran into this problem when I installed the blueman and bluez5 packages to support my Microsoft BT mouse. Clearing the checkboxes next to these packages on the «Other Software» tab in Software & Update fixed it.
That was it, «cdrom» was the offender (I’m running a virtual machine), unchecked it and the problem went away
For me there was an error telling me which package was the culprit on running sudo apt update in the terminal, disabling that one seemed to work
This is the same issue I’m also facing with Ubuntu 20.04 LTS. My device is connected to a ‘metered connection'(I’m thinking the issue is because I have set this connection as metered. Not sure though). But I have found a way to update even after this error.
- Click on the ‘settings’ option below that error message and it will open the ‘software & Updates’.
- Now just close the ‘Software & Updates’ window and you will see the updates are available for download and installing.
I don’t know the reason behind this error. If someone could add upon this it will be helpful. But this definitely works. I have done this for more than two weeks.
Assure cdrom is unchecked then cut and paste entire set of below commands
sudo apt-get clean cd /var/lib/apt sudo mv lists lists.old_`date '+%Y%m%d_%H%M%S'` sudo mkdir -p lists/partial sudo apt-get clean sudo apt-get update I had the same issue when upgrading from 18.10 to the newest version. In my case the reason was that I had some packages marked as kept back. This is what I did.
$ sudo apt upgrade Reading package lists. Done Building dependency tree Reading state information. Done Calculating upgrade. Done The following packages have been kept back: libodbc1 0 to upgrade, 0 to newly install, 0 to remove and 2 not to upgrade. I simply removed them along with their dependencies:
$ sudo apt remove libodbc1 Reading package lists. Done Building dependency tree Reading state information. Done The following packages were automatically installed and are no longer required: odbcinst odbcinst1debian2 Use 'sudo apt autoremove' to remove them. The following packages will be REMOVED freetds-bin libodbc1 Then the following sequence of commands led me to the successful upgrade:
sudo apt update sudo apt upgrade sudo apt dist-upgrade sudo do-release-upgrade How to Check Internet Connectivity in Linux Terminal
![]()
While working on Linux Servers where we do not have any GUI of Linux and have access to the terminal from where we have to manage the whole server, it becomes difficult to diagnose internet connectivity problems. Therefore, this post contains several methods and provides a detailed guide on how to check the internet connectivity in Linux Terminal.
Method 1: PING Command
The best and foremost way is to check the internet availability through the PING command.
The PING command is used for sending and receiving packages from and to some external/remote server.
As an example, we will try to send three internet packages to the Google server and check the internet connectivity if we will be able to receive the internet packets from the Google server.
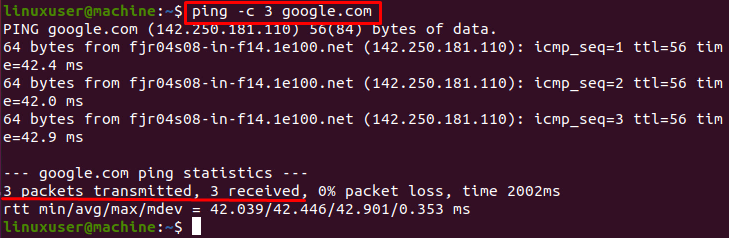
In the output, you can also witness that the three packages are transmitted and received. Again, this is because pinging to the Google server went successful.
Method 2: CURL Command
Another way to check the internet connection is through the CURL command.
The CURL command is used to download, upload, or transfer the data over the network from or to the server. It supports various protocols, and we can use it to check the internet connectivity by connecting to linuxhint.com and fetch the headers. If the headers are fetched successfully, that means the internet is working; otherwise, there is a problem.

If you get the status 200 OK and the website’s headers, the internet connection is working perfectly fine.
These are the methods to check internet connectivity.
Diagnose the Problem
If the internet is not connected using any of the above methods, you can use the IP command to check whether there is a problem in the gateway settings or network interface.
To get the IP address of your system assigned by the network adapter, use the command provided below:

To get the default gateway IP address, use the “ip r” command:

And try to ping to the default gateway using the PING command:

If pinging goes unsuccessful, it means there is a problem with the gateway settings, and you need to reconfigure them. Otherwise, the gateway settings are fine, but the internet is not working from the internet service provider end.
Conclusion
This post contains a profound guide on how to check the internet connectivity in Linux terminal and how to diagnose the problem. PING command is precisely used for pinging purposes, as its name is saying, while CURL command is used to transferring the data over the network. Using the “ip” command, we can diagnose the problem. Either there is a problem in the default gateway, DNS server resolution, Network adaptor, or ISP (internet service provider).
About the author
Shehroz Azam
A Javascript Developer & Linux enthusiast with 4 years of industrial experience and proven know-how to combine creative and usability viewpoints resulting in world-class web applications. I have experience working with Vue, React & Node.js & currently working on article writing and video creation.
Как проверить подключение к Интернету в терминале Linux

Советы и хитрости
Во время работы на серверах Linux, где у нас нет графического интерфейса Linux и есть доступ к терминалу, откуда мы должны управлять всем сервером, становится трудно диагностировать проблемы с подключением к Интернету. Таким образом, этот пост содержит несколько методов и подробное руководство о том, как проверить подключение к Интернету в Linux Terminal.
Метод 1: команда PING
Лучший способ — проверить доступность Интернета с помощью команды PING.
Команда PING используется для отправки и получения пакетов от внешнего / удаленного сервера и на него.
В качестве примера мы попытаемся отправить три интернет-пакета на сервер Google и проверить подключение к Интернету, сможем ли мы получать интернет-пакеты с сервера Google.

В выводе вы также можете увидеть, что три пакета переданы и получены. Опять же, это потому, что пинг на сервер Google прошел успешно.
Метод 2: команда CURL
Другой способ проверить подключение к Интернету — использовать команду CURL.
Команда CURL используется для загрузки, выгрузки или передачи данных по сети с сервера или на сервер. Он поддерживает различные протоколы, и мы можем использовать его для проверки подключения к Интернету, подключившись к linuxhint.com и получив заголовки. Если заголовки получены успешно, это означает, что Интернет работает; в противном случае возникнет проблема.

Если вы получаете статус 200 OK и заголовки веб-сайта, подключение к Интернету работает нормально.
Это методы проверки подключения к Интернету.
Диагностируйте проблему
Если Интернет не подключен ни одним из вышеперечисленных методов, вы можете использовать команду IP, чтобы проверить, есть ли проблема в настройках шлюза или в сетевом интерфейсе.
Чтобы получить IP-адрес вашей системы, назначенный сетевым адаптером, используйте команду, приведенную ниже:

Чтобы получить IP-адрес шлюза по умолчанию, используйте команду «ip r» :

И попробуйте выполнить ping до шлюза по умолчанию с помощью команды PING:

Если пинг не удался, это означает, что возникла проблема с настройками шлюза, и вам необходимо их перенастроить. В противном случае настройки шлюза в порядке, но Интернет не работает со стороны интернет-провайдера.
Заключение
Этот пост содержит подробное руководство о том, как проверить подключение к Интернету в терминале Linux и как диагностировать проблему. Команда PING точно используется для целей проверки связи. Как следует из ее названия, в то время как команда CURL используется для передачи данных по сети. Используя команду «ip», мы можем диагностировать проблему. Либо есть проблема в шлюзе по умолчанию, разрешении DNS-сервера, сетевом адаптере или ISP (провайдер интернет-услуг).