Команда chmod Linux
Система полномочий в Linux имеет очень важное значение, поскольку благодаря ей можно разделять привилегии между пользователями, ограничить доступ к нежелательным файлам или возможностям, контролировать доступные действия для сервисов и многое другое. В Linux существует всего три вида прав — право на чтение, запись и выполнение, а также три категории пользователей, к которым они могут применяться — владелец файла, группа файла и все остальные.
Эти права применяются для каждого файла, а поскольку все в системе Linux, даже устройства, считаются файлами, то, получается что эти права применимы ко всему. Мы более подробно рассматривали как работают права доступа к файлам Linux в отдельной статье, а этой, я хочу остановиться на команде chmod, которая используется для установки прав.
Команда chmod Linux
Эта команда имеет типичный для команд linux синтаксис, сначала команда, затем опции, а в конце файл или папка, к которой ее нужно применить:
$ chmod опции права /путь/к/файлу
Сначала рассмотрим какими бывают права доступа linux и как они устанавливаются. Пред этим рекомендую прочитать статью про права, ссылка на которую есть выше. Есть три основных вида прав:
Также есть три категории пользователей, для которых вы можете установить эти права на файл linux:
Синтаксис настройки прав такой:
группа_пользователей действие в ид_прав
В качестве действий могут использоваться знаки «+» — включить или «-« — отключить. Рассмотрим несколько примеров:
- u+x — разрешить выполнение для владельца;
- ugo+x — разрешить выполнение для всех;
- ug+w — разрешить запись для владельца и группы;
- o-x — запретить выполнение для остальных пользователей;
- ugo+rwx — разрешить все для всех;
Но права можно записывать не только таким способом. Есть еще восьмеричный формат записи, он более сложен для понимания, но пишется короче и проще. Я не буду рассказывать как считать эти цифры, просто запомните какая цифра за что отвечает, так проще:
Права на папку linux такие же, как и для файла. Во время установки прав сначала укажите цифру прав для владельца, затем для группы, а потом для остальных. Например, :
- 744 — разрешить все для владельца, а остальным только чтение;
- 755 — все для владельца, остальным только чтение и выполнение;
- 764 — все для владельца, чтение и запись для группы, и только чтение для остальных;
- 777 — всем разрешено все.
Каждая из цифр не зависит от предыдущих, вы вбираете именно то, что вам нужно. Теперь давайте рассмотрим несколько опций команды, которые нам понадобятся во время работы:
- -c — выводить информацию обо всех изменениях;
- -f — не выводить сообщения об ошибках;
- -v — выводить максимум информации;
- —preserve-root — не выполнять рекурсивные операции для корня «/»;
- —reference — взять маску прав из указанного файла;
- -R — включить поддержку рекурсии;
- —version — вывести версию утилиты;
Теперь, когда вы знаете опции и как настраиваются права доступа chmod, давайте рассмотрим несколько примеров как работает команда chmod linux.
Примеры использования chmod
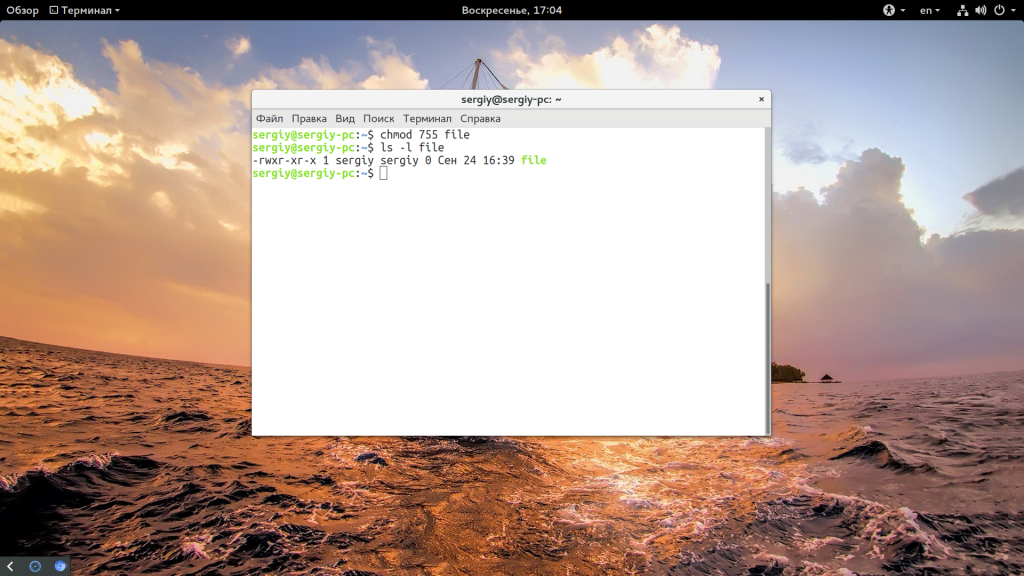
Я не буду приводить много примеров, так как там и так все более-менее понятно после пояснения правил создания выражений установки прав. Сначала самый частый случай — разрешить выполнения скрипта владельцу:

Или можно воспользоваться цифровой записью:
chmod 766 file
ls — l file

Недостаток цифровой записи в том, что вы не можете модифицировать уже существующие права доступа linux. Например, в первом варианте вы просто добавили флаг выполнения для владельца файла, а все остальные права оставили неизменными. В восьмеричном варианте мы полностью заменили текущие права новыми — все для владельца и чтение/запись для группы и остальных. Как видите, права установлены как и ожидалось. Теперь отключим выполнение владельцем:

Дальше разрешим только чтение всем, кроме владельца:


Файлы с правами 000 недоступны никаким пользователям, кроме суперпользователя и владельца. Вернем права обратно:
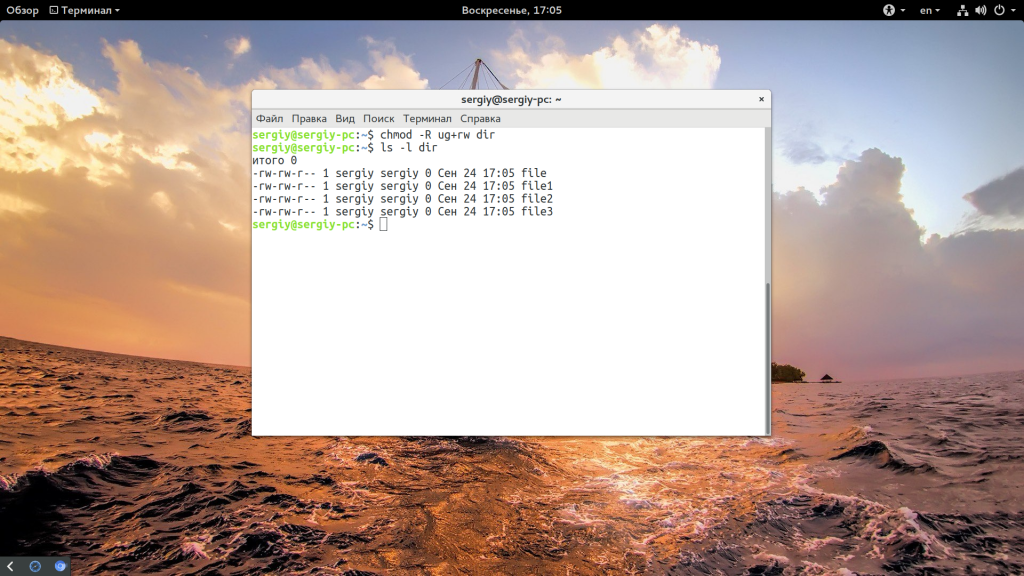
Такая же ситуация с файлами, владельцем которых вы не являетесь, если вы хотите изменить их права — используйте sudo. Из модификаторов прав вы можете конструировать любые последовательности, я думаю тут нет смысла разбирать их все. Для того чтобы поменять права на все файлы в папке используйте опцию -R:
chmod -R ug+rw dir
ls -l dir/
Также вы можете смотреть подробную информацию про вносимые изменения, например:

Выводы
В этой небольшой статье была рассмотрена команда chmod linux. Она очень часто используется наряду с такими командами, как chown и umask для управления правами. Надеюсь, эта информация была полезной для вас. Если у вас остались вопросы, спрашивайте в комментариях!
Обнаружили ошибку в тексте? Сообщите мне об этом. Выделите текст с ошибкой и нажмите Ctrl+Enter.
Chmod Command in Linux [With Examples]

In UNIX/Linux systems, files and directories are associated with 3 types of permissions that control access rights to them. The permissions are read, write and execute. These permissions decide what actions can be performed on files and directories by user groups.
In this tutorial, we learn about chmod command — which modifies permissions in Linux.
chmod command
The chmod command is used in Linux to modify the access permissions of filesystem objects such as files and directories. You may also use it to change special permissions such as setuid (SUID), setgid (SGID), and sticky bit.
chmod file(s) or directory(s)orchmod [who][operator][permissions] file(s)/directory(s)
who — to whom the permission applied.
operator — action to be performed.
permissions — read, write, and execute.
chmod [permissions-number] file(s)/directory(s)Where permissions is a 3 digit octal number. This would be the sum of the following values
Remember in Linux, the user who owns a file or directory, and the superuser (root), have the ability to change permissions.
Understanding Linux Permissions
In Linux permission determines who can access. modify and execute files and directories. The files and directories are associated with three user categories: owner, group, and others.
Here is the overview of each permission
- Read (r): The read permission for a file means the user can open and view the content. For a directory (folder) the user can list the contents of the directory.
- Write (w): This allows the user to modify or delete files. For directories, it enables users to add or remove files and subdirectories.
- Execute (x): This enables user to run executable files. For example for programs and shell scripts.
Note: Other than read, write, and execute there are a few special permission modes you can assign to files and directories. The special permission modes are setuid (SUID), setgid (SGID), and sticky bit.
Now we can look at three user groups:
- owner — The owner is user who owns the file or directory. By default when a user creates a file or directory the same user will become the owner.
- Group — The group is a collection of users. Files and directories can be assigned to a group. All the users in the group will have the same access permission on the files or directories.
- Other — Other users who are not the owner or in the group. This means «everyone» or in other way say the «world».
Symbolic mode Examples
The chmod symbolic mod is also known as relative mode. Let’s look into some examples.
Give the owner and group — read, write and execute permission — for others read and write on the directory:
chmod u=rwx,g=rwx,o=rx directory1orchmod ugx+rwx directory1
Give read, write, and execute permissions for all on the file:
Here we combine multiple permissions at once, you may use individual permission characters as well.
Give the group read and write permissions on the file:
Remove execute permissions for others on the script file:
To remove specific permissions from a file or directory, you can use the — symbol followed by the permission character.
Numerical mode Examples
Chmod numerical mode is also known as absolute mode. This is the commonly used method to modify permissions.
To give read, write, and execute permissions to the owner, read and execute permission to the group, and read permission to others on a text file:
Permissions are derived by summing up the each of following octal values in each user category.
So in the command above 7 value indicates rwx ( 4+2 +1), 5 values indicate rx (4 + 1) and 4 value indicates x (1).
Give full permission for all on the directory:
chmod 777 projectdirectorySpecial Permissions
In addition to read, write and execute — in Linux there are special permissions that can be assigned using chmod command. As mentioned before the special permissions are sticky bit, SUID or SGID. This permission can be set using symbolic or numerical methods.
Numerical values for respective special permissions are:
SUID = 4 SGID = 2 sticky bit = 1 zero effect = 0 For example to give sticky bit special permission on /tmp directory:
Using the symbolic method use s for SUID and SGIG and t for sticky bit. Examples:
Set stick bit on the file chmod a+t /tmp Set SUID on the file chmod u+s /mysuidfile.txt chmod u+x /mysuidfile.txt Set SGID on the file - This makes new files inherit the group permissions of the parent directory chmod g+s /parent-directoryChmod Recursively
Use -R or —recursive option with chmod command to recursively modify permissions for files, directories, and subdirectories.
chmod -R permission-number /path/to/directoryFor example to set 755 permissions recursively to all files, directories, and subdirectories in /var/www/html:
sudo chmod -R 755 /var/www/htmlThe same can be done using the symbolic notation:
chmod -R u=rwx,go=rx /var/www/htmlNote: Be careful when performing chmod recursive operation. Accidental modification of sensitive files and directories can cause disruption to normal operations or security risks.
Using Find Command
Above mentioned command recursive set all files and directories with the same permissions. This may be not required in all instances. To recursively set separate permission to files or directories we can bring the find command.
To find only directories type and change its permission. Syntax:
find /path/to/base-directory -type d -exec chmod mode <> \;For example to set 755 permissions to all directories and subdirectories within /var/www/html including html directory:
find /var/www/html -type d -exec chmod 755 <> \;Inside if you are inside the html directory you can dot (.) as the path. This won’t affect the base directory html.
find . -type d -exec chmod 755 <> \;To find only files and change its permissions. Syntax:
find /path/to/base-directory -type f -exec chmod 644 <> \;To change all files permissions to 644 within /var/www/html directory and its subdirectories:
find /var/www/html -type f -exec chmod 644 <> \;Before applying it’s good to verify which files it’s applying by just removing -exec portion of the command.
Using reference file
Using the —reference=re ference_file option, you can transfer file permissions from one file to another.
In the syntax shown, the filename ends up having the same file permissions as the reference_file .
chmod --reference=reference_file filenameHere «filename» ends up having the same file permissions as the «reference_file».
chmod --reference=myreferencefile.txt myfile.txt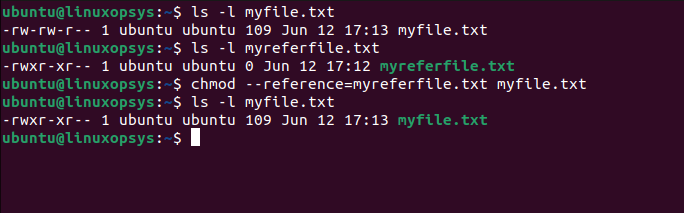
From the output you can the target file named myfile.txt gets the same file permission of myreferfile.txt.
Before concluding would like to bring up one more point. Do you know what happens chmod on Symlinks? No change happen to the actual symlink but it would change target file permissions. This is because symlinks permissions don’t really matter to the system.
If this resource helped you, let us know your care by a Thanks Tweet. Tweet a thanks