- Use chown to set the ownership of all a folder’s subfolders and files?
- 6 Answers 6
- Linux chown to all users
- NAME
- SYNOPSIS
- DESCRIPTION
- OPTIONS
- EXAMPLES
- AUTHOR
- REPORTING BUGS
- COPYRIGHT
- SEE ALSO
- How to Use chown Command to Change Ownership in Linux
- Examples of chown command in Linux
- 1. Change or set the user ownership of a file
- 2. Change the user and group ownership
- 3. Change the group to default group of a user
- 4. Change the group only
- 5. Change user and group ownership of a directory recursively
- 6. Set the same user and group ownership as a reference file
Use chown to set the ownership of all a folder’s subfolders and files?
Will any of these answers work if the files inside a folder are owned by someone else and only have user read/write permission?
6 Answers 6
Usage: chown [OPTION]. [OWNER][:[GROUP]] FILE. or: chown [OPTION]. --reference=RFILE FILE. Change the owner and/or group of each FILE to OWNER and/or GROUP. [. ] -R, --recursive operate on files and directories recursively [. ] So you need to run (probably with sudo ):
chown -R USERNAME:GROUPNAME /PATH/TO/FILE Or, if the group shall be the specified user’s primary group (usually same name), you can also omit the GROUPNAME and just give the USERNAME: with a colon (no space before it!). It will be set implicitly:
chown -R USERNAME: /PATH/TO/FILE To only change the user and leave the group as it is, just specify USERNAME and no group name and no colon:
chown -R USERNAME /PATH/TO/FILE To only change the group and leave the owner user as it is, just specify :GROUPNAME with a leading colon:
chown -R :GROUPNAME /PATH/TO/FILE My username is timo and I did this to take ownership to all my files and folders on home directory (transferred from another account):
~$ sudo chown -R timo /home/timo/* This is how I normally do it, and I usually do this one folder at a time. Doesn’t take but a few moments to work through each folder.
This will also change ownership of symlinks instead of just the destination files that the symlinks point to.
man chown chown options user:group files/folders Not sure why other answers did not cover one dot. : And . are interchangeable, so you can use one dot for instance
chown -R user.group files/folders Either get to the terminal display mode as described elsewhere or do a ssh login from another computer. Usually the account is intact and it will be accessible via ssh.
You may also have an account on the same machine without the login loop problem. If you do, then login to that account (assuming it will let you sudo).
Once in, open a terminal and find the directory under which you can see the username directories. i.e. /home/username1 /home/username2
if any of the user directories is owned by root change it by running:
sudo chown -R username:username /home/username This example is based on an architecture where the user directories are under /home/
Run ls -l again to confirm the directory is owned by the user.
This was tested on Ubuntu 20.04
Linux chown to all users
NAME
chown - change file owner and group
SYNOPSIS
chown [OPTION]. [OWNER][:[GROUP]] FILE. chown [OPTION]. --reference=RFILE FILE.
DESCRIPTION
This manual page documents the GNU version of chown. chown changes the user and/or group ownership of each given file. If only an owner (a user name or numeric user ID) is given, that user is made the owner of each given file, and the files' group is not changed. If the owner is followed by a colon and a group name (or numeric group ID), with no spaces between them, the group ownership of the files is changed as well. If a colon but no group name follows the user name, that user is made the owner of the files and the group of the files is changed to that user's login group. If the colon and group are given, but the owner is omitted, only the group of the files is changed; in this case, chown performs the same function as chgrp. If only a colon is given, or if the entire operand is empty, neither the owner nor the group is changed.
OPTIONS
Change the owner and/or group of each FILE to OWNER and/or GROUP. With --reference, change the owner and group of each FILE to those of RFILE. -c, --changes like verbose but report only when a change is made -f, --silent, --quiet suppress most error messages -v, --verbose output a diagnostic for every file processed --dereference affect the referent of each symbolic link (this is the default), rather than the symbolic link itself -h, --no-dereference affect symbolic links instead of any referenced file (useful only on systems that can change the ownership of a symlink) --from=CURRENT_OWNER:CURRENT_GROUP change the owner and/or group of each file only if its current owner and/or group match those specified here. Either may be omitted, in which case a match is not required for the omitted attribute --no-preserve-root do not treat '/' specially (the default) --preserve-root fail to operate recursively on '/' --reference=RFILE use RFILE's owner and group rather than specifying OWNER:GROUP values -R, --recursive operate on files and directories recursively The following options modify how a hierarchy is traversed when the -R option is also specified. If more than one is specified, only the final one takes effect. -H if a command line argument is a symbolic link to a directory, traverse it -L traverse every symbolic link to a directory encountered -P do not traverse any symbolic links (default) --help display this help and exit --version output version information and exit Owner is unchanged if missing. Group is unchanged if missing, but changed to login group if implied by a ':' following a symbolic OWNER. OWNER and GROUP may be numeric as well as symbolic.
EXAMPLES
chown root /u Change the owner of /u to "root". chown root:staff /u Likewise, but also change its group to "staff". chown -hR root /u Change the owner of /u and subfiles to "root".
AUTHOR
Written by David MacKenzie and Jim Meyering.
REPORTING BUGS
Report chown bugs to bug-coreutils@gnu.org GNU coreutils home page: http://www.gnu.org/software/coreutils/> General help using GNU software: http://www.gnu.org/gethelp/> Report chown translation bugs to http://translationproject.org/team/>
COPYRIGHT
Copyright © 2013 Free Software Foundation, Inc. License GPLv3+: GNU GPL version 3 or later http://gnu.org/licenses/gpl.html>. This is free software: you are free to change and redistribute it. There is NO WARRANTY, to the extent permitted by law.
SEE ALSO
chown(2) The full documentation for chown is maintained as a Texinfo manual. If the info and chown programs are properly installed at your site, the command info coreutils 'chown invocation' should give you access to the complete manual.
© 2019 Canonical Ltd. Ubuntu and Canonical are registered trademarks of Canonical Ltd.
How to Use chown Command to Change Ownership in Linux
The chown command in Linux enables you to change the user and group ownership of a file or directory. Learn to use chown with some practical examples.
The chown command in Linux allows you to change the ownership of files and directories. You can rightly guess that ‘chown’ is short for ‘change owner’.
If you are not aware of these terms, I highly recommend reading my explainer article about file permissions and ownership in Linux.
Here’s a picture to quickly recall it:
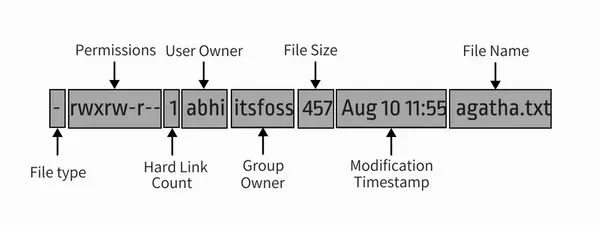
With the chown command, you can change both user and group ownership of a file or a directory.
Examples of chown command in Linux
Here’s what the syntax for chown command looks like:
chown [options] user_spec filesDo keep in mind that chown is an administrative command and so you need to be root or have sudo rights in order to make changes with chown command. I hope you know how to add sudo user.
Otherwise, you’ll see an error like this:
chown: changing ownership of 'agatha.txt': Operation not permittedNow let’s see how to use the chown command with examples.
Here’s the example set I am going to use:
-rw-r--r-- 1 abhishek abhishek 456 Jan 24 09:30 agatha.txt drwxr-xr-x 2 abhishek abhishek 4096 Jan 24 09:31 mydir drwxr-xr-x 3 abhishek abhishek 4096 Jan 24 09:30 new -rw-r--r-- 1 abhishek abhishek 356 Jan 24 09:30 sherlock.txt1. Change or set the user ownership of a file
To change the ownership of a file, use the command in this fashion:
sudo chown user_name file_nameYou may also use UID (user ID) instead of the user name. Here’s an example of the changes it makes:
[email protected]:~/tutorial$ sudo chown prakash agatha.txt [email protected]:~/tutorial$ ls -l agatha.txt -rw-r--r-- 1 prakash abhishek 456 Jan 24 09:30 agatha.txtAs you can see the owner of the file has changed to ‘prakash’ from ‘abhishek’ but the group remains ‘abhishek’. Let me show you how to change both user ownership and group ownership.
2. Change the user and group ownership
To change the user and group ownership of a file, you can specify the group with the user name separated by a column like this:
sudo chown user_name:group_name file_nameOf course, you can use UID and GID instead of user name and group name respectively.
[email protected]:~/tutorial$ sudo chown prakash:adm sherlock.txt [email protected]:~/tutorial$ ls -l sherlock.txt -rw-r--r-- 1 prakash adm 356 Jan 24 09:30 sherlock.txtAs you can see in the example above, I changed the user of the file sherlock.txt to ‘prakash’ and the group to ‘adm’.
3. Change the group to default group of a user
Every user has a default or primary group. If the user creates a new file or directory, this primary group automatically becomes the group owner of the file. You can list the default group of a user with the id command.
Now if you want to change the group ownership of a file to the default group of a user, you should just leave the group name after colon.
sudo chown user_name: file_nameAs you can see in the example below, sherlock.text file user owner ‘prakash‘ and group owner ‘adm‘. I changed the owner to ‘abhishek’ but didn’t provide the group name. And yet it changed the group from ‘adm’ to default ‘abhishek’ group.
[email protected]:~/tutorial$ ls -l sherlock.txt -rw-r--r-- 1 prakash adm 356 Jan 24 09:30 sherlock.txt [email protected]:~/tutorial$ sudo chown abhishek: sherlock.txt [email protected]:~/tutorial$ id abhishek uid=1000(abhishek) gid=1000(abhishek) groups=1000(abhishek),4(adm),24(cdrom),27(sudo),30(dip),46(plugdev),116(lpadmin),126(sambashare),999(docker) [email protected]:~/tutorial$ ls -l sherlock.txt -rw-r--r-- 1 abhishek abhishek 356 Jan 24 09:30 sherlock.txt4. Change the group only
If you just want to change the group without being bothered by the user owner, you can use the chown command like this:
sudo chown :group_name file_nameIn the example below, I set the group ownership to sudo without touching the user ownership:
[email protected]:~/tutorial$ ls -l agatha.txt -rw-r--r-- 1 prakash abhishek 456 Jan 24 09:30 agatha.txt [email protected]:~/tutorial$ sudo chown :sudo agatha.txt [email protected]:~/tutorial$ ls -l agatha.txt -rw-r--r-- 1 prakash sudo 456 Jan 24 09:30 agatha.txt5. Change user and group ownership of a directory recursively
In all the above commands, you can replace file with directory and it will work the same for changing ownership of the directory.
The one problem here is that by default the ownership of the content inside the directory is not changed.
sudo chown -R user_name:group_name directory_name6. Set the same user and group ownership as a reference file
You can use a file as reference and change the user and group ownership of a file based on the reference file in this manner:
sudo chown --reference=file1.txt file2.txtIn the example below, file agatha.txt has been used as a reference. And as you can see, the ownership of sherlock.txt has been changed on the basis of agatha.txt.
[email protected]:~/tutorial$ ls -l agatha.txt sherlock.txt -rw-r--r-- 1 prakash sudo 456 Jan 24 09:30 agatha.txt -rw-r--r-- 1 abhishek abhishek 356 Jan 24 09:30 sherlock.txt [email protected]:~/tutorial$ sudo chown --reference=agatha.txt sherlock.txt [email protected]:~/tutorial$ ls -l agatha.txt sherlock.txt -rw-r--r-- 1 prakash sudo 456 Jan 24 09:30 agatha.txt -rw-r--r-- 1 prakash sudo 356 Jan 24 09:30 sherlock.txtI think you have enough examples of the chown command to understand it. You can always refer to chown man page for more details.
If you have questions or suggestions, do let me know.