- Use chown to set the ownership of all a folder’s subfolders and files?
- 6 Answers 6
- Команда chown Linux
- Команда chown Linux
- 1. Синтаксис и опции
- 2. Использование chown
- Выводы
- Linux chown всем пользователям
- NAME
- SYNOPSIS
- DESCRIPTION
- OPTIONS
- EXAMPLES
- AUTHOR
- REPORTING BUGS
- COPYRIGHT
- SEE ALSO
- How to chown directory for multiple users?
- 2 Answers 2
Use chown to set the ownership of all a folder’s subfolders and files?
Will any of these answers work if the files inside a folder are owned by someone else and only have user read/write permission?
6 Answers 6
Usage: chown [OPTION]. [OWNER][:[GROUP]] FILE. or: chown [OPTION]. --reference=RFILE FILE. Change the owner and/or group of each FILE to OWNER and/or GROUP. [. ] -R, --recursive operate on files and directories recursively [. ] So you need to run (probably with sudo ):
chown -R USERNAME:GROUPNAME /PATH/TO/FILE Or, if the group shall be the specified user’s primary group (usually same name), you can also omit the GROUPNAME and just give the USERNAME: with a colon (no space before it!). It will be set implicitly:
chown -R USERNAME: /PATH/TO/FILE To only change the user and leave the group as it is, just specify USERNAME and no group name and no colon:
chown -R USERNAME /PATH/TO/FILE To only change the group and leave the owner user as it is, just specify :GROUPNAME with a leading colon:
chown -R :GROUPNAME /PATH/TO/FILE My username is timo and I did this to take ownership to all my files and folders on home directory (transferred from another account):
~$ sudo chown -R timo /home/timo/* This is how I normally do it, and I usually do this one folder at a time. Doesn’t take but a few moments to work through each folder.
This will also change ownership of symlinks instead of just the destination files that the symlinks point to.
man chown chown options user:group files/folders Not sure why other answers did not cover one dot. : And . are interchangeable, so you can use one dot for instance
chown -R user.group files/folders Either get to the terminal display mode as described elsewhere or do a ssh login from another computer. Usually the account is intact and it will be accessible via ssh.
You may also have an account on the same machine without the login loop problem. If you do, then login to that account (assuming it will let you sudo).
Once in, open a terminal and find the directory under which you can see the username directories. i.e. /home/username1 /home/username2
if any of the user directories is owned by root change it by running:
sudo chown -R username:username /home/username This example is based on an architecture where the user directories are under /home/
Run ls -l again to confirm the directory is owned by the user.
This was tested on Ubuntu 20.04
Команда chown Linux
Основа философии Linux — все объекты операционной системы — это файлы, для предоставления доступа к тем или иным возможностям системы мы просто даем доступ пользователю к нужным файлам или убираем. Я более подробно рассказывал обо всех правах в статье права доступа к файлам в Linux, здесь же скажу только что у каждого файла есть три группы прав: для владельца, группы и всех остальных.
При создании файла ему тот пользователь, от имени которого он был создан становится его владельцем, а группой устанавливается основная группа владельца. Но владельца файла и группу можно менять, для этого используются команды chown и chgrp. В этой статье будет рассмотрена команда chown linux, а также основные примеры её использования.
Команда chown Linux
1. Синтаксис и опции
Синтаксис chown, как и других подобных команд linux очень прост:
$ chown пользователь опции /путь/к/файлу
В поле пользователь надо указать пользователя, которому мы хотим передать файл. Также можно указать через двоеточие группу, например, пользователь:группа. Тогда изменится не только пользователь, но и группа. Вот основные опции, которые могут вам понадобиться:
- -c, —changes — подробный вывод всех выполняемых изменений;
- -f, —silent, —quiet — минимум информации, скрыть сообщения об ошибках;
- —dereference — изменять права для файла к которому ведет символическая ссылка вместо самой ссылки (поведение по умолчанию);
- -h, —no-dereference — изменять права символических ссылок и не трогать файлы, к которым они ведут;
- —from — изменять пользователя только для тех файлов, владельцем которых является указанный пользователь и группа;
- -R, —recursive — рекурсивная обработка всех подкаталогов;
- -H — если передана символическая ссылка на директорию — перейти по ней;
- -L — переходить по всем символическим ссылкам на директории;
- -P — не переходить по символическим ссылкам на директории (по умолчанию).
Утилита имеет ещё несколько опций, но это самые основные и то большинство из них вам не понадобится. А теперь давайте посмотрим как пользоваться chown.
2. Использование chown
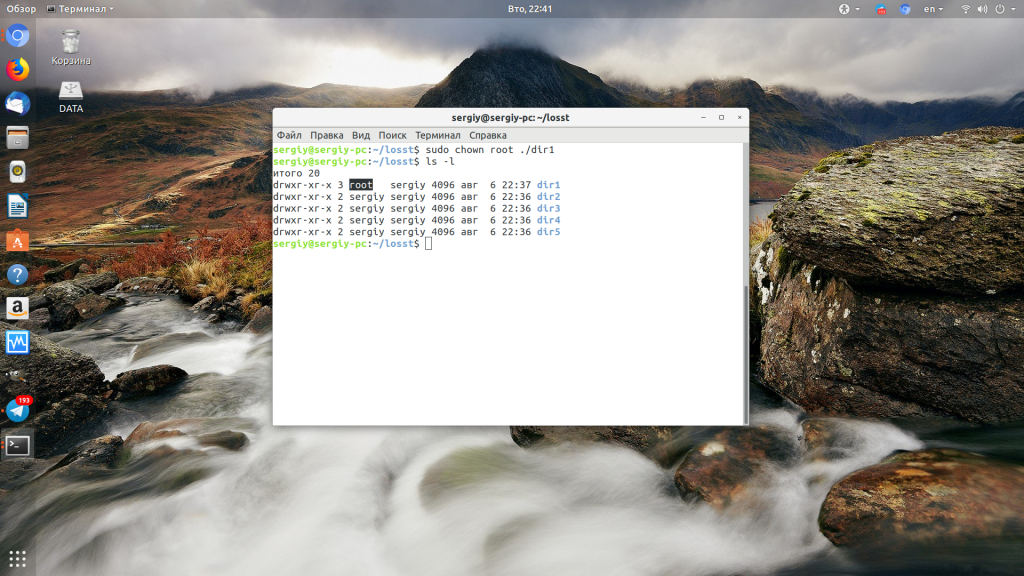
Например, у нас есть несколько папок dir и их владелец пользователь sergiy:

Давайте изменим владельца папки dir1 на root:
Если вы хотите поменять сразу владельца и группу каталога или файла запишите их через двоеточие, например, изменим пользователя и группу для каталога dir2 на root:

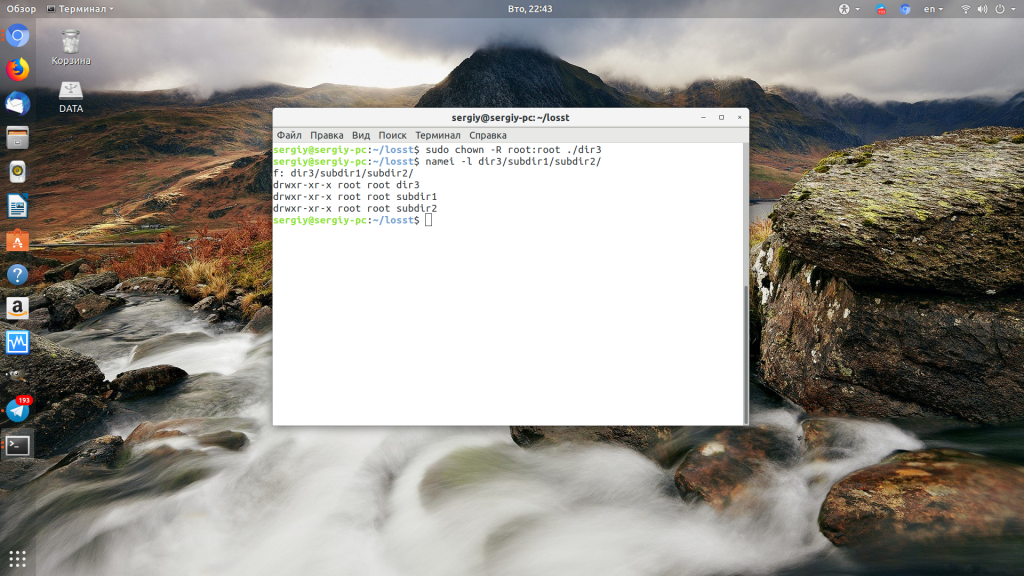
Если вы хотите чтобы изменения применялись не только к этому каталогу, но и ко всем его подкаталогам, добавьте опцию -R:
Дальше давайте изменим группу и владельца на www-data только для тех каталогов и файлов, у которых владелец и группа root в каталоге /dir3:
chown —from=root:root www-data:www-data -cR ./
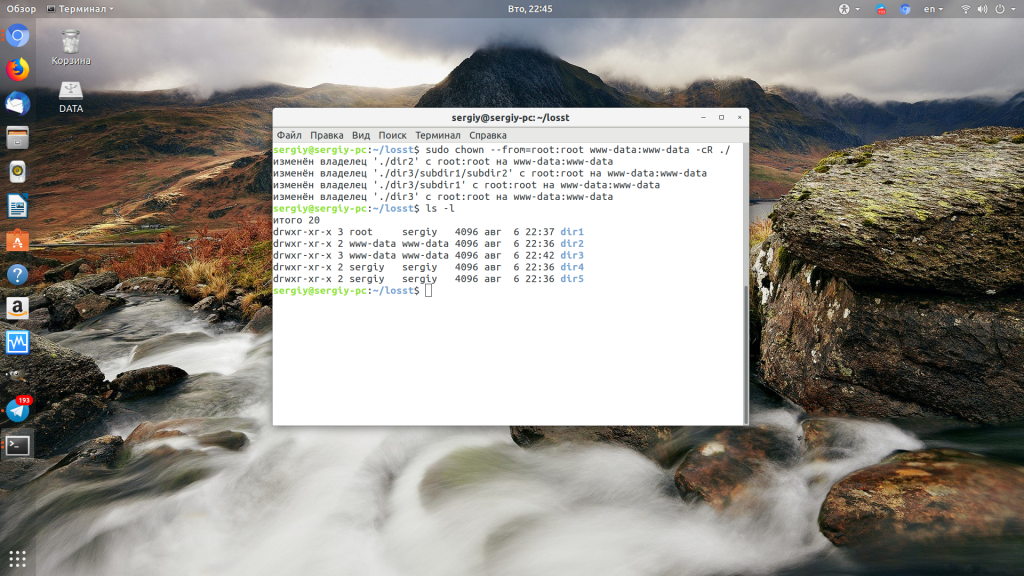
Для обращения к текущему каталогу используйте путь ./. Мы его использовали и выше. Далее указываем нужную группу с помощью опции —from и просим утилиту выводить изменения, которые она делает в файловой системе с помощью опции -c.
Выводы
Команда chown очень простая и позволяет только менять владельца и группу. Если вы хотите более подробно настроить права для владельца, группы и всех остальных, вам понадобится команда chmod. Права — довольно частая проблема при настройке работы различных программ, знание двух этих команд плюс ls и namei может помочь исправить много ошибок.
Обнаружили ошибку в тексте? Сообщите мне об этом. Выделите текст с ошибкой и нажмите Ctrl+Enter.
Linux chown всем пользователям
NAME
chown - change file owner and group
SYNOPSIS
chown [OPTION]. [OWNER][:[GROUP]] FILE. chown [OPTION]. --reference=RFILE FILE.
DESCRIPTION
This manual page documents the GNU version of chown. chown changes the user and/or group ownership of each given file. If only an owner (a user name or numeric user ID) is given, that user is made the owner of each given file, and the files' group is not changed. If the owner is followed by a colon and a group name (or numeric group ID), with no spaces between them, the group ownership of the files is changed as well. If a colon but no group name follows the user name, that user is made the owner of the files and the group of the files is changed to that user's login group. If the colon and group are given, but the owner is omitted, only the group of the files is changed; in this case, chown performs the same function as chgrp. If only a colon is given, or if the entire operand is empty, neither the owner nor the group is changed.
OPTIONS
Change the owner and/or group of each FILE to OWNER and/or GROUP. With --reference, change the owner and group of each FILE to those of RFILE. -c, --changes like verbose but report only when a change is made -f, --silent, --quiet suppress most error messages -v, --verbose output a diagnostic for every file processed --dereference affect the referent of each symbolic link (this is the default), rather than the symbolic link itself -h, --no-dereference affect symbolic links instead of any referenced file (useful only on systems that can change the ownership of a symlink) --from=CURRENT_OWNER:CURRENT_GROUP change the owner and/or group of each file only if its current owner and/or group match those specified here. Either may be omitted, in which case a match is not required for the omitted attribute --no-preserve-root do not treat '/' specially (the default) --preserve-root fail to operate recursively on '/' --reference=RFILE use RFILE's owner and group rather than specifying OWNER:GROUP values -R, --recursive operate on files and directories recursively The following options modify how a hierarchy is traversed when the -R option is also specified. If more than one is specified, only the final one takes effect. -H if a command line argument is a symbolic link to a directory, traverse it -L traverse every symbolic link to a directory encountered -P do not traverse any symbolic links (default) --help display this help and exit --version output version information and exit Owner is unchanged if missing. Group is unchanged if missing, but changed to login group if implied by a ':' following a symbolic OWNER. OWNER and GROUP may be numeric as well as symbolic.
EXAMPLES
chown root /u Change the owner of /u to "root". chown root:staff /u Likewise, but also change its group to "staff". chown -hR root /u Change the owner of /u and subfiles to "root".
AUTHOR
Written by David MacKenzie and Jim Meyering.
REPORTING BUGS
Report chown bugs to bug-coreutils@gnu.org GNU coreutils home page: http://www.gnu.org/software/coreutils/> General help using GNU software: http://www.gnu.org/gethelp/> Report chown translation bugs to http://translationproject.org/team/>
COPYRIGHT
Copyright © 2013 Free Software Foundation, Inc. License GPLv3+: GNU GPL version 3 or later http://gnu.org/licenses/gpl.html>. This is free software: you are free to change and redistribute it. There is NO WARRANTY, to the extent permitted by law.
SEE ALSO
chown(2) The full documentation for chown is maintained as a Texinfo manual. If the info and chown programs are properly installed at your site, the command info coreutils 'chown invocation' should give you access to the complete manual.
© 2019 Canonical Ltd. Ubuntu and Canonical are registered trademarks of Canonical Ltd.
How to chown directory for multiple users?
Specs: Running Centos 6 64 Bit I am trying to chown a directory for all users on the VPS, aswell as for apache. But for some reason I can only have either apache, or just the users. I tried doing the normal chown command but making a user a owner then apache the group, and vice versa. travis:apache and apache:travis I have to do it fully as in apache:apache or travis:travis. The usual command I run to chown a user: sudo chown -R userhere:userhere /path/to/whatever/i/need For either to work fully. Why is this important? Because whenver I am using wordpress, or any script that gives basic input to modify other items on the VPS it requires the apache to have access. If its on apache the perms change to 48/48. If I want users to be able to have FTP access I have to do userhere:userhere for it to work. But in the end I wont be able to use the web based scripts again. Really lost, please help.. I am also confused about another perms issue: https://superuser.com/questions/694746/centos-6-31592-31592-use-group-permissions
2 Answers 2
You’ll need a group with apache and all the VPS users in it, call it vpsusers for instance
# do this as root groupadd vpsusers gpasswd -a apache vpsusers gpasswd -a bob vpsusers # if you have a user named bob gpasswd -a alice vpsusers # if you have a user name alice # etc. And then make that group the group owner of the directory in question, eg
# also do this as root chown -R apache:vpsusers /your/directory And finally, make that group-writeable
# again, as root chmod -R g+w /your/directory (As always, think about what you’re doing before you chmod or chown. )